The term ‘tiering’ has been broadly used in data management jargon since the early days of hierarchical storage management (HSM) and information lifecycle management (ILM). Typically, a tier represents a different class of storage hardware. You could have a certain storage array with faster fiber channel drives for active data, and a slower array with large capacity SATA drives for older, infrequently accessed data. The same philosophy holds true with OneFS. However, since SmartPools terminology can prove a touch perplexing at times, this seemed like it would make for a useful blog topic.
The different hardware types within OneFS live within the same cluster as distinct groups of nodes – or ‘node pools’. As for ‘tiers’, this is actually an optional concept in OneFS. Tiers can be built from two or more node pools and accommodate similar but ‘non-compatible’ nodes to coexist in the same container.
Within OneFS, Storage Pools (and the isi storage pools command set) provide a series of abstracted layers for defining these subsets of hardware within a single cluster. This allows data to be optimally aligned with specific sets of nodes by creating data movement rules, or file pool policies. The hierarchy is as such:

Disk pools are the smallest unit within the Storage Pools hierarchy, with each pool representing a separate failure domain. Each drive may only belong to one disk pool and data protection stripes or mirrors don’t extend across pools. Disk pools are managed by OneFS and are not user configurable.
Above this, node pools are groups of disk pools, spread across similar PowerScale storage nodes (compatibility classes). Multiple groups of different node types can work together in a single, heterogeneous cluster.
Each node pool only contains disk pools from the same type of storage nodes and a disk pool may belong to exactly one node pool. Today, a minimum of 3 nodes are required per node pool.
Once node pools have been created, they can be easily modified to adapt to changing requirements. Individual nodes can be reassigned from one node pool to another. Node pool associations can also be discarded, releasing member nodes so they can be added to new or existing pools. Node pools can also be renamed at any time without changing any other settings in the Node Pool configuration.
Any new node added to a cluster is automatically allocated to a node pool and then subdivided into Disk Pools without any additional configuration steps, inheriting the SmartPools configuration properties of that Node Pool. This means the configuration of disk pool data protection, layout and cache settings only needs to be completed once per node pool and can be done at the time the node pool is first created.
Automatic allocation is determined by the shared attributes of the new nodes with the closest matching node pool. If the new node is not a close match to the nodes of any existing node pool, it will remain un-provisioned until the minimum node pool compatibility is met.
# isi storagepool health

SmartPools Health

Name                  Health  Type Prot   Members          Down          Smartfailed

--------------------- ------- ---- ------ ---------------- ------------- -------------

h400_30tb_1.6tb-      OK

ssd_64gb

 h400_30tb_1.6tb-     OK    HDD  +2d:1n 37-38,40-41,43-5 Nodes:        Nodes:

ssd_64gb:47                               5:bay5,8,11,14,1 Drives:       Drives:

                                          7, 39,42:bay8,11

                                          ,14,17

a2000_200tb_800gb-    OK

ssd_16gb

 a2000_200tb_800gb-   OK    HDD  +2d:1n 57-73:bay5,9,13, Nodes:        Nodes:

ssd_16gb:69                               17,21,           Drives:       Drives:

                                          56:bay5,13,17,21


OK = Ok, U = Too few nodes, M = Missing drives,

D = Some nodes or drives are down, S = Some nodes or drives are smartfailed,

R = Some nodes or drives need repair
When a new node pool is created and nodes are added, SmartPools associates those nodes with an ID. That ID is also used in file pool policies and file attributes to dictate file placement within a specific disk pool.
By default, a file which is not covered by a specific File Pool policy will go to the default node pool(s) identified during set up. If no default is specified, SmartPools will write that data to the pool with the most available capacity.
Tiers are groups of node pools combined into a logical superset to optimize data storage, according to OneFS platform type:
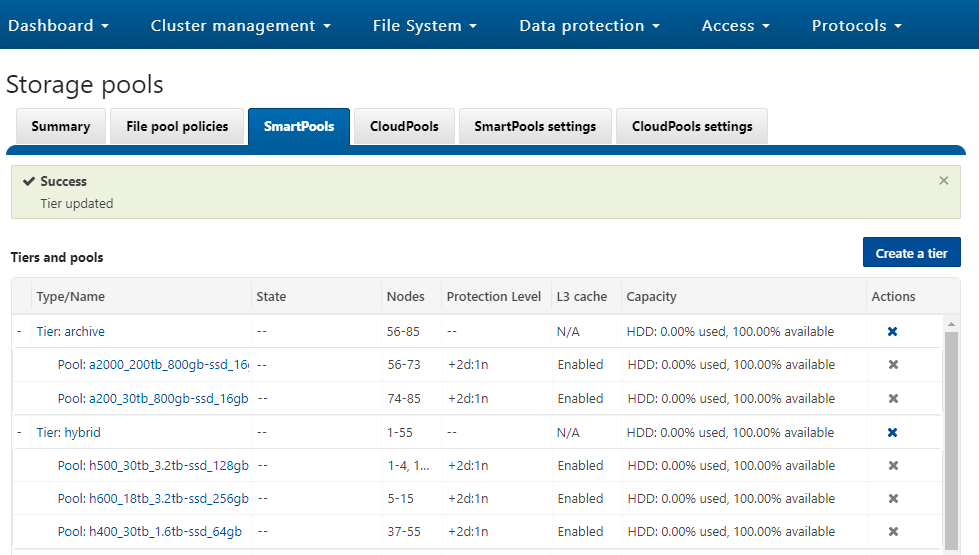
For example, H Series node pools are often combined into a single tier, as above, in this case including H600, H500, and H400 hardware. Similarly, the archive tier combines A200 and A2000 node pools into a single, logical bucket.
This is a significant benefit because it allows customers who consistently purchase the highest capacity nodes available to consolidate a variety of node styles within a single group, or tier, and manage them as one logical group.
SmartPools users typically deploy between two and four tiers, and the maximum recommended number of tiers is five per cluster. The fastest tier usually comprises all-flash F-series nodes for the most performance demanding portions of a workflow, and the lowest, capacity-optimized tier comprising A-series chassis with large SATA drives.
The following CLI command creates the ‘archive’ tier above and adds two node pools, A200 and A2000, to this tier:
# isi storagepool tiers create archive --children a2000_200tb_800gb-ssd_16gb --children a200_30tb_800gb-ssd_16gb
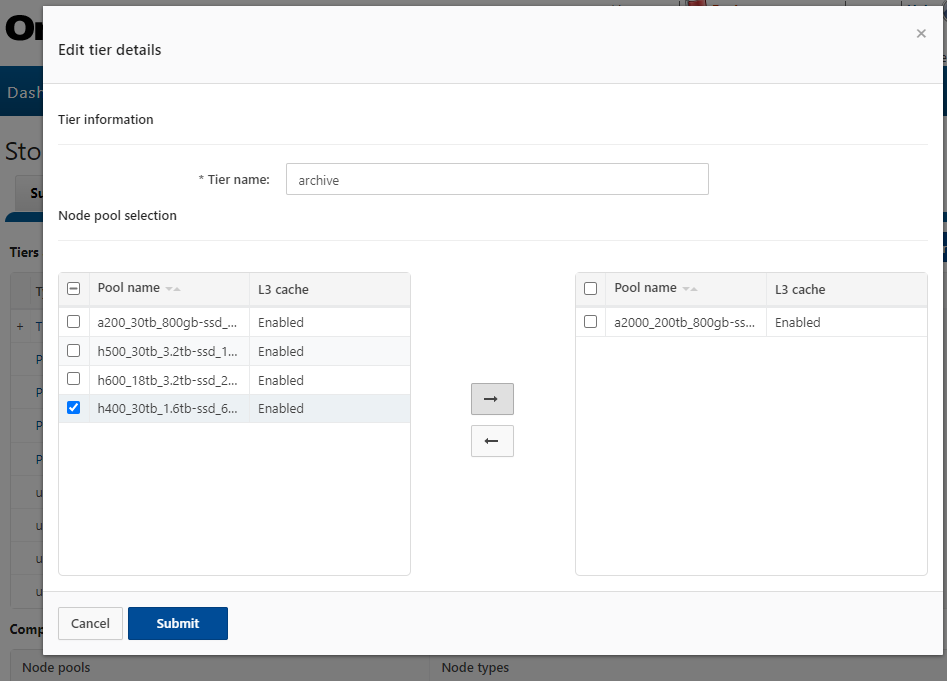
Additional node pools can be easily and transparently added to a tier. For example, to add the H400 pool above to the ‘archive’ tier:
# isi storagepool nodepools modify h400_30tb_1.6tb- ssd_16gb --tier archive
Or from the WebUI:
Once the appropriate node pools and tiers have been defined and configured, file pool policies can be crafted to govern where data is placed, protected, accessed, and how it moves among the node pools and Tiers. SmartPools file pool policies can be used to broadly control the four principal attributes of a file:
| Attribute | Description | Options |
| Location | Where a file resides | · Tier
· Node Pool |
| I/O | The file performance profile (I/O optimization setting) | · Sequential
· Concurrent · Random · SmartCache write caching |
| Protection | The protection level of a file | · Parity protection (+1n to +4n, +2d:1n, etc)
· Mirroring (2x – 8x) |
| SSD Strategy | The SSD strategy for a file | · Metadata-read
· Metadata-write · Data & metadata · Avoid SSD |
A file pool policy is configured based upon a file attribute the policy can match. These attributes include File Name, Path, File Type, File Size, Modified Time, Create Time, Metadata Change Time, Access Time or User Attributes.
Once the desired attribute is selected in a file pool policy, action can be taken on the matching subset of files. For example, if the configured attribute is File Size, additional logic is available to dictate thresholds (all files bigger than… smaller than…). Next, actions are applied: move to node pool x, set to y protection level and lay out for z access setting.
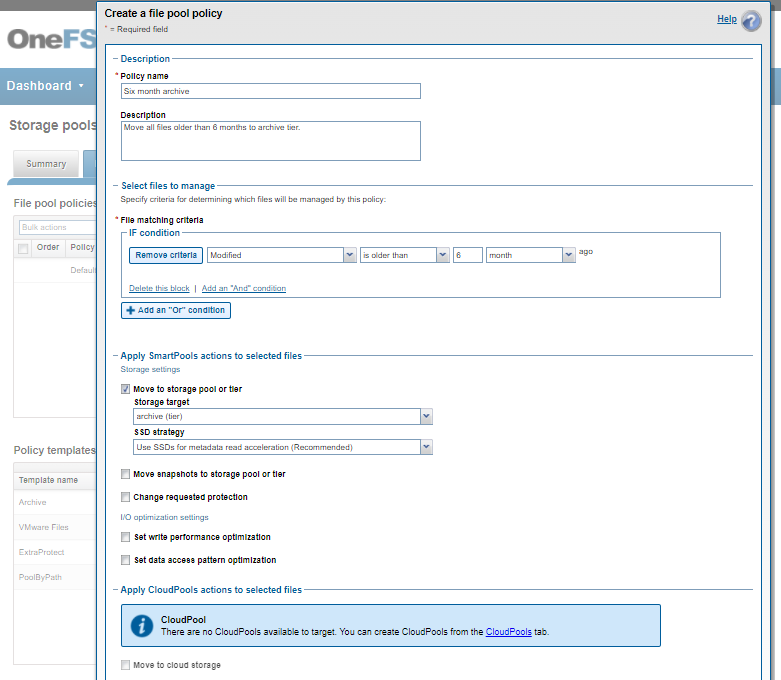
Consider a common file pools use case: An organization wants its active data to reside on their hybrid nodes in Tier 1 (SAS + SSD), and to move any data not accessed for 6 months to the cost optimized (SATA) archive Tier 2.

This can be easily achieved via a single SmartPools file pool policy, which can be configured to act either against a tier or nodepool. For example, from the WebUI by navigating to File System > Storage Pools > File Pool Policies:
Or from the CLI using the following syntax:
# isi filepool policies create "Six month archive" --description "Move all files older than 6 months to archive tier" --data-storage-target Archive1 --begin-filter --file-type=file --and --changed-time=6M --operator=gt --end-filter
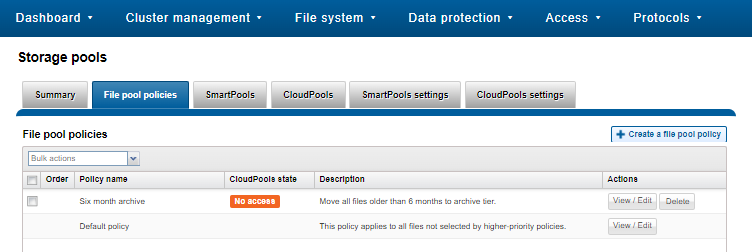
The newly created file pool policy is applied when the next scheduled SmartPools job runs.
By default, the SmartPools job is scheduled to run once a day. However, the job can also be kicked off manually. For example, via the CLI:
# isi job jobs start SmartPools

Started job [55]
The running SmartPools job can be listed and queried as follows:
# isi job jobs list

ID   Type       State   Impact  Policy  Pri  Phase  Running Time

-----------------------------------------------------------------

55   SmartPools Running Low     LOW     6    1/2    -

-----------------------------------------------------------------

Total: 1
# isi job jobs view 55

               ID: 55

             Type: SmartPools

            State: Running

           Impact: Low

           Policy: LOW

              Pri: 6

            Phase: 1/2

       Start Time: 2022-03-01T22:15:22

     Running Time: 1m 51s

     Participants: 1, 2, 3

         Progress: Visited 495464 LINs (37 processed), and approx. 93 GB:  467292 files, 28172 directories; 0 errors

                   LIN Estimate based on LIN count of 2312 done on Feb 23 23:02:17 2022

                   LIN Based Estimate: N/A Remaining (>99% Complete)

                   Block Based Estimate: 11m 18s Remaining (14% Complete)


Waiting on job ID: -

      Description:

       Human Desc:
As can be seen above, the Job Engine ‘view’ output provides a LIN count-based progress report on the SmartPools job execution status.