OneFS Restricted Shell

In contrast to many other storage appliances, PowerScale has always enjoyed an extensive, rich and capable command line, drawing from its FreeBSD heritage. As such, it incorporates a choice of full UNIX shells (ie. ZSH), the ability to script in a variety of languages (perl, python, etc), full data access, a variety of system and network management and monitoring tools, plus the comprehensive OneFS ‘isi’ command set. However, what is a bonus for usability can, on the flip side, also present a risk from a security point of view.

With this in mind, amongst the bevy of security features that debut in OneFS 9.5 release is the addition of a restricted shell for the CLI. This shell heavily curtails access to cluster command line utilities, eliminating areas where commands and scripts could be run and files modified maliciously and unaudited.

The new restricted shell can help both public and private sector organizations to meet a variety of regulatory compliance and audit requirements, in addition to reducing the security threat surface when administering OneFS.

Written in python, the restricted shell constrains users to a tight subset of the commands available in the regular OneFS command line shells, plus a couple of additional utilities. These include:

CLI Utility Description
ISI commands The ‘isi’ or ‘isi space’ commands. These include the commands such as ‘isi status’, etc. The full set of isi commands can are listed by ‘isi –help’
Shell commands The supported shell commands include ‘clear’, ‘exit’, ‘logout’, and ‘CTRL+D’.
Log access The ‘isi_log_access’ tool can be used if the user possesses the ISI_PRIV_SYS_SUPPORT privilege.
Recovery shell The recovery shell ‘isi_recovery_shell’ can be used if the users possesses the ISI_PRIV_RECOVERY_SHELL, and the security setting ‘Restricted shell Enabled’ is configured to ‘true’.

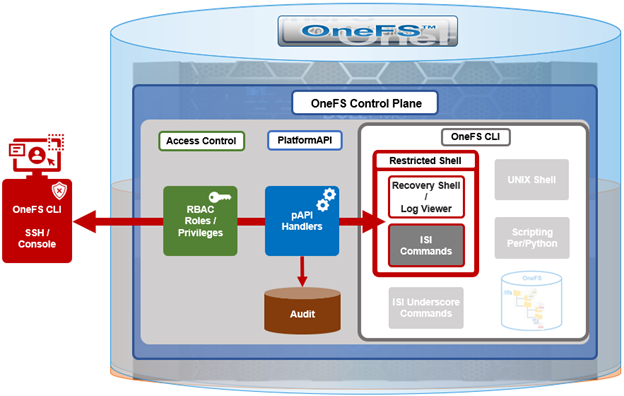
In order for a OneFS CLI command to be audited, its handler needs to call through the platform API (pAPI). This occurs with the regular ‘isi’ commands, but not necessarily with the ‘isi underscore’ commands, such as ‘isi_for_array’, etc. While some of these ‘isi_*’ commands write to log files, there is no uniform or consistent auditing or logging.

On the data access side, /ifs file system auditing works through the various OneFS protocol heads (NFS, SMB, S3, etc). So if the CLI is used with an unrestricted shell to directly access and modify /ifs, any access and changes are unrecorded and unaudited.

In OneFS 9.5, the new restricted shell is included in the permitted shells list (/etc/shells):

# grep -i restr /etc/shells

/usr/local/restricted_shell/bin/restricted_shell.py

It can be easily set for a user via the CLI. For example, to configure the ‘admin’ account to use the restricted shell, instead of its default of ZSH:

# isi auth users view admin | grep -i shell

                   Shell: /usr/local/bin/zsh

# isi auth users modify admin --shell=/usr/local/restricted_shell/bin/restricted_shell.py

# isi auth users view admin | grep -i shell

                   Shell: /usr/local/restricted_shell/bin/restricted_shell.py

OneFS can also be configured to limit non-root users to just the secure shell, too:

# isi security settings view | grep -i restr

  Restricted shell Enabled: No

# isi security settings modify --restricted-shell-enabled=true

# isi security settings view | grep -i restr

  Restricted shell Enabled: Yes

The underlying configuration changes to support this include only allowing non-root users with approved shells in /etc/shells to login via console or ssh and having just /usr/local/restricted_shell/bin/restricted_shell.py in the /etc/shells config file.

Note that no users’ shells are changed when the configuration commands above are enacted. If users are intended to have shell access, their login shell will need to be changed prior to them being able to login. Users will also require the privileges ‘ISI_PRIV_LOGIN_SSH’ and/or ‘ISI_PRIV_LOGIN_CONSOLE’ to be able to log in via SSH and the console respectively.

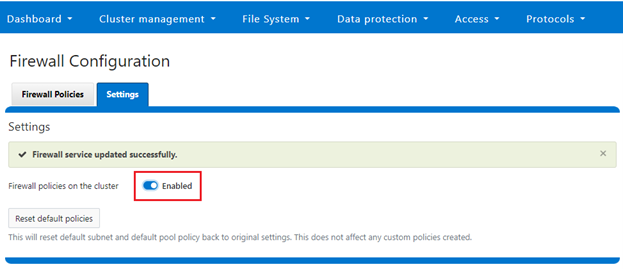
While the WebUI in OneFS 9.5 does not provide a secure shell configuration page, the restricted shell can be enabled from the platform API, in addition to the CLI. The pAPI security settings now include a ‘restricted_shell_enabled’ key which can be enabled by setting to value=1, from its default of ‘0’.

Be aware that, on configuring a OneFS 9.5 cluster to run in hardened mode with the STIG profile (ie. ‘isi hardening enable STIG’), the ‘restricted-shell-enable’ security setting is automatically set to ‘true’. This means that only root and users with ‘ISI_PRIV_LOGIN_SSH’ and/or ‘ISI_PRIV_LOGIN_CONSOLE’ privileges and the restricted shell as their shell will be permitted to login to the cluster. We will focus on OneFS security hardening in a future article.

So let’s take a look at some examples of the restricted shell’s configuration and operation. But note that a cluster’s default user ‘admin’ uses role-based access control (RBAC), whereas ‘root’ does not. As such, the ‘root’ account should ideally be as infrequently as possible, and ideally be considered solely as the account of last resort.

First, we log in as the ‘admin’ user and modify the ‘file’ and ‘local’ auth provider password hash types to the more secure ‘SHA512’ from their default value of ‘NTHash’:

# ssh 10.244.34.34 -l admin

# isi auth file view System | grep -i hash

     Password Hash Type: NTHash

# isi auth local view System | grep -i hash

      Password Hash Type: NTHash

# isi auth file modify System –-password-hash-type=SHA512

# isi auth local modify System –-password-hash-type=SHA512

Note that a cluster’s default user ‘admin’ uses role-based access control (RBAC), whereas ‘root’ does not. As such, the ‘root’ account should ideally be as infrequently as possible, and ideally be considered solely as the account of last resort.

Next, the ‘admin’ and ‘root’ passwords are changed in order to generate new passwords using the SHA512 hash:

# isi auth users change-password root

# isi auth users change-password admin

An ‘rl_ssh’ role is created and the SSH access privilege is added to it:

# isi auth roles create rl_ssh

# isi auth roles modify rl_ssh –-add-priv=ISI_PRIV_LOGIN_SSH

Then a regular user (usr_ssh_restricted) and an admin user (usr_admin_resticted) are created with restricted shell privileges:

# isi auth users create usr_ssh_restricted –-shell=/usr/local/restricted_shell/bin/restricted_shell.py –-set-password

# isi auth users create usr_admin_restricted –shell=/usr/local/restricted_shell/bin/restricted_shell.py –-set-password

We then assign the desired roles to the new users. For the restricted SSH user, we add to our newly created ‘rl_ssh’ role:

# isi auth roles modify rl_ssh –-add-user=usr_ssh_restricted

The admin user is then added to the security admin and the system admin roles:

# isi auth roles modify SecurityAdmin –-add-user=usr_admin_restricted

# isi auth roles modify SystemAdmin –-add-user=usr_admin_restricted

Next, we connect to cluster via SSH and authenticate as the ‘usr_ssh_restricted’ user:

$ ssh usr_ssh_restricted@10.246.178.121
(usr_ssh_restricted@10.246.178.121) Password:
Copyright (c) 2001-2023 Dell Inc. or its subsidiaries. All Rights Reserved.
Copyright (c) 1992-2018 The FreeBSD Project.
Copyright (c) 1979, 1980, 1983, 1986, 1988, 1989, 1991, 1992, 1993, 1994
        The Regents of the University of California. All rights reserved.
PowerScale OneFS 9.5.0.0

Allowed commands are
        clear ...
        isi ...
        isi_recovery_shell ...
        isi_log_access ...
        exit
        logout
%

This account has no cluster RBAC privileges beyond SSH access, so cannot run the various ‘isi’ commands. For example, attempting to run ‘isi status’ returns no data, instead warning of the need for event, job engine, and statistics privileges:

% isi status
Cluster Name: h7001
 
*** Capacity and health information require ***
***   the privilege: ISI_PRIV_STATISTICS.   ***

Critical Events:
*** Requires the privilege: ISI_PRIV_EVENT. ***

Cluster Job Status:
 
*** Requires the privilege: ISI_PRIV_JOB_ENGINE. ***

Allowed commands are
        clear ...
        isi ...
        isi_recovery_shell ...
        isi_log_access ...
        exit
        logout
%

Similarly, standard UNIX shell commands, such as ‘pwd’ and ‘whoami’ are also prohibited:

% pwd
Allowed commands are
        clear ...
        isi ...
        isi_recovery_shell ...
        isi_log_access ...
        exit
        logout
% whoami
Allowed commands are
        clear ...
        isi ...
        isi_recovery_shell ...
        isi_log_access ...
        exit
        logout

Indeed, without additional OneFS RBAC privileges, the only commands the ‘usr_ssh_restricted’ user can actually run in the restricted shell are ‘clear’, ‘exit’, and ‘logout’:

Note that the restricted shell automatically logs out an inactive session after a short period of inactivity.

Next, we log in in with the ‘usr_admin_restricted’ account:

$ ssh usr_admin_restricted@10.246.178.121
(usr_admin_restricted@10.246.178.121) Password:
Copyright (c) 2001-2023 Dell Inc. or its subsidiaries. All Rights Reserved.
Copyright (c) 1992-2018 The FreeBSD Project.
Copyright (c) 1979, 1980, 1983, 1986, 1988, 1989, 1991, 1992, 1993, 1994
        The Regents of the University of California. All rights reserved.

PowerScale OneFS 9.5.0.0

Allowed commands are
        clear ...
        isi ...
        isi_recovery_shell ...
        isi_log_access ...
        exit
        logout
%

The ‘isi’ commands now work, since the user has the ‘SecurityAdmin’ and ‘SystemAdmin’ roles and privileges:

% isi auth roles list
Name
---------------
AuditAdmin
BackupAdmin
BasicUserRole
SecurityAdmin
StatisticsAdmin
SystemAdmin
VMwareAdmin
rl_console
rl_ssh
---------------
Total: 9
Allowed commands are
        clear ...
        isi ...
        isi_recovery_shell ...
        isi_log_access ...
        exit
        logout

% isi auth users view usr_admin_restricted
                    Name: usr_admin_restricted
                      DN: CN=usr_admin_restricted,CN=Users,DC=H7001
              DNS Domain: -
                  Domain: H7001
                Provider: lsa-local-provider:System
        Sam Account Name: usr_admin_restricted
                     UID: 2003
                     SID: S-1-5-21-3745626141-289409179-1286507423-1003
                 Enabled: Yes
                 Expired: No
                  Expiry: -
                  Locked: No
                   Email: -
                   GECOS: -
           Generated GID: No
           Generated UID: No
           Generated UPN: Yes
           Primary Group
                          ID: GID:1800
                        Name: Isilon Users
          Home Directory: /ifs/home/usr_admin_restricted
        Max Password Age: 4W
        Password Expired: No
         Password Expiry: 2023-05-30T17:16:53
       Password Last Set: 2023-05-02T17:16:53
        Password Expires: Yes
              Last Logon: -
                   Shell: /usr/local/restricted_shell/bin/restricted_shell.py
                     UPN: usr_admin_restricted@H7001
User Can Change Password: Yes
   Disable When Inactive: No
Allowed commands are
        clear ...
        isi ...
        isi_recovery_shell ...
        isi_log_access ...
        exit
        logout
%

However, the OneFS ‘isi underscore’ commands are not supported under the restricted shell. For example, attempting to use the ‘isi_for_array’ command:

% isi_for_array -s uname -a
Allowed commands are
        clear ...
        isi ...
        isi_recovery_shell ...
        isi_log_access ...
        exit
        logout

Note that, by default, the ‘SecurityAdmin’ and SystemAdmin’ roles do not grant the ‘usr_admin_restricted’ user the privileges needed to execute the new ‘isi_log_access’ and ‘isi_recovery_shell’ commands.

In the next article in this series, we’ll take a look at these associated ‘isi_log_access’ and ‘isi_recovery_shell’ utilities that are also introduced in OneFS 9.5.

PowerScale OneFS 9.6 and APEX File Storage for AWS

Dropping in time for its unveiling at Dell Technologies World 2023, the new PowerScale OneFS 9.6 release is a cloud-only version, supporting the freshly launched APEX File Storage for AWS solution.

OneFS 9.6 delivers Dell’s first software defined unstructured data solution, simplifying the journey to the cloud with seamless data mobility, operational consistency between on-prem and cloud, and the file storage and data services PowerScale customers know and trust.

With the addition of Dell APEX File Storage for AWS, PowerScale clusters can now be deployed anywhere your data is, including:

OneFS 9.6 extends the PowerScale hybrid cloud to AWS, providing the same OneFS software platform on-prem and in the cloud, and customer-managed for full control.

PowerScale’s scale-out architecture can now be deployed on customer managed AWS EBS and ECS infrastructure, providing the scale and performance needed to run a variety of unstructured workflows in the public cloud. Once in the cloud, existing PowerScale investments can be further leveraged by accessing and orchestrating your data through the platform’s multi-protocol access and APIs.

This includes the common OneFS control plane (CLI, WebUI, and platform API), and the same enterprise features:

Feature Description
CloudPools Cloud tiering to a choice of providers
Data reduction Data compression and deduplication, reducing storage costs
ISV ecosystem 250+ ISVs for OneFS
Multi-protocol access Global permissions structure shared across users and protocols
SmartConnect Policy-based client failover load balancing
SmartQuotas Quota management and thin provisioning
SnapshotIQ Fast, efficient data backup and recovery
SyncIQ Asynchronous replication for DR

The challenges and complexity of data locality are reduced by OneFS SyncIQ and SmartSync native replication between on-prem, cloud adjacent, and cloud-based clusters. As such, APEX File Storage for AWS enables workloads in the cloud with its clustered architecture providing linear capacity and performance scaling up to six SSD nodes and 1PiB per namespace/cluster, and up to 10GB/s reads and 4GB/s writes per cluster. As such, it can be a solid fit for traditional file shares and home directories, vertical workloads like M&E, healthcare, life sciences, and finserv, and next-gen AI, ML and analytics applications.

Hybrid cloud

APEX for file storage on AWS is ideal for moving IT workloads to the cloud to support archive, backup, file shares, home directories, etc:

  • Use AWS for off-prem DR
  • File workflows can be migrated to AWS without requiring changes to storage architecture
  • Consistent user experience with on-prem PowerScale
  • Use OneFS features like SnapshotIQ and SyncIQ to natively replicate to the cloud
  • Use the same multi-protocol data services in AWS that you use on-prem

Cloud bursting

When workloads run short of computing on-prem resources, burst the extra demands to AWS cloud services:

  • Support compute-intensive workloads such as M&E, manufacturing, life sciences, analytics and more:
  • Use cloud for burst performance to power workload resource spikes
  • Native data replication services to move data to the cloud
  • Proven scale-out architecture provides leading file performance
  • Leverage AWS services to accelerate outcomes and control costs

Cluster licensing is capacity-based, sold in 1TiB increments, and flexible to cover HDD and SSD deployments. Support is included with the general license, as are all the supported OneFS data management and protection services. Subscription terms include 1-year or 3-year options, and existing AWS customers can apply their AWS infrastructure credits towards APEX File Storage. Plus, licensing is also available in a TLA.

So, in summary, the key features of this new OneFS cloud offering include:

  • Native replication
  • OneFS enterprise features
  • Customer-managed solution
  • Same user experience as on-prem
  • Scalability up to 1 PiB in a single namespace
  • Up to six SSD nodes
  • Leading file performance

We’ll take a look at the underlying technology behind this new APEX File Storage on AWS cloud-based PowerScale solution in more detail in a future article.

OneFS Firewall Management and Troubleshooting

In the final article in this series, we’ll focus on step five of the OneFS firewall provisioning process and turn our attention to some of the management and monitoring considerations and troubleshooting tools associated with the firewall.

Management and monitoring of the firewall in OneFS 9.5 can be performed via the CLI, or platform API, or WebUI. Since data security threats come from inside an environment as well as out, such as from a rogue IT employee, a good practice is to constrain the use of all-powerful ‘root’, ‘administrator’, and ‘sudo’ accounts as much as possible. Instead of granting cluster admins full rights, a preferred approach is to use OneFS’ comprehensive authentication, authorization, and accounting framework.

OneFS role-based access control (RBAC) can be used to explicitly limit who has access to configure and monitor the firewall. A cluster security administrator selects the desired access zone, creates a zone-aware role within it, assigns privileges, and then assigns members. For example, from the WebUI under Access > Membership and roles > Roles:

When these members login to the cluster via a configuration interface (WebUI, Platform API, or CLI) they inherit their assigned privileges.

Accessing the firewall from the WebUI and CLI in OneFS 9.5 requires the new ISI_PRIV_FIREWALL administration privilege.

# isi auth privileges -v | grep -i -A 2 firewall

         ID: ISI_PRIV_FIREWALL

Description: Configure network firewall

       Name: Firewall

   Category: Configuration

 Permission: w

This privilege can be assigned one of four permission levels for a role, including:

Permission Indicator Description
No permission.
R Read-only permission.
X Execute permission.
W Write permission.

By default, the built-in ‘SystemAdmin’ roles is granted write privileges to administer the firewall, while the built-in ‘AuditAdmin’ role has read permission to view the firewall configuration and logs.

With OneFS RBAC, an enhanced security approach for a site could be to create two additional roles on a cluster, each with an increasing realm of trust. For example:

  1. An IT ops/helpdesk role with ‘read’ access to the snapshot attributes would permit monitoring and troubleshooting the firewall, but no changes:
RBAC Role Firewall Privilege Permission
IT_Ops ISI_PRIV_FIREWALL Read

For example:

# isi auth roles create IT_Ops

# isi auth roles modify IT_Ops --add-priv-read ISI_PRIV_FIREWALL

# isi auth roles view IT_Ops | grep -A2 -i firewall

             ID: ISI_PRIV_FIREWALL

     Permission: r

2. A Firewall Admin role would provide full firewall configuration and management rights:

RBAC Role Firewall Privilege Permission
FirewallAdmin ISI_PRIV_FIREWALL Write

For example:

# isi auth roles create FirewallAdmin

# isi auth roles modify FirewallAdmin –add-priv-write ISI_PRIV_FIREWALL

# isi auth roles view FirewallAdmin | grep -A2 -i firewall

ID: ISI_PRIV_FIREWALL

Permission: w

Note that when configuring OneFS RBAC, remember to remove the ‘ISI_PRIV_AUTH’ and ‘ISI_PRIV_ROLE’ privilege from all but the most trusted administrators.

Additionally, enterprise security management tools such as CyberArk can also be incorporated to manage authentication and access control holistically across an environment. These can be configured to frequently change passwords on trusted accounts (ie. every hour or so), require multi-Level approvals prior to retrieving passwords, as well as track and audit password requests and trends.

OneFS Firewall Limits

When working with the OneFS Firewall, there are some upper bounds to the configurable attributes to keep in mind. These include:

Name Value Description
MAX_INTERFACES 500 Maximum number of L2 interfaces including Ethernet, VLAN, LAGG interfaces on a node.
MAX _SUBNETS 100 Maximum number of subnets within a OneFS cluster
MAX_POOLS 100 Maximum number of network pools within a OneFS cluster
DEFAULT_MAX_RULES 100 Default value of maximum rules within a firewall policy
MAX_RULES 200 Upper limit of maximum rules within a firewall policy
MAX_ACTIVE_RULES 5000 Upper limit of total active rules across the whole cluster
MAX_INACTIVE_POLICIES 200 Maximum number of policies which are not applied to any network subnet or pool. They will not be written into ipfw table.

Firewall performance

Be aware that, while the OneFS firewall can greatly enhance the network security of a cluster, by nature of its packet inspection and filtering activity, it does come with a slight performance penalty (generally less than 5%).

Firewall and hardening mode

If OneFS STIG Hardening (ie. via ‘isi hardening apply’) is applied to a cluster with the OneFS Firewall disabled, the firewall will be automatically activated. On the other hand, if the firewall is already enabled, then there will be no change and it will remain active.

Firewall and user-configurable ports

Some OneFS services allow the TCP/UDP ports on which the daemon listens to be changed. These include:

Service CLI Command Default Port
NDMP isi ndmp settings global modify –port 10000
S3 isi s3 settings global modify –https-port 9020, 9021
SSH isi ssh settings modify –port 22

The default ports for these services are already configured in the associated global policy rules. For example, for the S3 protocol:

# isi network firewall rules list | grep s3

default_pools_policy.rule_s3                  55     Firewall rule on s3 service                                                             allow

# isi network firewall rules view default_pools_policy.rule_s3

          ID: default_pools_policy.rule_s3

        Name: rule_s3

       Index: 55

 Description: Firewall rule on s3 service

    Protocol: TCP

   Dst Ports: 9020, 9021

Src Networks: -

   Src Ports: -

      Action: allow

Note that the global policies, or any custom policies, do not auto-update if these ports are reconfigured. This means that the firewall policies must be manually updated when changing ports. For example, if the NDMP port is changed from 10000 to 10001:

# isi ndmp settings global view

                       Service: False

                          Port: 10000

                           DMA: generic

          Bre Max Num Contexts: 64

MSB Context Retention Duration: 300

MSR Context Retention Duration: 600

        Stub File Open Timeout: 15

             Enable Redirector: False

              Enable Throttler: False

       Throttler CPU Threshold: 50

# isi ndmp settings global modify --port 10001

# isi ndmp settings global view | grep -i port

                          Port: 10001

The firewall’s NDMP rule port configuration must also be reset to 10001:

# isi network firewall rule list | grep ndmp

default_pools_policy.rule_ndmp                44     Firewall rule on ndmp service                                                           allow

# isi network firewall rule modify default_pools_policy.rule_ndmp --dst-ports 10001 --live

# isi network firewall rule view default_pools_policy.rule_ndmp | grep -i dst

   Dst Ports: 10001

Note that the ‘–live’ flag is specified to enact this port change immediately.

Firewall and source-based routing

Under the hood, OneFS source-based routing (SBR) and the OneFS Firewall both leverage ‘ipfw’. As such, SBR and the firewall share the single ipfw table in the kernel. However, the two features use separate ipfw table partitions.

This allows SBR and the firewall to be activated independently of each other. For example, even if the firewall is disabled, SBR can still be enabled and any configured SBR rules displayed as expected (ie. via ‘ipfw set 0 show’).

Firewall and IPv6

Note that the firewall’s global default policies have a rule allowing ICMP6 by default. For IPv6 enabled networks, ICMP6 is critical for the functioning of NDP (Neighbor Discovery Protocol). As such, when creating custom firewall policies and rules for IPv6-enabled network subnets/pools, be sure to add a rule allowing ICMP6 to support NDP. As discussed in a previous article, an alternative (and potentially easier) approach is to clone a global policy to a new one and just customize its ruleset instead.

Firewall and FTP

The OneFS FTP service can work in two modes: Active and Passive. Passive mode is the default, where FTP data connections are created on top of random ephemeral ports. However, since the OneFS firewall requires fixed ports to operate, it only supports the FTP service in active mode. Attempts to enable the firewall with FTP running in passive mode will generate the following warning:

# isi ftp settings view | grep -i active

          Active Mode: No

# isi network firewall settings modify --enabled yes

FTP service is running in Passive mode. Enabling network firewall will lead to FTP clients having their connections blocked. To avoid this, please enable FTP active mode and ensure clients are configured in active mode before retrying. Are you sure you want to proceed and enable network firewall? (yes/[no]):

In order to activate the OneFS firewall in conjunction with the FTP service, first ensure the FTP service is running in active mode before enabling the firewall. For example:

# isi ftp settings view | grep -i enable

  FTP Service Enabled: Yes

# isi ftp settings view | grep -i active

          Active Mode: No

# isi ftp setting modify –active-mode true

# isi ftp settings view | grep -i active

          Active Mode: Yes

# isi network firewall settings modify --enabled yes

Note: Verify FTP active mode support and/or firewall settings on the client side, too.

Firewall monitoring and troubleshooting

When it comes to monitoring the OneFS firewall, the following logfiles and utilities provide a variety of information and are a good source to start investigating an issue:

Utility Description
/var/log/isi_firewall_d.log Main OneFS firewall log file, which includes information from firewall daemon.
/var/log/isi_papi_d.log Logfile for platform AP, including Firewall related handlers.
isi_gconfig -t firewall CLI command that displays all firewall configuration info.
ipfw show CLI command which displays the ipfw table residing in the FreeBSD kernel.

Note that the above files and command output are automatically included in logsets generated by the ‘isi_gather_info’ data collection tool.

The isi_gconfig command can be run with the ‘-q’ flag to identify any values that are not at their default settings. For example, the stock (default) isi_firewall_d gconfig context will not report any configuration entries:

# isi_gconfig -q -t firewall

[root] {version:1}

The firewall can also be run in the foreground for additional active rule reporting and debug output. For example, first shut down the isi_firewall_d service:

# isi services -a isi_firewall_d disable

The service 'isi_firewall_d' has been disabled.

Next, start up the firewall with the ‘-f’ flag.

# isi_firewall_d -f

Acquiring kevents for flxconfig

Acquiring kevents for nodeinfo

Acquiring kevents for firewall config

Initialize the firewall library

Initialize the ipfw set

ipfw: Rule added by ipfw is for temporary use and will be auto flushed soon. Use isi firewall instead.

cmd:/sbin/ipfw set enable 0 normal termination, exit code:0

isi_firewall_d is now running

Loaded master FlexNet config (rev:312)

Update the local firewall with changed files: flx_config, Node info, Firewall config

Start to update the firewall rule...

flx_config version changed!                             latest_flx_config_revision: new:312, orig:0

node_info version changed!                              latest_node_info_revision: new:1, orig:0

firewall gconfig version changed!                               latest_fw_gconfig_revision: new:17, orig:0

Start to update the firewall rule for firewall configuration (gconfig)

Start to handle the firewall configure (gconfig)

Handle the firewall policy default_pools_policy

ipfw: Rule added by ipfw is for temporary use and will be auto flushed soon. Use isi firewall instead.

32043 allow tcp from any to any 10000 in

cmd:/sbin/ipfw add 32043 set 8 allow TCP from any  to any 10000 in  normal termination, exit code:0

ipfw: Rule added by ipfw is for temporary use and will be auto flushed soon. Use isi firewall instead.

32044 allow tcp from any to any 389,636 in

cmd:/sbin/ipfw add 32044 set 8 allow TCP from any  to any 389,636 in  normal termination, exit code:0

Snip...

If the OneFS firewall is enabled and some network traffic is blocked, either this or the ‘ipfw show’ CLI command will often provide the first clues.

Please note that the ‘ipfw’ command should NEVER be used to modify the OneFS firewall table!

For example, say a rule is added to the default pools policy denying traffic on port 9876 from all source networks (0.0.0.0/0):

# isi network firewall rules create default_pools_policy.rule_9876 --index=100 --dst-ports 9876 --src-networks 0.0.0.0/0 --action deny –live

# isi network firewall rules view default_pools_policy.rule_9876

          ID: default_pools_policy.rule_9876

        Name: rule_9876

       Index: 100

 Description:

    Protocol: ALL

   Dst Ports: 9876

Src Networks: 0.0.0.0/0

   Src Ports: -

      Action: deny

Running ‘ipfw show’ and grepping for the port will show this new rule:

# ipfw show | grep 9876

32099            0               0 deny ip from any to any 9876 in

The ‘ipfw show’ command output also reports the statistics of how many IP packets have matched each rule This can be incredibly useful when investigating firewall issues. For example, a telnet session is initiated to the cluster on port 9876 from a client:

# telnet 10.224.127.8 9876

Trying 10.224.127.8...

telnet: connect to address 10.224.127.8: Operation timed out

telnet: Unable to connect to remote host

The connection attempt will time out since the port 9876 ‘deny’ rule will silently drop the packets. At the same time, the ‘ipfw show’ command will increment its counter to report on the denied packets. For example:

# ipfw show | grep 9876

32099            9             540 deny ip from any to any 9876 in

If this behavior is not anticipated or desired, the rule name can be found searching the rules list for the port number, in this case port 9876:

# isi network firewall rules list | grep 9876

default_pools_policy.rule_9876                100                                                                deny

The offending rule can then be reverted to ‘allow’ traffic on port 9876:

# isi network firewall rules modify default_pools_policy.rule_9876 --action allow --live

Or easily deleted, if preferred:

# isi network firewall rules delete default_pools_policy.rule_9876 --live

Are you sure you want to delete firewall rule default_pools_policy.rule_9876? (yes/[no]): yes

OneFS Firewall Configuration – Part 2

In the previous article in this OneFS firewall series, we reviewed the upgrade, activation, and policy selection components of the firewall provisioning process.

Now, we turn our attention to the firewall rule configuration step of the process.

As stated previously, role-based access control (RBAC) explicitly limits who has access to manage the OneFS firewall. So ensure that the user account which will be used to enable and configure the OneFS firewall belongs to a role with the ‘ISI_PRIV_FIREWALL’ write privilege.

  1. Configuring Firewall Rules

Once the desired policy is created, the next step is to configure the rules. Clearly, the first step here is decide what ports and services need securing or opening, beyond the defaults.

The following CLI syntax will return a list of all the firewall’s default services, plus their respective ports, protocols, and aliases, sorted by ascending port number:

# isi network firewall services list

Service Name     Port  Protocol  Aliases

---------------------------------------------

ftp-data         20    TCP       -

ftp              21    TCP       -

ssh              22    TCP       -

smtp             25    TCP       -

dns              53    TCP       domain

                       UDP

http             80    TCP       www

                                 www-http

kerberos         88    TCP       kerberos-sec

                       UDP

rpcbind          111   TCP       portmapper

                       UDP       sunrpc

                                 rpc.bind

ntp              123   UDP       -

dcerpc           135   TCP       epmap

                       UDP       loc-srv

netbios-ns       137   UDP       -

netbios-dgm      138   UDP       -

netbios-ssn      139   UDP       -

snmp             161   UDP       -

snmptrap         162   UDP       snmp-trap

mountd           300   TCP       nfsmountd

                       UDP

statd            302   TCP       nfsstatd

                       UDP

lockd            304   TCP       nfslockd

                       UDP

nfsrquotad       305   TCP       -

                       UDP

nfsmgmtd         306   TCP       -

                       UDP

ldap             389   TCP       -

                       UDP

https            443   TCP       -

smb              445   TCP       microsoft-ds

hdfs-datanode    585   TCP       -

asf-rmcp         623   TCP       -

                       UDP

ldaps            636   TCP       sldap

asf-secure-rmcp  664   TCP       -

                       UDP

ftps-data        989   TCP       -

ftps             990   TCP       -

nfs              2049  TCP       nfsd

                       UDP

tcp-2097         2097  TCP       -

tcp-2098         2098  TCP       -

tcp-3148         3148  TCP       -

tcp-3149         3149  TCP       -

tcp-3268         3268  TCP       -

tcp-3269         3269  TCP       -

tcp-5667         5667  TCP       -

tcp-5668         5668  TCP       -

isi_ph_rpcd      6557  TCP       -

isi_dm_d         7722  TCP       -

hdfs-namenode    8020  TCP       -

isi_webui        8080  TCP       apache2

webhdfs          8082  TCP       -

tcp-8083         8083  TCP       -

ambari-handshake 8440  TCP       -

ambari-heartbeat 8441  TCP       -

tcp-8443         8443  TCP       -

tcp-8470         8470  TCP       -

s3-http          9020  TCP       -

s3-https         9021  TCP       -

isi_esrs_d       9443  TCP       -

ndmp             10000 TCP       -

cee              12228 TCP       -

nfsrdma          20049 TCP       -

                       UDP

tcp-28080        28080 TCP       -

---------------------------------------------

Total: 55

Similarly, the following CLI command will generate a list of existing rules and their associated policies, sorted in alphabetical order. For example, to show the first 5 rules:

# isi network firewall rules list –-limit 5

ID                                            Index  Description                                                                             Action

----------------------------------------------------------------------------------------------------------------------------------------------------

default_pools_policy.rule_ambari_handshake    41     Firewall rule on ambari-handshake service                                               allow

default_pools_policy.rule_ambari_heartbeat    42     Firewall rule on ambari-heartbeat service                                               allow

default_pools_policy.rule_catalog_search_req  50     Firewall rule on service for global catalog search requests                             allow

default_pools_policy.rule_cee                 52     Firewall rule on cee service                                                            allow

default_pools_policy.rule_dcerpc_tcp          18     Firewall rule on dcerpc(TCP) service                                                    allow

----------------------------------------------------------------------------------------------------------------------------------------------------

Total: 5

Both the ‘isi network firewall rules list’ and ‘isi network firewall services list’ commands also have a ‘-v’ verbose option, plus can return their output in csv, list, table, or json formats with the ‘–flag’.

The detailed info for a given firewall rule, in this case the default SMB rule, can be viewed with the following CLI syntax:

# isi network firewall rules view default_pools_policy.rule_smb

          ID: default_pools_policy.rule_smb

        Name: rule_smb

       Index: 3

 Description: Firewall rule on smb service

    Protocol: TCP

   Dst Ports: smb

Src Networks: -

   Src Ports: -

      Action: allow

Existing rules can be modified and new rules created and added into an existing firewall policy with the ‘isi network firewall rules create’ CLI syntax. Command options include:

Option Description
–action Allow, which mean pass packets.

Deny, which means silently drop packets.

Reject which means reply with ICMP error code.

id Specifies the ID of the new rule to create. The rule must be added to an existing policy. The ID can be up to 32 alphanumeric characters long and can include underscores or hyphens, but cannot include spaces or other punctuation. Specify the rule ID in the following format:

<policy_name>.<rule_name>

The rule name must be unique in the policy.

–index the rule index in the pool. the valid value is between 1 and 99. the lower value has the higher priority. if not specified, automatically go to the next available index (before default rule 100).
–live The live option must only be used when a user issues a command to create/modify/delete a rule in an active policy. Such changes will take effect immediately on all network subnets and pools associated with this policy. Using the live option on a rule in an inactive policy will be rejected, and an error message will be returned.
–protocol  Specify the protocol matched for the inbound packets.  Available value are tcp,udp,icmp,all.  if not configured, the default protocol all will be used.
–dst-ports   Specify the network ports/services provided in storage system which is identified by destination port(s). The protocol specified by –protocol will be applied on these destination ports.
–src-networks Specify one or more IP addresses with corresponding netmasks that are to be allowed by this firewall policy. The correct format for this parameter is address/netmask, similar to “192.0.2.128/25”. Multiple address/netmask pairs should be separated with commas. Use the value 0.0.0.0/0 for “any”.
–src-ports Specify the network ports/services provided in storage system which is identified by source port(s). The protocol specified by –protocol will be applied on these source ports.

Note that, unlike for firewall policies, there is no provision for cloning individual rules.

The following CLI syntax can be used to create new firewall rules. For example, to add ‘allow’ rules for the HTTP and SSH protocols, plus a ‘deny’ rule for port TCP 9876, into firewall policy fw_test1:

# isi network firewall rules create  fw_test1.rule_http  --index 1 --dst-ports http --src-networks 10.20.30.0/24,20.30.40.0/24 --action allow

# isi network firewall rules create  fw_test1.rule_ssh  --index 2 --dst-ports ssh --src-networks 10.20.30.0/24,20.30.40.0/16 --action allow

# isi network firewall rules create fw_test1.rule_tcp_9876 --index 3 --protocol tcp --dst-ports 9876  --src-networks 10.20.30.0/24,20.30.40.0/24 -- action deny

When a new rule is created in a policy, if the index value is not specified, it will automatically inherit the next available number in the series (ie. index=4 in this case).

# isi network firewall rules create fw_test1.rule_2049  --protocol udp -dst-ports 2049 --src-networks 30.1.0.0/16 -- action deny

For a more draconian approach, a ‘deny’ rule could be created using the match-everything ‘*’ wildcard for destination ports and a 0.0.0.0/0 network and mask, which would silently drop all traffic:

# isi network firewall rules create fw_test1.rule_1234  --index=100--dst-ports * --src-networks 0.0.0.0/0 --action deny

When modifying existing firewall rules, the following CLI syntax can be used, in this case to change the source network of an HTTP allow rule (index 1) in firewall policy fw_test1:

# isi network firewall rules modify fw_test1.rule_http --index 1  --protocol ip --dst-ports http --src-networks 10.1.0.0/16 -- action allow

Or to modify an SSH rule (index 2) in firewall policy fw_test1, changing the action from ‘allow’ to ‘deny’:

# isi network firewall rules modify fw_test1.rule_ssh --index 2 --protocol tcp --dst-ports ssh --src-networks 10.1.0.0/16,20.2.0.0/16 -- action deny

Also, to re-order the custom TCP 9876 rule form the earlier example from index 3 to index 7 in firewall policy fw_test1.

# isi network firewall rules modify fw_test1.rule_tcp_9876 --index 7

Note that all rules equal or behind index 7 will have their index values incremented by one.

When deleting a rule from a firewall policy, any rule reordering is handled automatically. If the policy has been applied to a network pool, the ‘–live’ option can be used to force the change to take effect immediately. For example, to delete the HTTP rule from the firewall policy ‘fw_test1’:

# isi network firewall policies delete fw_test1.rule_http --live

Firewall rules can also be created, modified and deleted within a policy from the WebUI by navigating to Cluster management > Firewall Configuration > Firewall Policies. For example, to create a rule that permits SupportAssist and Secure Gateway traffic on the 10.219.0.0/16 network:

Once saved, the new rule is then displayed in the Firewall Configuration page:

  1. Firewall management and monitoring.

In the next and final article in this series, we’ll turn our attention to managing, monitoring, and troubleshooting the OneFS firewall (step 5).

OneFS Firewall Configuration – Part 1

The new firewall in OneFS 9.5 enhances the security of the cluster and helps prevent unauthorized access to the storage system. When enabled, the default firewall configuration allows remote systems access to a specific set of default services for data, management, and inter-cluster interfaces (network pools).

The basic OneFS firewall provisioning process is as follows:

Note that role-based access control (RBAC) explicitly limits who has access to manage the OneFS firewall. In addition to the ubiquitous ‘root’, the cluster’s built-in SystemAdmin role has write privileges to configure and administer the firewall.

  1. Upgrade to OneFS 9.5

First, the cluster must be running OneFS 9.5 in order to provision the firewall.

If upgrading from an earlier release, the OneFS 9.5 upgrade must be committed before enabling the firewall.

Also, be aware that configuration and management of the firewall in OneFS 9.5 requires the new ISI_PRIV_FIREWALL administration privilege. This can be granted to a role with either  read-only or read-write privileges.

# isi auth privilege | grep -i firewall

ISI_PRIV_FIREWALL                   Configure network firewall

This privilege can be granted to a role with either  read-only or read-write permissions. By default, the built-in ‘SystemAdmin’ roles is granted write privileges to administer the firewall:

# isi auth roles view SystemAdmin | grep -A2 -i firewall

             ID: ISI_PRIV_FIREWALL

     Permission: w

Additionally, the built-in ‘AuditAdmin’ role has read permission to view the firewall configuration and logs, etc:

# isi auth roles view AuditAdmin | grep -A2 -i firewall

             ID: ISI_PRIV_FIREWALL

     Permission: r

Ensure that the user account which will be used to enable and configure the OneFS firewall belongs to a role with the ‘ISI_PRIV_FIREWALL’ write privilege.

  1. Activate Firewall

As mentioned previously, the OneFS firewall can be either ‘enabled’ or ‘disabled’, with the latter as the default state. The following CLI syntax will display the firewall’s global status – in this case ‘disabled’ (the default):

# isi network firewall settings view

Enabled: False

Firewall activation can be easily performed from the CLI as follows:

# isi network firewall settings modify --enabled true

# isi network firewall settings view

Enabled: True

Or from the WebUI under Cluster management > Firewall Configuration > Settings:

Note that the firewall is automatically enabled when STIG Hardening applied to a cluster.

  1. Pick policies

A cluster’s existing firewall policies can be easily viewed from the CLI with the following command:

# isi network firewall policies list

ID        Pools                    Subnets                   Rules
-----------------------------------------------------------------------------
fw_test1  groupnet0.subnet0.pool0  groupnet0.subnet1         test_rule1
-----------------------------------------------------------------------------
Total: 1

Or from the WebUI under Cluster management > Firewall Configuration > Firewall Policies:

The OneFS firewall offers four main strategies when it comes to selecting a firewall policy. These include:

  1. Retaining the default policy
  2. Reconfiguring the default policy
  3. Cloning the default policy and reconfiguring
  4. Creating a custom firewall policy

We’ll consider each of these strategies in order:

a.  Retaining the default policy

In many cases, the default OneFS firewall policy value will provide acceptable protection for a security conscious organization. In these instances, once the OneFS firewall has been enabled on a cluster, no further configuration is required, and the cluster administrators can move on to the management and monitoring phase.

The firewall policy for all front-end cluster interfaces (network pool) is ‘default’. While the default policy can be modified, be aware that this default policy is global. As such, any change against it will impact all network pools using this default policy.

The following table describes the default firewall policies that are assigned to each interface:

Policy Description
Default pools policy Contains rules for the inbound default ports for TCP and UDP services in OneFS.
Default subnets policy Contains rules for:

·         DNS port 53

·         Rule for ICMP

·         Rule for ICMP6

These can be viewed from the CLI as follows:

# isi network firewall policies view default_pools_policy

            ID: default_pools_policy

          Name: default_pools_policy

   Description: Default Firewall Pools Policy

Default Action: deny

     Max Rules: 100

         Pools: groupnet0.subnet0.pool0, groupnet0.subnet0.testpool1, groupnet0.subnet0.testpool2, groupnet0.subnet0.testpool3, groupnet0.subnet0.testpool4, groupnet0.subnet0.poolcava

       Subnets: -

         Rules: rule_ldap_tcp, rule_ldap_udp, rule_reserved_for_hw_tcp, rule_reserved_for_hw_udp, rule_isi_SyncIQ, rule_catalog_search_req, rule_lwswift, rule_session_transfer, rule_s3, rule_nfs_tcp, rule_nfs_udp, rule_smb, rule_hdfs_datanode, rule_nfsrdma_tcp, rule_nfsrdma_udp, rule_ftp_data, rule_ftps_data, rule_ftp, rule_ssh, rule_smtp, rule_http, rule_kerberos_tcp, rule_kerberos_udp, rule_rpcbind_tcp, rule_rpcbind_udp, rule_ntp, rule_dcerpc_tcp, rule_dcerpc_udp, rule_netbios_ns, rule_netbios_dgm, rule_netbios_ssn, rule_snmp, rule_snmptrap, rule_mountd_tcp, rule_mountd_udp, rule_statd_tcp, rule_statd_udp, rule_lockd_tcp, rule_lockd_udp, rule_nfsrquotad_tcp, rule_nfsrquotad_udp, rule_nfsmgmtd_tcp, rule_nfsmgmtd_udp, rule_https, rule_ldaps, rule_ftps, rule_hdfs_namenode, rule_isi_webui, rule_webhdfs, rule_ambari_handshake, rule_ambari_heartbeat, rule_isi_esrs_d, rule_ndmp, rule_isi_ph_rpcd, rule_cee, rule_icmp, rule_icmp6, rule_isi_dm_d


# isi network firewall policies view default_subnets_policy

            ID: default_subnets_policy

          Name: default_subnets_policy

   Description: Default Firewall Subnets Policy

Default Action: deny

     Max Rules: 100

         Pools: -

       Subnets: groupnet0.subnet0

         Rules: rule_subnets_dns_tcp, rule_subnets_dns_udp, rule_icmp, rule_icmp6

Or from the WebUI under Cluster Management > Firewall Configuration > Firewall Policies:


b.  Reconfiguring the default policy

Depending on an organization’s threat levels or security mandates, there may be a need to restrict access to certain additional IP addresses and/or management service protocols.

If the default policy is deemed insufficient, reconfiguring the default firewall policy can be a good option if only a small number of rule changes are required. The specifics of creating, modifying, and deleting individual firewall rules is covered later in this article (step 3 below).

Note that if new rule changes behave unexpectedly, or configurating the firewall generally goes awry, OneFS does provide a ‘get out of jail free’ card. In a pinch, the global firewall policy can be quickly and easily restored to its default values. This can be achieved with the following CLI syntax:

# isi network firewall reset-global-policy

This command will reset the global firewall policies to the original system defaults. Are you sure you want to continue? (yes/[no]):


Alternatively, the default policy can also be easily reverted from the WebUI too, by clicking the ‘Reset default policies’ button:

c.  Cloning the default policy and reconfiguring

Another option is cloning, which can be useful when batch modification or a large number of changes to the current policy are required. By cloning the default firewall policy, an exact copy of the existing policy and its rules is generated, but with a new policy name. For example:

# isi network firewall policies clone default_pools_policy clone_default_pools_policy

# isi network firewall policies list | grep -i clone

clone_default_pools_policy -

Cloning can also be initiated from the WebUI under Firewall Configuration > Firewall Policies > More Actions > Clone Policy:

Enter the desired name of the clone in the ‘Policy Name’ field in the pop-up window and click ‘Save’:

Once cloned, the policy can then be easily reconfigured to suit. For example, to modify the policy ‘fw_test1’ and change its default-action from deny-all to allow-all:

# isi network firewall policies modify fw_test1 --default--action allow-all

When modifying a firewall policy, the ‘–live’ option CLI option can be used to force it take effect immediately. Note that the ‘—live’ option is only valid when issuing a command to modify or delete an active custom policy and to modify default policy. Such changes will take effect immediately on all network subnets and pools associated with this policy. Using the live option on an inactive policy will be rejected, and an error message returned.

Options for creating or modifying a firewall policy include:

Option Description
–default-action Automatically add one rule to ‘deny all’ or ‘allow all’ to the bottom of the rule set for this created policy (Index = 100).
max-rule-num By default, each policy when created could have maximum 100 rules (include one default rule), so user could config maximum 99 rules.  User could expand the maximum rule number to a specified value. Currently this value is limited to 200 (and user could config maximum 199 rules).
–add-subnets  Specify the network subnet(s) to add to policy, separated by a comma.
–remove-subnets  Specify the networks subnets to remove from policy and fall back to global policy.
–add-pools  Specify the network pool(s) to add to policy, separated by a comma.
–remove-pools  Specify the networks pools to remove from policy and fall back to global policy.

When modifying firewall policies, OneFS prints the following warning to verify the changes and help avoid the risk of a self-induced denial-of-service:

# isi network firewall policies modify --pools groupnet0.subnet0.pool0 fw_test1

Changing the Firewall Policy associated with a subnet or pool may change the networks and/or services allowed to connect to OneFS. Please confirm you have selected the correct Firewall Policy and Subnets/Pools. Are you sure you want to continue? (yes/[no]): yes

Once again, having the following CLI command handy, plus console access to the cluster is always a prudent move:

# isi network firewall reset-global-policy

So adding network pools or subnets to a firewall policy will cause the previous policy to be removed from them. Similarly, adding network pools or subnets to the global default policy will revert any custom policy configuration they might have. For example, to apply the firewall policy fw_test1 to IP Pool groupnet0.subnet0.pool0 and groupnet0.subnet0.pool1:

# isi network pools view groupnet0.subnet0.pool0 | grep -i firewall

      Firewall Policy: default_pools_policy

# isi network firewall policies modify fw_test1 --add-pools groupnet0.subnet0.pool0, groupnet0.subnet0.pool1

# isi network pools view groupnet0.subnet0.pool0 | grep -i firewall

      Firewall Policy: fw_test1

Or to apply the firewall policy fw_test1 to IP Pool groupnet0.subnet0.pool0 and groupnet0.subnet0:

# isi network firewall policies modify fw_test1 --apply-subnet groupnet0.subnet0.pool0, groupnet0.subnet0

# isi network pools view groupnet0.subnet0.pool0 | grep -i firewall

 Firewall Policy: fw_test1

# isi network subnets view groupnet0.subnet0 | grep -i firewall

 Firewall Policy: fw_test1

To reapply global policy at any time, either add the pools to the default policy:

# isi network firewall policies modify default_pools_policy --add-pools groupnet0.subnet0.pool0, groupnet0.subnet0.pool1

# isi network pools view groupnet0.subnet0.pool0 | grep -i firewall

 Firewall Policy: default_subnets_policy

# isi network subnets view groupnet0.subnet1 | grep -i firewall

 Firewall Policy: default_subnets_policy

Or remove the pool from the custom policy:

# isi network firewall policies modify fw_test1 --remove-pools groupnet0.subnet0.pool0 groupnet0.subnet0.pool1

Firewall policies can also be managed on the desired network pool in the OneFS WebUI by navigating to Cluster configuration > Network configuration > External network > Edit pool details. For example:

Be aware that cloning is also not limited to the default policy, as clones can be made of any custom policies too. For example:

# isi network firewall policies clone clone_default_pools_policy fw_test1

d.  Creating a custom firewall policy

Alternatively, a custom firewall policy can also be created from scratch. This can be accomplished from the CLI using the following syntax, in this case to create a firewall policy named ‘fw_test1’:

# isi network firewall policies create fw_test1 --default-action deny

# isi network firewall policies view fw_test1

            ID: fw_test1

          Name: fw_test1

   Description:

Default Action: deny

     Max Rules: 100

         Pools: -

       Subnets: -

         Rules: -

Note that if a ‘default-action’ is not specified in the CLI command syntax, it will automatically default to deny.

Firewall policies can also be configured via the OneFS WebUI by navigating to Cluster management > Firewall Configuration > Firewall Policies > Create Policy:

However, in contrast to the CLI, if a ‘default-action’ is not specified when creating a policy in the WebUI, it will automatically default to ‘Allow’ instead, since the drop-down list works alphabetically.

If and when a firewall policy is no longer required, it can be swiftly and easily removed. For example, the following CLI syntax will delete the firewall policy ‘fw_test1’, clearing out any rules within this policy container:

# isi network firewall policies delete fw_test1

Are you sure you want to delete firewall policy fw_test1? (yes/[no]): yes

Note that the default global policies cannot be deleted.

# isi network firewall policies delete default_subnets_policy

Are you sure you want to delete firewall policy default_subnets_policy? (yes/[no]): yes

Firewall policy: Cannot delete default policy default_subnets_policy.
  1. Configuring Firewall Rules

In the next article in this series, we’ll turn our attention to configuring the OneFS firewall rule(s) (step 4).