OneFS Path-based File Pool Policies

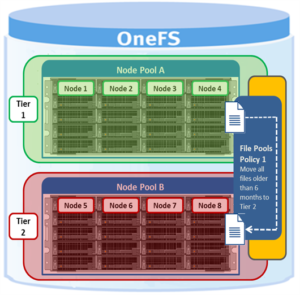
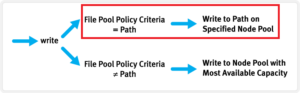
As we saw in the previous article, when data is written to the cluster, SmartPools determines which pool to write to based upon either path or on any other criteria.

If a file matches a file pool policy which is based on any other criteria besides path name, SmartPools will write that file to the Node Pool with the most available capacity.

However, if a file matches a file pool policy based on directory path, that file will be written into the Node Pool dictated by the File Pool policy immediately.

If the file matches a file pool policy that places it on a different Node Pool than the highest capacity Node Pool, it will be moved when the next scheduled SmartPools job runs.

If a filepool policy applies to a directory, any new files written to it will automatically inherit the settings from the parent directory. Typically, there is not much variance between the directory and the new file. So, assuming the settings are correct, the file is written straight to the desired pool or tier, with the appropriate protection, etc. This applies to access protocols like NFS and SMB, as well as copy commands like ‘cp’ issued directly from the OneFS command line interface (CLI). However, if the file settings differ from the parent directory, the SmartPools job will correct them and restripe the file. This will happen when the job next runs, rather than at the time of file creation.

However, simply moving a file into the directory (via the UNIX CLI commands such as cp, mv, etc) will not occur until a SmartPools, SetProtectPlus, Multiscan, or Autobalance job runs to completion. Since these jobs can each perform a re-layout of data, this is when the files will be re-assigned to the desired pool. The file movement can be verified by running the following command from the OneFS CLI:

# isi get -dD <dir>

So the key is whether you’re doing a copy (that is, a new write) or not. As long as you’re doing writes and the parent directory of the destination has the appropriate file pool policy applied, you should get the behavior you want.

One thing to note: If the actual operation that is desired is really a move rather than a copy, it may be faster to change the file pool policy and then do a recursive “isi filepool apply –recurse” on the affected files.

There’s negligible difference between using an NFS or SMB  client versus performing the copy on-cluster via the OneFS CLI. As mentioned above, using isi filepool apply will be slightly quicker than a straight copy and delete, since the copy is parallelized above the filesystem layer.

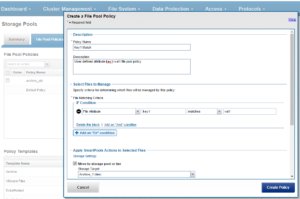
A file pool policy may be crafted which dictates that anything written to path /ifs/path1 is automatically moved directly to the Archive tier. This can easily be configured from the OneFS WebUI by navigating to File System > Storage Pools > File Pool Policies:

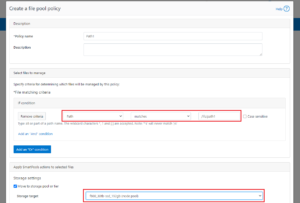
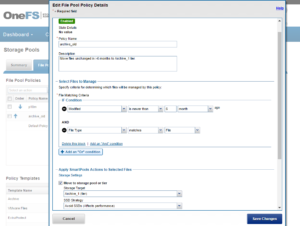
In the example above, a path based policy is created such that data written to /ifs/path1 will automatically be placed on the cluster’s F600 node pool.

For file Pool Policies that dictate placement of data based on its path, data typically lands on the correct node pool or tier without a SmartPools job running.  File Pool Policies that dictate placement of data on other attributes besides path name get written to Disk Pool with the highest available capacity and then moved, if necessary to match a File Pool policy, when the next SmartPools job runs.  This ensures that write performance is not sacrificed for initial data placement.

Any data not covered by a File Pool policy is moved to a tier that can be selected as a default for exactly this purpose.  If no Disk Pool has been selected for this purpose, SmartPools will default to the Node Pool with the most available capacity.

Be aware that, when reconfiguring an existing path-based filepool policy to target a different nodepool or tier, the change will not immediately take effect for the new incoming data. The directory where new files will be created must be updated first and there are a several options available to address this:

  • Running the SmartPools job will achieve this. However, this can take a significant amount of time, as the job may entail restriping or migrating a large quantity of file data.
  • Invoking the ’isi filepool apply <path>’ command on a single directory in question will do it very rapidly. This option is ideal for a single, or small number, of ‘incoming’ data directories.
  • To update all directories in a given subtree, but not affect the files’ actual data layouts, use:
# isi filepool apply --dont-restripe --recurse /ifs/path1
  • OneFS also contains the SmartPoolsTree job engine job specifically for this purpose. This can be invoked as follows:
# isi job start SmartPoolsTree --directory-only  --path /ifs/path1

For example, a cluster has both an F600 pool and an A2000 pool. A directory (/ifs/path1) is created and a file (file1.txt) written to it:

# mkdir /ifs/path1

# cd !$; touch file1.txt

As we can see, this file is written to the default A2000 pool:

# isi get -DD /ifs/path1/file1.txt | grep -i pool

*  Disk pools:         policy any pool group ID -> data target a2000_200tb_800gb-ssd_16gb:97(97), metadata target a2000_200tb_800gb-ssd_16gb:97(97)

Next, a path-based file pool policy is created such that files written to /ifs/test1 are automatically directed to the cluster’s F600 tier:

# isi filepool policies create test2 --begin-filter --path=/ifs/test1 --and --data-storage-target f600_30tb-ssd_192gb --end-filter
# isi filepool policies list

Name  Description  CloudPools State

------------------------------------

Path1              No access

------------------------------------

Total: 1
# isi filepool policies view Path1

                              Name: Path1

                       Description:

                  CloudPools State: No access

                CloudPools Details: Policy has no CloudPools actions

                       Apply Order: 1

             File Matching Pattern: Path == path1 (begins with)

          Set Requested Protection: -

               Data Access Pattern: -

                  Enable Coalescer: -

                    Enable Packing: -

               Data Storage Target: f600_30tb-ssd_192gb

                 Data SSD Strategy: metadata

           Snapshot Storage Target: -

             Snapshot SSD Strategy: -

                        Cloud Pool: -

         Cloud Compression Enabled: -

          Cloud Encryption Enabled: -

              Cloud Data Retention: -

Cloud Incremental Backup Retention: -

       Cloud Full Backup Retention: -

               Cloud Accessibility: -

                  Cloud Read Ahead: -

            Cloud Cache Expiration: -

         Cloud Writeback Frequency: -

                                ID: Path1

The ‘isi filepool apply’ command is run on /ifs/path1 in order to activate the path-based file policy:

# isi filepool apply /ifs/path1

A file (file-new1.txt) is then created under /ifs/path1:

# touch /ifs/path1/file-new1.txt

An inspection shows that this file is written to the F600 pool, as expected per the Path1 file pool policy:

# isi get -DD /ifs/path1/file-new1.txt | grep -i pool

*  Disk pools:         policy f600_30tb-ssd_192gb(9) -> data target f600_30tb-ssd_192gb:10(10), metadata target f600_30tb-ssd_192gb:10(10)

The legacy file (/ifs/path1/file1.txt) is still on the A2000 pool, despite the path-based policy. However, this policy can be enacted on pre-existing data by running the following:

# isi filepool apply --dont-restripe --recurse /ifs/path1

Now, the legacy files are also housed on the F600 pool, and any new writes to the /ifs/path1 directory will also be written to the F600s:

# isi get -DD file1.txt | grep -i pool

*  Disk pools:         policy f600_30tb-ssd_192gb(9) -> data target a2000_200tb_800gb-ssd_16gb:97(97), metadata target a2000_200tb_800gb-ssd_16gb:97(97)

OneFS File Pool Policies

A OneFS file pool policy can be easily generated from either the CLI or WebUI. For example, the following CLI syntax creates a policy which archives older files to a lower storage tier.

# isi filepool policies modify ARCHIVE_OLD --description "Move older files to archive storage" --data-storage-target TIER_A --data-ssd-strategy metadata-write --begin-filter --file-type=file --and --birth-time=2021-01-01 --operator=lt --and --accessed-time= 2021-09-01 --operator=lt --end-filter

After a file match with a File Pool policy occurs, the SmartPools job uses the settings in the matching policy to store and protect the file. However, a matching policy might not specify all settings for the match file. In this case, the default policy is used for those settings not specified in the custom policy. For each file stored on a cluster, the system needs to determine the following:

·         Requested protection level

·         Data storage target for local data cache

·         SSD strategy for metadata and data

·         Protection level for local data cache

·         Configuration for snapshots

·         SmartCache setting

·         L3 cache setting

·         Data access pattern

·         CloudPools actions (if any)

If no File Pool policy matches a file, the default policy specifies all storage settings for the file. The default policy, in effect, matches all files not matched by any other SmartPools policy. For this reason, the default policy is the last in the file pool policy list, and, as such, always the last policy that SmartPools applies.

Next, SmartPools checks the file’s current settings against those the policy would assign to identify those which do not match.  Once SmartPools has the complete list of settings that it needs to apply to that file, it sets them all simultaneously, and moves to restripe that file to reflect any and all changes to Node Pool, protection, SmartCache use, layout, etc.

Custom File Attributes, or user attributes, can be used when more granular control is needed than can be achieved using the standard file attributes options (File Name, Path, File Type, File Size, Modified Time, Create Time, Metadata Change Time, Access Time).  User Attributes use key value pairs to tag files with additional identifying criteria which SmartPools can then use to apply File Pool policies. While SmartPools has no utility to set file attributes, this can be done easily by using the ‘setextattr’ command.

Custom File Attributes are generally used to designate ownership or create project affinities. Once set, they are leveraged by SmartPools just as File Name, File Type or any other file attribute to specify location, protection and performance access for a matching group of files.

For example, the following CLI commands can be used to set and verify the existence of the attribute ‘key1’ with value ‘val1’ on a file ‘attrib.txt’:

# setextattr user key1 val1 attrib.txt

# getextattr user key1 attrib.txt

file    val1

A File Pool policy can be crafted to match and act upon a specific custom attribute and/or value.

For example, the File Policy below, created via the OneFS WebUI, will match files with the custom attribute ‘key1=val1’ and move them to the ‘Archive_1’ tier:

Once a subset of a cluster’s files have been marked with a custom attribute, either manually or as part of a custom application or workflow, they will then be moved to the Archive_1 tier upon the next successful run of the SmartPools job.

The file system explorer (and ‘isi get –D’ CLI command) provides a detailed view of where SmartPools-managed data is at any time by both the actual Node Pool location and the File Pool policy-dictated location (i.e. where that file will move after the next successful completion of the SmartPools job).

When data is written to the cluster, SmartPools writes it to a single Node Pool only.  This means that, in almost all cases, a file exists in its entirety within a Node Pool, and not across Node Pools.  SmartPools determines which pool to write to based on one of two situations:

  • If a file matches a file pool policy based on directory path, that file will be written into the Node Pool dictated by the File Pool policy immediately.
  • If a file matches a file pool policy which is based on any other criteria besides path name, SmartPools will write that file to the Node Pool with the most available capacity.

If the file matches a file pool policy that places it on a different Node Pool than the highest capacity Node Pool, it will be moved when the next scheduled SmartPools job runs.

For performance, charge back, ownership or security purposes it is sometimes important to know exactly where a specific file or group of files is on disk at any given time.  While any file in a SmartPools environment typically exists entirely in one Storage Pool, there are exceptions when a single file may be split (usually only on a temporary basis) across two or more Node Pools at one time.

SmartPools generally only allows a file to reside in one Node Pool. A file may temporarily span several Node Pools in some situations.  When a file Pool policy dictates a file move from one Node Pool to another, that file will exist partially on the source Node Pool and partially on the Destination Node Pool until the move is complete.  If the Node Pool configuration is changed (for example, when splitting a Node Pool into two Node Pools) a file may be split across those two new pools until the next scheduled SmartPools job runs.  If a Node Pool fills up and data spills over to another Node Pool so the cluster can continue accepting writes, a file may be split over the intended Node Pool and the default Spillover Node Pool.  The last circumstance under which a file may span more than One Node Pool is for typical restriping activities like cross-Node Pool rebalances or rebuilds.

OneFS File Pools

File Pools is the SmartPools logic layer, where user-configurable policies govern where data is placed, protected, accessed, and how it moves among the Node Pools and Tiers.

File Pools allow data to be automatically moved from one type of storage to another within a single cluster to meet performance, space, cost or other requirements, while retaining its data protection settings.  For example a File Pool policy may dictate anything written to path /ifs/data/hpc/ lands on an F600 node pool, then moves to an A200 node pool when it becomes older than four weeks.

To simplify management, there are defaults in place for Node Pool and File Pool settings which handle basic data placement, movement, protection and performance.  Also provided are customizable template policies which are optimized for archiving, extra protection, performance, etc.

When a SmartPools job runs, the data may be moved, undergo a protection or layout change, etc. Within a File Pool, SSD Strategies can be configured to place either one copy or all of that pool’s metadata – or even some of its data – on SSDs in that pool.  Alternatively, a pool’s SSDs can be turned over for use by L3 cache instead.

Overall system performance impact can be configured to suit the peaks and lulls of an environment’s workload.  Change the time or frequency of any SmartPools job and the amount of resources allocated to SmartPools.  For extremely high-utilization environments, a sample File Pool policy template can be used to match SmartPools run times to non-peak computing hours.

File pool policies can be used to broadly control the three principal attributes of a file, namely:

  1. Where a file resides.
  • Tier
  • Node Pool
  1. The file performance profile (I/O optimization setting).
  • Sequential
  • Concurrent
  • Random
  • SmartCache write caching
  1. The protection level of a file.
  • Parity protected (+1n to +4n, +2d:1n, etc)
  • Mirrored (2x – 8x)

A file pool policy is built on a file attribute the policy can match on.  The attributes a file Pool policy can use are any of: File Name, Path, File Type, File Size, Modified Time, Create Time, Metadata Change Time, Access Time or User Attributes.

Once the file attribute is set to select the appropriate files, the action to be taken on those files can be added – for example: if the attribute is File Size, additional settings are available to dictate thresholds (all files bigger than… smaller than…). Next, actions are applied: move to Node Pool ‘x’, set to protection level ‘y’, and lay out for access setting ‘z’.

File Attribute Description
File Name Specifies file criteria based on the file name
Path Specifies file criteria based on where the file is stored
File Type Specifies file criteria based on the file-system object type
File Size Specifies file criteria based on the file size
Modified Time Specifies file criteria based on when the file was last modified
Create Time Specifies file criteria based on when the file was created
Metadata Change Time Specifies file criteria based on when the file metadata was last modified
Access Time Specifies file criteria based on when the file was last accessed
User Attributes Specifies file criteria based on custom  attributes – see below

‘And’ and ‘Or’ operators allow for the combination of criteria within a single policy for extremely granular data manipulation.

File Pool Policies that dictate placement of data based on its path force data to the correct disk on write directly to that Node Pool without a SmartPools job running.  File Pool Policies that dictate placement of data on other attributes besides path name get written to Disk Pool with the highest available capacity and then moved, if necessary to match a File Pool policy, when the next SmartPools job runs.  This ensures that write performance is not sacrificed for initial data placement.

Any data not covered by a File Pool policy is moved to a tier that can be selected as a default for exactly this purpose.  If no pool has been selected for this purpose, SmartPools will default to the Node Pool with the most available capacity.

When a SmartPools job runs, it runs all the policies in order.  If a file matches multiple policies, SmartPools will apply only the first rule it fits.  So, for example if there is a rule that moves all jpg files to a nearline Node Pool, and another that moves all files under 2 MB to a performance tier, if the jpg rule appears first in the list, then jpg files under 2 MB will go to nearline, NOT the performance tier.  As mentioned above, criteria can be combined within a single policy using ‘And’ or ‘Or’ so that data can be classified very granularly.  Using this example, if the desired behavior is to have all jpg files over 2 MB to be moved to nearline, the File Pool policy can be simply constructed with an ‘And’ operator to cover precisely that condition.

Policy order, and policies themselves, can be easily changed at any time. Specifically, policies can be added, deleted, edited, copied and re-ordered.

Say, for example, an organization wants their active data on performance nodes in Tier_1, and to move any data unchanged for 6 months to Tier_2. So as not to contend with production workloads, the SmartPools job needs to be scheduled to run daily during off-hours (12am – 6pm).

The following CLI syntax will create a file pool policy ‘archive_old’, which finds any files that haven’t been change for six months or more, and moves them to the ‘Archive_1’ tier:

# isi filepool policies create archive_old --data-storage-target Tier_2 --data-ssd-strategy avoid --begin-filter --file-type=file --and --changed-time=6M --operator=lt --end-filter

Or from the WebUI:

The ‘archive_old’ policy is shown in the file pool policies list as enabled:

The SmartPools job that executes the policy can be scheduled from the WebUI as follows – in this case to run during the workflow quiet hours of 12am to 6am each day:

Note: The default schedule for the SmartPools job is every day at 10pm, and with a low impact policy.

File Pool policies can be created, copied, modified, prioritized or removed at any time.  Sample policy templates are also provided that can be used as is or as templates for customization. These include:

SmartPools currently supports up to 128 file pool policies, and as this list of policies grows, it becomes less practical to manually walk through all of them to see how a file will behave when policies are applied.

When the SmartPools file pool policy engine finds a match between a file and a policy, it stops processing policies for that file, since the first policy match determines what will happen to that file.  Next, SmartPools checks the file’s current settings against those the policy would assign to identify those which do not match.  Once SmartPools has the complete list of settings that need to apply to that file, it sets them all simultaneously, and moves to restripe that file to reflect any and all changes to Node Pool, protection, SmartCache use, layout, etc.