Another of the core security enhancements introduced in OneFS 9.5 is the ability to enforce strict user account security policies. This is required for compliance with both private and public sector security mandates. For example, the account policy restriction requirements expressed within the US military STIG requirements stipulate:
| Requirement | Description |
| Delay | The OS must enforce a delay of at least 4 seconds between logon prompts following a failed logon attempt. |
| Disable | The OS must disable account identifiers (individuals, groups, roles, and devices) after 35 days of inactivity. |
| Limit | The OS must limit the number of concurrent sessions to ten for all accounts and/or account types. |
To directly address these security edicts, OneFS 9.5 adds the following account policy restriction controls:
| Account Policy Function | Details |
| Delay after failed login | • After a failed login, OneFS enforces a configurable delay for subsequent logins on same cluster node
• Only applicable to administrative logins (not Protocol logins)
|
| Disable inactive accounts | • Disables an inactive account after specified number of days.
• Only applicable to Local user accounts • Cluster wide |
| Concurrent session limit | • Limits the number of active sessions a user can have on a cluster node
• Only applicable to administrative logins • Node specific |
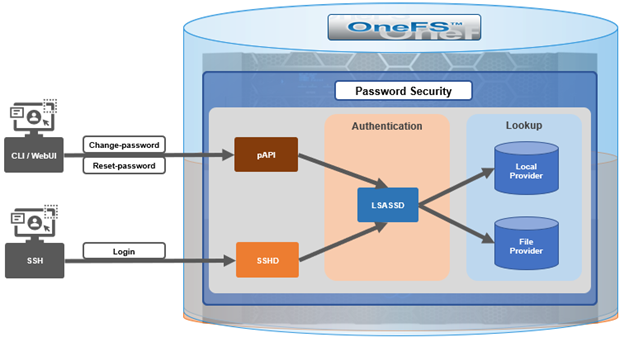
OneFS provides a variety of access mechanisms for administering a cluster. These include SSH, serial console, WebUI and platform API, all of which utilize different underlying access methods. The serial console and SSH are standard FreeBSD third-party applications and are accounted for per-node, whereas the WebUI and pAPI use HTTP module extensions to facilitate access to the system and services and are accounted for cluster-wide. Prior to OneFS 9.5, there was no common mechanism to represent or account for sessions across these disparate applications.
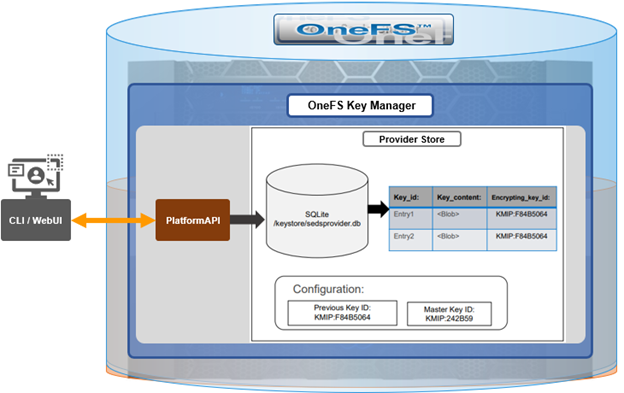
Under the hood, the OneFS account security policy framework encompasses the following high-level architecture:
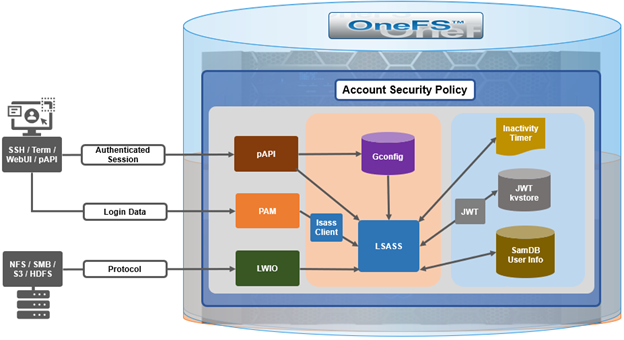
With SSH, there’s no explicit or reliable ‘log-off’ event sent to OneFS, beyond actually disconnecting the connection. As such, accounting for active sessions can be problematic and unreliable, especially when connections time out or unexpectedly disconnect. However, OneFS does include an accounting database that stores records of system activities like user login and logout, which can be queried to determine active SSH sessions. Each active SSH connection has an isi_ssh_d process owned by the account associated with it, and this information can be gathered via standard syscalls. OneFS enumerates the number of SSHD processes per account to calculate the total number of active established sessions. This value is then used as part of the total concurrent administrative sessions limit. Since SSH only supports user access via the ‘system’ multi-tenant access zone, there is no need for any zone-aware accounting.
The WebUI and platform API use JSON web tokens (JWT) for authenticated sessions. OneFS stores the JWT tokens in the cluster-wide kvstore, and access policy uses valid session tokens in the kvstore to account for active sessions when user logs on via the WebUI or pAPI. When the user logs off, the associated token is removed, and a message is sent to JWT service with an explicit log off notification. In the event that a session times out or disconnects, the JWT service will not get an event, but the tokens have a limit short lifespan and any expired tokens are purged from the list on a scheduled basis in conjunction with the JWT timer. OneFS enumerates the unique session IDs associated with each user’s JWT tokens in the kvstore to get a number of active WebUI and pAPI sessions to use as part of user’s session limit check.
For serial console access accounting, the process table will have information when an STTY connection is active and OneFS extrapolates user data from it to determine the session count, similar to ssh with a syscall for process data. There is an accounting database that stores records of system activities like user login and logout, which is also queried for active console sessions. Serial console access is only from the system multi-tenant access zone, so there is no need for zone-aware accounting.
An API call retrieves user session data from the process table and kvstore to calculate number of user active sessions. As such, the checking and enforcement of session limits is performed in similar manner to the verification of user privileges for SSH, serial console, or WebUI access.
Delaying Failed Login Reconnections
OneFS 9.5 provides the ability to enforce a configurable delay period. This delay is specified in seconds, after which every unsuccessful authentication attempt results in the user being denied the ability to reconnect to the cluster until after the configured delay period has passed. The login delay period is defined in seconds through the ‘FailedLoginDelayTime’ global attribute and, by default, OneFS is configured for no delay via a ‘FailedLoginDelayTime’ value of ‘0’. When a cluster is placed into hardened mode with the STIG policy enacted, the delay value is automatically set to 4 seconds. Note that the delay happens in the lsass client, so that the authentication service is not affected.
The configured ‘failed login delay time’ limit can be viewed with following CLI command:
# isi auth settings global view

                            Send NTLMv2: No

                      Space Replacement:

                              Workgroup: WORKGROUP

               Provider Hostname Lookup: disabled

                          Alloc Retries: 5

                 User Object Cache Size: 47.68M

                       On Disk Identity: native

                         RPC Block Time: Now

                       RPC Max Requests: 64

                            RPC Timeout: 30s

Default LDAP TLS Revocation Check Level: none

                   System GID Threshold: 80

                   System UID Threshold: 80

                         Min Mapped Rid: 2147483648

                              Group UID: 4294967292

                               Null GID: 4294967293

                               Null UID: 4294967293

                            Unknown GID: 4294967294

                            Unknown UID: 4294967294

                Failed Login Delay Time: Now

               Concurrent Session Limit: 0
Similarly, the following syntax will configure the ‘failed login delay time’ to a value of 4 seconds:
# isi auth settings global modify --failed-login-delay-time 4s

# isi auth settings global view | grep -i delay

                Failed Login Delay Time: 4s
However, when a cluster is put into STIG hardening mode, the ‘Concurrent Session Limit’ is automatically set to ’10’.
# isi auth settings global view | grep -i delay

                Failed Login Delay Time: 10s
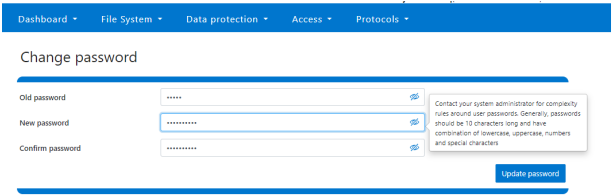
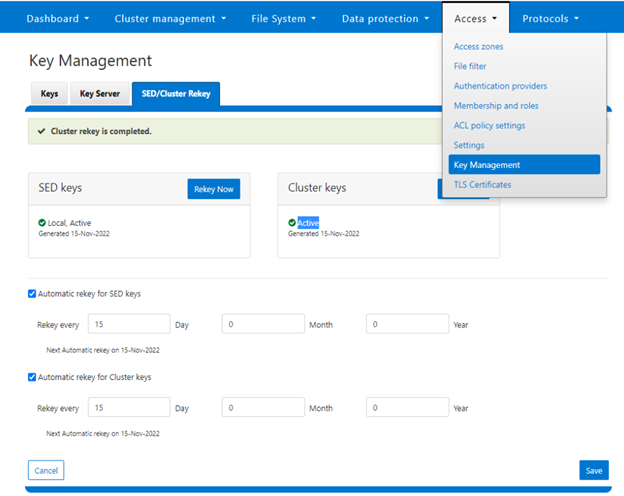
The delay time after login failure can also be configured from the WebUI under Access > Settings > Global provider settings:
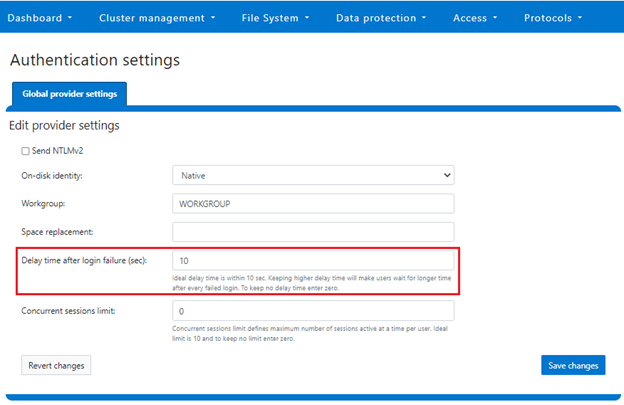
The valid range of the ‘FailedLoginDelayTime’ global attribute is from ‘0’ to ‘65535’, and the delay time is limited to the same cluster node.
Note that this maximum session limit is only applicable to administrative logins.
Disabling Inactive Accounts
In OneFS 9.5, if desired, any user account that has been inactive for a configurable duration will be automatically disabled. Once disabled, administrative intervention is required in order to re-enable a deactivated user account. The last activity time of a user is determined by their previous logon, and a timer runs every midnight during which all ‘inactive’ accounts are disabled. If the last logon record for a user is unavailable, or stale, the timestamp when the account was enabled is taken as their last activity instead. If inactivity tracking is enabled after the last logon (or enabled) time of a user, the inactivity tracking time is considered for inactivity period.
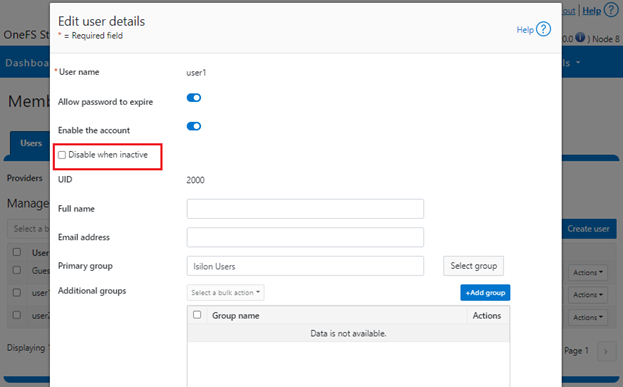
This feature is disabled by default in OneFS, and all users are exempted from inactivity tracking until configured otherwise. However, individual accounts can be exempted from this behavior, and this can be configured through the user-specific ‘DisableWhenInactive’ attribute. For example:
# isi auth user view user1 | grep -i inactive

   Disable When Inactive: Yes

# isi auth user modify user1 --disable-when-inactive 0

# isi auth user view user1 | grep -i inactive

   Disable When Inactive: No
If a cluster is put into STIG hardened mode, the value for the ‘MaxInactivityDays’ parameter is automatically reconfigured to value ‘35’, implying a user will be disabled after 35 days of inactivity. All the local users are removed from exemption when in STIG hardened mode.
Note that this functionality is limited to only the ’local’ provider and does not apply to ‘file’ providers.
The inactive account disabling configuration can be viewed from the CLI with the following syntax. In this example, the ‘MaxInactivityDays’ attribute is configured for 35 days:
# isi auth local view system

                    Name: System

                  Status: active

          Authentication: Yes

   Create Home Directory: Yes

 Home Directory Template: /ifs/home/%U

        Lockout Duration: Now

       Lockout Threshold: 0

          Lockout Window: Now

             Login Shell: /bin/zsh

            Machine Name:

        Min Password Age: Now

        Max Password Age: 4W

     Min Password Length: 15

    Password Prompt Time: 2W

     Password Complexity: -

 Password History Length: 0

  Password Chars Changed: 8

Password Percent Changed: 50

      Password Hash Type: NTHash

     Max Inactivity Days: 35
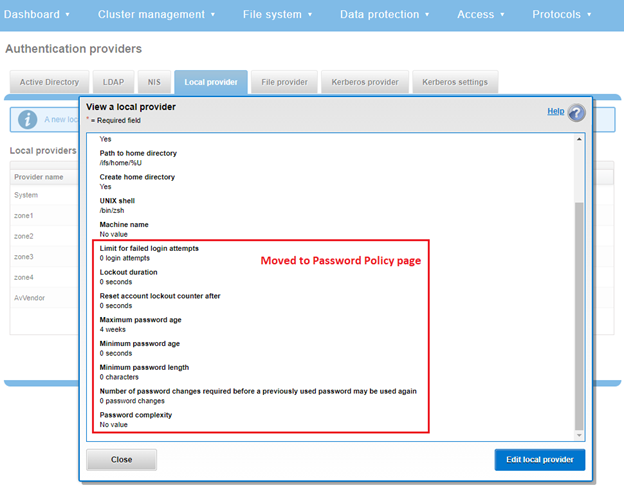
Inactive account disabling can also be configured from the WebUI under Access > Authentication providers > Local provider:
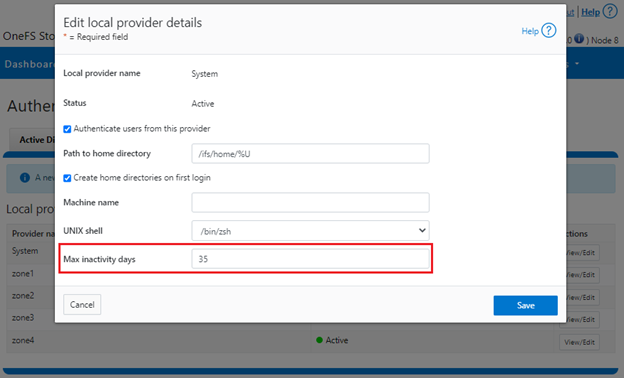
The valid range of the ‘MaxInactivityDays’ parameter is from ‘0’ to ‘UINT_MAX’. As such, the following CLI syntax will configure the maximum number of days a user account can be inactive before it will be disabled to 10 days:
# isi auth local modify system --max-inactivity-days 10

# isi auth local view system | grep -i inactiv

     Max Inactivity Days: 0tem –max-inactivity-days 10
Setting this value to 0 days will disable the feature:
# isi auth local modify system --max-inactivity-days 0

# isi auth local view system | grep -i inactiv

     Max Inactivity Days: 0tem –max-inactivity-days 0
Inactivity account disabling, as well as password expiry, can also be configured granularly, per user account. For example, ‘user1’ has a default configuration of the ‘disable when inactive’ threshold set to ‘No’.
# isi auth users view user1

                    Name: user1

                      DN: CN=user1,CN=Users,DC=GLADOS

              DNS Domain: -

                  Domain: GLADOS

                Provider: lsa-local-provider:System

        Sam Account Name: user1

                     UID: 2000

                     SID: S-1-5-21-1839173366-2940572996-2365153926-1000

                 Enabled: Yes

                 Expired: No

                  Expiry: -

                  Locked: No

                   Email: -

                   GECOS: -

           Generated GID: No

           Generated UID: No

           Generated UPN: Yes

           Primary Group

                          ID: GID:1800

                        Name: Isilon Users

          Home Directory: /ifs/home/user1

        Max Password Age: 4W

        Password Expired: No

         Password Expiry: 2023-06-15T17:45:55

       Password Last Set: 2023-05-18T17:45:55

        Password Expired: No

              Last Logon: -

                   Shell: /bin/zsh

                     UPN: user1@GLADOS

User Can Change Password: Yes

   Disable When Inactive: No
The following CLI command will activate the account inactivity disabling setting and enable password expiry for the ‘user1’ account:
# isi auth users modify user1 --disable-when-inactive Yes --password-expires Yes
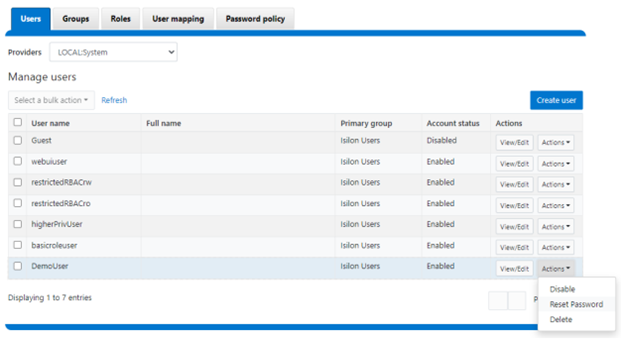
Inactive account disabling can also be configured from the WebUI under Access > Membership and roles > Users > Providers:
Limiting Concurrent Sessions
OneFS 9.5 can limit the number of administrative sessions active on a OneFS cluster node, and all WebUI, SSH, pAPI, and serial console sessions are accounted for when calculating the session limit. The SSH and console session count is node-local, whereas WebUI and pAPI sessions are tracked cluster-wide. As such, the formula used to calculate a node’s total active sessions is as follows:
Total active user sessions on a node = Total WebUI and pAPI sessions across the cluster + Total SSH and Console sessions on the node
This feature leverages the cluster wide session management through JWT for calculating the total number of sessions on a cluster’s node. By default, OneFS 9.5 has is no configured limit and the ‘Concurrent Session Limit’ parameter has a value of ‘0’. For example:
# isi auth settings global view

                            Send NTLMv2: No

                      Space Replacement:

                              Workgroup: WORKGROUP

               Provider Hostname Lookup: disabled

                          Alloc Retries: 5

                 User Object Cache Size: 47.68M

                       On Disk Identity: native

                         RPC Block Time: Now

                       RPC Max Requests: 64

                            RPC Timeout: 30s

Default LDAP TLS Revocation Check Level: none

                   System GID Threshold: 80

                   System UID Threshold: 80

                         Min Mapped Rid: 2147483648

                              Group UID: 4294967292

                               Null GID: 4294967293

                               Null UID: 4294967293

                            Unknown GID: 4294967294

                            Unknown UID: 4294967294

                Failed Login Delay Time: Now

               Concurrent Session Limit: 0
The following CLI syntax will configure the ‘concurrent session limit’ to a value of 5 sessions:
# isi auth settings global modify –-concurrent-session-limit 5

# isi auth settings global view | grep -i concur

                Concurrent Session Limit: 5
Once the session limit has been exceeded, attempts to connect, in this case as ‘root’ via SSH, will be met with the following ‘Access denied’ error message:
login as: root

Keyboard-interactive authentication prompts from server:

| Password:

End of keyboard-interactive prompts from server

Access denied

password:
The concurrent sessions limit can also be configured from the WebUI under Access > Settings > Global provider settings:
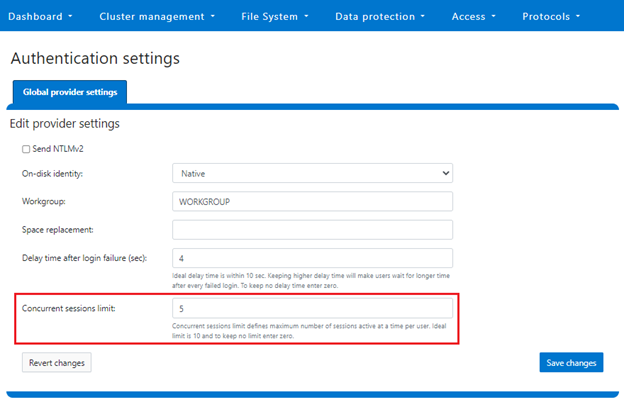
However, when a cluster is put into STIG hardening mode, the ‘Concurrent Session Limit’ is automatically set to a maximum of 10 sessions.
Note that this maximum session limit is only applicable to administrative logins.
Performance
Disabling an account after a period of inactivity in OneFS requires a SQLite database update every time a user has successfully logged on to the OneFS cluster. After a successful logon, the time to logon is recorded in the database, which is later used to compute the inactivity period.
Inactivity tracking is disabled by default in OneFS 9.5, but can be easily enabled by configuring the ‘MaxInactivityDays’ attribute to a non-zero value. In cases where inactivity tracking is enabled and many users are not exempt from inactivity tracking, a significant number of logons within a short period of time can generate significant SQLite database requests. However, OneFS consolidates multiple database updates during user logon to a single commit in order to minimize the overall load.
Troubleshooting
When it comes to troubleshooting OneFS account security policy configurations there are two main logfiles to check:
- /var/log/lsassd.log
- /var/log/messages
- /var/log/isi_papi_d.log
For additional reporting detail, debug level logging can be enabled on the lsassd.log file with the following CLI command:
# /usr/likewise/bin/lwsm set-log-level lsass - debug
When finished, logging can be returned to the regular ‘error’ level:
# /usr/likewise/bin/lwsm set-log-level lsass - error