In the previous article, we looked at an overview of CAVA on OneFS. Next, we’ll focus our attention on how to set it up. In a nutshell, the basic procedure for installing CAVA on a PowerScale cluster can be summarized as follows:
- Configure CAVA servers in OneFS
- Create an IP address pool
- Establish a dedicated multi-tenant access zone for CAVA
- Associate an Active Directory authentication provider with the multi-tenant access zone
- Update the AV application’s user role.
There are also a few pre-requisites to address before starting the installation, and these include:
| Pre-requisite | Description |
| SMB service | Ensure the OneFS SMB service is enabled to allow AV apps to retrieve file from cluster for scanning. |
| SmartConnect Service IP | The SSIP should be configured at the subnet level. CAVA uses SmartConnect to balance scanning requests across all the nodes in the IP pool. |
| AV application and CEE | Refer to the CEE installation and usage guide and the Vendor’s AV application documentation. |
| Active Directory | OneFS CAVA requires that both cluster and AV application reside in the same AD domain. |
| IP Addressing | All connections from AV applications are served by dedicated cluster IP pool. These IP addresses are used to configure the IP ranges in this IP pool.The best practice is to use exclusive IP addresses that are only available to the AV app. |
- During CAVA server configuration, a domain user account is created for the Windows ‘EMC CAVA’ service. This account is used to access the hidden ‘CHECK$ ‘ SMB share in order to retrieve the files for scanning. In the following example, the user account is ‘LAB\cavausr’.
- Once the anti-virus servers have been installed and configured, their corresponding CAVA entries are created on the cluster. This can be done via the following CLI syntax:
# isi antivirus cava servers create --server-name=av1 --server-uri=10.1.2.3 --enabled=1
Or from the WebUI:
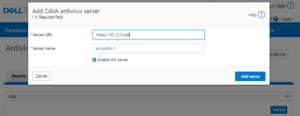
Multiple CAVA servers may be added in order to meet the desired server ratio for a particular PowerScale cluster. The recommended sizing formula is:
CAVA servers = 𝑛𝑢𝑚𝑏𝑒𝑟 𝑜𝑓 cluster 𝑛𝑜𝑑𝑒𝑠 / 4
Before performing the following steps, ensure the CAVA ‘Service Enabled’ configuration option is set to ‘No’.
# isi antivirus cava settings view

       Service Enabled: No

     Scan Access Zones: System

               IP Pool: -

         Report Expiry: 8 weeks, 4 days

          Scan Timeout: 1 minute

Cloudpool Scan Timeout: 1 minute

     Maximum Scan Size: 0.00kB
- Next, an IP pool is created for the anti-virus applications to connect to the cluster. This dedicated IP pool should only be used by the anti-virus applications. As such, the recommendation is to ensure the IP ranges in this IP pool are exclusive and only available for use by the CAVA servers.
Avoid mixing the IP range in this dedicated IP pool with others for a regular SMB client connection.
The antivirus traffic is load balanced by the SmartConnect zone in this IP pool. Since this is a dedicated IP pool for CAVA servers, all the AV scanning should be evenly distributed within the pool. This can be accomplished with the following CLI syntax:
# isi network pools create groupnet0.subnet0.pool1 --ranges=10.1.2.3-10.1.2.13 -- sc-dns-zone "cava1.lab.onefs.com" --ifaces=1:ext-1
In this example, the IP pool is ‘groupnet0.subnet0.pool1’, with address range ‘10.1.2.3 – 10.1.2.13’, the SmartConnect Zone name is ‘cava1.lab.onefs.com’, and the assigned network interface is node 1’s ext-1. Ensure the appropriate DNS delegation is created.
- Once the IP pool is created, it can be associated with the CAVA configuration via the following CLI command:
# isi antivirus cava settings modify --ip-pool="groupnet0.subnet0.pool1"

This action will make the IP Pool unavailable to all other users except antivirus servers. Do you want to continue? (yes/[no]): yes

"

IP Pool groupnet0.subnet0.pool1 added to CAVA antivirus.

Note: The access zone of IP Pool groupnet0.subnet0.pool1 has been changed to AvVendor.

"
Or from the WebUI:
Be sure to create the DNS delegation for the zone name associated with this IP pool.
At this point, the IP pool is associated with the ‘AvVendor’ multi-tenant access zone, and the IP pool is exclusively available to the CAVA servers.
- Next, a dedicated multi-tenant access zone, ‘AvVendor’ associated with the IP pool is automatically created when the CAVA service is enabled on the cluster. The CAVA service can be enabled, via the following CLI command:
# isi antivirus cava settings modify --service-enabled=1
View the CAVA settings and verify that the ‘Server Enabled’ field is set to ‘Yes’:
# isi antivirus cava settings view

Service Enabled: Yes

Scan Access Zones: System

IP Pool: groupnet0.subnet0.pool1

Report Expiry: 8 weeks, 4 days

Scan Timeout: 1 minute

 Cloudpool Scan Timeout: 1 minute

Maximum Scan Size: 0.00kB
Confirm that the ‘AvVendor’ multi-tenant access zone has been successfully created:
# isi zone zones list

Name Path --------------

System /ifs

AvVendor /ifs

--------------

Total: 2
- If using Active Directory, OneFS CAVA requires the cluster and all the AV application servers to reside in the same AD domain.
The output of the following CLI command will display the cluster’s current authentication provider status:
# isi auth status
Evaluate which AD domain you wish to use for access. This domain should contain the account that will be used by the service on the CEE server to connect to the cluster.
If the cluster is not already joined to the desired AD domain, the following CLI syntax can be used to create an AD machine account for the cluster – in this example joining the ‘lab.onefs.com’ domain:
# isi auth ads create lab.onefs.com --user administrator
Note that a local user account can also be used in place of an AD account, if preferred.
- Next, the auth provider needs to be added to the ‘AvVendor’ multi-tenant access zone. This can be accomplished from either the WebUI or CLI. For example:
# isi zone zones modify AvVendor --add-auth-providers=lsa-activedirectoryprovider:lab.onefs.com
- The AV software, running on a Windows server, accesses the cluster’s data via a hidden ‘CHECK$’ share. Add the ‘ISI_PRIV_AV_VENDOR’ privilege in the AVapp role to the AV software’s user account in order to grant access to the CHECK$ share. For example, the following CLI command assigns the ‘LAB\cavausr’ user account to the ‘AVapp’ role in the ‘AvVendor’ multi-tenant access zone:
# isi auth roles modify AvVendor --zone= AvVendor --add-user lab\\cavausr
- At this point, the configuration for the CAVA service on the cluster is complete. The following CLI syntax confirms that the ‘System Status’ is reported as ‘RUNNING’:
# isi antivirus cava status

System Status: RUNNING

Fault Message: -

CEE Version: 8.7.7.0 DTD

Version: 2.3.0 AV

Vendor: Symantec
- On the CAVA side as well. The existing docs work fine for other products but with PowerScale there are some integration points which are NOT obvious.
The CAVA Windows service should be modified to use the AD domain or local account that was created/used in step 6 above. This user account must be added to the ‘Local Administrators’ group on the CEE server, in order to allow the CAVA process to scan the system process list and find the AV engine process:
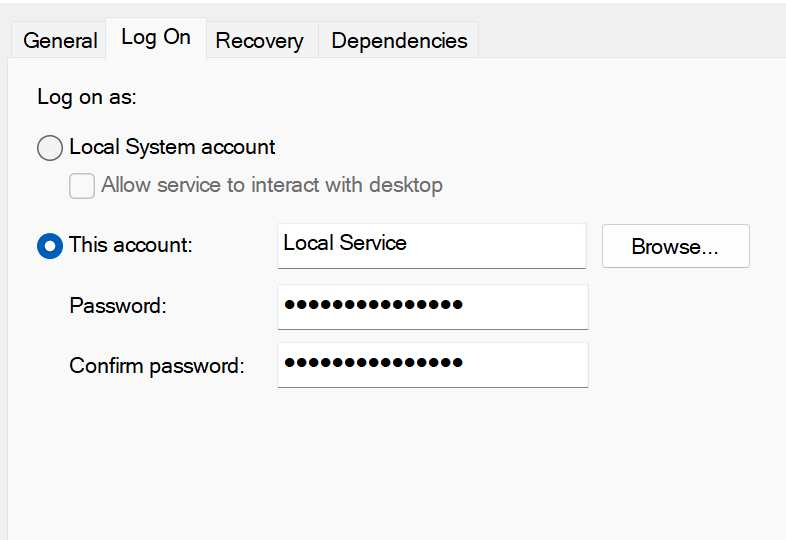
Note that the CAVA service requires a restart after reconfiguring the log-in information.
Also ensure that the inbound port TCP12228 is available, in the case of a firewall or other packet filtering device.
Note that, if using MS Defender, ensure the option for ‘Real Time Scan’ is set to ‘enabled’.
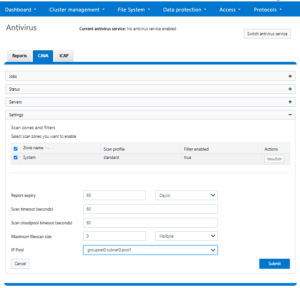
- Finally, the CAVA job can be scheduled to run periodically. In this case, the job ‘av1’ is configured to scan all of /ifs, including any CloudPools, daily at 11am, and with a ‘medium’ impact policy:
# isi antivirus cava jobs create av1 -e Yes --schedule 'every day at 11:00' --impact MEDIUM --paths-to-include /ifs –enabled yes –scan-cloudpool-files yes

# isi antivirus cava jobs list

Name  Include Paths  Exclude Paths  Schedule                 Enabled

---------------------------------------------------------------------

av1   /ifs           -              every 1 days at 11:00 am Yes

---------------------------------------------------------------------

Total: 1
This can also be configured from the WebUI by navigating to Data protection > Antivirus > CAVA and clicking the ‘Add job’ button:


Additionally, CAVA antivirus filters can be managed per multi-tenant access zone for on-demand or protocol access using the ‘isi antivirus cava filter’s command, per below. Be aware that the ISI_PRIV_ANTIVIRUS privilege is required in order to manage CAVA filters.
# isi antivirus cava filters list

Zone   Enabled  Open-on-fail  Scan-profile  Scan Cloudpool Files

-----------------------------------------------------------------

System Yes      Yes           standard      No

zone1  Yes      Yes           standard      No

zone2  Yes      Yes           standard      No

zone3  Yes      Yes           standard      No

zone4  Yes      Yes           standard      No

-----------------------------------------------------------------

Total: 5


# isi antivirus cava filters view

Zone: System

Enabled: Yes

Open-on-fail: Yes

File Extensions: *

File Extension Action: include

Scan If No Extension: No

Exclude Paths: -

Scan-profile: standard

Scan-on-read: No

Scan-on-close: Yes

Scan-on-rename: Yes

Scan Cloudpool Files: No
The ISI_PRIV_ANTIVIRUS privilege is required in order to manage CAVA filters.
Note that blocking access, repair, and quarantine are all deferred to the specific CAVA AV Vendor, and all decisions for these are made by the AV Vendor. This is not a configurable option in OneFS for CAVA AV.