OneFS SupportAssist Provisioning – Part 1

In OneFS 9.5, several OneFS components also now leverage SupportAssist as their secure off-cluster data retrieval and communication channel. These include:

Component Details
Events and Alerts SupportAssist can send CELOG events and attachments via ESE to CLM.
Diagnostics Logfile gathers can be uploaded to Dell via SupportAssist.
License activation License activation uses SupportAssist for the ‘isi license activation start’ CLI cmd
Telemetry Telemetry is sent through SupportAssist to CloudIQ for analytics
Health check Health check definition downloads will now leverage SupportAssist
Remote Support Remote Support now uses SupportAssist along with Connectivity Hub

For existing clusters, SupportAssist supports the same basic workflows as its predecessor, ESRS. This makes the transition from old to new generally pretty seamless.

As such, the overall process for enabling OneFS SupportAssist is as follows:

  1. Upgrade the cluster to OneFS 9.5.
  2. Obtain the secure access key and PIN.
  3. Select either direct connectivity or gateway connectivity.
  4. If using gateway connectivity, install Secure Connect Gateway v5.x.
  5. Provision SupportAssist on the cluster.

We’ll go through each of the configuration steps above in order:

  1. Upgrading to OneFS 9.5.

First, the cluster must be running OneFS 9.5 in order to configure SupportAssist.

There are some additional considerations and caveats to bear in mind when upgrading to OneFS 9.5 and planning on enabling SupportAssist. These include the following:

  • SupportAssist is disabled when STIG Hardening applied to cluster
  • Using SupportAssist on a hardened cluster is not supported.
  • Clusters with the OneFS network firewall enabled (‘isi network firewall settings’) may need to allow outbound traffic on ports 443 and 8443, plus 9443 if gateway (SCG) connectivity is configured.
  • SupportAssist is supported on a cluster that’s running in Compliance mode

If upgrading from an earlier release, the OneFS 9.5 upgrade to must be committed before SupportAssist can be provisioned.

Also, ensure that the user account that will be used to enable SupportAssist belongs to a role with the ‘ISI_PRIV_REMOTE_SUPPORT’ read and write privilege:

# isi auth privileges | grep REMOTE
ISI_PRIV_REMOTE_SUPPORT                           Configure remote support

For example, the ‘ese’ user account below:

# isi auth roles view SupportAssistRole
       Name: SupportAssistRole
Description: -
    Members: ese
 Privileges
             ID: ISI_PRIV_LOGIN_PAPI
     Permission: r
             ID: ISI_PRIV_REMOTE_SUPPORT
     Permission: w


  1. Obtaining secure access key and PIN.

An access key and pin are required in order to provision SupportAssist, and these secure keys are held in Key manager under the RICE domain. This access key and pin can be obtained from the following Dell Support site: https://www.dell.com/support/connectivity/product/isilon-onefs.

In the Quick link navigation bar, select the ‘Generate Access key’ link:

On the following page, select the appropriate button:

The credentials required to obtain an access key and pin vary depending on prior cluster configuration. Sites that have previously provisioned ESRS will need their OneFS Software ID (SWID) to obtain their access key and pin.

The ‘isi license list’ CLI command can be used to determine a cluster’s SWID. For example:

# isi license list | grep "OneFS Software ID"

OneFS Software ID: ELMISL999CKKD

However, customers with new clusters and/or have not previously provisioned ESRS or SupportAssist will require their Site ID in order to obtain the access key and pin.

Note that any new cluster hardware shipping after January 2023 will already have a built-in key, so this key can be used in place of the Site ID above.

For example, if this is the first time registering this cluster and it does not have a built-in key, select ‘Yes, let’s register’:

Enter the Site ID, site name, and location information for the cluster:

Choose a 4-digit PIN and save it for future reference. After that click the ‘Create My Access Key’ button:

Next, the access key is generated:

An automated email is sent from the ‘Dell | ServicesConnectivity Team’ containing the pertinent key info. For example:

Note that this access key is valid for one week, after which it automatically expires.


  1. Direct or gateway topology decision. 

A topology decision will need to be made between implementing either direct connectivity or gateway connectivity, depending on the needs of the environment:

  • Direct Connect:

  • Gateway Connect:

SupportAssist uses ports 443 and 8443 by default for bi-directional communication between the cluster and Connectivity Hub. As such, these ports will need to be open across any firewalls or packet filters between the cluster and the corporate network edge to allow connectivity to Dell Support.

Additionally, port 9443 is used for communicating with a gateway (SCG).

# grep -i esrs /etc/services

isi_esrs_d      9443/tcp  #EMC Secure Remote Support outbound alerts


  1. Optional Secure Connect Gateway installation.

This step is only required when deploying a Secure Connect gateway. If a direct connect topology is desired, go directly to step 5 below.

When configuring SupportAssist with the gateway connectivity option, Secure Connect Gateway v5.0 or later must be deployed within the data center.

Dell Secure Connect Gateway (SCG) is available for Linux, Windows, Hyper-V, and VMware environments, and as of writing, the latest version is 5.14.00.16. The installation binaries can be downloaded from: https://www.dell.com/support/home/en-us/product-support/product/secure-connect-gateway/drivers

The procedure to download SCG is as follows:

  1. Sign in to www.dell.com/SCG-App . The Secure Connect Gateway – Application Edition page is displayed. If you have issues signing in using your business account or unable to access the page even after signing in, contact Dell Administrative Support.
  2. In the Quick links section, click Generate Access key.
  3. On the Generate Access Key page, perform the following steps:
  4. Select a site ID, site name, or site location.
  5. Enter a four-digit PIN and click Generate key. An access key is generated and sent to your email address. NOTE: The access key and PIN must be used within seven days and cannot be used to register multiple instances of secure connect gateway.
  6. Click Done.
  7. On the Secure Connect Gateway – Application Edition page, click the Drivers & Downloads tab.
  8. Search and select the required version.
  9. In the ACTION column, click Download.

The following steps are required in order to setup SCG:

https://dl.dell.com/content/docu105633_secure-connect-gateway-application-edition-quick-setup-guide.pdf?language=en-us

Pertinent resources for installing SCG include:

Users guide, for system and network requirements, steps to create business account, and installation instructions. https://www.dell.com/SCG-App-docs

Support matrix, for supported devices, protocols, firmware versions, and operating systems: https://www.dell.com/SCG-App-docs

The SCG dashboard page displays a variety of device and network information, status, and metrics. For example:

Another useful source of SCG installation, configuration, and troubleshooting information is the Dell support forum: https://www.dell.com/community/Secure-Connect-Gateway/bd-p/SCG


  1. Provisioning SupportAssist on the cluster.

At this point, the off-cluster pre-staging work should be complete.

In the next article in this series, we turn our attention to the SupportAssist provisioning process on the cluster itself (step 5).

OneFS SupportAssist Architecture and Operation

The previous article in this series looked at an overview of OneFS SupportAssist. Now, we’ll turn our attention to its core architecture and operation.

Under the hood, SupportAssist relies on the following infrastructure and services:

Service Name
ESE Embedded Service Enabler.
isi_rice_d Remote Information Connectivity Engine (RICE).
isi_crispies_d Coordinator for RICE Incidental Service Peripherals including ESE Start.
Gconfig OneFS centralized configuration infrastructure.
MCP Master Control Program – starts, monitors, and restarts OneFS services.
Tardis Configuration service and database.
Transaction journal Task manager for RICE.

Of these, ESE, isi_crispies_d, isi_rice_d, and the Transaction Journal are new in OneFS 9.5 and exclusive to SupportAssist. In contrast, Gconfig, MCP, and Tardis are all legacy services that are used by multiple other OneFS components.

The Remote Information Connectivity Engine (RICE) represents the new SupportAssist ecosystem for OneFS to connect to the Dell backend, and the high level architecture is as follows:

Dell’s Embedded Service Enabler (ESE) is at the core of the connectivity platform and acts as a unified communications broker between the PowerScale cluster and Dell Support. ESE runs as a OneFS service and, on startup, looks for an on-premises gateway server. If none is found, it connects back to the connectivity pipe (SRS). The collector service then interacts with ESE to send telemetry, obtain upgrade packages, transmit alerts and events, etc.

Depending on the available resources, ESE provides a base functionality with additional optional capabilities to enhance serviceability. ESE is multithreaded, and each payload type is handled by specific threads. For example, events are handled by event threads, binary and structured payloads are handled by web threads, etc. Within OneFS, ESE gets installed to /usr/local/ese and runs as ‘ese’ user and  group.

The responsibilities of isi_rice_d include listening for network changes, getting eligible nodes elected for communication, monitoring notifications from CRISPIES, and engaging Task Manager when ESE is ready to go.

The Task Manager is a core component of the RICE engine. Its responsibility is to watch the incoming tasks that are placed into the journal and assign workers to step through the tasks state machine until completion. It controls the resource utilization (python threads) and distributes tasks that are waiting on a priority basis.

The ‘isi_crispies_d’ service exists to ensure that ESE is only running on the RICE active node, and nowhere else. It acts, in effect, like a specialized MCP just for ESE and RICE-associated services, such as IPA. This entails starting ESE on the RICE active node, re-starting it if it crashes on the RICE active node, and stopping it and restarting it on the appropriate node if the RICE active instance moves to another node. We are using ‘isi_crispies_d’ for this, and not MCP, because MCP does not support a service running on only one node at a time.

The core responsibilities of ‘isi_crispies_d’ include:

  • Starting and stopping ESE on the RICE active node
  • Monitoring ESE and restarting, if necessary. ‘isi_crispies_d’ restarts ESE on the node if it crashes. It will retry a couple of times and then notify RICE if it’s unable to start ESE.
  • Listening for gconfig changes and updating ESE. Stopping ESE if unable to make a change and notifying RICE.
  • Monitoring other related services.

The state of ESE, and of other RICE service peripherals, is stored in the OneFS tardis configuration database so that it can be checked by RICE. Similarly, ‘isi_crispies_d’ monitors the OneFS Tardis configuration database to see which node is designated as the RICE ‘active’ node.

The ‘isi_telemetry_d’ daemon is started by MCP and runs when SupportAssist is enabled. It does not have to be running on the same node as the active RICE and ESE instance. Only one instance of ‘isi_telemetry_d’ will be active at any time, and the other nodes will be waiting for the lock.

The current status and setup of SupportAssist on a PowerScale cluster can be queried via the ‘isi supportassist settings view’ CLI command. For example:

# isi supportassist settings view

        Service enabled: Yes

       Connection State: enabled

      OneFS Software ID: ELMISL08224764

          Network Pools: subnet0:pool0

        Connection mode: direct

           Gateway host: -

           Gateway port: -

    Backup Gateway host: -

    Backup Gateway port: -

  Enable Remote Support: Yes

Automatic Case Creation: Yes

       Download enabled: Yes

This can also be obtained from the WebUI by navigating to Cluster management > General settings > SupportAssist:

SupportAssist can be enabled and disabled via the ‘isi services’ CLI command set. For example:

# isi services isi_supportassist disable

The service 'isi_supportassist' has been disabled.

# isi services isi_supportassist enable

The service 'isi_supportassist' has been enabled.

# isi services -a | grep supportassist

   isi_supportassist    SupportAssist Monitor                    Enabled

The core services can be checked as follows:

# ps -auxw | grep -e 'rice' -e 'crispies' | grep -v grep

root    8348    9.4  0.0 109844  60984  -  Ss   22:14        0:00.06 /usr/libexec/isilon/isi_crispies_d /usr/bin/isi_crispies_d

root    8183    8.8  0.0 108060  64396  -  Ss   22:14        0:01.58 /usr/libexec/isilon/isi_rice_d /usr/bin/isi_rice_d

Note that once a cluster is provisioned with SupportAssist, ESRS can no longer be used. However, customers that have not previously connected their clusters to Dell Support may still provision ESRS, but will be presented with a message encouraging them to adopt the best practice of using SupportAssist

Additionally, SupportAssist in OneFS 9.5 does not currently support IPv6 networking, so clusters deployed in IPv6 environments should continue to use ESRS until SupportAssist IPv6 integration is introduced in a future OneFS release.

OneFS SupportAssist

Amongst the myriad of new features that are introduced in the OneFS 9.5 release is SupportAssist, Dell’s next-gen remote connectivity system.

Dell SupportAssist helps rapidly identifies, diagnoses, and resolve cluster issues fast and provides the following key benefits:

  • Improve productivity by replacing manual routines with automated support.
  • Accelerate resolution, or avoid issues completely, with predictive issue detection and proactive remediation.
  • SupportAssist is included with all support plans (features vary based on service level agreement).

Within OneFS, SupportAssist is intended for transmitting events, logs, and telemetry from PowerScale to Dell support. As such, it provides a full replacement for the legacy ESRS.

Delivering a consistent remote support experience across the Dell storage portfolio, SupportAssist is intended for all sites that can send telemetry off-cluster to Dell over the internet. SupportAssist integrates the Dell Embedded Service Enabler (ESE) into PowerScale OneFS along with a suite of daemons to allow its use on a distributed system

SupportAssist ESRS
Dell’s next generation remote connectivity solution. Being phased out of service.
Can either connect directly, or via supporting gateways. Can only use gateways for remote connectivity.
Uses Connectivity Hub to coordinate support. Uses ServiceLink to coordinate support.
Requires access key and pin, or hardware key, to enable. Uses customer username and password to enable.

SupportAssist uses Dell Connectivity Hub and can either interact directly, or through a Secure Connect gateway.

SupportAssist comprises a variety of components that gather and transmit various pieces of OneFS data and telemetry to Dell Support, via the Embedded Service Enabler (ESE).  These workflows include CELOG events, In-product activation (IPA) information, CloudIQ telemetry data, Isi-Gather-info (IGI) logsets, and provisioning, configuration and authentication data to ESE and the various backend services.

Operation Details
Event Notification In OneFS 9.5, SupportAssist can be configured to send CELOG events and attachments via ESE to CLM.   CELOG has a ‘supportassist’ channel that, when active, will create an EVENT task for SupportAssist to propagate.
License Activation The isi license activation start command uses SupportAssist to connect.

Several pieces of PowerScale and OneFS functionality require licenses, and to register and must communicate with the Dell backend services in order to activate those cluster licenses. In OneFS 9.5, SupportAssist is the preferred mechanism to send those license activations via the Embedded Service Enabler(ESE) to the Dell backend. License information can be generated via the ‘isi license generate’ CLI command, and then activated via the ‘isi license activation start’ syntax.

Provisioning SupportAssist must register with backend services in a process known as provisioning.  This process must be executed before the Embedded Service Enabler(ESE) will respond on any of its other available API endpoints.  Provisioning can only successfully occur once per installation, and subsequent provisioning tasks will fail. SupportAssist must be configured via the CLI or WebUI before provisioning.  The provisioning process uses authentication information that was stored in the key manager upon the first boot.
Diagnostics The OneFS isi diagnostics gather and isi_gather_info logfile collation and transmission commands have a –supportassist option.
Healthchecks HealthCheck definitions are updated using SupportAssist.
Telemetry CloudIQ Telemetry data is sent using SupportAssist.
Remote Support Remote Support uses SupportAssist and the Connectivity Hub to assist customers with their clusters.

SupportAssist requires an access key and PIN, or hardware key, in order to be enabled, with most customers likely using the access key and pin method. Secure keys are held in Key manager under the RICE domain.

In addition to the transmission of data from the cluster to Dell, Connectivity Hub also allows inbound remote support sessions to be established for remote cluster troubleshooting.

In the next article in this series, we’ll take a deeper look at the SupportAssist architecture and operation.

OneFS SmartQoS Monitoring and Troubleshooting

The previous articles in this series have covered the SmartQoS architecture, configuration, and management. Now, we’ll turn out attention to monitoring and troubleshooting.

The ‘isi statistics workload’ CLI command can be used to monitor the dataset’s performance. The ‘Ops’ column displays the current protocol operations per second. In the following example, OPs stabilize  around 9.8, which is just below the configured limit value of 10 Ops.

# isi statistics workload --dataset ds1 & data

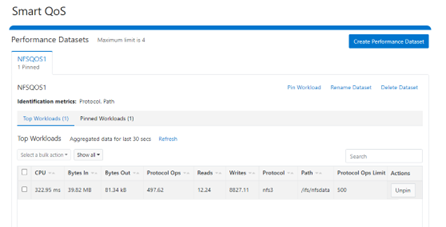
Similarly, this next example from the SmartQoS WebUI shows a small NFS workflow performing 497 protocol OPS in a pinned workload with a limit of 500 OPS:

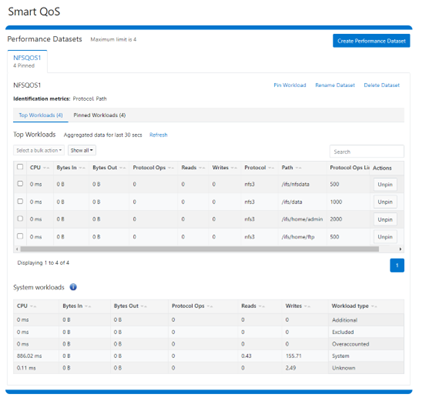
Multiple paths and protocols can be pinned by selecting ‘Pin Workload’ option for a given Dataset. Here, four directory path workloads are each configured with different Protocol OPs limits:

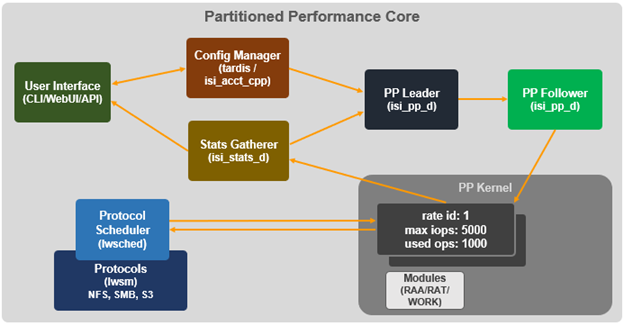
When it comes to troubleshooting SmartQoS, there are a few areas that are worth checking right away, including the SmartQoS Ops limit configuration, isi_pp_d and isi_stats_d daemons, and the protocol service(s).

  1. For suspected Ops limit configuration issues, first confirm that the SmartQoS limits feature is enabled:
# isi performance settings view
Top N Collections: 1024
Time In Queue Threshold (ms): 10.0
Target read latency in microseconds: 12000.0
Target write latency in microseconds: 12000.0
Protocol Ops Limit Enabled: Yes

Next, verify that the workload level protocols_ops limit is correctly configured:

# isi performance workloads view <workload>

Check whether any errors are reported in the isi_tardis_d configuration log:

# cat /var/log/isi_tardis_d.log
  1. To investigating isi_pp_d, first check that the service is enabled
# isi services –a isi_pp_d

Service 'isi_pp_d' is enabled.

If necessary, the isi_pp_d service can be restarted as follows:

# isi services isi_pp_d disable

Service 'isi_pp_d' is disabled.

# isi services isi_pp_d enable

Service 'isi_pp_d' is enabled.

There’s also an isi_pp_d debug tool, which can be helpful in a pinch:

# isi_pp_d -h

Usage: isi_pp_d [-ldhs]

-l Run as a leader process; otherwise, run as a follower. Only one leader process on the cluster will be active.

-d Run in debug mode (do not daemonize).

-s Display pp_leader node (devid and lnn)

-h Display this help.

Debugging can be enabled on the isi_pp_d log file with the following command syntax:

# isi_ilog -a isi_pp_d -l debug, /var/log/isi_pp_d.log

For example, the following log snippet shows a typical isi_ppd_d.log message communication between isi_pp_d leader and isi_pp_d followers:

/ifs/.ifsvar/modules/pp/comm/SETTINGS

[090500b000000b80,08020000:0000bfddffffffff,09000100:ffbcff7cbb9779de,09000100:d8d2fee9ff9e3bfe,090001 00:0000000075f0dfdf]      

100,,,,20,1658854839  < in the format of <workload_id, cputime, disk_reads, disk_writes, protocol_ops, timestamp>

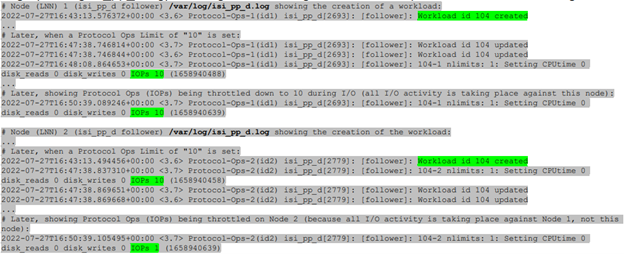
Here, the extract from the /var/log/isi_pp_d.log logfiles from nodes 1 and 2 of a cluster illustrate the different stages of Protocol Ops limit enforcement and usage:

  1. To investigate the isi_stats_d, first confirm that the isi_pp_d service is enabled:
# isi services -a isi_stats_d
Service 'isi_stats_d' is enabled.

If necessary, the isi_stats_d service can be restarted as follows:

# isi services isi_stats_d disable

# isi services isi_stats_d enable

The workload level statistics can be viewed with the following command:

# isi statistics workload list --dataset=<name>

Debugging can be enabled and on the isi_stats_d log file with the following command syntax:

# isi_stats_tool --action set_tracelevel --value debug

# cat /var/log/isi_stats_d.log
  1. To investigate protocol issues, the ‘isi services’ and ‘lwsm’ CLI commands can be useful. For example, to check the status of the S3 protocol:
# /usr/likewise/bin/lwsm list | grep -i protocol
hdfs                       [protocol]    stopped
lwswift                    [protocol]    running (lwswift: 8393)
nfs                        [protocol]    running (nfs: 8396)
s3                         [protocol]    stopped
srv                        [protocol]    running (lwio: 8096)

# /usr/likewise/bin/lwsm status s3
stopped

# /usr/likewise/bin/lwsm info s3
Service: s3
Description: S3 Server
Categories: protocol
Path: /usr/likewise/lib/lw-svcm/s3.so
Arguments:
Dependencies: lsass onefs_s3 AuditEnabled?flt_audit_s3
Container: s3

The above CLI output confirms that the S3 protocol is inactive. The S3 service can be started as follows:

# isi services -a | grep -i s3
s3                   S3 Service                               Enabled

Similarly, the S3 service can be restarted as follows:

# /usr/likewise/bin/lwsm restart s3
Stopping service: s3
Starting service: s3

To investigate further, the protocol’s log level verbosity can be increase. For example, to set the s3 log to ‘debug’:

# isi s3 log-level view
Current logging level is 'info'

# isi s3 log-level modify debug

# isi s3 log-level view
Current logging level is 'debug'

Next, view and monitor the appropriate protocol log. For example, for the S3 protocol:

# cat /var/log/s3.log

# tail -f /var/log/s3.log

Beyond the above, /var/log/messages can also be monitored for pertinent errors, since the main partition performance (PP) modules log to this file. Debug level logging can be enabled for the various PP modules as follows

Dataset:

# sysctl ilog.ifs.acct.raa.syslog=debug+ 
ilog.ifs.acct.raa.syslog: error,warning,notice (inherited) -> error,warning,notice,info,debug

Workload:

# sysctl ilog.ifs.acct.rat.syslog=debug+
ilog.ifs.acct.rat.syslog: error,warning,notice (inherited) -> error,warning,notice,info,debug

Actor work:

# sysctl ilog.ifs.acct.work.syslog=debug+
ilog.ifs.acct.work.syslog: error,warning,notice (inherited) -> error,warning,notice,info,debug

When finished, the default logging levels for the above modules can be restored as follows:

# sysctl ilog.ifs.acct.raa.syslog=notice+

# sysctl ilog.ifs.acct.rat.syslog=notice+

# sysctl ilog.ifs.acct.work.syslog=notice+