OneFS SmartPools Data Management – Part 2

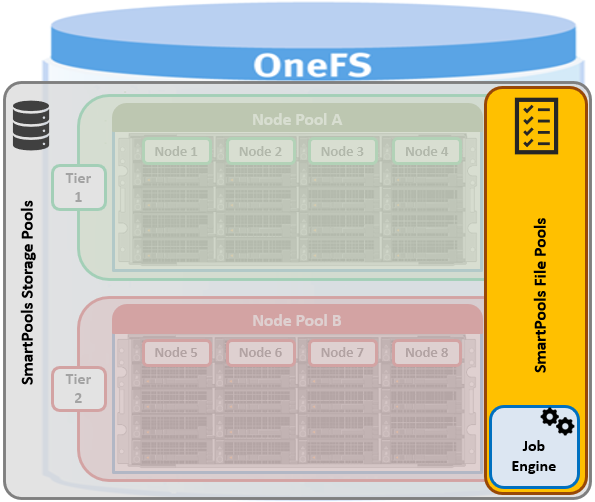
As we saw in the previous article in this series, SmartPools operation is quarterbacked and executed by the OneFS job engine.
When a one of the SmartPools job runs, all the files’ attributes are examined and checked against the list of file pool policies. As such, file pool policies are built on file attribute(s) the policy can match on, and these include file name, path, file type, size, timestamps, etc.
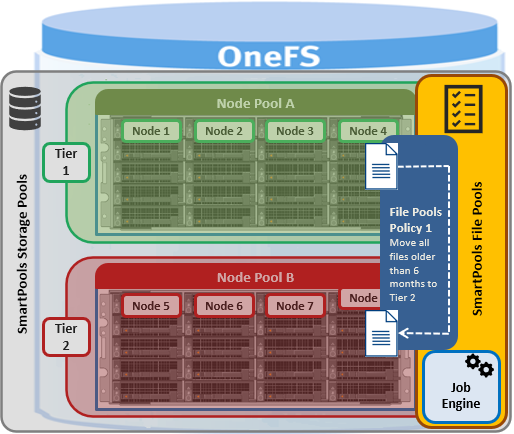
Once the file attribute is set to select the appropriate files, the action to be taken on those files can be added. For example, if the selected attribute is File Size, additional settings are available to dictate thresholds – for instance, all files bigger than 500MB, but smaller than 2GB. Next, actions are applied, such as move to node pool ‘x’, protect at level ‘y’, and lay out for access setting ‘z’.

File Attribute Description
File Name Specifies file criteria based on the file name
Path Specifies file criteria based on where the file is stored
File Type Specifies file criteria based on the file-system object type
File Size Specifies file criteria based on the file size
Modified Time Specifies file criteria based on when the file was last modified
Create Time Specifies file criteria based on when the file was created
Metadata Change Time Specifies file criteria based on when the file metadata was last modified
Access Time Specifies file criteria based on when the file was last accessed
User Attributes Specifies file criteria based on custom  attributes – see below

Path-based file pool policies can direct data to the correct node pool on write, without a SmartPools job running.  However, policies that use other attributes beside path to dictate placement, move their matching data when the next SmartPools job runs. This ensures that write performance is not sacrificed for initial data placement. Data not covered by a file pool policy is targeted to the default tier, which can be configured as desired. Note that CloudPools, the OneFS off-cluster cloud tiering service, also uses the file pool policy engine.

File pool policies can be configured from the CLI using the ‘isi filepools create’ command, or via the WebUI by navigating to File System > Storage Pools > File Pool Policies > Create a file pool policy:
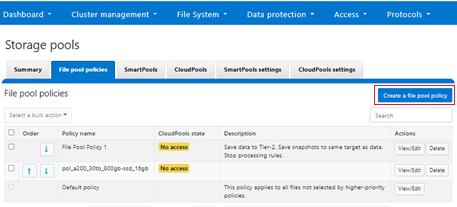
When a file pool policy is created, SmartPools stores it in a configuration database with any other file policies.  When a SmartPools job runs, it applies all the policies in order.  If a file matches multiple policies, SmartPools will only apply the first rule it matches.  So, for example if there is a rule that moves all small jpeg files to an A-series archive pool, and another that moves all files under 1 MB to an F-series performance tier, if the jpeg rule appears first in the list, then jpg files under 2 MB will go to archive, NOT the performance tier.

Criteria can be combined within a single policy using ‘And’ or ‘Or’ operators, so that data can be classified very granularly.  Continuing with our example, if the desired behavior is to have all jpg files over 2 MB to be moved to the Archive node pool, the file pool policy can be simply constructed with an ‘And’ operator to explicitly cover that condition.

While the example above is a simple one, if needed, SmartPools can currently support up to 128 file pool policies, each of which can contain up to 3 file matching criteria or rules. However, as the list of file pool policies grows large, it becomes less practical to manually traverse them to see how a file will behave when policies are applied.

File pool policy order, and policies themselves, can be easily changed at any time. Specifically, policies can be added deleted, edited, copied and re-ordered. For example:

# isi filepool policies modify Archive_1 --description "Move older files to archive storage" --data-storage-target Archive_1 --data-ssd-strategy metadata --begin-filter --file-type=file --and --birth-time=2022-10-01 --operator=lt --and --accessed-time=2022-11-01 --operator=lt --end-filter

The file pool policy is applied when the next scheduled SmartPools job runs. By default, the SmartPools job runs once a day, but can also started manually:

# isi job jobs start SmartPools

File pool policies are evaluated in descending order, according to their position in the file pool policies list. By default, when a new policy is created, it is inserted immediately above the default file pool policy. The default policy is always the last in priority, and applies to all files that are not matched by any other file pool policy. The priority order of a file pool policy can be altered by moving it up or down in the list. For example:

# isi filepool policies list

Name        Description                               CloudPools State

----------------------------------------------------------------

Archive_1   Move older files to archive storage       No access

Perf_1      Move recent files to perf tier            No access

----------------------------------------------------------------

Total: 2

# isi filepool policies modify Perf_1 --apply-order 1

# isi filepool policies list

Name        Description                               CloudPools State

----------------------------------------------------------------

Perf_1      Move recent files to perf tier            No access

Archive_1   Move older files to archive storage       No access

----------------------------------------------------------------

Total: 2

In this case, the ‘Perf_1’ policy has been promoted to the top of the list, above the ‘Archive_1’ policy.

If no File Pool policy matches a file, the default policy specifies all storage settings for the file. The default policy, in effect, matches all files not matched by any other SmartPools policy. For this reason, the default policy is the last in the file pool policy list, and, as such, always the last policy that SmartPools applies.

Additionally, a file pool policy can be configured to match a user-specified ‘custom attribute’ and/or value.

When data is written to the cluster, SmartPools writes it to a single Node Pool only.  This means that, in almost all cases, a file exists in its entirety within a Node Pool, and not across Node Pools.  SmartPools determines which pool to write to as follows:

  • If a file matches a file pool policy based on directory path, that file will be written into the Node Pool dictated by the File Pool policy immediately.
  • If a file matches a file pool policy which is based on any other criteria besides path name, SmartPools will write that file to the Node Pool with the most available capacity.

The OneFS ‘isi get –D’ CLI command, or WebUI File System Explorer, provides a detailed view of where SmartPools-managed data is at any time by both the actual Node Pool location and the File Pool policy-dictated location (i.e. where that file will move after the next successful completion of the SmartPools job). More specifically, the selection of a disk pool target from a file pool policy typically follows the following logic path:

  1. If SmartPools is licensed and the policy’s pool ID is found that disk pool is targeted.
  2. If SmartPools is unlicensed, the policy ID specified for a file is ignored and the ‘any disk pool’ group ID is used instead.
  3. If the policy ID is not found and global spillover is enabled for the cluster, the spillover target is used as the policy. If global spillover is disabled, the ‘any disk pool’ group is used as the policy.
  4. The pools in the policy which satisfy the SSD preference are presented in a weighted random order. This continues until a suitable pool is found or an error is returned.
  5. If no suitable pool is found, the SSD preference is changed to ‘fallback’ and step #3 is repeated. The ‘fallback’ value allows the use of any pool if the reserved ‘system’ policy is used, or the cluster is all-SSD. Otherwise only all-HDD pools are used.
  6. If no suitable pool is found and global spillover is enabled for the cluster, the spillover target is used as the policy and step #3 is repeated (the SSD preference remains as ‘fallback’).
  7. If spillover is disabled and no suitable pool is found, processing stop and an error is returned.

After a file match with a File Pool policy occurs, the OneFS uses the settings in the matching policy to store and protect the file. However, a matching policy might not specify all settings for the match file. In this case, the default policy is used for those settings not specified in the custom policy. For each file stored on a cluster, the system needs to determine the following:

·         Requested protection level

·         Data storage target for local data cache

·         SSD strategy for metadata and data

·         Protection level for local data cache

·         Configuration for snapshots

·         SmartCache setting

·         L3 cache setting

·         Data access pattern

·         CloudPools actions (if any)

A question that’s frequently asked is what happens to any files that are due to be tiered but are being actively used? SmartPools can move the files transparently, even if they’re open and being modified.

Under the hood, the locks OneFS uses to provide consistency inside the filesystem, are separate from the external file locks for consistency between applications. This allows OneFS to discreetly move metadata and data blocks around, while the file is locked by an application. The restriper also performs its work in small chunks to further minimize disruption.

In addition to actual file placement, SmartPools data access (DAC) settings can be configured at the file pool, or even the single file, level for the type of application or workflow. DAC allows data to be optimized for concurrent, streaming or random access, with each of these three options influencing how files are laid out on disk and cached. Specifically, the ‘random’ data access setting performs little to no read-cache prefetching, to avoid wasted disk seeks. This works best for small files under 128KB, and large files with random, small block accesses. Data is striped across the minimum number of drives needed to achieve the data protection settings.

Streaming access works well for sequentially-read, medium to large files. This access pattern uses aggressive prefetching to improve overall read throughput, and on disk layout spreads the file across a large number of drives to optimize access.

Concurrency, the default, is the middle ground option with moderate prefetching, and data striped across the minimum number of drives required to achieve the configured protection setting. Concurrency is useful for general workloads like file shares and home directories, and file sets with a mix of both random and sequential access.

All the current generation of PowerScale nodes contain some percentage of flash media, and these SSDs can be used to accelerate performance across the entire cluster, by using them for caching or storage. As such, OneFS offers several SSD Strategies, including:

SSD Strategy Description
Metadata read acceleration Creates a preferred mirror of file metadata on SSD, and writes the rest of the metadata, plus all the actual file data, to HDD.
Metadata read & write acceleration All the metadata mirrors are stored on SSD.
Avoid SSDs Writes all associated file data and metadata to HDDs. Only really used when there is insufficient SSD storage capacity, to prioritize its utilization.
Data on SSDs All of a node pool’s data and metadata resides on flash.
L3 cache All of a node pool’s SSDs are used for SmartFlash read caching.

When L3 caching is enabled, it consumes all the SSD capacity in a node pool and therefore cannot coexist with other SSD strategies.

In contrast to L3 cache, with the data on SSD strategy, only the files specifically targeted to SSD benefit from the increased read and write performance. The remainder of the data on the node pool lives exclusively on hard disk and will not benefit from SSD.

The ‘isi_cache_stats -v’ CLI command will return the ratio of L3 cache hits to cache misses. A value of  70% or more cache hits indicates that L3 is working pretty well. Whereas less than 70% suggests that the SSDs may be better used for a metadata strategy.

However, be aware that SmartPools SSD strategies in general typically require more complex configuration than L3 and must be monitored so as not to exceed the available SSD capacity.

In summary, as far as good practices for optimal cluster performance, consider the following when deploying and configuring SmartPools:

  • Define a performance and protection profile, or SLA, for each tier, and configure it accordingly.
  • Avoid creating tiers that combine node pools with differing performance profiles (ie. with and without SSDs).
  • Ensure that cluster capacity utilization, for both hard drives and SSDs, remains below 90%.
  • Keep Virtual Hot Spares enabled, with a minimum of 10% space allocation.
  • Avoid creating hardlinks to files which will cause the file to match different file pool policies
  • If node pools are combined into tiers, craft file pool rules to target the tiers rather than individual node pools within the tiers.
  • Determine if metadata operations for a particular workload are biased towards reads, writes, or an even mix, and select the optimal SmartPools metadata or L3 caching strategy.
  • If attempting to configure ‘up-tiering’, ensure it does what you expect. SmartPools jobs are scheduled, so the promotion of a file from an archive to a performance tier will not be immediate upon its access or modification.
  • When employing a deep archiving strategy, ensure that the performance pool is optimized for all directories and metadata and the archive tier just for cold files as they age. This can be configured by adding a ‘TYPE=FILE’ statement to the aging file pool policy rule(s) to only move files to the archive tier.
  • If SmartPools takes more than a day to run, or the cluster is already running the FSAnalyze job, consider using the FilePolicy, and corresponding IndexUpdate job.
  • When enabling and scheduling the FilePolicy job, continue running the SmartPools job at a reduced frequency. For example:
  • IndexUpdate running every six hours (low impact and priority 5), FilePolicy running daily (low impact and priority 6), and the SmartPools job running on the first Sunday of each month ( low impact and priority 6).
  • Use SmartPools for Painless Tech refresh with intra-cluster migrations of data to other node pools. Allowing data to drain from a node pool before decommissioning makes the SmartFail occur much faster.

And finally, a laudable mantra for SmartPools management could be “simplicity reigns”! Where possible, resist the temptation to create more tiers, policies, or rules (ie. complexity) than you actually need.
OneFS SmartPools Data Management

The previous article examined OneFS storage pools, the substrate upon which SmartPools data tiering is built.

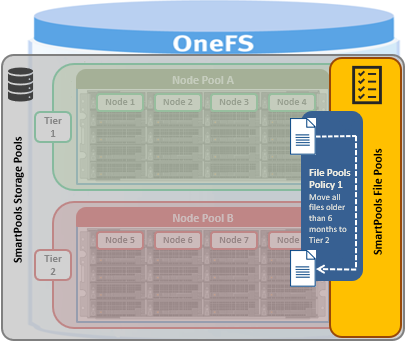
Next up the stack are OneFS file pools – the SmartPools logic layer. User configurable file pool policies govern where data is placed, accessed, and protected, accessed, and how it moves among the node pools and tiers.

File pools allow data to be automatically moved from one type of storage to another within a single cluster, to meet performance, space, cost or other criteria – all while retaining its data protection settings, and without any stubs, indirection layers, or other file system modifications.

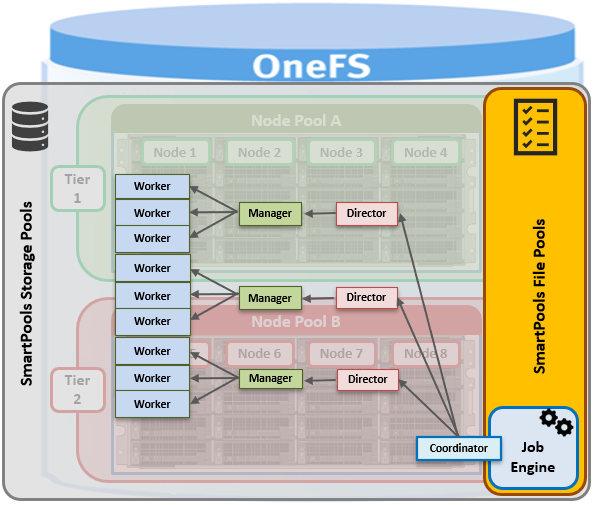
Under the hood, the OneFS job engine is responsible for enacting the file movement, as instructed by configured file pool policies.

In all, there are currently five job engine jobs associated with OneFS SmartPools:

Job Description Default Execution
SetProtectPlus Applies the default file policy. This job is disabled if SmartPools is activated on the cluster Daily @ 10pm if SP is unlicensed.

Low impact, priority 6

SmartPools Job that runs and moves data between the tiers of nodes within the same cluster. Also executes the CloudPools functionality if licensed and configured. Daily @ 10pm

Low impact, priority 6

SmartPoolsTree Enforces SmartPools file policies on a subtree. Manual

Medium impact, priority 5

FilePolicy Efficient changelist-based SmartPools file pool policy job. Daily @ 10pm

Low impact, priority 6

IndexUpdate Creates and updates an efficient file system index for FilePolicy job. Manual

Low impact, priority 5

When SmartPools is unlicensed, any disk pool policies are ignored, and instead, the policy is considered to include all disk pools, and file data is directed to, and balanced across, all pools.

When a SmartPools job runs, it examines and compares file attributes against the list of file pool policy rules.  To minimize runtime, the initial scanning phase of the SmartPools’ job uses a LIN-based scan, rather than a more expensive tree-walk – and this is typically even more efficient when an SSD metadata acceleration strategy is used.

A SmartPools LIN tree scan breaks up the metadata into ranges for the cluster nodes to work on in parallel.  Each node can then dedicate multiple threads to execute the scan on their assigned range.  A LIN scan also ensures each file is opened only once, which is much more efficient when compared to a directory walk, where hard links and other constructs can result in single threading, multiple opens, etc.

When a file pool job thread finds a match between a file and a policy, it stops processing additional rules, since that match determines what will happen to the file. Next, SmartPools checks the file’s current settings against those the policy would assign, to identify those which do not match. Once SmartPools has the complete list of settings that it needs to apply to that file, it sets them all simultaneously, and moves to restripe that file to reflect any and all changes to node pool, protection, SmartCache use, layout, etc.

The file pool policy engine falls under the control and management of the SmartPools job. The default schedule for this process is every day at 10pm, and with a low impact policy. However, this schedule, priority and impact can be manually configured and tailored to a particular environment and workload.

SmartPools can also be run on-demand, to apply the appropriate file-pool membership settings to an individual file, or subdirectory, without having to wait for the background scan to do it.

For example, to test what affect a new policy will have, the ‘isi filepool apply’ command line utility can be run against a small subset of the data, which can be either a single file, or group of files or directories.  This CLI command can either be run live, to actually make the policy changes, or in a ‘dry-run’ assessment mode, using the ‘-nv’ flags, to estimate the scope and effect of a policy.

For a detailed view of where a SmartPools-managed file is at any time, the ‘isi get’ CLI command can provide both the actual node pool location, and the file pool policy-dictated location – or where that file will move to, after the next successful SmartPools job run.

When data is written to the cluster, SmartPools writes it to a single node pool only.  This means that, in almost all cases, a file exists in its entirety within a node pool, and not across pools

Unlike the SmartPools job, which scans the entire LIN tree, and the SmartPoolsTree job which visits a subtree of files, the FilePolicy job, introduced in OneFS 8.2, provides a faster, lower impact method for applying file pool policies. In conjunction with the IndexUpdate job, FilePolicy improves job scan performance, by using a snapshot delta based ‘file system index’, or changelist, to find files needing policy changes.

Avoiding a full treewalk dramatically decreases the amount of locking and metadata scanning work the job is required to perform, improving execution time, and reducing impact on CPU and disk – albeit at the expense of not quite doing everything that SmartPools does. However, most of the time SmartPools and FilePolicy perform the same work.  Disabled by default, FilePolicy supports a wide range of file policy features, reports the same information, and provides the same configuration options as the SmartPools job. Since FilePolicy is a changelist-based job, it performs best when run frequently – once or multiple times a day, depending on the configured file pool policies, data size and rate of change.

When enabling and using the FilePolicy and IndexUpdate jobs, the recommendation is to continue running the SmartPools job as well, but at a much-reduced frequency.

FilePolicy requires access to a current index. This means that if the IndexUpdate job has not yet been run, attempting to start the FilePolicy job will fail with an error message, prompting to run the IndexUpdate job first. And once the index has been created, the FilePolicy job will run as expected. The IndexUpdate job can be run several times daily (for example. every six hours) to keep the index current and prevent the snapshots it uses from growing large.

User configurable file pool policies govern where data is placed, accessed, and protected, accessed, and how it moves among the node pools and tiers. As such, these policies can be used to manage three fundamental properties of data storage:

Property Description
Location The physical tier or node pool in which a file lives.
Performance A file’s performance profile, or I/O optimization setting, which includes sequential, concurrent, or random access. Plus SmartCache write caching
Protection The protection level of a file, and whether it’s FEC parity-protected or mirrored.

For example, a file pool policy may dictate that anything written to path /ifs/foo goes to the H-Series nodes in node pool 1, then moves to the A-Series nodes in node pool 3 when older than 30 days. The file system itself is doing the work, so there are no transparency or data access risks to worry about.

Also, to simplify management, there are defaults in place for node pool and file pool settings which handle basic data placement, movement, protection and performance. There are several generic template policies, too, which can be customized, cloned, or used as-is

Data movement is parallelized, with the resources of multiple nodes combining for efficient job completion.  While a SmartPools job is running and tiering is in progress, all data is completely available to users and applications.

The performance of node pools can also be governed with SmartPools SSD ‘Strategies’, which can be configured for read caching or metadata storage. Plus the overall system performance impact can be tuned to suit the peaks and lulls of an environment’s workload, by scheduling the SmartPools job to run during off-peak hours.

OneFS SmartPools – Storage Pools

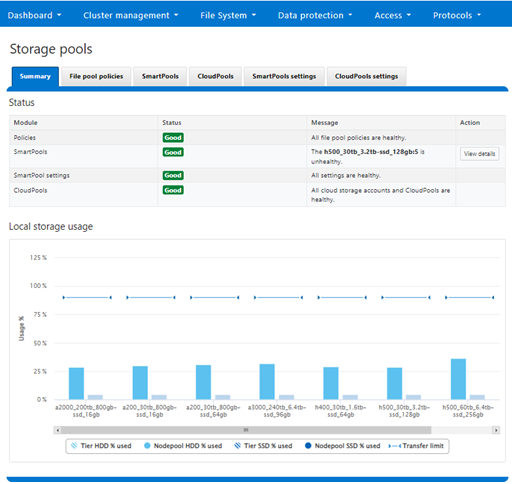
SmartPools is the OneFS tiering engine, and it enables multiple levels of performance, protection, and storage density to co-exist within a PowerScale cluster. SmartPools allows a cluster admin to define the value of a cluster’s data, and automatically align it with the appropriate price/performance tier over time. Data movement is seamless, and with file-level granularity and control via automated policies, you can easily tune performance and layout, storage tier alignment, and protection settings – with minimal impact to a cluster’s end-users. But first, we’ll run through its taxonomy.

At its core, SmartPools is logically separated into two areas: storage pools and file pools.

Heterogeneous PowerScale clusters can be built with a wide variety of node styles and capacities, in order to meet the needs of a varied data set and wide spectrum of workloads. These node styles fall loosely into three main categories or tiers.

  • F-series, all-flash nodes, typically for high performance, low latency workloads
  • H-series hybrid nodes, containing a mixture of SSD and hard drives, great for concurrency and streaming workloads.
  • A-series active archive nodes, capacity optimized and using large SATA drives.

Storage pools in OneFS provide the ability to define hardware tiers within a single cluster, allowing file layout to be aligned with specific sets of nodes by configuring storage pool policies.

The notion of Storage pools is an abstraction that includes disk pools, node pools, and tiers.

Disk pools are the smallest unit within the storage pools hierarchy. OneFS provisioning works on the premise of dividing the hard drives and SSDs in similar node types into sets, with each pool representing a separate failure domain.

These disk pools are typically protected by default at +2d:1n (or the ability to withstand two disk or one entire node failure) and span a neighborhood from three to forty standalone F-series nodes, or a neighborhood of four to twenty chassis-based H and A series nodes – where each chassis contains four compute modules (one per node), and five drive containers, or ‘sleds’, per node.

Each drive belongs to one disk pool and data protection stripes or mirrors typically don’t extend across pools. Disk pools are managed by OneFS and are generally not user configurable.

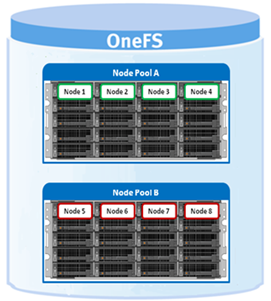
Node pools are groups of disk pools, spread across similar storage nodes. Multiple node pools of differing types can coexist in a single, heterogeneous cluster, and this is the lowest level of pool that general SmartPools configuration targets. Say, for example: one node pool of all-flash F-Series nodes for HPC, one node pool of H-Series nodes, for home directories and file shares, and one node pool of A-series nodes, for archive data.

This allows OneFS to present a single storage resource pool, comprising multiple flash and spinning drive media types – NVMe, high speed SAS, large capacity SATA – providing a range of different performance, protection, and capacity characteristics. This heterogeneous storage pools in turn can support a diverse range of applications and workloads with a single, unified namespace and point of management.  It also enables the mixing of older and newer hardware, allowing for simple investment protection even across product generations, and seamless hardware refreshes.

Each node pool only contains disk pools from the same type of storage nodes, and a disk pool may belong to exactly one node pool. For example, all-flash F-series nodes would be in one node pool, whereas A-series nodes with high capacity SATA drives would be in another. Today, a minimum of 4 nodes, or one chassis, are required per node pool for Gen6 modular chassis-based hardware, or three PowerScale F-series nodes per node pool.

Nodes are not associated with each other, or provisioned, until at least three nodes from the same compatibility class are assigned in a node pool. If nodes are removed from a pool, that node pool becomes under-provisioned. In this situation, if two like-nodes remain, they are still writable. If only one remains, it is automatically set to read-only.

Once node pools are created, they can be easily modified to adapt to changing requirements.  Individual nodes can be reassigned from one node pool to another, if necessary.  Node pool associations can also be discarded, releasing member nodes so they can be added to new or existing pools. Node pools can also be renamed at any time without changing any other settings in the node pool configuration.

When new nodes are added to a cluster, they’re automatically allocated to a node pool, and then subdivided into disk pools without any additional configuration steps – and they inherit the SmartPools configuration properties of that node pool. This means the configuration of a pool’s data protection, layout ,and cache settings only needs to be done once, at the time the node pool is first created. Automatic allocation is determined by the shared attributes of the new nodes with the closest matching node pool. If the new node is not a close match to the nodes of any existing pool, it remains un-provisioned until the minimum node pool membership for like-nodes is met.

When a new node pool is created, and nodes are added, SmartPools associates those nodes with a pool ID. This ID is also used in file pool policies and file attributes to dictate file placement within a specific disk pool.

By default, a file which is not covered by a specific file pool policy will go to the configured ‘default’ node pool, identified during set up.  If no default is specified, SmartPools will typically write that data to the pool with the most available capacity.

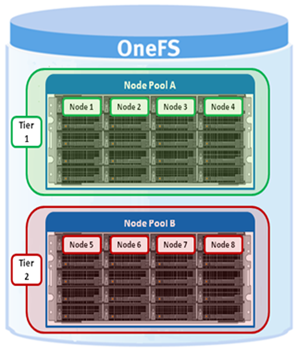
Tiers are groups of node pools combined into a logical superset to optimize data storage, typically according to OneFS platform type.

For example, similar ‘archive’ node pools are often consolidated into a single tier, which could incorporate different styles of archive node pools into a single, logical container. For example, PowerScale A300s with 12TB SATA drives and PowerScale A3000s with 16TB SATA drives logically combined into a single active archive tier. This is a significant benefit to customers who consistently purchase the highest capacity nodes available, to consolidate a variety of node styles within a single tier and manage them as one logical group.

Note, however, that a storage efficiency cost may be incurred if the node pools in a tier are too small. For example, in a six node cluster with two separate three-node pools (different drive sizes), each pool has a 33% protection overhead. This is compared to a six node cluster with single six-node pool (same drive size), protection overhead drops to 16% (at the default +2d:1n protection).

SmartPools users frequently deploy 2 to 4 tiers, with the fastest tier typically containing all-flash nodes for the most performance demanding portions of a workflow, and the lowest, capacity-biased tier comprising high capacity SATA drive nodes.

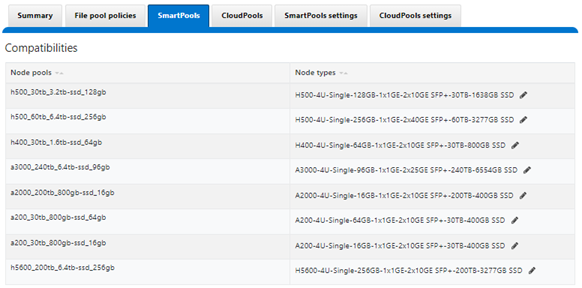
SmartPools allows nodes of any type supported by the particular OneFS version, to be combined within the same cluster. The like-nodes are provisioned into different node pools according to their physical attributes:

These node compatibility classes are fairly stringent. This is in order to avoid disproportionate amounts of work being directed towards a subset of cluster resources, which could result in bullying of the lower powered nodes.

However, cluster administrators can safely target specific data to broader classes of storage by creating tiers. For example, if a cluster includes two different varieties of H nodes, such as H700s and H7000s, these will automatically be provisioned into two different node pools. These two node pools can be logically combined into a tier, and file placement targeted to it, resulting in automatic balancing across the node pools.

SmartPools separates hardware by node type and creates a separate node pool for each distinct hardware variant. To reside in the same node pool, nodes must have a set of core attributes in common, and node compatibilities can be defined to allow nodes with the same drive types, quantities and capacities and compatible RAM configurations, to be provisioned into the same pools.

That said, due to significant architectural differences, there are no node compatibilities between the chassis-based all-flash F800 or F810s, and the self-contained all-flash nodes like the F600 or F900.

OneFS also contains an SSD compatibility option, which allows nodes with dissimilar flash capacity to be provisioned to a single node pool. When creating this SSD compatibility, OneFS automatically checks that the two pools to be merged have the same number of SSDs, tier, requested protection, and the same SSD strategy or L3 cache setting.

If a node pool fills up, writes to that pool will automatically spill over to the next pool.  This default behavior ensures that work can continue, even if one type of capacity is full.  There are some circumstances in which spillover is undesirable, for example when different business units within an organization purchase separate pools, or data location has security or protection implications.  In these circumstances, spillover can simply be disabled.  Disabling spillover ensures a file exists in one pool and will not move to another.

From a data protection and layout efficiency point of view, SmartPools subdivides large numbers of like nodes into smaller, more efficiently protected disk pools – automatically calculating and grouping the cluster into pools of disks, that are optimized for both Mean Time to Data Loss (MTTDL) and efficient space utilization. This means that protection level decisions are not left to the cluster admin, unless desired.

With Automatic Provisioning, every set of equivalent node hardware is automatically split up into disk pools, node pools and neighborhoods. These pools are protected by default against up to two drive or one node failure per disk pool. By subdividing a node’s disks into multiple, separately protected disk pools, nodes are significantly more resilient to multiple disk failures.

If the automatically provisioned node pools that OneFS creates are not appropriate for an environment, they can be manually reconfigured. This is done by creating a manual node pool and moving nodes from an existing node pool to the newly created one. However, the strong recommendation is to use the default, automatically provisioned node pools. Manually assigned pools may not provide the same level of performance and storage efficiency as automatically assigned pools.

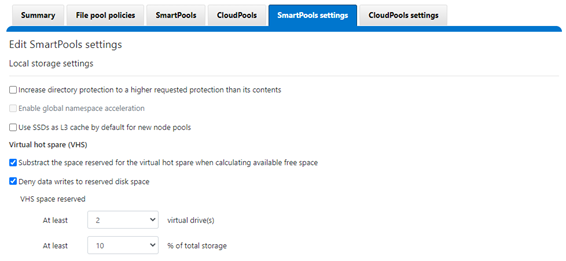
Unlike hardware RAID, OneFS has no requirement for dedicated hot spare drives. Instead, it simply borrows from the available free space in the file system in order to recover from failures; this technique is called virtual hot spare, or VHS.

SmartPools Virtual Hot Spare helps ensure that node pools maintain enough free space to successfully re-protect data in the event of drive failure. Though configured globally, VHS actually operates at the disk pool level so that nodes with different size drives reserve the appropriate VHS space. This helps ensure that, while data may move from one disk pool to another during repair, it remains on the same class of storage.

VHS reservations are cluster wide and configurable as either a percentage of total storage, up to 20%, or from 1 to 4 virtual drives. This reservation works by allocating a fraction of the node pool’s VHS space in each of its constituent disk pools.

Keep in mind that reservations for virtual hot sparing will affect spillover – if, for example, VHS is configured to reserve 10% of a pool’s capacity, spillover will occur at 90% full.

OneFS SMB Drain Support and Safe Disconnects

Introduced in OneFS 9.3, SMB drain support further enhances OneFS non-disruptive upgrades, by allowing for the safe disconnection of SMB clients. In an ideal world, OneFS would be able to seamlessly migrate all SMB clients transparently to non-rebooting nodes. Windows continuous availability (CA) does this natively, but this is not always a viable option given the client SMB3 support requirements, the performance implications of CA, etc.

Because SMB clients may be caching data through the use of oplocks or leases, it is important to ensure that this caching is stopped prior to disconnecting a client. OneFS SMB drain support ensures that, in non-CA cases, an SMB client is able to flush its cache before being disconnected, and, in conjunction with SmartConnect, enables safe migration of SMB clients to non-rebooting nodes in a cluster.

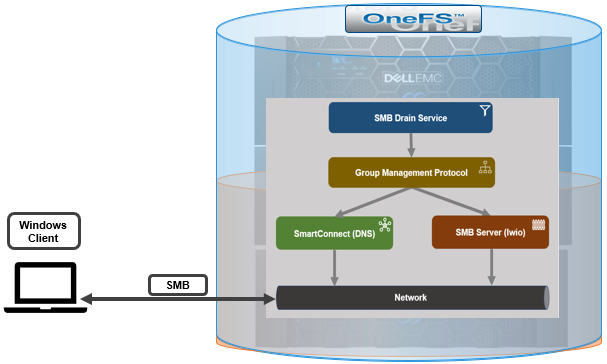
The following diagram illustrates the basic interaction of the SMB server and SmartConnect with the drain service:

Both SmartConnect and SMB detect when the drain service is running on the local node through the OneFS group management protocol (GMP). When the drain service is active, SmartConnect will no longer include the draining node’s IP address in DNS query responses. Then SMB starts the process of disconnecting clients.

GMP indicates whether the drain service is running on a local node, and, if so, SMB will no longer grant new oplocks or leases. So when a new oplock or lease is requested, the server responds indicating a conflict, which prevents the granting of the lock or lease. SMB then starts the process of breaking existing oplocks and leases, by emulating conflicting access. So, in the case of the lease,  OneFS will send a break response to the client, and, depending on the type of lease, will either wait for an acknowledgement of the break or break the lease immediately. The OneFS lwio server continually scans for sessions which have no oplocks or leases, and these sessions can then be drained down and disconnected. Note that an SMB clients with oplocks and leases disabled will automatically be a candidate for disconnection, since no sessions or locks will be detected during the scan. When a session is disconnected, the drain service notes the time of the disconnection and the client’s GUID (in the case of SMB 2 or 3) or its IP address (if SMB1). This information is used to track any reconnecting clients.

Once a Windows client has been disconnected, it typically sends a DNS request and receives  a response with an IP address of a non-draining node to connect to. However, not all SMB clients do this. For example, Linux and MacOS SMB clients will often perform a small number of attempts to reconnect to the previous IP address instead (either due to caching or stubborn client behavior), before declaring a network error. This is obviously undesirable since it results in a user-visible event. So OneFS cannot immediately disconnect reconnecting clients. Instead, the client is allowed to reconnect, but the lwio server starts delaying the responses to ‘session setup’ and ‘tree connect’ requests by 8 seconds by default. So this limits what the client can do after reconnect, and the goal is two persuade it to send a DNS request instead and connect to a non-rebooting node. The responses to negotiate request are not delayed because most clients will automatically consider the lack of a response as a network error and will not retry. If the node happens to reboot before the negotiation response is sent, the client will likely report an error to the user, so OneFS does not delay the response to minimize this possibility. The server still will not allow oplocks and leases to be granted, and will eventually disconnect the client again, after a default 20 seconds since the last time the client was disconnected.

No configuration is required for this SMB drain functionality in OneFS 9.3 and later, and, as such, there are no CLI commands to control it, etc. The drain service is started on the local node and the service is going to go through the process of safely disconnecting the clients. However, there is a OneFS registry parameter which, if necessary, can be used to modify or override the SMB drain behavior via the isi_gconfig CLI command.

For example, to disable SMB draining:

# isi_gconfig registry.Services.lwio.Parameters.Drivers.srv.EnableSessionDraining=0

registry.Services.lwio.Parameters.Drivers.srv.EnableSessionDraining (uint32) = 0

The three configurable values are:

Parameter Default Value Description
EnableSessionDraining Default is ‘enabled’. Global SMB draining on/off switch.
DrainDisconnectTimeout Default is 20 seconds. Controls the minimum time between disconnecting and reconnecting clients.
DrainResponseDelay Default is 8 seconds. Controls the delay period for responses to ‘session setup’ and ‘tree connect’ requests.

Be aware that, unlike DrainDisconnectTimeout which is in seconds, the DrainResponseDelay parameter is expressed in milliseconds (ms):

# isi_gconfig registry.Services.lwio.Parameters.Drivers.srv.DrainResponseDelay

registry.Services.lwio.Parameters.Drivers.srv.DrainResponseDelay (uint32) = 8000

SMB safe disconnect works in concert with OneFS’ drain-based upgrade, which was introduced in OneFS 9.2. Drain-based upgrade provides a mechanism by which nodes are prevented from rebooting or restarting protocol services until all SMB clients have disconnected from the node. A single SMB client that does not disconnect can cause the upgrade to be delayed indefinitely, so the cluster administrator is provided with options to reboot the node despite persisting clients.

As a truly non-disruptive upgrade process, drain-based upgrade can be potentially slower, since it is dependent upon client disconnections. The core OneFS protocols are handled as follows:

Protocol Action
SMB Wait for clients to drain and disconnect before rebooting node
SMB3-CA Witness, drain service → immediate migration → faster upgrade
NFS, HDFS, HTTP, S3 Assumed resilient to rebooting nodes

Drain-based upgrades can be configured and managed via the OneFS WebUI, CLI, and RESTful platform API, and the supported operations include:

  • OneFS upgrades
  • Firmware upgrades
  • Cluster reboots
  • Combined upgrades (OneFS and Firmware)

Drain-based upgrade is predicated upon the parallel upgrade workflow, which offers accelerated upgrades for large clusters by working across OneFS neighborhoods, or fault domains. By concurrently upgrading a node per neighborhood, the more node neighborhoods there are within a cluster the more parallel activity can occur.

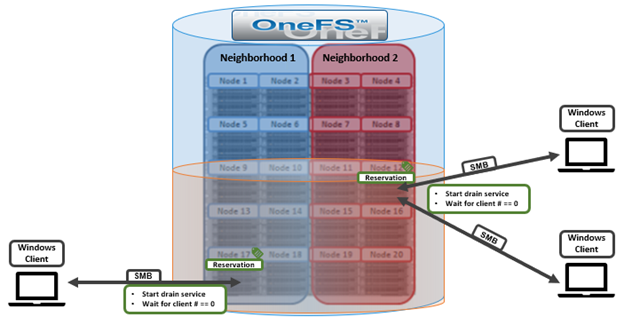
Imagine a PowerScale H700 cluster with five chassis split into two neighborhoods, each containing ten nodes:

Once the drain-based upgrade is started, a maximum of one node from each neighborhood will get the reservation, which allows the nodes to upgrade simultaneously. OneFS will not reboot these nodes until the number of SMB clients is “0”. Say nodes 12 and 17 get the reservation for upgrading at the same time. However, there is one SMB connection to node 17 and two SMB connections to node 12. Neither of these nodes will be able to reboot until their SMB connection count gets to “0”. At this point, there are three options available:

Drain Action Description
Wait Wait until the SMB connection count reaches “0” or it hits the drain timeout value. The drain timeout value is a configurable parameter for each upgrade process. It is the maximum waiting period. If drain timeout is set to “0”, it means wait forever.
Delay drain Add the node into the delay list to delay client draining. The upgrade process will continue on another node in this neighborhood. After all the non-delayed nodes are upgraded, OneFS will rewind to the node in the delay list.
Skip drain Stop waiting for clients to migrate away from the draining node and reboot immediately.

The ‘isi upgrade cluster drain’ CLI command syntax can be used to manage client draining per-node. For example, to configure node 1 in the cluster to delay draining:

# isi upgrade cluster drain delay add 1

The node(s) will delay draining active SMB client connections (until all nodes in the same neighborhood have finished draining). Are you sure? (yes/[no]): yes

# isi upgrade cluster drain delay list

LNN

----

1

The following CLI syntax can be used to confirm whether there are any active SMB connections. In this case, node 1 has one connected Windows client:

# isi statistics query current --keys=node.clientstats.connected.smb

Node  node.clientstats.connected.smb

-------------------------------------

    1                               1

-------------------------------------

The ‘isi upgrade’ CLI command syntax can be used to perform the drain-based upgrade, and now includes flags for configuring drain-timeout and alert-timeout. In this example setting each to value 60 minutes and 45 minutes respectively. As such, if there is still an SMB connection after 45 minutes, a CELOG alert will be triggered to notify the cluster administrator. And after an hour, any remaining SMB connections will be dropped, and the node upgrade reboot will continue.

# isi upgrade start --parallel --skip-optional --install-image-path=/ifs /data/<installation-file-name> --drain-timeout=60m --alert-timeout=45m

From the OneFS WebUI, the same can be achieved by navigating to Upgrade under Cluster management.