OneFS Firewall

Among the array of security features introduced in OneFS 9.5 is a new host-based firewall. This firewall allows cluster administrators to configure policies and rules on a PowerScale cluster in order to meet the network and application management needs and security mandates of an organization.

The OneFS firewall protects the cluster’s external, or front-end, network and operates as a packet filter for inbound traffic. It is available upon installation or upgrade to OneFS 9.5, but is disabled by default in both cases. However, the OneFS STIG hardening profile automatically enables the firewall and the default policies, in addition to manual activation.

The firewall generally manages IP packet filtering in accordance with the OneFS Security Configuration Guide, especially in regards to the network port usage. Packet control is governed by firewall policies, which are comprised of one or more individual rules.

Item Description Match Action
Firewall Policy Each policy is a set of firewall rules. Rules are matched by index in ascending order Each policy has a default action.
Firewall Rule Each rule specifies what kinds of network packets should be matched by Firewall engine and what action should be taken upon them. Matching criteria includes protocol, source ports, destination ports, source network address) Options are ‘allow’, ‘deny’ or ‘reject’.

A security best practice is to enable the OneFS firewall using the default policies, with any adjustments as required. The recommended configuration process is as follows:

Step Details
1.  Access Ensure that the cluster uses a default SSH or HTTP port before enabling. The default firewall policies block all nondefault ports until you change the policies.
2.  Enable Enable the OneFS firewall.
3.  Compare Compare your cluster network port configurations against the default ports listed in Network port usage.
4.  Configure Edit the default firewall policies to accommodate any non-standard ports in use in the cluster. NOTE: The firewall policies do not automatically update when port configurations are changed.
5.  Constrain Limit access to the OneFS Web UI to specific administrator terminals

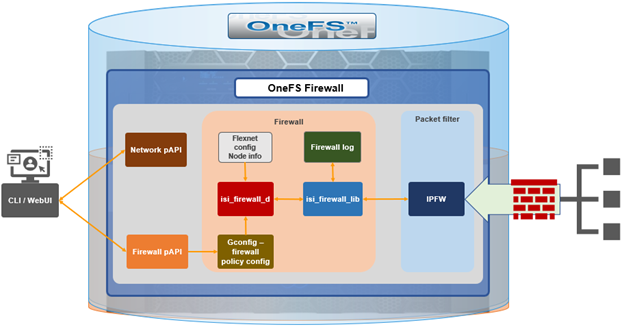
Under the hood, the OneFS firewall is built upon the ubiquitous ‘ipfirewall’, or ‘ipfw’, which is FreeBSD’s native stateful firewall, packet filter and traffic accounting facility.

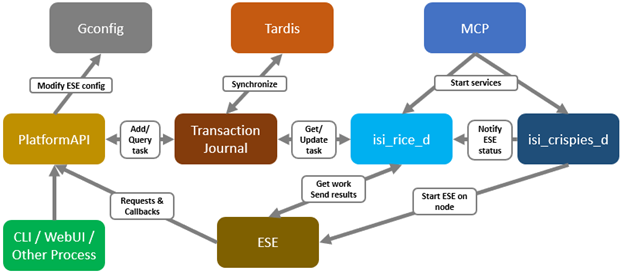
Firewall configuration and management is via the CLI, or platform API, or WebUI and OneFS 9.5 introduces a new Firewall Configuration page to support this. Note that the firewall is only available once a cluster is already running OneFS 9.5 and the feature has been manually enabled, activating the isi_firewall_d service. The firewall’s configuration is split between gconfig, which handles the settings and policies, and the ipfw table, which stores the rules themselves.

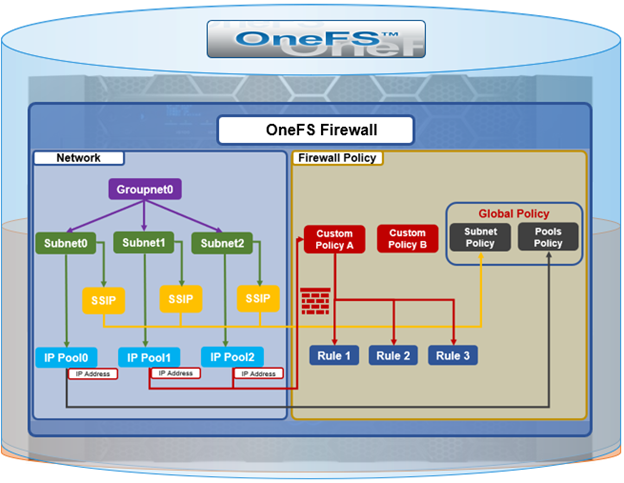
The firewall gracefully handles any SmartConnect dynamic IP movement between nodes since firewall policies are applied per network pool. Additionally, being network pool based allows the firewall to support OneFS access zones and shared/multitenancy models.

The individual firewall rules, which are essentially simplified wrappers around ipfw rules, work by matching packets via the 5-tuples that uniquely identify an IPv4 UDP or TCP session:

  • Source IP address
  • Source port
  • Destination IP address
  • Destination port
  • Transport protocol

The rules are then organized within a firewall policy, which can be applied to one or more network pools.

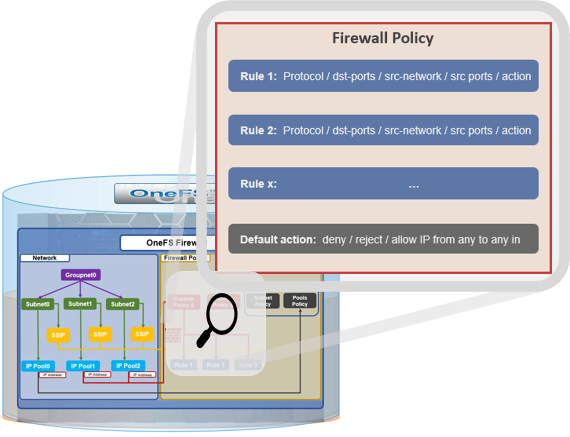
Note that each pool can only have a single firewall policy applied to it. If there is no custom firewall policy configured for a network pool, it automatically uses the global default firewall policy.

When enabled, the OneFS firewall function is cluster wide, and all inbound packets from external interfaces will go through either the custom policy or default global policy before reaching the protocol handling pathways. Packets passed to the firewall are compared against each of the rules in the policy, in rule-number order. Multiple rules with the same number are permitted, in which case they are processed in order of insertion. When a match is found, the action corresponding to that matching rule is performed. A packet is checked against the active ruleset in multiple places in the protocol stack, and the basic flow is as follows:

  1. Get the logical interface for incoming packets
  2. Find all network pools assigned to this interface
  3. Compare these network pools one by one with destination IP address to find the matching pool (either custom firewall policy, or default global policy).
  4. Compare each rule with service (protocol & destination ports) & source IP address in this pool from in order of lowest index value.  If matched, perform actions according to the associated rule.
  5. If no rule matches, go to the final rule (deny all or allow all) which is specified upon policy creation.

The OneFS firewall automatically reserves 20,000 rules in the ipfw table for its custom and default policies and rules. By default, each policy can gave a maximum of 100 rules, including one default rule. This translates to an effective maximum of 99 user-defined rules per policy, because the default rule is reserved and cannot be modified. As such, a maximum of 198 policies can be applied to pools or subnets since the default-pools-policy and default-subnets-policy are reserved and cannot be deleted.

Additional firewall bounds and limits to keep in mind include:

Name Value Description
MAX_INTERFACES 500 Maximum number of Layer 2 interfaces per node (including Ethernet, VLAN, LAGG interfaces).
MAX _SUBNETS 100 Maximum number of subnets within a OneFS cluster
MAX_POOLS 100 Maximum number of network pools within a OneFS cluster
DEFAULT_MAX_RULES 100 Default value of maximum rules within a firewall policy
MAX_RULES 200 Upper limit of maximum rules within a firewall policy
MAX_ACTIVE_RULES 5000 Upper limit of total active rules across the whole cluster
MAX_INACTIVE_POLICIES 200 Maximum number of policies which are not applied to any network subnet or pool. They will not be written into ipfw table.

The firewall default global policy is ready to use out of box and, unless a custom policy has been explicitly configured, all network pools use this global policy. Custom policies can be configured by either cloning and modifying an existing policy or creating one from scratch.

Component Description
Custom policy A user-defined container with a set of rules. A policy can be applied to multiple network pools, but a network pool can only apply one policy.


Firewall rule An ipfw-like rule which can be used to restrict remote access. Each rule has an index which is valid within the policy. Index values range from 1 to 99, with lower numbers having higher priority. Source networks are described by IP and netmask, and services can be expressed either by port number (ie. 80) or service name (ie. http,ssh,smb). The ‘*‘ wildcard can also be used to denote all services. Supported actions include ‘allow’, ‘drop’ and ‘reject’.
Default policy A global policy to manage all default services, used for maintaining OneFS minimum running and management. While ‘Deny any‘ is the default action of the policy, the defined service rules have a default action to ‘allow all remote access’. All packets not matching any of the rules are automatically dropped.

Two default policies: 

·         default-pools-policy

·         default-subnets-policy

Note that these two default policies cannot be deleted, but individual rule modification is permitted in each.

Default services The firewall’s default pre-defined services include the usual suspects, such as: DNS, FTP, HDFS, HTTP, HTTPS, ICMP, NDMP, NFS, NTP, S3, SMB, SNMP, SSH, etc. A full listing is available via the ‘isi network firewall services list’ CLI command output.

For a given network pool, either the global policy or a custom policy is assigned and takes effect. Additionally, all configuration changes to either policy type are managed by gconfig and are persistent across cluster reboots.

In the next article in this series we’ll take a look at the configuration and management of the OneFS firewall.

OneFS Snapshot Security

In this era of elevated cyber-crime and data security threats, there is increasing demand for immutable, tamper-proof snapshots. Often this need arises as part of a broader security mandate, ideally proactively, but oftentimes as a response to a security incident. OneFS addresses this requirement in the following ways:

On-cluster Off-cluster
·         Read-only snapshots

·         Snapshot locks

·         Role-based administration

·         SyncIQ snapshot replication

·         Cyber-vaulting


  1. Read-only snapshots

At its core, OneFS SnapshotIQ generates read-only, point-in-time, space efficient copies of a defined subset of a cluster’s data.

Only the changed blocks of a file are stored when updating OneFS snapshots, ensuring efficient storage utilization. They are also highly scalable and typically take less than a second to create, while generating little performance overhead. As such, the RPO (recovery point objective) and RTO (recovery time objective) of a OneFS snapshot can be very small and highly flexible, with the use of rich policies and schedules.

OneFS Snapshots are created manually, via a scheduled, or automatically generated by OneFS to facilitate system operations. But whatever the generation method, once a snapshot has been taken, its contents cannot be manually altered.

  1. Snapshot Locks

In addition to snapshot contents immutability, for an enhanced level of tamper-proofing, SnapshotIQ also provides the ability to lock snapshots with the ‘isi snapshot locks’ CLI syntax. This prevents snapshots from being accidentally or unintentionally deleted.

For example, a manual snapshot, ‘snaploc1’ is taken of /ifs/test:

# isi snapshot snapshots create /ifs/test --name snaploc1

# isi snapshot snapshots list | grep snaploc1

79188 snaploc1                                     /ifs/test

A lock is then placed on it (in this case lock ID=1):

# isi snapshot locks create snaplock1

# isi snapshot locks list snaploc1

ID

----

1

----

Total: 1

Attempts to delete the snapshot fails because the lock prevents its removal:

# isi snapshot snapshots delete snaploc1

Are you sure? (yes/[no]): yes

Snapshot "snaploc1" can't be deleted because it is locked

The CLI command ‘isi snapshot locks delete <lock_ID>’ can be used to clear existing snapshot locks, if desired. For example,  to remove the only lock (ID=1) from snapshot ‘snaploc1’:

# isi snapshot locks list snaploc1

ID

----

1

----

Total: 1

# isi snapshot locks delete snaploc1 1

Are you sure you want to delete snapshot lock 1 from snaploc1? (yes/[no]): yes

# isi snap locks view snaploc1 1

No such lock

Once the lock is removed, the snapshot can then be deleted:

# isi snapshot snapshots delete snaploc1

Are you sure? (yes/[no]): yes

# isi snapshot snapshots list| grep -i snaploc1 | wc -l

       0

Note that a snapshot can have up to a maximum of sixteen locks on it at any time. Also, lock numbers are continually incremented and not recycled upon deletion.

Like snapshot expiry, snapshot locks can also have an expiry time configured. For example, to set a lock on snapshot ‘snaploc1’ that expires at 1am on April 1st April, 2024:

# isi snap lock create snaploc1 --expires '2024-04-01T01:00:00'

# isi snap lock list snaploc1

ID

----

36

----

Total: 1

# isi snap lock view snaploc1 33

     ID: 36

Comment:

Expires: 2024-04-01T01:00:00

  Count: 1

Note that if the duration period of a particular snapshot lock expires but others remain, OneFS will not delete that snapshot until all the locks on it have been deleted or expired.

The following table provides an example snapshot expiration schedule, with monthly locked snapshots to prevent deletion:

Snapshot Frequency Snapshot Time Snapshot Expiration Max Retained Snapshots
Every other hour Start at 12:00AM

End at 11:59AM

1 day 27
Every day At 12:00AM 1 week
Every week Saturday at 12:00AM 1 month
Every month First Saturday of month at 12:00AM Locked

3. Roles-based Access Control

Read-only snapshots plus locks present physically secure snapshots on a cluster. However, if you are able to login to the cluster and have the required elevated administrator privileges to do so, you can still remove locks and/or delete snapshots.

Since data security threats come from inside an environment as well as out, such as from a disgruntled IT employee or other internal bad actor, another key to a robust security profile is to constrain the use of all-powerful ‘root’, ‘administrator’, and ‘sudo’ accounts as much as possible. Instead, of granting cluster admins full rights, a preferred security best practice is to leverage the comprehensive authentication, authorization, and accounting framework that OneFS natively provides.

OneFS role-based access control (RBAC) can be used to explicitly limit who has access to manage and delete snapshots. This granular control allows administrative roles to be crafted which can create and manage snapshot schedules, but prevent their unlocking and/or deletion. Similarly, lock removal and snapshot deletion can be isolated to a specific security role (or to root only).

A cluster security administrator selects the desired access zone, creates a zone-aware role within it, assigns privileges, and then assigns members.

For example, from the WebUI under Access > Membership and roles > Roles:

When these members login to the cluster via a configuration interface (WebUI, Platform API, or CLI) they inherit their assigned privileges.

The specific privileges that can be used to segment OneFS snapshot management include:

Privilege Description
ISI_PRIV_SNAPSHOT_ALIAS Aliasing for snapshots
ISI_PRIV_SNAPSHOT_LOCKS Locking of snapshots from deletion
ISI_PRIV_SNAPSHOT_PENDING Upcoming snapshot based on schedules
ISI_PRIV_SNAPSHOT_RESTORE Restoring directory to a particular snapshot
ISI_PRIV_SNAPSHOT_SCHEDULES Scheduling for periodic snapshots
ISI_PRIV_SNAPSHOT_SETTING Service and access settings
ISI_PRIV_SNAPSHOT_SNAPSHOTMANAGEMENT Manual snapshots and locks
ISI_PRIV_SNAPSHOT_SNAPSHOT_SUMMARY Snapshot summary and usage details

Each privilege can be assigned one of four permission levels for a role, including:

Permission Indicator Description
No permission.
R Read-only permission.
X Execute permission.
W Write permission.

The ability for a user to delete a snapshot is governed by the ‘ISI_PRIV_SNAPSHOT_SNAPSHOTMANAGEMENT’ privilege.  Similarly, the ‘ISI_PRIV_SNAPSHOT_LOCKS’ governs lock creation and removal.

In the following example, the ‘snap’ role has ‘read’ rights for the ‘ISI_PRIV_SNAPSHOT_LOCKS’ privilege, allowing a user associated with this role to view snapshot locks:

# isi auth roles view snap | grep -I -A 1 locks

             ID: ISI_PRIV_SNAPSHOT_LOCKS

     Permission: r

--

# isi snapshot locks list snaploc1

ID

----

1

----

Total: 1

However, attempts to remove the lock ‘ID 1’ from the ‘snaploc1’ snapshot fail without write privileges:

# isi snapshot locks delete snaploc1 1

Privilege check failed. The following write privilege is required: Snapshot locks (ISI_PRIV_SNAPSHOT_LOCKS)

Write privileges are added to ‘ISI_PRIV_SNAPSHOT_LOCKS’ in the ‘’snaploc1’ role:

# isi auth roles modify snap –-add-priv-write ISI_PRIV_SNAPSHOT_LOCKS

# isi auth roles view snap | grep -I -A 1 locks

             ID: ISI_PRIV_SNAPSHOT_LOCKS

     Permission: w

--

This allows the lock ‘ID 1’ to be successfully deleted from the ‘snaploc1’ snapshot:

# isi snapshot locks delete snaploc1 1

Are you sure you want to delete snapshot lock 1 from snaploc1? (yes/[no]): yes

# isi snap locks view snaploc1 1

No such lock

Using OneFS RBAC, an enhanced security approach for a site could be to create three OneFS roles on a cluster, each with an increasing realm of trust:

a.  First, an IT ops/helpdesk role with ‘read’ access to the snapshot attributes would permit monitoring and troubleshooting, but no changes:

Snapshot Privilege Permission
ISI_PRIV_SNAPSHOT_ALIAS Read
ISI_PRIV_SNAPSHOT_LOCKS Read
ISI_PRIV_SNAPSHOT_PENDING Read
ISI_PRIV_SNAPSHOT_RESTORE Read
ISI_PRIV_SNAPSHOT_SCHEDULES Read
ISI_PRIV_SNAPSHOT_SETTING Read
ISI_PRIV_SNAPSHOT_SNAPSHOTMANAGEMENT Read
ISI_PRIV_SNAPSHOT_SNAPSHOT_SUMMARY Read

b.  Next, a cluster admin role, with ‘read’ privileges for ‘ISI_PRIV_SNAPSHOT_LOCKS’ and ‘ISI_PRIV_SNAPSHOT_SNAPSHOTMANAGEMENT’ would prevent snapshot and lock deletion, but provide ‘write’ access for schedule configuration, restores, etc..

Snapshot Privilege Permission
ISI_PRIV_SNAPSHOT_ALIAS Write
ISI_PRIV_SNAPSHOT_LOCKS Read
ISI_PRIV_SNAPSHOT_PENDING Write
ISI_PRIV_SNAPSHOT_RESTORE Write
ISI_PRIV_SNAPSHOT_SCHEDULES Write
ISI_PRIV_SNAPSHOT_SETTING Write
ISI_PRIV_SNAPSHOT_SNAPSHOTMANAGEMENT Read
ISI_PRIV_SNAPSHOT_SNAPSHOT_SUMMARY Write

c.  Finally, a cluster security admin role (root equivalence) would provide full snapshot configuration and management, lock control, and deletion rights:

Snapshot Privilege Permission
ISI_PRIV_SNAPSHOT_ALIAS Write
ISI_PRIV_SNAPSHOT_LOCKS Write
ISI_PRIV_SNAPSHOT_PENDING Write
ISI_PRIV_SNAPSHOT_RESTORE Write
ISI_PRIV_SNAPSHOT_SCHEDULES Write
ISI_PRIV_SNAPSHOT_SETTING Write
ISI_PRIV_SNAPSHOT_SNAPSHOTMANAGEMENT Write
ISI_PRIV_SNAPSHOT_SNAPSHOT_SUMMARY Write

Note that when configuring OneFS RBAC, remember to remove the ‘ISI_PRIV_AUTH’ and ‘ISI_PRIV_ROLE’ privilege from all but the most trusted administrators.

Additionally, enterprise security management tools such as CyberArk can also be incorporated to manage authentication and access control holistically across an environment. These can be configured to frequently change passwords on trusted accounts (ie. every hour or so), require multi-Level approvals prior to retrieving passwords, as well as track and audit password requests and trends.

While this article focuses exclusively on OneFS snapshots, the expanded use of RBAC granular privileges for enhanced security is germane to most key areas of cluster management and data protection, such as SyncIQ replication, etc.

  1. Snapshot replication

In addition to utilizing snapshots for its own checkpointing system, SyncIQ, the OneFS data replication engine, supports snapshot replication to a target cluster.

OneFS SyncIQ replication policies contain an option for triggering a replication policy when a snapshot of the source directory is completed. Additionally, at the onset of a new policy configuration, when the “Whenever a Snapshot of the Source Directory is Taken” option is selected, a checkbox appears to enable any existing snapshots in the source directory to be replicated. More information is available in this SyncIQ paper.

  1. Cyber-vaulting

File data is arguably the most difficult to protect, because:

  • It is the only type of data where potentially all employees have a direct connection to the storage (with the other type of storage it’s via an application)
  • File data is linked (or mounted) to the operating system of the client. This means that it’s sufficient to gain file access to the OS to get access to potentially critical data.
  • Users are the largest breach points that happen.

The Cyber Security Framework (CSF) from the National Institute of Standards and Technology (NIST) categorizes the threat through recovery process:

Within the ‘Protect’ phase, there are two core aspects:

  • Applying all the core protection features available on the OneFS platform, namely:
Feature Description
Access control Where the core data protection functions are being executed. Assess who actually needs write access.
Immutability Having immutable snapshots, replica versions, etc. Augmenting backup strategy with an archiving strategy with SmartLock WORM.
Encryption Encrypting both data in-flight and data at rest.
Anti-virus Integrating with anti-virus/anti-malware protection that does content inspection.
Security advisories Dell Security Advisories (DSA) inform about fixes to common vulnerabilities and exposures.


  • Data isolation provides a last resort copy of business critical data, and can be achieved by using an air gap to isolate the cyber vault copy of the data. The vault copy is logically separated from the production copy of the data. Data syncing happens only intermittently by closing the airgap after ensuring there are no known issues.

The combination of OneFS snapshots and SyncIQ replication allows for granular data recovery. This means that only the affected files are recovered, while the most recent changes are preserved for the unaffected data. While an on-prem air-gapped cyber vault can still provide secure network isolation, in the event of an attack, the ability to failover to a fully operational ‘clean slate’ remote site provides additional security and peace of mind.

We’ll explore PowerScale cyber protection and recovery in more depth in a future article.

OneFS SupportAssist Management and Troubleshooting

In this final article in the OneFS SupportAssist series, we turn our attention to management and troubleshooting.

Once the provisioning process above is complete, the ‘isi supportassist settings view’ CLI command reports the status and health of SupportAssist operations on the cluster.

# isi supportassist settings view

        Service enabled: Yes

       Connection State: enabled

      OneFS Software ID: xxxxxxxxxx

          Network Pools: subnet0:pool0

        Connection mode: direct

           Gateway host: -

           Gateway port: -

    Backup Gateway host: -

    Backup Gateway port: -

  Enable Remote Support: Yes

Automatic Case Creation: Yes

       Download enabled: Yes

This can also be obtained from the WebUI by navigating to Cluster management > General settings > SupportAssist:

There are some caveats and considerations to keep in mind when upgrading to OneFS 9.5 and enabling SupportAssist, including:

  • SupportAssist is disabled when STIG Hardening applied to cluster
  • Using SupportAssist on a hardened cluster is not supported
  • Clusters with the OneFS network firewall enabled (‘isi network firewall settings’) may need to allow outbound traffic on port 9443.
  • SupportAssist is supported on a cluster that’s running in Compliance mode
  • Secure keys are held in Key manager under the RICE domain

Also, note that ESRS can no longer be used after SupportAssist has been provisioned on a cluster.

SupportAssist has a variety of components that gather and transmit various pieces of OneFS data and telemetry to Dell Support and backend services through the Embedded Service Enabler (ESE.  These workflows include CELOG events; In-product activation (IPA) information; CloudIQ telemetry data; Isi-Gather-info (IGI) logsets; and provisioning, configuration, and authentication data to ESE and the various backend services.

Activity Information
Events and alerts SupportAssist can be configured to send CELOG events..
Diagnostics The OneFS isi diagnostics gather and isi_gather_info logfile collation and transmission commands have a SupportAssist option.
Healthchecks HealthCheck definitions are updated using SupportAssist.
License Activation The isi license activation start command uses SupportAssist to connect.
Remote Support Remote Support uses SupportAssist and the Connectivity Hub to assist customers with their clusters.
Telemetry CloudIQ telemetry data is sent using SupportAssist.

CELOG

Once SupportAssist is up and running, it can be configured to send CELOG events and attachments via ESE to CLM. This can be managed by the ‘isi event channels’ CLI command syntax. For example:

# isi event channels list

ID   Name                Type          Enabled

-----------------------------------------------

1    RemoteSupport       connectemc    No

2    Heartbeat Self-Test heartbeat     Yes

3    SupportAssist       supportassist No

-----------------------------------------------

Total: 3

# isi event channels view SupportAssist

     ID: 3

   Name: SupportAssist

   Type: supportassist

Enabled: No

Or from the WebUI:

CloudIQ Telemetry

In OneFS 9.5, SupportAssist provides an option to send telemetry data to CloudIQ. This can be enabled from the CLI as follows;

# isi supportassist telemetry modify --telemetry-enabled 1 --telemetry-persist 0

# isi supportassist telemetry view

        Telemetry Enabled: Yes

        Telemetry Persist: No

        Telemetry Threads: 8

Offline Collection Period: 7200

Or via the SupportAssist WebUI:


Diagnostics Gather

Also in OneFS 9.5, the ‘isi diagnostics gather’ and ‘isi_gather_info’ CLI commands both now include a ‘–supportassist’ upload option for log gathers, which also allows them to continue to function when the cluster is unhealthy via a new ‘Emergency mode’. For example, to start a gather from the CLI that will be uploaded via SupportAssist:

# isi diagnostics gather start –supportassist 1

Similarly, for the isi_gather_info utility:

# isi_gather_info --supportassist

Or to explicitly avoid using SupportAssist for ISI gather info log gather upload:

# isi_gather_info --nosupportassist

This can also be configured from the WebUI via Cluster management > General configuration > Diagnostics > Gather:


License Activation

A cluster’s product licenses can also be managed through SupportAssist in OneFS 9.5.

PowerScale License Activation (previously known as In-Product Activation) facilitates the management of the cluster’s entitlements and licenses by communicating directly with Software Licensing Central via SupportAssist.

To activate OneFS product licenses through the SupportAssist WebUI, navigate to Cluster management > Licensing. For example, on a new cluster without any signed licenses:

Click the button Update & Refresh in the License Activation section. In the ‘Activation File Wizard’, select the desired software modules.

Next select ‘Review changes’, review, click ‘Proceed’, and finally ‘Activate’.

Note that it can take up to 24 hours for the activation to occur.

Alternatively, cluster License activation codes (LAC) can also be added manually.

Troubleshooting

When it comes to troubleshooting SupportAssist, the basic process flow is as follows:

The OneFS components and services above are:

Component Info
ESE Embedded Service Enabler.
isi_rice_d Remote Information Connectivity Engine (RICE).
isi_crispies_d Coordinator for RICE Incidental Service Peripherals including ESE Start.
Gconfig OneFS centralized configuration infrastructure.
MCP Master Control Program – starts, monitors, and restarts OneFS services.
Tardis Configuration service and database.
Transaction journal Task manager for RICE.


Of these, ESE, isi_crispies_d, isi_rice_d, and the Transaction Journal are new in OneFS 9.5 and exclusive to SupportAssist. In contrast, Gconfig, MCP, and Tardis are all legacy services that are used by multiple other OneFS components.

For its connectivity, SupportAssist elects a single leader single node within the subnet pool, and NANON nodes are automatically avoided. Ports 443 and 8443 are required to be open for bi-directional communication between the cluster and Connectivity Hub, and port 9443 is for communicating with a gateway. The SupportAssist ESE component communicates with a number of Dell backend services, including SRS, Connectivity Hub, ELMS licensing, CloudIQ, ESE, etc.

As such, debugging backend issues may involve one or more services, and Dell Support can assist with this process.

The main log files for investigating and troubleshooting SupportAssist issues and idiosyncrasies are isi_rice_d.log and isi_crispies_d.log. These is also an ese_log, which can be useful, too. These can be found at:

Component Logfile Location Info
Rice /var/log/isi_rice_d.log Per node
Crispies /var/log/isi_crispies_d.log Per node
ESE /ifs/.ifsvar/ese/var/log/ESE.log Cluster-wise for single instance ESE


Debug level logging can be configured from the CLI as follows:

# isi_for_array isi_ilog -a isi_crispies_d --level=debug+

# isi_for_array isi_ilog -a isi_rice_d --level=debug+

Note that the OneFS log gathers (such as the output from the isi_gather_info utility) will capture all the above log files, plus the pertinent SupportAssist Gconfig contexts and Tardis namespaces, for later analysis.

If needed, the Rice and ESE configurations can also be viewed as follows:

# isi_gconfig -t ese

[root] {version:1}

ese.mode (char*) = direct

ese.connection_state (char*) = disabled

ese.enable_remote_support (bool) = true

ese.automatic_case_creation (bool) = true

ese.event_muted (bool) = false

ese.primary_contact.first_name (char*) =

ese.primary_contact.last_name (char*) =

ese.primary_contact.email (char*) =

ese.primary_contact.phone (char*) =

ese.primary_contact.language (char*) =

ese.secondary_contact.first_name (char*) =

ese.secondary_contact.last_name (char*) =

ese.secondary_contact.email (char*) =

ese.secondary_contact.phone (char*) =

ese.secondary_contact.language (char*) =

(empty dir ese.gateway_endpoints)

ese.defaultBackendType (char*) = srs

ese.ipAddress (char*) = 127.0.0.1

ese.useSSL (bool) = true

ese.srsPrefix (char*) = /esrs/{version}/devices

ese.directEndpointsUseProxy (bool) = false

ese.enableDataItemApi (bool) = true

ese.usingBuiltinConfig (bool) = false

ese.productFrontendPrefix (char*) = platform/16/supportassist

ese.productFrontendType (char*) = webrest

ese.contractVersion (char*) = 1.0

ese.systemMode (char*) = normal

ese.srsTransferType (char*) = ISILON-GW

ese.targetEnvironment (char*) = PROD

And for Rice:

# isi_gconfig -t rice

[root] {version:1}

rice.enabled (bool) = false

rice.ese_provisioned (bool) = false

rice.hardware_key_present (bool) = false

rice.supportassist_dismissed (bool) = false

rice.eligible_lnns (char*) = []

rice.instance_swid (char*) =

rice.task_prune_interval (int) = 86400

rice.last_task_prune_time (uint) = 0

rice.event_prune_max_items (int) = 100

rice.event_prune_days_to_keep (int) = 30

rice.jnl_tasks_prune_max_items (int) = 100

rice.jnl_tasks_prune_days_to_keep (int) = 30

rice.config_reserved_workers (int) = 1

rice.event_reserved_workers (int) = 1

rice.telemetry_reserved_workers (int) = 1

rice.license_reserved_workers (int) = 1

rice.log_reserved_workers (int) = 1

rice.download_reserved_workers (int) = 1

rice.misc_task_workers (int) = 3

rice.accepted_terms (bool) = false

(empty dir rice.network_pools)

rice.telemetry_enabled (bool) = true

rice.telemetry_persist (bool) = false

rice.telemetry_threads (uint) = 8

rice.enable_download (bool) = true

rice.init_performed (bool) = false

rice.ese_disconnect_alert_timeout (int) = 14400

rice.offline_collection_period (uint) = 7200

The ‘-q’ flag can also be used in conjunction with the isi_gconfig command to identify any values that are not at their default settings. For example, the stock (default) Rice gconfig context will not report any configuration entries:

# isi_gconfig -q -t rice

[root] {version:1}

OneFS SupportAssist Provisioning – Part 2

In the previous article in this OneFS SupportAssist series, we reviewed the off-cluster prerequisites for enabling OneFS SupportAssist:

  1. Upgrading the cluster to OneFS 9.5.
  2. Obtaining the secure access key and PIN.
  3. Selecting either direct connectivity or gateway connectivity.
  4. If using gateway connectivity, installing Secure Connect Gateway v5.x.

In this article, we turn our attention to step 5 – provisioning SupportAssist on the cluster.

Note that, as part of this process, we’ll be using the access key and PIN credentials previously obtained from the Dell Support portal in step 2 above.

Provisioning SupportAssist on a cluster

SupportAssist can be configured from the OneFS 9.5 WebUI by navigating to ‘Cluster management > General settings > SupportAssist’. To initiate the provisioning process on a cluster, click on the ‘Connect SupportAssist’ link, as below:

Note that if SupportAssist is unconfigured, the Remote Support page displays the following banner warning of the future deprecation of SRS:

Similarly, when unconfigured, the SupportAssist WebUI page also displays verbiage recommending the adoption of SupportAssist:

There is also a ‘Connect SupportAssist’ button to begin the provisioning process.

  1. Accepting the telemetry notice.

Selecting the ‘Configure SupportAssist’ button initiates the following setup wizard. The first step requires checking and accepting the Infrastructure Telemetry Notice:


  1. Support Contract.

For the next step, enter the details for the primary support contact, as prompted:

Or from the CLI using the ‘isi supportassist contacts’ command set. For example:

# isi supportassist contacts modify --primary-first-name=Nick --primary-last-name=Trimbee --primary-email=trimbn@isilon.com


  1. Establish Connections.

Next, complete the ‘Establish Connections’ page

This involves the following steps:

  • Selecting the network pool(s).
  • Adding the secure access key and PIN,
  • Configuring either direct or gateway access
  • Selecting whether to allow remote support, CloudIQ telemetry, and auto case creation.

a.  Select network pool(s).

At least one statically-allocated IPv4 network subnet and pool is required for provisioning SupportAssist. As of OneFS 9.5, does not support IPv6 networking for SupportAssist remote connectivity. However, IPv6 support is planned for a future release.

Select one or more network pools or subnets from the options displayed. For example, in this case ‘subnet0pool0’:

Or from the CLI:

Select one or more static subnet/pools for outbound communication. This can be performed via the following CLI syntax:

# isi supportassist settings modify --network-pools="subnet0.pool0"

Additionally, if the cluster has the OneFS 9.5 network firewall enabled (‘isi network firewall settings’), ensure that outbound traffic is allowed on port 9443.

b.  Add secure access key and PIN.

In this next step, add the secure access key and pin. These should have been obtained in an earlier step in the provisioning procedure from the following Dell Support site: https://www.dell.com/support/connectivity/product/isilon-onefs.:

Alternatively, if configuring SupportAssist via the OneFS CLI, add the key and pin via the following syntax:

# isi supportassist provision start --access-key <key> --pin <pin>


c.  Configure access.

  i.  Direct access.

From the WebUI, under ‘Cluster management > General settings > SupportAssist’ select the ‘Connect directly’ button:

Or from the CLI. For example, to configure direct access (the default), ensure the following parameter is set:

# isi supportassist settings modify --connection-mode direct

# isi supportassist settings view | grep -i "connection mode"

        Connection mode: direct

  ii.  Gateway access.

Alternatively, to connect via a gateway, check the ‘Connect via Secure Connect Gateway’ button:

Complete the ‘gateway host’ and ‘gateway port’ fields as appropriate for the environment.

Alternatively, to set up a gateway configuration from the CLI, use the ‘isi supportassist settings modify’ syntax. For example, to configure using the gateway FQDN ‘secure-connect-gateway.yourdomain.com’ and the default port ‘9443’:

# isi supportassist settings modify --connection-mode gateway

# isi supportassist settings view | grep -i "connection mode"

        Connection mode: gateway

# isi supportassist settings modify --gateway-host secure-connect-gateway.yourdomain.com --gateway-port 9443

When setting up the gateway connectivity option, Secure Connect Gateway v5.0 or later must be deployed within the data center. Note that SupportAssist is incompatible with either ESRS gateway v3.52 or SAE gateway v4. However, Secure Connect Gateway v5.x is backwards compatible with PowerScale OneFS ESRS, which allows the gateway to be provisioned and configured ahead of a cluster upgrade to OneFS 9.5.


d.  Configure support options.

Finally, configure the desired support options:

When complete, the WebUI will confirm that SmartConnect is successfully configured and enabled, as follows:

Or from the CLI:

# isi supportassist settings view

        Service enabled: Yes

       Connection State: enabled

      OneFS Software ID: ELMISL0223BJJC

          Network Pools: subnet0.pool0, subnet0.testpool1, subnet0.testpool2, subnet0.testpool3, subnet0.testpool4

        Connection mode: gateway

           Gateway host: eng-sea-scgv5stg3.west.isilon.com

           Gateway port: 9443

    Backup Gateway host: eng-sea-scgv5stg.west.isilon.com

    Backup Gateway port: 9443

  Enable Remote Support: Yes

Automatic Case Creation: Yes

       Download enabled: Yes