OneFS SMB Redirector Encryption

As on-the-wire encryption becomes increasingly commonplace, and often mandated via regulatory compliance security requirements, the policies applied in enterprise networks are rapidly shifting towards fully encrypting all traffic.

The OneFS SMB protocol implementation (lwio) has supported encryption for Windows and other SMB client connections to a PowerScale cluster since OneFS 8.1.1, as detailed in this article.

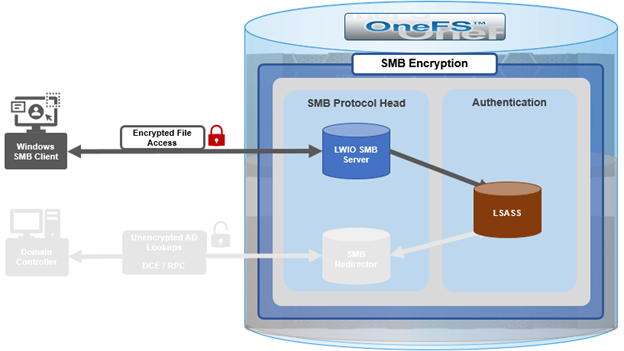
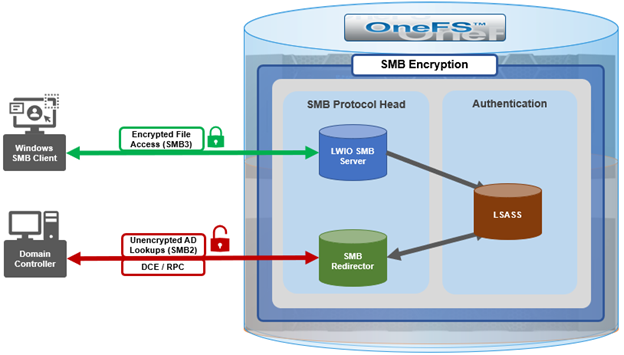
However, prior to OneFS 9.5, this did not include encrypted communications between the SMB redirector and Active Directory (AD) domain controller (DC). While Microsoft added support for SMB encryption in SMB 3.0, the redirector in OneFS 9.4 and prior releases only supported Microsoft’s earlier SMB 2.002 dialect.

When OneFS connects to Active Directory for tasks requiring remote procedure calls (RPCs), such as joining a domain, NTLM authentication, or resolving usernames and SIDs, these SMB connections are established from OneFS as the client connecting to a domain controller server.

As outlined in the Windows SMB security documentation, by default, and starting with Windows 2012 R2, domain admins can choose to encrypt access to a file share, which can include a domain controller. When encryption is enabled, only SMB3 connections are permitted.

With OneFS 9.5, the OneFS SMB redirector now supports SMB3, thereby allowing the Local Security Authority Subsystem Service (LSASS) daemon to communicate with domain controllers running Windows Server 2012 R2 and later over an encrypted session.

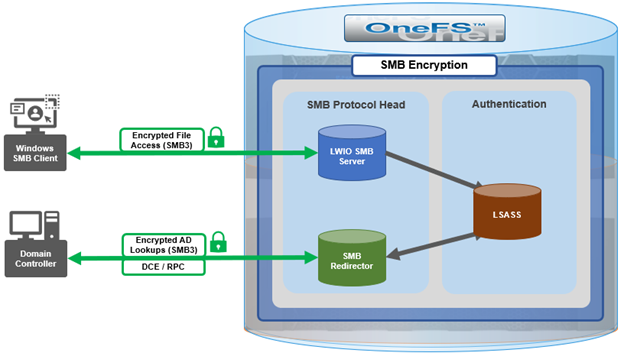
The OneFS redirector, also known as the ‘rdr driver’, is a stripped-down SMB client with minimal functionality, only supporting what is absolutely necessary.

Under the hood, OneFS SMB encryption and decryption use standard OpenSSL functions, and AES-128-CCM encryption is negotiated during SMB negotiate phase.

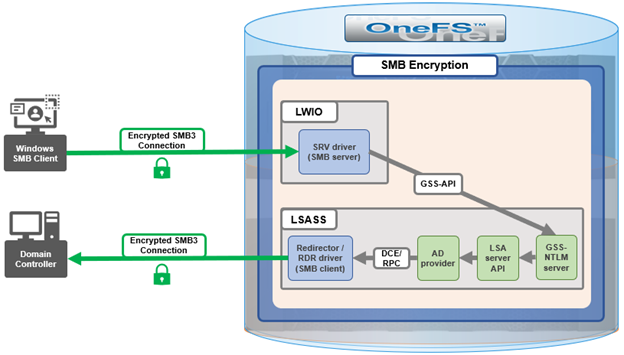
Although everything stems from the NTLM authentication requested by SMB server, the sequence of calls leads to the redirector establishing an SMB connection to the AD domain controller.

With OneFS 9.5, no configuration is required to enable SMB encryption in most situations, and there are no WebUI OR CLI configuration settings for the redirector.

With the default OneFS configuration, the redirector supports encryption if negotiated but it does not require it. Similarly, if the Active Directory domain requires encryption, the OneFS redirector will automatically enable and use encryption. However, if the OneFS redirector is explicitly configured to require encryption and the domain controller does not support encryption, the connection will fail.

The OneFS redirector encryption settings include:

Key Values Description
Smb3EncryptionEnabled Boolean. Default is ‘1’ == Enabled Enable or disable SMB3 encryption for OneFS redirector.
Smb3EncryptionRequired Boolean. Default is ‘0’ == Not required. Require or not require redirector connection to be encrypted.
MaxSmb2DialectVersion Default is ‘max’ == SMB 3.0.2 Set the SMB dialect the redirector will support.  Maximum is currently SMB 3.0.2.

The above keys and values are stored in the OneFS Likewise SMB registry and can be viewed and configured with the ‘lwreqshell’ utility. For example, to view the SMB redirector encryption config settings:

# /usr/likewise/bin/lwregshell list_values "HKEY_THIS_MACHINE\Services\lwio\Parameters\Drivers\rdr" | grep -i encrypt

   "Smb3EncryptionEnabled"  REG_DWORD       0x00000001 (1)

   "Smb3EncryptionRequired" REG_DWORD       0x00000000 (0)

The following syntax can be used to disable the ‘Smb3EncryptionRequired’ parameter by setting it to value ‘1’:

# /usr/likewise/bin/lwregshell set_value "[HKEY_THIS_MACHINE\Services\lwio\Parameters\Drivers\rdr]" "Smb3EncryptionRequired" "0x00000001"

# /usr/likewise/bin/lwregshell list_values "HKEY_THIS_MACHINE\Services\lwio\Parameters\Drivers\rdr" | grep -i encrypt

   "Smb3EncryptionEnabled"  REG_DWORD       0x00000001 (1)

   "Smb3EncryptionRequired" REG_DWORD       0x00000001 (1)

Similarly, to restore the ‘Smb3EncryptionRequired’ parameter’s default value of ‘0’ (ie. not required):

# /usr/likewise/bin/lwregshell set_value "[HKEY_THIS_MACHINE\Services\lwio\Parameters\Drivers\rdr]" "Smb3EncryptionEnabled" "0x00000001"

Note that, during the upgrade to OneFS 9.5, any nodes still running the old version will not be able to NTLM-authenticate if the DC they have affinity with requires encryption.

While redirector encryption is implemented in user space (in contrast to the SMB server, which is in the kernel), since  it involves OpenSSL, the library does take advantage of hardware acceleration on the processor and utilizes AES-NI. As such, performance is only minimally impacted when the number of NTLM authentications to the AD domain is very large.

Also note that redirector encryption also only currently supports only AES-128-CCM encryption provided in the SMB 3.0.0 and 3.0.2 dialects. OneFS does not use AES-128-GCM encryption, available in the SMB 3.1.1 dialect (the latest), at this time.

When it comes to troubleshooting the redirector, the lwregshell tool can be used to verify its configuration settings. For example, to view the redirector encryption settings:

# /usr/likewise/bin/lwregshell list_values "HKEY_THIS_MACHINE\Services\lwio\Parameters\Drivers\rdr" | grep -i encrypt

   "Smb3EncryptionEnabled"  REG_DWORD       0x00000001 (1)

   "Smb3EncryptionRequired" REG_DWORD       0x00000000 (0)

Similarly, to find the maximum SMB version supported by the redirector:

# /usr/likewise/bin/lwregshell list_values "HKEY_THIS_MACHINE\Services\lwio\Parameters\Drivers\rdr" | grep -i dialect

   "MaxSmb2DialectVersion"  REG_SZ          "max"

The ‘lwsm’ CLI utility with the following syntax will confirm the status of the various lsass components:

# /usr/likewise/bin/lwsm list | grep lsass

lsass                      [service]     running (lsass: 5164)

netlogon                   [service]     running (lsass: 5164)

rdr                        [driver]      running (lsass: 5164)

It can also be used to show and modify the logging level. For example:

# /usr/likewise/bin/lwsm get-log rdr

<default>: syslog LOG_CIFS at WARNING

# /usr/likewise/bin/lwsm set-log-level rdr - debug

# /usr/likewise/bin/lwsm get-log rdr

<default>: syslog LOG_CIFS at DEBUG

When finished, rdr logging can be returned to its previous log level as follows:

# /usr/likewise/bin/lwsm set-log-level rdr - warning

# /usr/likewise/bin/lwsm get-log rdr

<default>: syslog LOG_CIFS at WARNING

Additionally, the existing ‘lwio-tool’ utility has been modified in OneFS 9.5 to include functionality allowing simple test connections to domain controllers (no NTLM) via the new ‘rdr’ syntax:

# /usr/likewise/bin/lwio-tool rdr openpipe //<domain_controller>/NETLOGON

The ‘lwio-tool’ usage in OneFS 9.5 is as follows:

# /usr/likewise/bin/lwio-tool -h

Usage: lwio-tool <command> [command-args]

  commands:

    iotest rundown

    rdr [openpipe|openfile] username@password://domain/path

    srvtest transport [query|start|stop]

    testfileapi [create|createnp] <path>

OneFS WebUI Single Sign-on Management and Troubleshooting

Earlier in this series, we took a look at the architecture of the new OneFS WebUI SSO functionality. Now, we move on to its management and troubleshooting.

As we saw in the previous article, once the IdP and SP are configured, a cluster admin can enable SSO per access zone via the OneFS WebUI by navigating to Access > Authentication providers > SSO. From here, select the desired access zone and click the ‘Enable SSO’ toggle:

Or from the OneFS CLI via the following syntax:

# isi auth sso settings modify –sso-enabled 1

Once complete, the SSO configuration can be verified from a client web browser by browsing to the OneFS login screen. If all is operating correctly, redirection to the ADFS login screen will occurs. For example:

After successful authentication with ADFS, cluster access is granted and the browser session is redirected back to the OneFS WebUI .

In addition to the new SSO WebUI pages, OneFS 9.5 also adds a sub-command to the ‘isi auth’ command set for configuring SSO from the CLI. This new syntax includes:

  • isi auth sso idps
  • isi auth sso settings
  • isi auth sso sp

With these, the following procedure can be used to configure and enable SSO via the OneFS CLI.

  1. Define the ADFS instance in OneFS.

Create the IdP.

# isi auth ads create <domain_name> <user> --password=<password> ...

Where:

Attribute Description
<domain_name> Fully qualified Active Directory domain name that identifies the ADFS server. For example, idp1.isilon.com.
<user> The user account with permission to join machines to the given domain.
<password> The password for <user>.


  1. Add the Active Directory IdP to OneFS zones. Note that each of a cluster’s access zone(s) must have an IdP configured for it. The same IdP can be used for all the zones, but each access zone must be configured separately.
# isi zone zones modify --add-auth-providers

For example:

# isi zone zones modify system –add-auth-providers=lsa-activedirectoryprovider:idp1.isilon.com

  1. Verify that OneFS can find users in Active Directory.
# isi auth users view idp1.isilon.com\\<username>

In the output, ensure that an email address is displayed. If not, return to Active Directory and assign email addresses to users.

  1. Configure the OneFS hostname for SAML SSO.
# isi auth sso sp modify --hostname=<name>

Where <name> is the name that SAML SSO can use to represent the OneFS cluster to ADFS. SAML redirects clients to this hostname.

  1. Obtain the ADFS metadata and store it on  the cluster.

In the following example, an HTTPS GET request is issued via the ‘curl’ utility to obtain the metadata from the IDP and store it under /ifs on the cluster.

# curl -o /ifs/adfs.xml https://idp1.isilon.com/FederationMetadata/2008-07/ FederationMetadata.xml
  1. Create the IdP on OneFS using the ‘metadata-location’ path for the xml file in the previous step.
# isi auth sso idps create idp1.isilon.com --metadata-location="/ifs/adfs.xml"
  1. Enable SSO:
# isi auth sso settings modify --sso-enabled=yes -–zone <zone>

The following syntax can be used to view the IdP configuration:

# isi auth sso idps view <idp_ID>

For example:

# isi auth sso idps view idp

ID: idp

Metadata Location: /ifs/adfs.xml

Entity ID: https://dns.isilon.com/adfs/services/trust

Login endpoint of the IDP

URL: https://dns.isilon.com/adfs/ls/

Binding: wrn:oasis:names:tc:SAML:2.0:bidings:HTTP-Redirect

Logout endpoint of the IDP

URL: https://dns.isilon.com/adfs/ls/

Binding: wrn:oasis:names:tc:SAML:2.0:bidings:HTTP-Redirect

Response URL: -

Type: metadata

Signing Certificate: -

      Path:

      Issuer: CN-ADFS Signing – dns.isilon.com

      Subject: CN-ADFS Signing – dns.isilon.com

      Not Before: 2023-02-02T22:22:00

      Not After: 2024-02-02T22:22:00

      Status: valid

Value and Type

      Value: -----BEGIN CERTIFICATE-----

MITC9DCCAdygAwIBAgIQQQQc55appr1CtfPNj5kv+DANBgkqhk1G9w8BAQsFADA2

<snip>

Troubleshooting.

In the event that the IdP and/or SP Signing certificate happen to expire, users will be unable to login to the cluster via SSO and an error message will be displayed on login page.

In the example above, the IdP certificate has expired, as described in the alert message. In this situation, a warning is also displayed on the SSO Authentication page, as shown below:

To correct this, download either a new signing certificate from the Identity Provider or a new metadata file containing the IdP certificate details. Once complete, the cluster’s IdP configuration can then be updated by uploading the XML file or the new certificate.

Similarly, if the SP certificate has expired, the following notification alert is displayed upon attempted login:

The error message below is also displayed on the WebUI SSO tab, under Access > Authentication providers > SSO, along with a link to regenerate the metadata file:

The expired SP signing key and certificate can also be easily regenerated from the OneFS CLI:

# isi auth sso sp signing-key rekey

This command will delete any existing signing key and certificate and replace them with a newly generated signing key and certificate. Make sure the newly generated certificate is added to the IDP to ensure that the IDP can verify messages sent from the cluster. Are you sure?  (yes/[no]):  yes

# isi auth sso sp signing-key dump

-----BEGIN CERIFICATE-----

MIIE6TCCAtGgAwIBAgIJAP30nSyYUz/cMA0GCSqGSIb3DQEBCwUAMCYxJDAiBgNVBAMMG1Bvd2VyU2NhbGUgU0FNTCBTaWduaWSnIEtleTAeFw0yMjExMTUwMzU0NTFaFw0yMzExMTUwMzU0NTFaMCYxJDAiBgNVBAMMG1Bvd2VyU2NhbGUgU0FNTCBTaWduaWSnIEtleTCCAilwDQYJKoZIhvcNAQEBBQADggIPADCCAgoCggIBAMOOmYJ1aUuxvyH0nbUMurMbQubgtdpVBevy12D3qn+x7rgym8/v50da/4xpMmv/zbE0zJ0IVbWHZedibtQhLZ1qRSY/vBlaztU/nA90XQzXMnckzpcunOTG29SMO3x3Ud4*fqcP4sKhV

<snip>

Once regenerated, either the XML file or certificate can be downloaded, and the cluster configuration updated by either metadata download or manual copy:

Finally, upload the SP details back to the Identity provider.

For additional troubleshooting of OneFS SSO and authentication issues, there are a couple of key log files to check. These include:

Log file Information
/var/log/isi_saml_d.log SAML specific log messages logged by isi_saml_d.
/var/log/apache2/webui_httpd_error.log WebUI error messages including some SAML errors logged by the WebUI HTTP server.
/var/log/jwt.log Errors related to token generation logged by the JWT service.
/var/log/lsassd.log General authentication errors logged by the ‘lsassd’ service, such as failing to lookup users by email.

OneFS WebUI Single Sign-on Configuration and Deployment

In the first article in this series, we took a look at the architecture of the new OneFS WebUI SSO functionality. Now, we move on to its provisioning and setup.

SSO on PowerScale can be configured via either the OneFS WebUI or CLI. As such, OneFS 9.5 debuts a new dedicated WebUI SSO configuration page under Access > Authentication Providers > SSO. Alternatively, for command line afficionados, the CLI now includes a new ‘isi auth sso’ command set.

The overall SSO configuration flow is as above.

  1. Upgrade to OneFS 9.5

First, ensure the cluster is running OneFS 9.5 or a later release. If upgrading from an earlier OneFS version, note that the SSO service requires this upgrade to be committed prior to configuration and use.

Next, configure an SSO administrator. In OneFS, this account requires at least one of the following privileges:

Privilege Description
ISI_PRIV_LOGIN_PAPI Required for the admin to use the OneFS WebUI to administer SSO
ISI_PRIV_LOGIN_SSH Required for the admin to use the OneFS CLI via SSH to administer SSO.
ISI_PRIV_LOGIN_CONSOLE Required for the admin to use the OneFS CLI on the serial console to administer SSO.

The user account used for IdP management should have an associated email address configured.

  1. Setup Identity Provider (IdP)

OneFS SSO activation also requires having a suitable Identity Provider (IdP), such as ADFS, provisioned and available prior to setting up OneFS SSO.

ADFS can be configured via either the Windows GUI or command shell, and detailed information on the deployment and configuration of ADFS can be found in the Microsoft Windows Server documentation.

The Windows remote desktop utility (RDP) can be used to provision, connect to, and configure an ADFS server.

i.  When connected to ADFS, configure a rule defining access. For example, the following command line syntax can be used to create a simple rule that permits all users to log in:

$AuthRules = @"

@RuleTemplate="AllowAllAuthzRule" => issue(Type = "http://schemas.microsoft.com/

authorization/claims/permit", Value="true");

"@

Or from the ADFS UI:

Note that more complex rules can be crafted to meet the particular requirements of an organization, where desired.

ii.  Create a rule parameter to map the Active Directory (AD) user email address to the SAML NameID. For example:

$TransformRules = @"

@RuleTemplate = "LdapClaims"

@RuleName = "LDAP mail"

c:[Type == "http://schemas.microsoft.com/ws/2008/06/identity/claims/

windowsaccountname", Issuer == "AD AUTHORITY"]

=> issue(store = "Active Directory",

types = ("http://schemas.xmlsoap.org/ws/2005/05/identity/claims/ emailaddress"), query = ";mail;{0}", param = c.Value);

@RuleTemplate = "MapClaims"

@RuleName = "NameID"

c:[Type == "http://schemas.xmlsoap.org/ws/2005/05/identity/claims/emailaddress"]

=> issue(Type = "http://schemas.xmlsoap.org/ws/2005/05/identity/claims/ nameidentifier", Issuer = c.

Issuer, OriginalIssuer = c.OriginalIssuer,

Value = c.Value, ValueType = c.ValueType, Properties["http://schemas.xmlsoap.org/ws/2005/05/identity/ claimproperties/format"] = "urn:oasis:names:tc:SAML:1.1:nameid-format:emailAddress");

"@

iii.  Configure AD to trust the OneFS WebUI certificate.

iv.  Create the relying party trust. For example:

Add-AdfsRelyingPartyTrust -Name <cluster-name>\

-MetadataUrl "https://<cluster-node-ip>:8080/session/1/saml/metadata" \

-IssuanceAuthorizationRules $AuthRules -IssuanceTransformRules $TransformRules

Or from Windows Server Manager:

  1. Select Access Zone

Since OneFS SSO is zone-aware, the next step involves choosing the desired access zone to configure. Navigate to Access > Authentication providers > SSO, select an access zone (ie. the system zone) and click the ‘Add IdP’.

Note that each of a cluster’s access zone(s) must have an IdP configured for it. The same IdP can be used for all the zones, but each access zone must be configured separately.

  1. Add IdP Configuration

In OneFS 9.5 and later, the WebUI SSO configuration is a wizard-driven, ‘guided workflow’ process involving the following steps:

First, navigate to Access > Authentication providers > SSO, select the desired access zone (ie. the system zone), and then click the ‘Add IdP’ button.

On the ‘Add Identity Provider’ page, enter a unique name for the IdP. For example, Isln-IdP1 in this case:

When done, click ‘Next’, select the default ‘Upload metadata XML’ option, and browse to the XML file downloaded from the ADFS system:

Alternatively, if the preference is to enter the information by hand, select ‘Manual entry’ and complete the configuration form fields:

If the ‘manual’ method is selected, you must have the IdP certificate ready to upload. With the Manual option, the following information is required:

Field Description
Binding Select POST or Redirect binding.
Entity ID Unique identifier of the IdP as configured on the IdP. For example:

http://idp1.isilon.com/adfs/services/trust

Login URL Log in endpoint for the IdP. For example:

http://idp1.isilon.com/adfs/ls/

Logout URL Log out endpoint for the IdP. For example: http://idp1.example.com/adfs/ls/
Signing Certificate Provide the PEM encoded certificate obtained from the IdP. This certificate is required to verify messages from the IdP.

Upload the IdP certificate:

For example:

Repeat this step for each access zone in which SSO is to be configured.

When complete, click the ‘Next’ button to move on to the SP configuration step.

  1. Configure Service Provider

On the Service Provider page, confirm that the current access zone is carried over from the prior page.

Select ‘Metadata download’ or ‘Manual copy’, depending on the desired method of entering OneFS details about this SP to the IdP.

Provide the hostname or IP address for the SP for the current access zone.

Click the ‘Generate’ button to create the information (metadata) about OneFS and this access zone for to use in configuring the IdP.

This generated information can now be used to configure the IdP (in this case, Windows ADFS) to accept requests from PowerScale as the SP and its configured access zone.

As shown above, the ‘Edit Identity Provider’ WebUI page provides two methods:

Method Action
Metadata download Download the XML file which contains the signing certificate, etc.
Manual copy Use the ‘Copy Links’ in the lower half of the form to copy the information.

If ‘Manual copy’ is selected, the ‘Copy Links’ in the lower half of the form can be used to copy the information to the IdP.

Next, download the Signing Certificate.

When completed, click ‘Next’ to finish the SSO setup wizard.

  1. Enable SSO and Verify Operation

Once the IdP and SP are configured, a cluster admin can enable SSO per access zone via the OneFS WebUI by navigating to Access > Authentication providers > SSO. From here, select the desired access zone and click the ‘Enable SSO’ toggle:

Or from the OneFS CLI via the following syntax:

# isi auth sso settings modify --sso-enabled 1

OneFS WebUI Single Sign-on

The Security Assertion Markup Language (SAML) is an open standard for sharing security information about identity, authentication and authorization across different systems. SAML is implemented using the Extensible Markup Language (XML) standard for sharing data. The SAML framework enables Single Sign-on (SSO), which in turn allows users to log in once, and their login credential can be reused to authenticate with and access other different service providers. It defines several entities, described in the following table, including end users, service providers (SP), and identity providers (IdP), and is used to manage identity information.

Entity Description
End user An end user is an entity requiring authentication prior to being allowed to use an application.
Identity provider (IdP) Performs authentication and passes the user’s identity and authorization level to the service provider. For example, Active Directory Federation Services (ADFS).
Service provider (SP) Trusts the identity provider and authorizes the given user to access the requested resource.. With SAML 2.0, a PowerScale cluster is a service provider.
SAML Assertion XML document that the identity provider sends to the service provider that contains the user authorization.

The Windows Active Directory Federation Services (ADFS), for example, is one of the ubiquitous identity providers for SAML contexts.

OneFS 9.5 introduces SAML-based SSO for the WebUI to provide a more convenient authentication method, in addition to meeting the security compliance requirements for federal and enterprise customers. In OneFS 9.5, the WebUI’s initial login page has been redesigned to support SSO and, when enabled, a new ‘Log in with SSO’ button is displayed on the login page under the traditional username and password text boxes. For example:

OneFS SSO is also zone-aware in support of multi-tenant cluster configurations. As such, a separate Identity Provider can be configured independently for each OneFS access zone.

Under the hood, OneFS SSO employs the following high level architecture:

In OneFS 9.5, the SSO operates through HTTP REDIRECT and POST bindings, with the cluster acting as the Service Provider.

There are three different types of SAML Assertions – authentication, attribute, and authorization decision.

  • Authentication assertions prove identification of the user and provide the time the user logged in and what method of authentication they used (I.e., Kerberos, 2 factor, etc.)
  • The attribution assertion passes the SAML attributes to the service provider – SAML attributes are specific pieces of data that provide information about the user.
  • An authorization decision assertion says if the user is authorized to use the service or if the identify provider denied their request due to a password failure or lack of rights to the service.

SAML SSO works by transferring the user’s identity from one place (the identity provider) to another (the service provider). This is done through an exchange of digitally signed XML documents.

SAML Request, also known as an authentication request, is generated by the Service Provider to ‘request’ an authentication.

SAML Response is generated by the Identity Provider and contains the actual assertion of the authenticated user. In addition, a SAML Response may contain additional information, such as user profile information and group/role information, depending on what the Service Provider can support. Note that the Service Provider never directly interacts with the Identity Provider, with a browser acting as the agent facilitating any redirections.

Since SAML authentication is asynchronous, the Service Provider does not maintain the state of any authentication requests. As such, when the Service Provider receives a response from an Identity Provider, the response must contain all the necessary information.

The general flow is as follows:

When OneFS redirects a user to the configured IdP for login, it makes an HTTP GET request (SAMLRequest), instructing the IdP that the cluster is attempting to perform a login (SAMLAuthnRequest). When the user successfully authenticates, the IdP responds back to OneFS with an HTTP POST containing an HTML form (SAMLResponse) that indicates whether the login was successful, who logged in, plus any additional claims configured on the IdP.

On receiving the SAMLResponse, OneFS verifies the signature using the public key (X.509 certificate) in to ensure it really came from its trusted IdP and that none of the contents have been tampered with. OneFS then extracts the identity of the user, along with any other pertinent attributes. At this point, the user is redirected back to the OneFS WebUI dashboard (landing page), as if logged into the site manually.

In the next article in this series, we’ll take a detailed look at the above procedure to deploy SSO on a PowerScale cluster: