The FlexProtect job is responsible for maintaining the appropriate protection level of data across the cluster. For example, it ensures that a file which is configured to be protected at +2n, is actually protected at that level. Given this, FlexProtect is arguably the most critical of the OneFS maintenance jobs because it represents the Mean-Time-To-Repair (MTTR) of the cluster, which has an exponential impact on MTTDL. Any failures or delay has a direct impact on the reliability of the OneFS file system.
In addition to FlexProtect, there is also a FlexProtectLin job. FlexProtectLin is run by default when there is a copy of file system metadata available on solid state drive (SSD) storage. FlexProtectLin typically offers significant runtime improvements over its conventional disk based counterpart.
As such, the primary purpose of FlexProtect is to repair nodes and drives which need to be removed from the cluster. In the case of a cluster group change, for example the addition or subtraction of a node or drive, OneFS automatically informs the job engine, which responds by starting a FlexProtect job. Any drives and/or nodes to be removed are marked with OneFS’ ‘restripe_from’ capability. The job engine coordinator notices that the group change includes a newly-smart-failed device and then initiates a FlexProtect job in response.
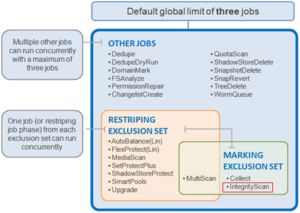
FlexProtect falls within the job engine’s restriping exclusion set and, similar to AutoBalance, comes in two flavors: FlexProtect and FlexProtectLin.
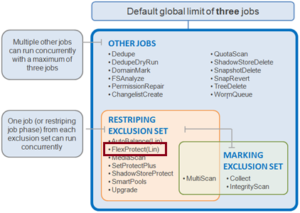
Run automatically after a drive or node removal or failure, FlexProtect locates any unprotected files on the cluster, and repairs them as rapidly as possible. The FlexProtect job runs by default with an impact level of ‘medium’ and a priority level of ‘1’, and includes six distinct job phases:
The regular version of FlexProtect has the following phases:
| Job Phase | Description |
| Drive Scan | Job engine scans the disks for inodes needing repair. If an inode needs repair, the job engine sets the LIN’s ‘needs repair’ flag for use in the next phase.
|
| LIN Verify | This phase scans the OneFS LIN tree to addresses the drive scan limitations. |
| LIN Re-verify | The prior repair phases can miss protection group and metatree transfers. FlexProtect may have already repaired the destination of a transfer, but not the source. If a LIN is being restriped when a metatree transfer, it is added to a persistent queue, and this phase processes that queue.
|
| Repair | LINs with the ‘needs repair’ flag set are passed to the restriper for repair. This phase needs to progress quickly and the job engine workers perform parallel execution across the cluster. |
| Check | This phase ensures that all LINs were repaired by the previous phases as expected. |
| Device Removal | The successfully repaired nodes and drives that were marked ‘restripe from’ at the beginning of phase 1 are removed from the cluster in this phase. Any additional nodes and drives which were subsequently failed remain in the cluster, with the expectation that a new FlexProtect job will handle them shortly. |
Be aware that prior to OneFS 8.2, FlexProtect is the only job allowed to run if a cluster is in degraded mode, such as when a drive has failed, for example. Other jobs will automatically be paused and will not resume until FlexProtect has completed and the cluster is healthy again. In OneFS 8.2 and later, FlexProtect does not pause when there is only one temporarily unavailable device in a disk pool, when a device is smartfailed, or for dead devices.
The FlexProtect job executes in userspace and generally repairs any components marked with the ‘restripe from’ bit as rapidly as possible. Within OneFS, a LIN Tree reference is placed inside the inode, a logical block. A B-Tree describes the mapping between a logical offset and the physical data blocks:
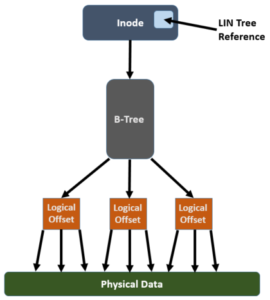
In order for FlexProtect to avoid the overhead of having to traverse the whole way from the LIN Tree reference -> LIN Tree -> B-Tree -> Logical Offset -> Data block, it leverages the OneFS construct known as the ‘Width Device List’ (WDL). The WDL enables FlexProtect to perform fast drive scanning of inodes because the inode contents are sufficient to determine need for restripe. The WDL keeps a list of the drives in use by a particular file, and are stored as an attribute within an inode and are thus protected by mirroring. There are two WDL attributes in OneFS, one for data and one for metadata. The WDL is primarily used by FlexProtect to determine whether an inode references a degraded node or drive. It New or replaced drives are automatically added to the WDL as part of new allocations.
As mentioned previously, the FlexProtect job has two distinct variants. In the FlexProtectLin version of the job the Disk Scan and LIN Verify phases are redundant and therefore removed, while keeping the other phases identical. FlexProtectLin is preferred when at least one metadata mirror is stored on SSD, providing substantial job performance benefits.
In addition to automatic job execution after a drive or node removal or failure, FlexProtect can also be initiated on demand. The following CLI syntax will kick of a manual job run:
# isi job start flexprotect

Started job [274]
# isi job list

ID   Type        State   Impact  Pri  Phase  Running Time

----------------------------------------------------------

274  FlexProtect Running Medium  1    1/6    4s

----------------------------------------------------------

Total: 1
The FlexProtect job’s progress can be tracked via a CLI command as follows:
# isi job jobs view 274

               ID: 274

             Type: FlexProtect

            State: Succeeded

           Impact: Medium

           Policy: MEDIUM

              Pri: 1

            Phase: 6/6

       Start Time: 2020-12-04T17:13:38

     Running Time: 17s

     Participants: 1, 2, 3

         Progress: No work needed

Waiting on job ID: -

      Description: {"nodes": "{}", "drives": "{}"}
Upon completion, the FlexProtect job report, detailing all six stages, can be viewed by using the following CLI command with the job ID as the argument:
# isi job reports view 274

FlexProtect[274] phase 1 (2020-12-04T17:13:44)

----------------------------------------------

Elapsed time 6 seconds

Working time 6 seconds

Errors       0

Drives       33

LINs         250

Size         363108486755 bytes (338.171G)

ECCs         0


FlexProtect[274] phase 2 (2020-12-04T17:13:55)

----------------------------------------------

Elapsed time 11 seconds

Working time 11 seconds

Errors       0

LINs         33

Zombies      0


FlexProtect[274] phase 3 (2020-12-04T17:13:55)

----------------------------------------------

Elapsed time 0 seconds

Working time 0 seconds

Errors       0

LINs         0

Zombies      0


FlexProtect[274] phase 4 (2020-12T17:13:55)

----------------------------------------------

Elapsed time 0 seconds

Working time 0 seconds

Errors       0

LINs         0

Zombies      0


FlexProtect[274] phase 5 (2020-12-04T17:13:55)

----------------------------------------------

Elapsed time 0 seconds

Working time 0 seconds

Errors       0

Drives       0

LINs         0

Size         0 bytes

ECCs         0


FlexProtect[274] phase 6 (2020-12-04T17:13:55)

----------------------------------------------

Elapsed time       0 seconds

Working time       0 seconds

Errors             0

Nodes marked gone  {}

Drives marked gone {}
While a FlexProtect job is running, the following command will detail which LINs the job engine workers are currently accessing:
# sysctl efs.bam.busy_vnodes | grep isi_job_d

vnode 0xfffff802938d18c0 (lin 0) is fd 11 of pid 2850: isi_job_d

vnode 0xfffff80294817460 (lin 1:0002:0008) is fd 12 of pid 2850: isi_job_d

vnode 0xfffff80294af3000 (lin 1:0002:001a) is fd 20 of pid 2850: isi_job_d

vnode 0xfffff8029c7c7af0 (lin 1:0002:001b) is fd 17 of pid 2850: isi_job_d

vnode 0xfffff802b280dd20 (lin 1:0002:000a) is fd 14 of pid 2850: isi_job_d
Using the ‘isi get -L’ command, a LIN address can be translated to show the actual file name and its path. For example:
# isi get -L 1:0002:0008

A valid path for LIN 0x100020008 is /ifs/.ifsvar/run/isi_job_d.lock
Additionally, the following gconfig CLI commands can be used to configure degraded mode, which will determine whether other job engine jobs can run concurrently with FlexProtect or FlexProtectLIN:
To view the current configuration:
# isi_gconfig -t job-config | grep degraded
To allow other jobs to run:
# isi_gconfig -t job-config core.run_degraded=true
To prevent other jobs from running:
# isi_gconfig -t job-config core.run_degraded=false