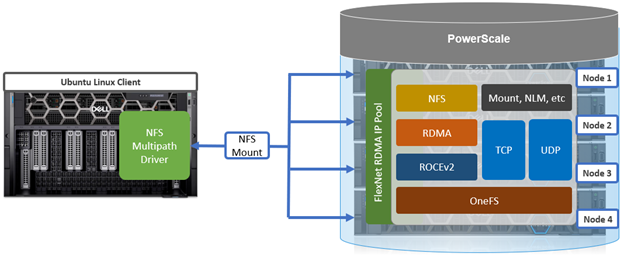
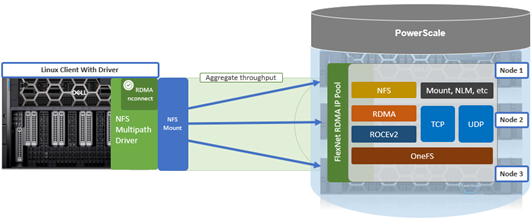
PowerScale Multipath Client Driver Configuration and Management

As discussed earlier in this series of articles, the multipath driver allows Linux clients to mount a PowerScale cluster’s NFS exports over NFS v3, NFS v4.1, or NFS v4.2 over RDMA.

The principal NFS mount options of interest with the multipath client driver are:

Mount option Description
nconnect Allows the admin to specify the number of TCP connections the client can establish between itself and the NFS server. It works with remoteports to spread load across multiple target interfaces.
localports Mount option that allows a client to use its multiple NICs to multiplex I/O.
localports_failover Mount option allowing transports to temporarily move from local client interfaces that are unable to serve NFS connections.
proto The underlying transport protocol that the NFS mount will use. Typically, either TCP or RDMA.
remoteports Mount option that allows a client to target multiple servers/ NICS to multiplex I/O. Remoteports spreads the load to multiple file handles instead of taking a single file handle to avoid thrashing on locks.
version The version of the NFS protocol that is to be used. The multipath driver supports NFSv3, NFSv4.1, and NFSv4.2. Note that NFSv4.0 is unsupported.

These options allow the multipath driver to be configured such that an IO stream to a single NFS mount can be spread across a number of local (client) and remote (cluster) network interfaces (ports). Nconnect allows you to specify how many socket connections you want to open to each combination of local and remote ports.

Below are some example topologies and NFS client configurations using the multipath driver.

  1. Here, NFSv3 with RDMA is used to spread traffic across all the front-end interfaces (remoteports) on the PowerScale cluster:
# mount -o proto=rdma,port=20049,vers=3,nconnect=18,remoteports=10.231.180.95- 10.231.180.98 10.231.180.98:/ifs/data /mnt/test
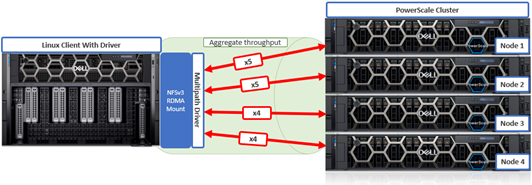
The above client NFS  mount configuration would open 5 socket connections to two of the ‘remoteports’ (cluster node) IP address specified and 4 socket connections to the other two.

As you can see, this driver can be incredibly powerful given its ability to multipath comprehensively. Clearly, there are many combinations of local and remote ports and socket connections that can be configured.

  1. This next example uses NFSv3 with RDMA across three ‘localports’ (client) and with 8 socket connections to each:
# mount -o proto=rdma,port=20049,vers=3,nconnect=24,localports=10.219.57.225- 10.219.57.227, remoteports=10.231.180.95-10.231.180.98 10.231.180.98:/ifs/data /mnt/test

  1. This final config specifies NFSv4.1 with RDMA using a high connection count to target multiple nodes (remoteports) on the cluster:
# mount -t nfs –o proto=rdma,port=20049,vers=4.1,nconnect=64,remoteports=10.231.180.95- 10.231.180.98 10.231.180.98:/ifs/data /mnt/test
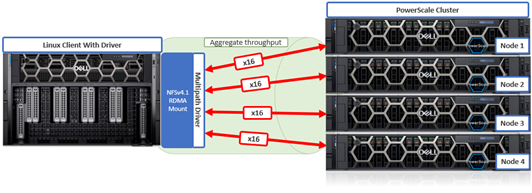
In this case, 16 socket connections will be opened to each of the four specified remote (cluster) ports for a total of 64 connections.

Note that the Dell multipath driver has a hard-coded limit of 64 nconnect socket connections per mount.

Behind the scenes, the driver uses a network map to store the local and remote port and nconnect socket configuration.

The multipath driver supports both IPv4 and IPv6 addresses for local and remote port specification. If a specified IP address is unresponsive, the driver will remove the offending address from its network map.

Note that the Dell multipath driver supports NFSv3, NFSv4.1, and NFSv4.2 but is incompatible with NFSv4.0.

On Ubuntu 20.04, for example, NFSv3 and NFSv4.1 are both fully-featured. In addition, the ‘remoteports’ behavior is more obvious with NFSv4.1 because the client state is tracked:

# mount -t nfs -o vers=4.1,nconnect=8,remoteports=10.231.180.95-10.231.180.98 10.231.180.95:/ifs /mnt/test

And from the cluster:

cluster# isi_for_array 'isi_nfs4mgmt'

ID                Vers   Conn   SessionId     Client Address Port   O-Owners      Opens  Handles L-Owners

2685351452398170437  4.1    tcp    5           10.219.57.229  872    0     0     0     0

5880148330078271256   4.1    tcp    11          10.219.57.229  680    0     0     0     0

2685351452398170437   4.1    tcp    5           10.219.57.229  872    0     0     0     0

6230063502872509892   4.1    tcp    1           10.219.57.229  895    0     0     0     0

6786883841029053972   4.1    tcp    1           10.219.57.229  756    0     0     0     0

With a single mount, the client has created many connections across the server.

This also works with RDMA:

# mount -t nfs -o vers=4.1,proto=rdma,nconnect=4 10.231.180.95:/ifs /mnt/test

# isi_for_array 'isi_nfs4mgmt’

ID                 Vers   Conn   SessionId     ClientAddress  Port   O-Owners      Opens  Handles L-Owners

6786883841029053974   4.1    rdma   2           10.219.57.229  54807  0     0     0     0

6230063502872509894   4.1    rdma   2           10.219.57.229  34194  0     0     0     0

5880148330078271258   4.1    rdma   12          10.219.57.229  43462  0     0     0     0

2685351452398170443  4.1    rdma   8           10.219.57.229  57401  0     0     0     0


0

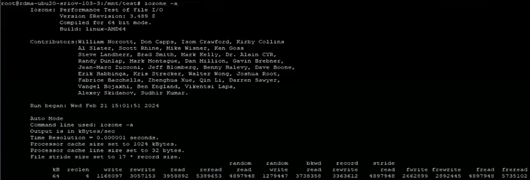
Once the Linux client NFS mounts have been configured, their correct functioning can be easily verified by generating read and/or write traffic to the PowerScale cluster and viewing the OneFS performance statistics. Running a load generator like ‘iozone’ is a useful way to generate traffic on the NFS mount. The iozone utility can be invoked with its ‘-a’ flag to select full automatic mode. This produces output that covers all tested file operations for record sizes of 4k to 16M for file sizes of 64k to 512M.

# iozone -a

For example:
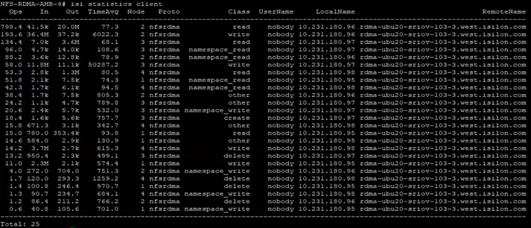
From the PowerScale cluster, if the multipath driver is working correctly the ‘isi statistics client’ CLI command output will show the Linux client connecting and generating traffic to all of the cluster’s nodes that are specified in the’ –remoteports’ option for the NFS mount.

# isi statistics client

For example:
Alternatively, from the client, the ‘netstat’ CLI command can be used from the Linux client to query the number of TCP connections established:

# netstat -an | grep 2049 | grep EST | sort -k 5

On Linux systems, the ‘netstat’ command line utility typically requires the ‘net-tools’ package to be installed.

Since NFS is a network protocol, when it comes to investigating, troubleshooting, and debugging multipath driver issues, one of the most useful and revealing troubleshooting tools is a packet capturing device or sniffer. These provide visibility into the IP packets as they are transported across the Ethernet network between the Linux client and the PowerScale cluster nodes.

Packet captures (PCAPs) of traffic between client and cluster can be filtered and analyzed by tools such as Wireshark to ensure that requests, authentication, and transmission are occurring as expected across the desired NICs.

Gathering PCAPs is best performed on the Linux client-side and on the multiple specified interfaces if the client is using the ‘–localports’ NFS mount option.

In addition to PCAPs, the following three client-side logs are another useful place to check when debugging a multipath driver issue:

Log file Description
/var/log/kern.log Most client logging is written to this log file
/var/log/auth.log Authentication logging
/var/log/messages Error level message will appear here


Verbose logging can be enabled on the Linux client with the following CLI syntax:

# sudo rpcdebug -m nfs -s all

Conversely, the following command will revert logging back to the default level:

# sudo rpcdebug -m nfs -c all


Additionally, a ‘dellnfs-ctl’ CLI tool comes packaged with the multipath driver module and is automatically available on the Linux client after the driver module installation.

The command usage syntax for the ‘dellnfs-ctl’ tool is as follows:

# dellnfs-ctl

syntax: /usr/bin/dellnfs-ctl [reload/status/trace]

Note that to operate it in trace mode, the ‘dellnfs-ctl’ tool requires the ‘trace-cmd’ package to be installed.

For example, the trace-cmd package can be installed on an Ubuntu Linux system using the ‘apt install’ package utility command:

# sudo apt install trace-cmd

The current version of the dellnfs-ctl tool, plus the associated services and kernel modules, can be queried with the following CLI command syntax:

# dellnfs-ctl status

version: 4.0.22-dell

kernel modules: sunrpc rpcrdma compat_nfs_ssc lockd nfs_acl auth_rpcgss rpcsec_gss_krb5 nfs nfsv3 nfsv4

services: rpcbind.socket rpcbind rpc-gssd rpc_pipefs: /run/rpc_pipefs

With the ‘reload’ option, the ‘dellnfs-ctl’ tool uses ‘modprobe’ to reload and restart the NFS RPC services. For example:

# dellnfs-ctl reload

dellnfs-ctl: stopping service rpcbind.socket

dellnfs-ctl: umounting fs /run/rpc_pipefs

dellnfs-ctl: unloading kmod nfsv3

dellnfs-ctl: unloading kmod nfs

dellnfs-ctl: unloading kmod nfs_acl

dellnfs-ctl: unloading kmod lockd

dellnfs-ctl: unloading kmod compat_nfs_ssc

dellnfs-ctl: unloading kmod rpcrdma

dellnfs-ctl: unloading kmod sunrpc

dellnfs-ctl: loading kmod sunrpc

dellnfs-ctl: loading kmod rpcrdma

dellnfs-ctl: loading kmod compat_nfs_ssc

dellnfs-ctl: loading kmod lockd

dellnfs-ctl: loading kmod nfs_acl

dellnfs-ctl: loading kmod nfs

dellnfs-ctl: loading kmod nfsv3

dellnfs-ctl: mounting fs /run/rpc_pipefs

dellnfs-ctl: starting service rpcbind.socket

dellnfs-ctl: starting service rpcbind

In the event that a problem is detected, it is important to run the reload script before uninstalling or reinstalling the driver. Because the script runs modprobe, the kernel modules that are modified by the driver will be reloaded.

Note that this will affect existing NFS mounts. As such, any active mounts will need to be re-mounted after a reload is performed.


As we have seen throughout this series of articles, the core benefits of the Dell multipath driver include:

  • Better single NFS mount performance.
  • Increased bandwidth for single NFS mount with multiple R/W streaming files.
  • Improved performance for heavily used NIC’s to a single PowerScale Node.

The Dell multipath driver allows NFS clients to direct I/O to multiple PowerScale nodes through a single NFS mount point for higher single-client throughput. This enables Dell to deliver the first Ethernet storage solution validated on NVIDIA’s DGX SuperPOD.
PowerScale Multipath Client Driver – Compiling on OpenSUSE Linux

The previous article in this series explored building the PowerScale multipath client driver from source on Ubuntu Linux. Now we’ll turn our attention to compiling the driver on the OpenSUSE Linux platform.

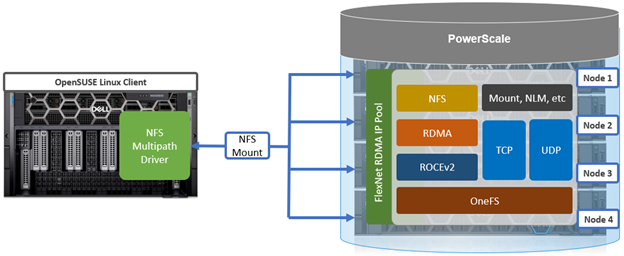
Unlike the traditional one-to-one NFS server/client mapping, this multipath client driver allows the performance of multiple PowerScale nodes to be aggregated through a single NFS mount point to one or many compute nodes.

Building the PowerScale multipath client driver from scratch, rather than just installing it from a pre-built Linux package, helps guard against minor version kernel mismatches on the Linux client that would result in the driver not installing correctly.

The driver itself is available for download on the Dell Support Site. There is no license or cost for this driver, either for the pre-built Linux package or source code. The zipped tarfile download contains a README doc which provides basic instruction.

For an OpenSUSE Linux client to successfully connect to a PowerScale cluster using the multipath driver, there are a couple prerequisites that must be met:

  • The NFS client system or virtual machine must be running the following OpenSUSE version:
Supported Linux Distribution Kernel Version
OpenSUSE 15.4 5.14.x
  • If RDMA is being configured, the system must contain an RDMA-capable Ethernet NIC, such as the Mellanox CX series.
  • The ‘trace-cmd’ package should be installed, along with NFS client related packages.

For example,:

# zypper install trace-cmd nfs-common
  • Unless already installed, developer tools may also need to be added. For example:
# zypper install rpmbuild tar gzip git kernel-devel

The following CLI commands can be used to verify the kernel version and other pertinent details of the OpenSUSE client:

# uname -a

Unless all the Linux clients are known to be identical, the best practice is to build and install the driver per-client or you may experience failed installs.

Overall, the driver source code compilation process is as follows:

  1. Download the driver source code from the driver download site.
  2. Unpack the driver source code on the Linux client

Once downloaded, this file can be extracted using the Linux ‘tar’ utility. For example:

# tar -xvf <source_tarfile>
  1. Build the driver source code on the Linux client

Once downloaded to the Linux client, the multipath driver package source can be built with the following CLI command:

# ./build.sh bin

A successful build is underway when the following output appears on the console:

…<build takes about ten minutes>

------------------------------------------------------------------

When the build is complete, a package file is created in the ./dist directory, located under the top level source code directory.

  1. Install the driver binaries on the OpenSUSE client
# zypper in ./dist/dellnfs-4.0.22-kernel_5.14.21_150400.24.97_default.x86_64.rpm
Loading repository data...
Reading installed packages...
Resolving package dependencies...

The following NEW package is going to be installed:
dellnfs

1 new package to install.
  1. Check installed files
# rpm -qa | grep dell
dellnfs-4.0.22-kernel_5.14.21_150400.24.100_default.x86_64
  1. Reboot
# reboot
  1. Check services are started
# systemctl start portmap
# systemctl start nfs
# systemctl status nfs
nfs.service - Alias for NFS client
Loaded: loaded (/usr/lib/systemd/system/nfs.service; disabled; vendor preset: disabled)
Active: active (exited) since Tues 2024-10-15 15:11:09 PST; 2s ago
Process: 15577 ExecStart=/bin/true (code=exited, status=0/SUCCESS)
Main PID: 15577 (code=exited, status=0/SUCCESS)

Oct 15 15:11:09 CLI22 systemd[1]: Starting Alias for NFS client...
Oct 15 15:11:09 CLI22 systemd[1]: Finished Alias for NFS client.
  1. Check client driver is loaded with dellnfs-ctl script
# dellnfs-ctl status
version: 4.0.22
kernel modules: sunrpc
services: rpcbind.socket rpcbind
rpc_pipefs: /var/lib/nfs/rpc_pipefs

Note, however, that when building and installing on an OpenSUSE virtual instance (VM), additional steps are required.

Since OpenSUSE does not reliably install a kernel-devel kit that matches the running kernel version, this must be forced to happen as follows:

  1. Install dependencies
# zypper install rpmbuild tar gzip git
  1. Install CORRECT kernel-devel package

The recommended way to install kernel-devel package according to OpenSUSE documentation is to use:

# zypper install kernel-default-devel

Beware that the ‘zypper install kernel-default-devel’ command occasionally fails to install the correct kernel-devel package. This can be verified by looking at the following paths:

# ls /lib/modules/

5.14.21-150500.55.39-default

# uname -a

Linux 6f8edb8b881a 5.15.0-91-generic #101~20.04.1-Ubuntu SMP Thu Nov 16 14:22:28 UTC 2023 x86_64 x86_64 x86_64 GNU/Linux

Note that the contents of /lib/modules above does not match the ‘uname’ command output:

‘5.14.21-150500.55.39-default’  vs.  ‘5.15.0-91-generic’

Another issue with installing with ‘kernel-devel’ is that sometimes the /lib/modules/$(uname -r) directory will not include the /build subdirectory.

If this occurs, the client side driver will fail with the following error:

# ls -alh /lib/modules/$(uname -r)/build

ls: cannot access '/lib/modules/5.14.21-150400.24.63-default/build': No such file or directory

....

Kernel root not found

The recommendation is to install the specific kernel-devel package for the client’s Linux version. For example:

# ls -alh /lib/modules/$(uname -r)

total 5.4M

drwxr-xr-x 1 root root  488 Dec 13 19:37 .

drwxr-xr-x 1 root root  164 Dec 13 19:42 ..

drwxr-xr-x 1 root root   94 May  3  2023 kernel

drwxr-xr-x 1 root root   60 Dec 13 19:37 mfe_aac

-rw-r--r-- 1 root root 1.2M May  9  2023 modules.alias

-rw-r--r-- 1 root root 1.2M May  9  2023 modules.alias.bin

-rw-r--r-- 1 root root 6.4K May  3  2023 modules.builtin

-rw-r--r-- 1 root root  17K May  9  2023 modules.builtin.alias.bin

-rw-r--r-- 1 root root 8.2K May  9  2023 modules.builtin.bin

-rw-r--r-- 1 root root  49K May  3  2023 modules.builtin.modinfo

-rw-r--r-- 1 root root 610K May  9  2023 modules.dep

-rw-r--r-- 1 root root 809K May  9  2023 modules.dep.bin

-rw-r--r-- 1 root root  455 May  9  2023 modules.devname

-rw-r--r-- 1 root root  802 May  3  2023 modules.fips

-rw-r--r-- 1 root root 181K May  3  2023 modules.order

-rw-r--r-- 1 root root 1.2K May  9  2023 modules.softdep

-rw-r--r-- 1 root root 610K May  9  2023 modules.symbols

-rw-r--r-- 1 root root 740K May  9  2023 modules.symbols.bin

drwxr-xr-x 1 root root   36 May  9  2023 vdso


# rpm -qf /lib/modules/$(uname -r)/

kernel-default-5.14.21-150400.24.63.1.x86_64 <---------------------

kernel-default-extra-5.14.21-150400.24.63.1.x86_64

kernel-default-optional-5.14.21-150400.24.63.1.x86_64

Take the package name and prefix it with ‘kernel-default-devel’:

====================================================================

# zypper install kernel-default-devel-5.14.21-150400.24.63.1.x86_64

Loading repository data...

Reading installed packages...

The selected package 'kernel-default-devel-5.14.21-150400.24.63.1.x86_64' from repository 'Update repository with updates from SUSE Linux Enterprise 15' has lower version than the installed one. Use 'zypper install --oldpackage kernel-default-devel-5.14.21-150400.24.63.1.x86_64' to force installation of the package.

Resolving package dependencies...

Nothing to do.

# zypper install --oldpackage  kernel-default-devel-5.14.21-150400.24.63.1.x86_64

Loading repository data...

Reading installed packages...

Resolving package dependencies...

The following 2 NEW packages are going to be installed:

kernel-default-devel-5.14.21-150400.24.63.1 kernel-devel-5.14.21-150400.24.63.1

2 new packages to install.

Now the build directory exists:

# ls -alh /lib/modules/$(uname -r)

total 5.4M

drwxr-xr-x 1 root root 510 Dec 13 19:46 .

drwxr-xr-x 1 root root 164 Dec 13 19:42 ..

lrwxrwxrwx 1 root root 54 May 3 2023 build -> /usr/src/linux-5.14.21-150400.24.63-obj/x86_64/default

drwxr-xr-x 1 root root 94 May 3 2023 kernel

drwxr-xr-x 1 root root 60 Dec 13 19:37 mfe_aac

It is less likely you will run into this if you run ‘zypper update’ first. Note that this can take more than fifteen minutes to complete.

Next, reboot the Linux client and then run:

# zypper install kernel-default-devel

In the next and final article of this series, we’ll be looking at the configuration and management of the multipath client driver.

PowerScale Multipath Client Driver – Compiling on Ubuntu Linux

As discussed in the first article in this series, the new PowerScale multipath client driver enables performance aggregation of multiple PowerScale nodes through a single NFS mount point to one or many compute nodes.

There are several good reasons to build the PowerScale multipath client driver from scratch rather than just installing it from a pre-built Linux package. The primary motivation is typically that any minor version kernel mismatch on the Linux client will result in the driver not installing correctly. For example, kernel version 5.4.0-150-generic is incompatible with 5.4.0-167-generic. Both are incompatible with 5.15.0-91-generic, which has an upgraded kernel.

The multipath driver bits are available for download on the Dell Support Site to any customer that has OneFS entitlement:

https://www.dell.com/support/home/en-us/product-support/product/isilon-onefs/drivers

There is no license requirement for this driver, nor charge for it, and it’s provided as both pre-built Linux package, and customer-compliable source code. There’s a README file included with the code that provides basic instruction.

This multipath client driver runs on both physical and virtual machines, and across several popular Linux distros. The following matrix shows the currently supported variants, plus the availability of a pre-compiled driver package and/or self-compilation option.

Linux distribution Kernel version Upstream driver version (minimum) Multipath driver version Package

available

Self-

compile

OpenSUSE 15.4 5.14.x 4.x 1.x Yes Yes
Ubuntu 20.04 5.4.x 4.x 1.x Yes Yes
Ubuntu 22.04 5.15.x 4.x 1.x Yes Yes

While the multipath driver’s major release version—1.x—is correct in the table, the second digit release number will be frequently incremented as updated versions of the multipath client driver are released.

By design, the multipath driver only supports newer and most recent versions of the popular Linux distributions. Older Linux kernel versions often do not support full NFS client functionality, particularly for the ‘–remoteports’ and/or ‘–localports’ mount configuration options. Additionally, older and end-of-life Linux versions can often present significant security risks, especially once current vulnerability patches and hotfixes are no longer being made available.

Both x86 CPU architectures and GPU-based platforms, such as the NVIDIA DGX range, are supported.

Linux system Processor type Example
Physical CPU Dell PE R760
Physical GPU Dell PE XE9680

NVIDIA DGX H100

Virtual machine CPU VMware ESXi
Virtual machine GPU VMware vDGA

While there is no specific NFS or OneFS core configuration required on the PowerScale cluster side when using Linux clients with the Dell multipath driver, there are a couple of basic prerequisites The following OneFS support matrix on the top right of this slide lays out which driver functionality is available in what release, from OneFS 9.5 to current.

Version NFSv3, NFSv4.1 TCP NFSv3 RDMA NFSv4.1 RDMA NVIDIA SuperPOD
OneFS 9.5 Yes Yes No No
OneFS 9.7 Yes Yes Yes No
OneFS 9.9 Yes   Yes  Yes Yes

Also note that OneFS 9.9 is required for any NVIDIA SuperPOD deployments, because there are some performance optimizations in 9.9 specifically for that platform.

The following CLI commands can be run on the PowerScale cluster to verify its compatibility. The cluster’s current OneFS version can be easily determined using the following CLI command:

# uname -or

Isilon OneFS 9.9.0.0

Also, to confirm RDMA is supported and enabled:

# isi nfs settings global view | grep -i RDMA

   NFS RDMA Enabled: Yes

Additionally, both the dynamic and static network pools can be configured on the cluster for use with the multipath driver. If F710 nodes are being deployed in the cluster, OneFS 9.7 or later is required.

Note that when deploying an NVIDIA SuperPOD or BasePOD solution, the reference architecture mandates a PowerScale cluster composed of F710 all-flash nodes running OneFS 9.9 or later.

For a Linux client to successfully connect to a PowerScale cluster using the multipath driver, there are a few prerequisites that must be met:

  • The NFS client system or virtual machine must be running one of the following Linux versions:
Supported Linux Distribution Kernel Version
OpenSUSE 15.4 5.14.x
Ubuntu 20.04 5.4.x
Ubuntu 22.04 5.15.x

By design, the multipath driver only supports newer and most recent versions of the popular Linux distributions. Older Linux kernels often don’t include full NFS client functionality, particularly for the ‘–remoteports’ and ‘–localports’ mount options.

  • If RDMA is being configured, the client must contain an RDMA-capable Ethernet NIC, such as the Mellanox CX series.
  • The Linux client should have the ‘trace-cmd’ package installed, along with NFS client related packages.

For example, on an Ubuntu system:

# sudo apt install trace-cmd nfs-common

The following CLI commands can be used to verify the kernel version, and other pertinent details, of a Linux client:

# uname -a

Similarly, depending on the flavor of Linux, the following commands will show the details of the particular distribution:

# lsb_release -a

Or:

# cat /etc/os-release

 For security purposes, the driver downloads are signed with SHA256. Using Debian linux as an example, the driver components can be accessed as follows:

  1. Verify the SHA256 Checksum Manually

If you have a separate SHA256 checksum file, you can verify the checksum manually as follows:

First, calculate the checksum:

# sha256sum dellnfs-modules_4.0.24-Dell-Technologies.kver.5.4.0-190-generic_amd64.deb.signed

Then compare the output with the checksum provided.

  1. Extract the Signed Package

First, if not already available, install the necessary extraction tools:

# sudo apt-get install ar

Next, extract the signed driver file:

# ar x dellnfs-modules_4.0.24-Dell-Technologies.kver.5.4.0-190-generic_amd64.deb.signed

This should yield multiple extracted files, including the following:

 control.tar.xz, data.tar.xz, and debian-binary.

Unless all the Linux clients are known to be identical, the best practice is to build and install the driver per-client or you may experience failed installs.

Within Ubuntu (and certain other Linux distros) , Dynamic Kernel Module Support (DKMS) can be used to allow kernel modules to be generated from sources outside the kernel source tree. As such, DKMS modules can be automatically rebuilt when a new kernel is installed, enabling drivers to continue operating after a Linux kernel upgrade. Similarly, DKMS can enable a new driver to be installed on a Linux client running a slightly different kernel version, without the need for manual recompilation.

Considerations when building the multipath driver from source include:

  • The recommendation is to build the multipath driver on all supported Linux versions unless all NFS clients have exactly the same kernel versions.
  • Since a multipath driver binary install package is not provided for NVIDIA DGX platforms, the driver must be manually built with DKMS.

Dependent packages that should be added before building and installing the multipath driver include:

OS Dependent package Install command
Ubuntu 20 debhelper sudo apt-get install debhelper
Ubuntu 22 debhelper

nfs-kernel-server

sudo apt-get install debhelper

sudo apt-get install nfs-kernel-server

The driver source code compilation process is as follows:

  1. Download the driver source code from the repository

As mentioned previously, the driver source code can be obtained as a tarfile from the Dell Support driver download site.

  1. Unpack the driver source code on the Linux client

Once downloaded, this file can be extracted using the ‘tar’ utility. For example:

# tar -xvf <source_tarfile>
  1. Build the driver source code on the Linux client

Once downloaded to the Linux client, the multipath driver package source can be built with the following CLI command:

# ./build.sh bin

Note that, in general, a successful build is underway when the following output appears on the console:

…<build takes about ten minutes>

------------------------------------------------------------------

When the build is complete, a package file is created in the ./dist directory, located under the top level source code directory. For example:

# ls -lsia ./dist

total 1048-rw-r--r-- 1 root root 1069868 Mar 24 16:23 dellnfs-modules_4.0.22-dell.kver.5.15.0-89-generic_amd64.deb

If the kernel version, Linux distribution, or OFED are not supported, an error message will be displayed during the build process.

  1. Install the driver binaries on the Linux client

The previous blog article in this series describes the process for adding the driver binary package to a Linux client.

That said, when building the driver on Ubuntu, there are a couple of idiosyncrasies to be aware of.

When running Ubuntu 18.04 or later, the “dellnfs-ctl” script can be used to reload the NFS client modules as follows:

# dellnfs-ctl reload

Also, Ubuntu 22.x clients should also have the ‘nfs-kernel-server’ package installed. For example:

# sudo apt install nfs-kernel-server
  1. Install the *.deb package generated:
# sudo apt-get install ./dist/dellnfs-modules_*-generic_amd64.deb
  1. Regenerate running kernel image:
# sudo update-initramfs -u -k `uname -r`
  1. Check that the package is installed correctly:
# dpkg -l | grep dellnfs-modules

dellnfs-modules   2:4.0.22-dell.kver.5.4.0-150-generic amd64        NFS RDMA kernel modules

# dpkg -S /lib/modules/`uname -r`/updates/bundle/net/sunrpc/xprtrdma/rpcrdma.ko

dellnfs-modules: /lib/modules/5.4.0-150-generic/updates/bundle/net/sunrpc/xprtrdma/rpcrdma.ko
  1. Optionally reboot the Linux client:
# reboot
  1. Verify the module is running:
# dellnfs-ctl status

version: 4.0.22-dell
kernel modules: sunrpc rpcrdma compat_nfs_ssc lockd nfs_acl nfs nfsv3
services: rpcbind.socket rpcbind rpc-gssdrpc_pipefs: /run/rpc_pipefs

For NVIDIA DGX clients in particular, the Mellanox OpenFabrics Enterprise Driver for Linux (MLNX_OFED) is a single Virtual Protocol Interconnect (VPI) software stack that operates across the network adapters in DGX systems. MLNX_OFED is an NVIDIA-tested and packaged version of OFED which supports Ethernet, as well as Infiniband, using RDMA and kernel bypass APIs (OFED verbs).

When building the multipath driver on an DGX platform, or alongside a DKMS install of the Mellanox OFED driver package, there are a few extra steps required beyond the package manager install itself.

If a DKMS install is required by your system (typically NVDIA DGX platforms), the package will be formatted with the term ‘multikernel’ in the package name. For example:

# ls

dellnfs-dkms_4.5-OFED.4.5.1.0.1.1.gb4fdfac.multikel_all.deb

This indicates the package is built for DKMS and therefore must be installed by DKMS. After installing with your package manager, the following files will be present under the /usr/src directory:

# ls /usr/src

dellnfs-99.4.5  kernel-mft-dkms-4.22.1           linux-hwe-5.19-headers-5.19.0-45  mlnx-ofed-kernel-5.8  srp-5.8

iser-5.8        knem-1.1.4.90mlnx3               mlnx-nfsrdma-5.8                  ofa_kernel

isert-5.8       linux-headers-5.19.0-45-generic  mlnx-nvme-5.8                     ofa_kernel-5.8

Next, the following CLI command will install the driver:

# dkms install -m dellnfs -v 99.4.5

Creating symlink /var/lib/dkms/dellnfs/99.4.5/source ->

/usr/src/dellnfs-99.4.5

Kernel preparation unnecessary for this kernel. Skipping...

Building module:

cleaning build area...

./_dkms-run.sh -j8 KVER=5.19.0-45-generic

K_BUILD=/lib/modules/5.19.0-45-generic/build......................................

Once the DKMS installation is complete, either reload the driver with the ‘dellnfs-ctl’ utility, or reboot the client:

# dellnfs-ctl reload

Or:

# reboot

In the next article in this series, we’ll turn our attention to compiling the driver source on the OpenSUSE Linux platform.

PowerScale Multipath Client Driver Pre-built Package Installation

As mentioned in the first article in this series, the PowerScale multipath client driver driver is able to aggregate the performance of multiple PowerScale nodes through a single NFS mount point to one or more Linux clients.

The driver itself is a kernel module, and that means it needs to be installed alongside a corresponding kernel version to that which it was built on. Version matching is strict, right down to the minor build version.

There are two installation options provided for the PowerScale multipath client driver:

  • As a pre-built binary installation package for each of the supported Linux distribution versions listed below.
  • Or via source code under the GPL 2 open source license, which can be compiled at a customer site.

This article covers the first option, and outlines the steps involved with the installation of the pre-built binary driver package for the following, currently supported Linux versions:

Linux distribution Kernel version Upstream driver version (minimum) Multipath driver version Package

available

OpenSUSE 15.4 5.14.x 4.x 1.x ü
Ubuntu 20.04 5.4.x 4.x 1.x ü
Ubuntu 22.04 5.15.x 4.x 1.x ü

Package installation is typically handled best by the client Linux distro’s native package manager. Since it’s a kernel module, installing and updating the driver typically requires a reboot. PowerScale engineering anticipate periodically releasing updated driver packages to keep up with Linux on the supported platforms list, as well as fix bugs and add additional functionality.

This multipath client driver runs on both physical and virtual machines, and both x86 CPU architectures and GPU-based platforms, such as the NVIDIA DGX range, are supported.

While there is no specific NFS or OneFS core configuration required on the PowerScale cluster side when using Linux clients with the Dell multipath driver, there are a couple of basic prerequisites. The following OneFS support matrix on the top right of this slide lays out which driver functionality is available in what release, from OneFS 9.5 to current.

Version NFSv3, NFSv4.1 TCP NFSv3 RDMA NFSv4.1 RDMA NVIDIA SuperPOD
OneFS 9.5 Yes Yes No No
OneFS 9.7 Yes Yes Yes No
OneFS 9.9 Yes Yes Yes Yes

Also note that OneFS 9.9 is required for any NVIDIA SuperPOD deployments, because there are some performance optimizations in 9.9 specifically for that platform.

The following CLI commands can be run on the PowerScale cluster to verify its compatibility. The cluster’s current OneFS version can be easily determined using the following CLI command:

# uname -or

Isilon OneFS 9.9.0.0

Also, to confirm RDMA is supported and enabled:

# isi nfs settings global view | grep -i RDMA

   NFS RDMA Enabled: Yes

Additionally, both the dynamic and static network pools can be configured on the cluster for use with the multipath driver. If F710 nodes are being deployed in the cluster, OneFS 9.7 or later is required.

Note that when deploying an NVIDIA SuperPOD or BasePOD solution, the reference architecture mandates a PowerScale cluster composed of F710 all-flash nodes running OneFS 9.9 or later.

For a Linux client to successfully connect to a PowerScale cluster using the multipath driver, there are a few prerequisites that must be met, in addition to running one of the Linux versions listed above. These include:

  • If RDMA is being configured, the client must contain an RDMA-capable Ethernet NIC, such as the Mellanox CX series.
  • The Linux client should have the ‘trace-cmd’ package installed, along with NFS client related packages.

For example, on an Ubuntu system:

# sudo apt install trace-cmd nfs-common

The following CLI commands can be used to verify the kernel version, and other pertinent details, of a Linux client:

# uname -a

Similarly, depending on the flavor of Linux, the following commands will show the details of the particular distribution:

# lsb_release -a

Or:

# cat /etc/os-release

The multipath client driver is available for download on the Dell Support Site to any customer that has OneFS entitlement: For security purposes, the download files are signed with SHA256. Using Debian linux as an example, the driver components can be accessed as follows:

  1. Verify the SHA256 Checksum Manually

The downloaded driver package’s authenticity can be manually verified via its SHA256 checksum as follows:

First, calculate the checksum on the signed driver package:

# sha256sum dellnfs-modules_4.0.24-Dell-Technologies.kver.5.4.0-190-generic_amd64.deb.signed

Then compare the output with the value in the accompanying checksum file.

  1. Extract the Signed Package

First, if not already available, install the necessary extraction tools:

# sudo apt-get install ar

Next, extract the signed driver file:

# ar x dellnfs-modules_4.0.24-Dell-Technologies.kver.5.4.0-190-generic_amd64.deb.signed

This should yield multiple extracted files, including the following:

 control.tar.xz, data.tar.xz, and debian-binary.
  1. Repackage the File

If needed, the extracted contents can be repackaged into a standard ‘.deb’ package file:

# ar rcs dellnfs-modules_4.0.24-Dell-Technologies.kver.5.4.0-190-generic_amd64.deb debian-binary control.tar.xz data.tar.xz
  1. Install the Repackaged Debian File

Once repackaged, you can install the Debian package using the ‘dpkg’ utility. For example:

# sudo dpkg -i dellnfs-modules_4.0.24-Dell-Technologies.kver.5.4.0-190-generic_amd64.deb

Package installation is handled using the native package manager, and each of the supported Linux distributions uses the following format and package installation utility:

Linux Distribution Package Manager Package Utility
OpenSUSE RPM Zipper
Ubuntu Deb apt-get / dpkg

The RPM and DEB packages can either be obtained from the Dell download site or built manually at the customer site.

The multipath client driver is provided as a pre-built binary installation package for each of the supported Linux distribution versions. The process for package installation varies slightly across the different Linux versions, but the basic process is as follows:

Note that the multipath driver installation does require a reboot of the Linux system.

For Ubuntu, the following procedure describes how to install the multipath driver package:

  1. Download the DEB package.
  2. Verify that DEB package and Kernel Version Match.

Compare the package version and the kernel version to ensure they are an exact match. If they are not an exact  match, do not install the package. Instead, build the driver from source according to the instructions in the “Building and Installing the Driver’ section later in this document.

  1. Install the DEB package.
# sudo apt-get install ./dist/dellnfs-modules_*-generic_amd64.deb
  1. Check package is installed correctly.
# dpkg -l | grep dellnfs-modules

dellnfs-modules   2:4.0.22-dell.kver.5.4.0-150-generic amd64        NFS RDMA kernel modules

# dpkg -S /lib/modules/`uname -r`/updates/bundle/net/sunrpc/xprtrdma/rpcrdma.ko

dellnfs-modules: /lib/modules/5.4.0-150-generic/updates/bundle/net/sunrpc/xprtrdma/rpcrdma.ko

Regenerate the running kernel image.

# sudo update-initramfs -u -k `uname -r`
  1. Reboot the Linux client.
# reboot
  1. Confirm the module and services are running.
# dellnfs-ctl status

version: 4.0.22-dell
kernel modules: sunrpc rpcrdma compat_nfs_ssc lockd nfs_acl nfs nfsv3
services: rpcbind.socket rpcbind rpc-gssdrpc_pipefs: /run/rpc_pipefs

If the services are not up, run the ‘dellnfs-ctl reload’ command to start the services.

  1. Verify an NFS mount

Attempt a mount, since NFS occasionally needs to create a symlink to rpc.statd. For example:

# mount -t nfs -o proto=rdma,port=20049,rsize=1048576,wsize=1048576,vers=3,nconnect=32,remoteports=10.231.180.95-10.231.180.98,remoteports_offset=1 10.231.180.95:/ifs/data/fio /mnt/test/

Created symlink /run/systemd/system/remote-fs.target.wants/rpc-statd.service → /lib/systemd/system/rpc-statd.service.

In the above, a symlink created on the first mount. Perform a reload to confirm the service is running correctly. For example:

# dellnfs-ctl reload

dellnfs-ctl: stopping service rpcbind.socket

dellnfs-ctl: umounting fs /run/rpc_pipefs

dellnfs-ctl: unloading kmod nfsv3

dellnfs-ctl: unloading kmod nfs

dellnfs-ctl: unloading kmod nfs_acl

dellnfs-ctl: unloading kmod lockd

dellnfs-ctl: unloading kmod compat_nfs_ssc

dellnfs-ctl: unloading kmod rpcrdma

dellnfs-ctl: unloading kmod sunrpc

dellnfs-ctl: loading kmod sunrpc

dellnfs-ctl: loading kmod rpcrdma

dellnfs-ctl: loading kmod compat_nfs_ssc

dellnfs-ctl: loading kmod lockd

dellnfs-ctl: loading kmod nfs_acl

dellnfs-ctl: loading kmod nfs

dellnfs-ctl: loading kmod nfsv3

dellnfs-ctl: mounting fs /run/rpc_pipefs

dellnfs-ctl: starting service rpcbind.socket

dellnfs-ctl: starting service rpcbind


Similarly, for OpenSUSE and SLES, the driver package installation steps are as follows:

  1. Download the driver RPM package.
  2. Verify that RPM package and Kernel Version Match.

Compare the package version and the kernel version to ensure they are an exact match. If they are not an exact  match, do not install the package. Instead, build the driver from source according to the instructions in the “Building and Installing the Driver’ section later in this document.

  1. Install the downloaded RPM package.
# zypper in ./dist/dellnfs-4.0.22-kernel_5.14.21_150400.24.97_default.x86_64.rpm
Loading repository data...
Reading installed packages...
Resolving package dependencies...

The following NEW package is going to be installed:
  dellnfs

1 new package to install.
  1. Check the installed files.
# rpm -qa | grep dell
dellnfs-4.0.22-kernel_5.14.21_150400.24.100_default.x86_64
  1. Reboot the Linux client.
# reboot
  1. Verify the services are started.
# systemctl start rpcbind
# systemctl start nfs
# systemctl status nfs
nfs.service - Alias for NFS client
     Loaded: loaded (/usr/lib/systemd/system/nfs.service; disabled; vendor preset: disabled)
     Active: active (exited) since Wed 2023-12-13 15:11:09 PST; 2s ago
    Process: 15577 ExecStart=/bin/true (code=exited, status=0/SUCCESS)
   Main PID: 15577 (code=exited, status=0/SUCCESS)
  1. Verify the client driver is loaded with ‘dellnfs-ctl’ script.
# dellnfs-ctl status
version: 4.0.22
kernel modules: sunrpc
services: rpcbind.socket rpcbind
rpc_pipefs: /var/lib/nfs/rpc_pipefs
  1. Verify an NFS mount

Attempt a mount, since NFS occasionally needs to create a symlink to rpc.statd. For example:

# mount -t nfs -o proto=rdma,port=20049,rsize=1048576,wsize=1048576,vers=3,nconnect=32,remoteports=10.231.180.95-10.231.180.98,remoteports_offset=1 10.231.180.95:/ifs/data/fio /mnt/test/

Created symlink /run/systemd/system/remote-fs.target.wants/rpc-statd.service → /lib/systemd/system/rpc-statd.service.

In the above, a symlink is created on the first mount. Next, perform a reload to confirm the service is running correctly. For example:

# dellnfs-ctl reload

dellnfs-ctl: stopping service rpcbind.socket

dellnfs-ctl: umounting fs /run/rpc_pipefs

dellnfs-ctl: unloading kmod nfsv3

dellnfs-ctl: unloading kmod nfs

dellnfs-ctl: unloading kmod nfs_acl

dellnfs-ctl: unloading kmod lockd

dellnfs-ctl: unloading kmod compat_nfs_ssc

dellnfs-ctl: unloading kmod rpcrdma

dellnfs-ctl: unloading kmod sunrpc

dellnfs-ctl: loading kmod sunrpc

dellnfs-ctl: loading kmod rpcrdma

dellnfs-ctl: loading kmod compat_nfs_ssc

dellnfs-ctl: loading kmod lockd

dellnfs-ctl: loading kmod nfs_acl

dellnfs-ctl: loading kmod nfs

dellnfs-ctl: loading kmod nfsv3

dellnfs-ctl: mounting fs /run/rpc_pipefs

dellnfs-ctl: starting service rpcbind.socket

dellnfs-ctl: starting service rpcbind

Unlike installing the driver, removing it does not typically require a client reboot, and can also be performed via the appropriate package manager for the Linux flavor.

Also, be aware that there are no upgrade or patching systems for the driver. This means that if a client’s kernel version is updated, the module must be re-built or a matching package re-installed. And correspondingly, if there is an update to the dellnfs package, the module must be re-installed.

# sudo update-initramfs -u -k `uname -r`

Next, perform a reload to confirm the service is running correctly. For example:

# dellnfs-ctl reload

dellnfs-ctl: stopping service rpcbind.socket

dellnfs-ctl: umounting fs /run/rpc_pipefs

dellnfs-ctl: unloading kmod nfsv3

dellnfs-ctl: unloading kmod nfs

dellnfs-ctl: unloading kmod nfs_acl

dellnfs-ctl: unloading kmod lockd

dellnfs-ctl: unloading kmod compat_nfs_ssc

dellnfs-ctl: unloading kmod rpcrdma

dellnfs-ctl: unloading kmod sunrpc

dellnfs-ctl: loading kmod sunrpc

dellnfs-ctl: loading kmod rpcrdma

dellnfs-ctl: loading kmod compat_nfs_ssc

dellnfs-ctl: loading kmod lockd

dellnfs-ctl: loading kmod nfs_acl

dellnfs-ctl: loading kmod nfs

dellnfs-ctl: loading kmod nfsv3

dellnfs-ctl: mounting fs /run/rpc_pipefs

dellnfs-ctl: starting service rpcbind.socket

dellnfs-ctl: starting service rpcbind

Note that there are no upgrade or patching systems available for the ‘dellnfs’ multipath driver module. If a Linux client’s kernel version is updated, the module must be rebuilt or a matching package reinstalled. Similarly, if there is an update to the ‘dellnfs’ package, the module must be reinstalled.

Uninstalling the multipath client driver does not require a reboot and can be performed using the standard package manager for the pertinent Linux distribution. This unloads the loaded module and then removes the files. As such, uninstallation is a fairly trivial process.

The package manager commands for each Linux version to remove a package are as follows:

OS Package removal command
Ubuntu sudo apt-get autoremove <package_name>
OpenSUSE/SLES zypper remove -u <package_name>

In the next article in this series, we’ll take a look at the specifics of multipath driver binary package installation.