PowerScale InsightIQ 6.3

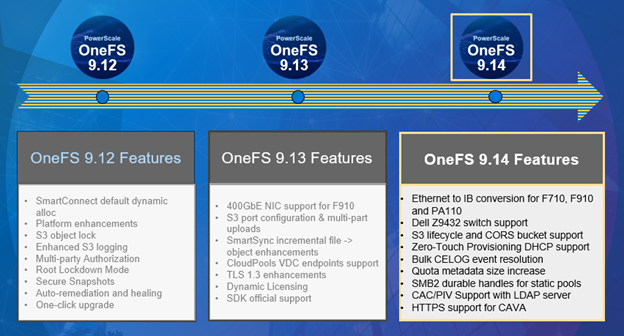
It’s been a sprightly spring for Dell PowerScale. Hot on the heels of the OneFS 9.14 launch comes the introduction of the innovative new PowerScale InsightIQ 6.3 release.

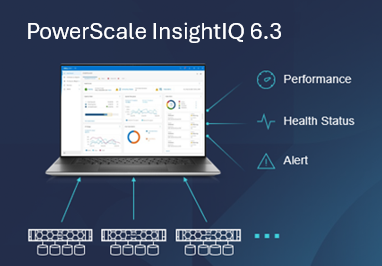
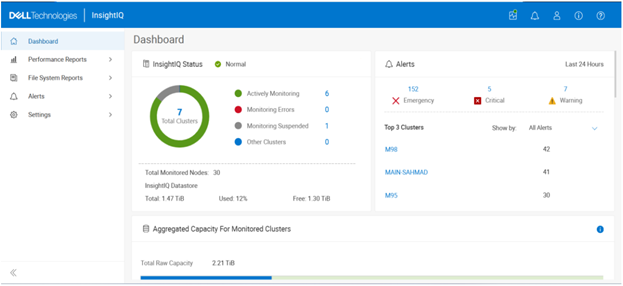
InsightIQ provides powerful performance and health monitoring and reporting functionality, helping to maximize PowerScale cluster efficiency. This includes advanced analytics to optimize applications, correlate cluster events, and the ability to accurately forecast future storage needs.

So what new functionality does this InsightIQ 6.3 release add to the PowerScale metrics and monitoring mix?

Additional functionality includes:

Feature IIQ 6.3 Functionality
Expanded Ecosystem ·         Ecosystem support extended to include RHEL 10.0 and PowerScale OneFS 9.14.
Virtual Cluster Support ·         Monitoring of virtual clusters on AWS or Azure to also use InsightIQ no matter where InsightIQ is located.
Support Granular Protocol Operations ·         Break down performance metrics by S3 operations, helping analyze and troubleshoot S3 protocol issues.
Multiple values per category filtering ·         Filter on multiple IP, host, node and protocol, enabling administrators comparing performance by variety of individuals against the same period.
SSO support ·         IIQ users can enable SSO via Azure AD or ADFS. SAML only
Upgrade ·         In-place, direct upgrade from 6.1 and 6.2 to 6.3

The new PowerScale InsightIQ 6.3 release introduces several significant enhancements aimed at improving flexibility, security, and usability. IIQ 6.3 expands platform compatibility by extending ecosystem support to Red Hat Enterprise Linux (RHEL) 10.0 and PowerScale OneFS 9.14.

InsightIQ 6.3 also adds support for monitoring virtual clusters deployed on AWS or Azure, allowing InsightIQ to monitor environments regardless of where the application itself is hosted. Performance visibility for file and object workloads has been enhanced through support for granular protocol operations, enabling metrics to be analyzed and broken down by individual file and/or object actions to streamline troubleshooting of protocol-related issues. Filtering capabilities have been improved to allow multiple values per category—such as IP addresses, hosts, nodes, and protocols—making it easier to compare performance across multiple entities within the same time range.

Security and operational integration are further strengthened with Single Sign-On support using SAML-based authentication through Microsoft ADFS or Azure Entra ID. InsightIQ 6.3 also supports direct, in-place upgrades from versions 6.1 and 6.2, simplifying the upgrade process for existing Scale and Simple deployments.

InsightIQ 6.3 introduces a new AI‑based assistant, too. This AI assistant is an intelligent, document‑aware companion designed to help users quickly find answers, understand product capabilities, and troubleshoot issues related to InsightIQ and PowerScale. The assistant draws its responses from supported documentation, including InsightIQ and PowerScale documentation, release notes, and knowledge base (KB) articles.

InsightIQ 6.3 continues to offer the same two deployment models as its predecessors:

Deployment Model Description
InsightIQ Scale Resides on bare-metal Linux hardware or virtual machine.
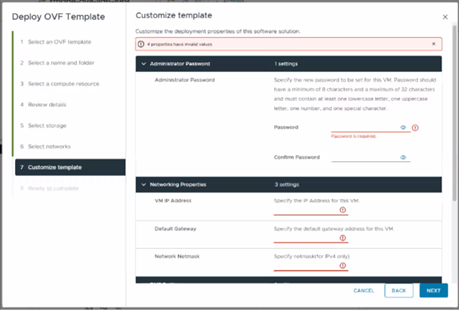
InsightIQ Simple Deploys on a VMware hypervisor (OVA).

The InsightIQ Scale version resides on bare-metal Linux hardware or virtual machine, whereas InsightIQ Simple deploys via OVA on a VMware hypervisor.

InsightIQ v6.x Scale enjoys a substantial breadth-of-monitoring scope, with the ability to encompass 504 nodes across up to 20 clusters.

Additionally, InsightIQ v6.x Scale can be deployed on a single Linux host. This is in stark contrast to InsightIQ 5’s requirements for a three Linux node minimum installation platform.

Deployment:

The specific deployment options and hardware requirements for installing and running InsightIQ 6.x are as follows:

Attribute InsightIQ 6.3 Simple InsightIQ 6.3 Scale
Scalability Up to 10 clusters or 252 nodes Up to 20 clusters or 504 nodes
Deployment On VMware, using OVA template RHEL, SLES, or Ubuntu with deployment script
Hardware requirements VMware v15 or higher:

·         CPU: 8 vCPU

·         Memory: 16GB

·         Storage: 1.5TB (thin provisioned);

Or 500GB on NFS server datastore

Up to 10 clusters and 252 nodes:

·         CPU: 8 vCPU or Cores

·         Memory: 16GB

·         Storage: 500GB

Up to 20 clusters and 504 nodes:

·         CPU: 12 vCPU or Cores

·         Memory: 32GB

·         Storage: 1TB

Networking requirements 1 static IP on the PowerScale cluster’s subnet 1 static IP on the PowerScale cluster’s subnet

Ecosystem support:

The InsightIQ ecosystem includes VMware ESXi v9.0.1 in addition to VMware v8 OU3, Ubuntu 24.04 Online deployment and OpenStack RHOSP 21 with RHEL 9.6, SLES 15 SP4, and Red Hat Enterprise Linux (RHEL) versions 9.6 and 8.10. This allows customers who have standardized upon VMware to run an InsightIQ 6.3 Scale deployment image on an ESXi 9.0.1 hypervisor to monitor the latest OneFS versions.

Qualified on InsightIQ 6.2 InsightIQ 6.3
OS (IIQ Scale) RHEL 8.10, RHEL 9.6, and SLES 15 SP4 RHEL 8.10, RHEL 9.6, RHEL 10.0, SLES 15 SP4
PowerScale OneFS 9.5 to 9.13 OneFS 9.7 to 9.14
VMware ESXi ESXi v8.0U3, and ESXi v9.0.1 ESXi v8.0U3, and ESXi v9.0.1
VMware Workstation Workstation 17 Free Version Workstation 17 Free Version
Ubuntu Ubuntu 24.04 Online deployment Ubuntu 24.04 Online deployment
OpenStack RHOSP 21 with RHEL 9.6 RHOSP 21 with RHEL 9.6

Similarly, in addition to deployment on VMware ESXi 8 and 9, the InsightIQ Simple version can also be installed for free on VMware Workstation 17, providing the ability to stand up InsightIQ in a non-production or lab environment for trial or demo purposes, without incurring a VMware licensing charge.

Additionally, the InsightIQ OVA template is under 5GB in size, and with an installation time of generally less than 12 minutes.

In the next article in this series, we’ll dig into the details of the additional functionality that debuts in this new InsightIQ 6.3 release.

OneFS Cluster Inventory Request API

The OneFS cluster inventory request API  enables automated workflows to query detailed hardware and infrastructure inventory information from a PowerScale cluster. This capability, which was introduced in OneFS 9.12, is particularly useful for orchestration and discovery use cases, functioning in a manner similar to how LLDP is used within networking environments to collect device and topology data.

The new REST API provides comprehensive inventory details at both the node and backend fabric levels. Node‑level inventory includes general system information, baseboard management controller (BMC) data, network interface details, and attached storage drives. In addition, the response includes backend switch inventory information for supported Ethernet switches running firmware versions later than 10.5.2. InfiniBand switches are not currently supported by this feature. The API also returns the last known inventory state for any component that is offline at the time of the request, such as during upgrades or maintenance, allowing visibility into previously collected data even when a component is temporarily unavailable.

The inventory collection mechanism uses a producer‑consumer design model. On the producer side, cron jobs periodically query cached node and switch information and store the results as inventory cache files within the /ifs filesystem. For node‑level inventory, OneFS collects system and hardware details and saves them to the node information cache. For backend switches, inventory data is retrieved from the switch information cache. The cluster inventory request API also leverages the existing OneFS FlexNet service and its data store to collect network interface details such as IP addressing and interface configuration.

On the consumer side, a new platform API handler reads these cached inventory files from /ifs and assembles them into a consolidated inventory report, which is then returned to the requesting client. This design avoids real‑time polling of hardware during API requests, improving both performance and reliability.

Here are some details regarding the new cron jobs and event triggers:

Inventory Update Method Storage Location Frequency
Node cache inventory update Cron scheduled Node info cache /ifs/.ifsvar/db/node_info_cache/* Every 12 hours
Backend switch inventory update Cron scheduled Switch info cache /ifs/.ifsvar/db/switch_info_cache/* Every 15 minutes
Event-driven node-level update Event triggered Node info cache /ifs/.ifsvar/db/node_info_cache/* Update on /ifs mount events
Node networking update Event triggered Flexnet DB /ifs/.ifsvar/module/flexnet/* IP network change events

Several periodic and event‑driven mechanisms are used to keep the inventory data current. A scheduled cron job updates the node‑level inventory cache every twelve hours, while a separate cron job refreshes the backend switch inventory cache every fifteen minutes. For example:

# cat /etc/crontab | grep inventory

# run the gather inventory switches info every 15 minutes

*/15    *       *       *       *       root    isi_ropc /usr/bin/isi_gather_inventory -t switches

# run the gather inventory node cache info every 12 hours

0       */12    *       *       *       root    /usr/bin/isi_gather_inventory -t node

In addition to these scheduled updates, OneFS uses event‑driven triggers to refresh inventory data when relevant system changes occur. For example, when the /ifs filesystem is mounted, OneFS automatically triggers a node‑level inventory update to ensure the latest data is captured. Network‑related inventory data is updated in response to IP configuration changes via the FlexNet database.

The inventory cache data is stored in three locations within /ifs, consisting of the node inventory cache, the switch inventory cache, and the FlexNet database for network interface information. Customers access the inventory data through a single REST API endpoint provided by the OneFS platform API at /platform/<version>/cluster/inventory:

http://<x.x.x.x>:8080/platform/26/cluster/inventory

Or with python:

# python -c 'import isi.papi.basepapi as papi; resp = papi.get("/cluster/inventory");print(resp.body)'

Note that access to this inventory endpoint requires the requesting user to possess both the ‘ISI_PRIV_DEVICES’ and ‘ISI_PRIV_NETWORK’ RBAC privileges.

Here’s an example of this substantial inventory report from an F210 cluster:

When queried, the API returns a structured inventory report comprising two primary sections: a

  • Nodes array
  • Switches array

For example:

Specifically, each ‘nodes’ object represents an individual node in the cluster and includes nested objects for its drives, BMC details, and network interfaces. The ‘switches’ array represents the entire backend fabric, and may include multiple backend switches, with each switch object containing its corresponding port‑level information.

If a backend switch query fails, the behavior depends on whether valid inventory data was previously collected. If historical data exists, the API returns the last known switch inventory state. If the backend switch has never been successfully queried, the switches section of the response will be empty. This behavior ensures that the inventory report remains consistent and informative even when transient connectivity issues occur.

The PowerScale OneFS cluster inventory request API (`isi.papi.basepapi`) allows native Python integration for cluster inventory operations, offering more robust error handling and authentication management compared to direct HTTP requests. This native API approach is particularly well-suited for DevOps automation workflows, enabling seamless integration with configuration management tools, CI/CD pipelines, and infrastructure-as-code frameworks.

The fundamental approach to accessing cluster inventory through the OneFS cluster inventory request API involves importing the `isi.papi.basepapi` module and using the `get()` method to retrieve inventory data. This method provides automatic session management, authentication handling, and response parsing, simplifying the development of automation scripts. For example, here’s a basic python script to perform a node and drive inventory on a cluster:

#!/usr/bin/env python3

import isi.papi.basepapi as papi

try:

    resp = papi.get("/cluster/inventory")

    if resp.status == 200:

        inventory = resp.body

        nodes = inventory.get("nodes", [])

        drive_count = sum(len(node.get("drives", [])) for node in nodes)

        print(f"Cluster contains {len(nodes)} nodes")

        print(f"Total drives: {drive_count}")

    else:

        print(f"Error: {resp.status} - {resp.body}")

except Exception as e:

    print(f"API Error: {e}")

The script’s output is along the following lines:

# python3 inventory.py

Cluster contains 228 nodes

Total drives: 4342

From a troubleshooting perspective, OneFS also includes an internal ‘isi_gather_inventory’ command line (CLI) utility that can be used to manually initiate inventory collection.

Component Details
Node information isi_gather_inventory -t node
Switch information isi_gather_inventory -t switches
Log file /var/log/messages

Note that the ‘isi_gather_inventory’ CLI tool can only be run by root.

Separate commands are available to gather node inventory data or backend switch information, and related messages are written to the system log. The utility does not generate standalone log files, but inventory cache contents can be collected using standard OneFS support log packages, which include archived copies of the node and switch inventory cache data.

PowerScale inventory monitoring can be readily integrated into modern DevOps and infrastructure automation workflows. Within CI/CD pipelines—such as those implemented in Jenkins—the OneFS cluster inventory API enables automated pre-deployment validation, ensuring cluster health and configuration integrity before changes are applied. This approach supports continuous change detection and compliance verification as part of the delivery lifecycle.

Configuration management tools such as Ansible can leverage the cluster inventory API for dynamic inventory generation and real-time state validation. By querying current cluster conditions during playbook execution, automation workflows can enforce guardrails that ensure configuration changes occur only when predefined operational criteria are met. Similarly, Terraform can consume inventory data via external data sources, enabling adaptive infrastructure-as-code patterns that align deployments with the actual cluster state and reduce configuration drift.

GitOps workflows further benefit from PowerScale inventory integration by embedding automated validation checks into controllers and operators. Infrastructure changes are applied only when cluster conditions are healthy and compliant, providing a reliable mechanism for policy-driven storage management at scale.

Beyond deployment orchestration, the cluster inventory API supports a wide range of operational use cases. Capacity planning automation can be achieved through periodic collection of node and drive inventory data, combined with trend analysis to forecast growth and trigger proactive alerts as utilization thresholds are approached. Performance monitoring systems, such as Prometheus, can ingest inventory and performance metrics to provide end-to-end observability, enabling threshold-based alerting and long-term performance optimization.

Maintenance workflows can also be automated using the API’s health and hardware inventory data to detect failing components and initiate remediation processes. Integration with IT service management and procurement systems enables automated ticket creation and replacement part ordering, while detailed hardware metadata ensures compatibility and accuracy. Finally, regular synchronization with configuration management databases (CMDBs) ensures inventory accuracy, supporting change management, auditability, and compliance reporting across the storage environment.

OneFS User Account Lockout for File Provider Configuration and Management

In this second article in the series we turn our focus to the configuration and management of the user account lockout functionality.

As discussed in the previous article, OneFS 9.13 adds three new account lockout configuration settings for the file provider. The ‘lockout-threshold’ parameter defines the maximum number of failed authentication attempts allowed before an account is locked. The ‘lockout-window’ specifies the time period over which those failed attempts are counted; if the threshold is not reached within this window, the failure counter automatically resets. Lastly, ‘lockout-duration’ determines how long the account remains locked after the threshold has been exceeded.

In operation, when repeated incorrect password attempts, whether from a legitimate user or a malicious actor, reach the configured threshold within the specified window, the account is locked for the defined duration. During this lockout period, authentication is prohibited even if the correct credentials are provided. Cluster admins can review the account’s lockout status and manually unlock it if desired. Setting the threshold to zero disables the lockout mechanism altogether. Additionally, if failed attempts are spaced beyond the lockout window or a successful authentication occurs before the threshold is reached, the failure counter resets and no lockout is enforced.

So how does user account lockout work in practice?

  1. Starting with a PowerScale cluster running a fresh OneFS 9.13 install, a new user (‘testlock1’), is added to the system zone’s file provider.
# pw user add -n testlock1
  1. Next, the user ‘testlock1 is added to the ‘AuditAdmin’ role and the password is reset:
# isi auth roles modify AuditAdmin –add-user testlock1

# isi auth users reset-password testlock1

Z,71GGsuw,36l.XK
  1. The user’s lockout status can be verified as follows:
# isi auth users view testlock1 | grep -i lock

                  Locked: No

As expected, our new ‘testlock1 file provider user’s lockout status as not locked.

Since this is a fresh 9.13 install, the user lockout parameters are still their default configuration.

# isi auth file view System | grep -i lockout

       Lockout Duration: Now

      Lockout Threshold: 0

         Lockout Window: Now

As such, the lockout threshold value of ‘0’ above indicates that user account lockout is currently disabled.

  1. Next, the lockout-threshold is set to ‘3’, the lockout-duration to 60 seconds, and the lockout window 60 seconds too.
# isi auth file modify System --lockout-threshold=3 --lockout-duration=60 --lockout-window=60

Enabling the user lockout function may make the administrator account vulnerable to Denial of Service (DoS) attacks, potentially rendering the entire system unmanageable. Therefore, please choose the configuration values for lockout-duration and lockout-window carefully.

Be cautious when setting these values:

- Avoid setting lockout-duration to 0 (which means indefinitely) or a very long time, as this may result in being locked out for an extended period or even indefinitely.

- Avoid setting lockout-window to 0 (which means the failed attempt count will never be reset) or a very long time, as this may require waiting too long before the failed attempt is reset or may never be reset.

Additionally, to minimize the risk of Denial of Service (DoS) attacks, please configure the accounts that are excluded from the user lockout feature.

Are you sure you want to proceed with this action? (yes/[no]): yes

Before OneFS enables this configuration, it displays the above warning. This message warning that enabling lockout comes with the risk of DoS attacks by rendering the system unmanageable, and suggests excluding admin account(s).
  1. The success of the above ‘isi auth file modify’ command can be verified as follows:
# isi auth file view System | grep -i lockout

       Lockout Duration: 60

      Lockout Threshold: 3

         Lockout Window: 60
  1. After three attempts to log in as user ‘testlock1 with the wrong password within the lockout window of 60 seconds, this user ‘testlock1 is locked out:
login as: testlock1

Keyboard-interactive authentication prompts from server:

| Password:

End of keyboard-interactive prompts from server

Access denied

Keyboard-interactive authentication prompts from server:

| Password:

End of keyboard-interactive prompts from server

Access denied

Keyboard-interactive authentication prompts from server:

| Password:

End of keyboard-interactive prompts from server

Access denied

Keyboard-interactive authentication prompts from server:

| Password:

This can be verified from a cluster admin account, such as ‘root’, as follows:

# isi auth users view testlock1 | grep -i lock

                  Locked: Yes
  1. Since the lockout duration is also set to 60 seconds, after one minute this account will be unlocked.

Alternatively, this account can be unlocked manually by an administrator. For example:

# isi auth users view testlock1 | grep -i lock

                  Locked: Yes

# isi auth users modify testlock1 -–unlock

# isi auth users view testlock1 | grep -i lock

                  Locked: No

If a user is added to the exclusion list, the account, in this case ‘testlock1’ is automatically exempted from this lockout function. For example:

# isi_gconfig registry.Services.lsass.Parameters.Providers.File.Instance.System.LockoutExcludedUsers=’[“testlock1”]’

Note that OneFS does not check whether a user account name is valid when it is added to the exclusion list.

The lockout duration value can be specified in several ways. For example, a simple numeric value equates to seconds. For example:

# isi auth file modify System --lockout-duration=60

The above configuration will lockout for sixty seconds (one minute).

Other more convenient time period notation can also be used, such as M=minute, H=hour, D=day, W=week, etc.

For example, a two day lockout duration can be expressed as follows:

# isi auth file modify System --lockout-duration=1D

Or:

# isi auth file modify System --lockout-duration=48H

The user account lockout feature provides a configurable exclusion list, which allows certain users (eg. ‘root’ and/or ‘administrator’) to be exempted from lockout. This exclusion list is housed in gconfig, and is configured using the following ‘isi_gconfig’ CLI command permutations:

File Provider Action Command
System Modify isi_gconfig registry.Services.lsass.Parameters.Providers.File.Instance.System.LockoutExcludedUsers=’[“user1”, ”user2”]’
View isi_gconfig registry.Services.lsass.Parameters.Providers.File.Instance.System.LockoutExcludedUsers
Non-system Create isi_gconfig registry.Services.lsass.Parameters.Providers.File.Instance._key.<file_provider_name>._multi_sz.LockoutExcludedUsers._name=LockoutExcludedUsers
Modify isi_gconfig registry.Services.lsass.Parameters.Providers.File.Instance._key.<file_provider_name>._multi_sz.LockoutExcludedUsers.value=’[“user3”, “user4”]’
View isi_gconfig registry.Services.lsass.Parameters.Providers.File.Instance._key.<file_provider_name>._multi_sz.LockoutExcludedUsers

So, for example, the syntax for adding ‘testlock1’ and ‘testlock2’ system zone user accounts to the lockout exclusion list is as follows:

# isi_gconfig registry.Services.lsass.Parameters.Providers.File.Instance.System.LockoutExcludedUsers=’[“testlock1”, ”testlock2”]’

# isi_gconfig registry.Services.lsass.Parameters.Providers.File.Instance.System.LockoutExcludedUsers

registry.Services.lsass.Parameters.Providers.File.Instance.System.LockoutExcludedUsers (char**) = [ "testlock1", "testlock2" ]

Note that the system file provider exclusion list is already present by default, so there is no need for a create option. However, for a non-system zone file provider, the exclusion list needs to be created first, before it can be modified and/or viewed.

To guard against cluster admin accounts becoming inadvertently locked out, a recommended practice is generally to add ‘root’ and/or ‘administrator’ to the exclusion list. For example:

# isi_gconfig registry.Services.lsass.Parameters.Providers.File.Instance.System.LockoutExcludedUsers='["root","administrator"]'

# isi_gconfig registry.Services.lsass.Parameters.Providers.File.Instance.System.LockoutExcludedUsers

registry.Services.lsass.Parameters.Providers.File.Instance.System.LockoutExcludedUsers (char**) = [ "root", "administrator" ]

Also, be aware that configuring the ‘lockout duration’ parameter to ‘0’ means the account will never get unlocked automatically, so exercise caution when configuring lockout duration.

PowerScale OneFS 9.14

As we gear up for next month’s Dell Technologies World, PowerScale is welcoming spring with the debut of the innovative OneFS 9.14 release, which officially shipped today (April 8, 2026).

OneFS 9.14 brings a wave of enhancements across spectrum of the PowerScale platform. As the product continues to evolve, this release focuses on strengthening core functionality, expanding hardware and object support, delivering stronger security capabilities, improving serviceability, and elevating overall usability and customer experience.

Below is an early look at what’s coming, with deeper technical dives on individual features to follow in future posts.

Streamlined Deployment and Automation Enhancements

OneFS 9.14 introduces zero‑touch provisioning DHCP support, enabling nodes to automatically receive their IP addresses during deployment. This capability is designed to simplify large‑scale automated rollouts and reduce the operational overhead associated with manual node configuration.

The release also adds a new REST API for syslog management, giving customers the ability to automate creation and updates of syslog configurations. Instead of navigating the GUI and making manual adjustments, storage admins can now easily script and manage logging settings programmatically, making it ideal for environments with tightly automated and/or DevOps-driven workflows.

Customers who rely heavily on SmartQuotas quota description metadata gain more flexibility as well. The maximum description field size in configuration objects increases from 1 KB to 4 KB and 4095 ASCII characters, allowing for richer metadata that is easier to search, categorize, and align with operational requirements.

SMB and Object Storage Improvements

SMB environments will benefit from SMB2 durable handle support for static network pools, which keeps file handles active on the server briefly after a client disconnects. This means that if a connection drops, users can reconnect without re‑authenticating—improving application resilience while maintaining security boundaries.

On the object storage side, OneFS 9.14 introduces support for S3 CORS buckets, enabling modern web applications to retrieve and display resources without running into browser security restrictions. New S3 lifecycle‑management capabilities also arrive in this release, including automated cleanup of incomplete multipart uploads and rule‑based object deletion. These features help keep buckets clean, reduce storage waste, and simplify long-term data management.

Security Advancements

Security continues to be a critical pillar of the platform. OneFS 9.14 expands authentication capabilities by adding CAC/PIV support for LDAP server hosts, extending the existing HTTPS‑only support. This enhancement allows customers operating in high‑security environments, especially governmental or other regulated sectors, to integrate more seamlessly with their identity infrastructure.

Additionally, CAVA antivirus scanning now supports HTTPS, replacing the older HTTP requirement. As more customers move to encrypted communications by default, this enhancement ensures that antivirus scanning can remain active without compromising network security posture.

Platform & Hardware Enablement Updates

The release introduces backend support for the Dell Z9432 top‑of‑rack switch, enabling higher connectivity density. A second supplier option for Ethernet HB NICs (Broadcom) also enters the portfolio, expanding hardware flexibility and supply-chain resilience.

Serviceability receives a boost as well. A diagnostics tool previously reserved for internal service teams is being productized, providing the ability to capture deeper performance and slow‑processing data on demand. This tool can be activated and disabled by the customer and provides valuable insight during troubleshooting, helping reduce time to resolution.

Finally, there’s also new in‑band automation for upgrading or downgrading backend switch firmware, making infrastructure maintenance significantly easier. Customers gain additional control over their system health workflows with the ability to enable or disable automatic downloads of healthcare definitions—an important feature for environments with strict update governance.

In summary, OneFS 9.14 brings the following new features and functionality to the Dell PowerScale ecosystem:

Category Key Features
Unlock Platform Power for Gen AI ·         Conversion of front-end Ethernet to IB in F710, F910, & PA110

·         Dell Z9432 switch for Backend Flat/ToR Support

Objects Support Enhancements ·         S3 CORS buckets support

·         S3 Lifecycle management for incomplete MPU

·         S3 Lifecycle Management for buckets

Serviceability ·         Productize On-Slow-Op Processing

·         In-band Switch Upgrade for DNOS Flat topology in OneFS

·         Better support for bulk resolving of CELOG Events

·         Ability to enable/disable automatic download of HCF definitions and repair actions

Useability ·         DHCP support for OneFS for Zero Touch Provisioning

·         Rest access to create and update syslog configuration

·         Add custom metadata to quota description 1k to 4k increase

·         SMB2 durable handles for static network pools

Security ·         CAC/PIV Support with LDAP server host

·         HTTPS support in OneFS for CAVA

OneFS 9.14 is shaping up to be a significant release that strengthens the PowerScale ecosystem across automation, object storage, security, serviceability, and hardware support. With a blend of immediate production-ready enhancements and forward‑looking technical previews, this release continues the platform’s momentum toward greater scalability, operational simplicity, and enterprise-grade resilience. Stay tuned for deep-dive articles where we explore each feature in detail and discuss how customers can leverage them in real-world deployments.

We’ll be taking a deeper look at the new OneFS 9.14 features and functionality in blog articles over the course of the next few weeks.

Meanwhile, the new OneFS 9.14 code is available on the Dell Support site, as both an upgrade and reimage file, allowing both installation and upgrade of this new release.

For existing clusters running a prior OneFS release, the recommendation is to open a Service Request with to schedule an upgrade. To provide a consistent and positive upgrade experience, Dell Technologies is offering assisted upgrades to OneFS 9.14 at no cost to customers with a valid support contract. Please refer to this Knowledge Base article for additional information on how to initiate the upgrade process.