OneFS ChangelistCreate Job

Received a couple of recent questions around the OneFS ChangelistCreate job, so thought it would make for a useful topic to explore over the course of the next couple of blog articles.

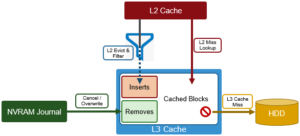
A changelist is essentially a catalog of the attributes and objects which changed between two checkpoints. For example, a list of the files, dirs, etc which were added, removed, modified, etc, typically between two file system snapshots. In OneFS, changelists are implemented as system B-trees (SBTs), with entries being indexed by ID or LIN, and containing information such as path, type and resulting size of the corresponding object. The SnapshotIQ framework is leveraged as the underlying mechanism for taking the required snapshots.

Historically, changelists were primarily utilized by SyncIQ as the foundation for differential replication. However, they are now used more widely, such as by FSAnalyze for InsightIQ, and IndexUpdate for the SmartPools FilePolicy job. Changelists are also of considerable interest to partners and vendors looking to integrate third party data protection and management software, solutions and tools with OneFS.

The OneFS Job Engine contains a class of jobs which utilize a ‘changelist’, rather than LIN-based scanning. The changelist approach analyzes two snapshots to find the LINs which changed, or delta,  between the snapshots, and then examines and catalogs the detailed changes.

The ChangelistCreate job supports the creation of a changelist for any two snapshots with a common root path. The job itself is started manually and runs by default with a LOW impact policy and a priority of 5.

# isi job types view ChangelistCreate

         ID: ChangelistCreate

Description: Create a list of changes between two snapshots with matching root paths.

    Enabled: Yes

     Policy: LOW

   Schedule: -

   Priority: 5

When a new ChangelistCreate job starts, it checks to see whether a finalized changelist with matching snapshot IDs already exists. If so, it completes quickly and successfully. Next, the job checks whether an in-progress changelist with matching snapshot IDs already exists. In this case, it retrieves and inspects the metadata entry (LIN 1) to find the ID of the job most recently operating on the changelist. If the ID references an active (e.g. paused) job, then the new job will exit with an EINPROGRESS error. Otherwise, the new job sets the metadata job ID value to its own job ID and proceeds with changelist creation.

ChangelistCreate scans all the snapshot tracking files (STFs) from the older snapshot (inclusive) to the newer snapshot (exclusive) in order to build a comprehensive list of applicable, changed LINs. When complete, it  compiles a changelist through a combination of tree walks, stats, and path lookups.

Under the hood, the ChangelistCreate job has four distinct phases:

Phase Description
1.    Summarize Performs basic validation and snapshot locking, determining any restart state, and summary STF creation.
2.    Examine Handles the stat, path lookup, scoped tree walks, and changelist entry creation activity.
3.    Merge Moves entries from a temporary ‘split-lin’ changelist to the primary changelist.
4.    Enumerate Calculates the final changelist entry count.

If a ChangelistCreate job fails or is cancelled before a changelist is finalized, the partial results can typically still be used by a subsequent job, with a couple of caveats. Specifically, stoppage at the summarize phase will result in the loss of all summary STF creation work, and stoppage at the ‘examine’ phase will result in any subsequent job(s) still iterating over all LINs in the summary STF but avoiding scoped tree walks, etc when a changelist entry already exists.

The ChangeListCreate ‘examine’ phase employs recursive logic, which is used to divide the task into work items to allow for distributed, interruptible processing.

For example, consider the processing of a LIN for a regular file, with no hardlinks or alternate data streams, which was changed at some point between the older and newer snapshots:

  1. The job engine calls a task’s ‘item_process’ routine, which, seeing that its work stack is empty, reads the next LIN from its allotted range in the summary STF, and then creates a work item for the LIN.
  2. This work item is pushed on to the work stack and  a handler invoked.
  3. The handler runs, sees that the LIN references a file, sets the work item’s type approiately, and returns.
  4. The ‘item_process’ routine addresses the newest work item on the stack.
  5. The  handler runs, a changelist entry is created for the LIN, and the handler pops the work item off the stack and returns.
  6. At this point the work stack is empty and the cycle repeats.

A depth-first approach ensures that a changelist entry is not created for a parent directory until entries have been created for all descendants covered by the recursive logic (the exception being LINs whose work items are split, which are written to a temporary “split-lin” changelist). As a result, if a prior job is interrupted, a subsequent job can easily identify and ignore branches that have already been fully processed.

From the administrator’s perspective, in addition to the regular job engine controls, OneFS also provides the ‘isi_changelist_mod’ CLI utility as the primary way to interact with changelists:

# isi_changelist_mod

Description:

    Manage snapshot changelists.

Usage:

    isi_changelist_mod -a cl_name ...            Display all entries.

    isi_changelist_mod -h                        Display help.

    isi_changelist_mod -i {cl_name | --all} ...  Describe changelist(s).

    isi_changelist_mod -k {cl_name | --all}      Kill changelist(s).

    isi_changelist_mod -l                        List changelists.


Options for entry display (-a) and changelist describe (-i):

    --B         Replace non-printable path characters with octal codes.

                See ascii(7).

    --b         As --B, but use C escape codes whenever possible,

                e.g. \t for TAB.

    --p         Only display path.

    --q         Replace non-printable path characters with '?'.

    --s         Append '/' to paths of directories.

    --t         Use shquote(3) on path strings to make them suitable for

                command-line arguments.

    --w         Display raw path strings. (Default.)


Additional options for entry display (-a):

    --d den     Fractional entry range denominator (2 <= den <= 1024).

    --n num     Fractional entry range numerator (1 <= num <= den).

    --v         Prepend '+' and '-' to paths of added and removed entries.

    For changelist entry st_* field descriptions, see stat(2).

Here’s an example command output entry for a particular changed file:

st_ino=4297261065 st_mode=0100644 st_size=3 st_atime=1429572712 st_mtime=1429572712 st_ctime=1429572712 st_flags=224 cl_flags=01 path=/ifs/data/test1/f3

The ‘st_*’ fields above are derived from ‘stat’ output, and correspond to the following:

ST Field Description
st_ino File’s inode number.
st_mode File type and mode .
st_size Size of the file (if it is a regular file or symbolic link).
st_atime Last access time of file data (epoch).
st_mtime Time of last modification of file data (epoch).
st_ctime File’s last status change timestamp (epoch time of last change to the inode)
st_flags User defined flags enabled for the file.

Similarly, the changelist entry status information field ‘cl_flags’ can have one of the following values:

CL Field Description
01 Added or moved to.
02 Removed of moved from.
04 Path changed – moved to/from.
10 Contains Alternate Data Stream(s)
20 Is an Alternate Data Stream
40 Hardlinks exist.

So, from the example above, we can see that the object has the following pertinent attributes:

  • Its inode number is 4297261065
  • It resides in the file system at /ifs/data/test1/f3.
  • The st_mode=0100644 shows it’s a file (value=1)
    • with user/group/all mode bits indicating user=read/write (6), group=read (4), everyone=read(4).
  • It’s newly created file, as indicated by the cl_flags=01 field’

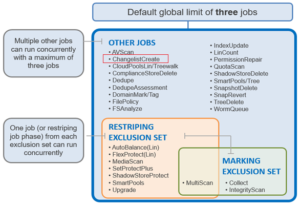
If desired, OneFS can also be allow multiple ChangeListCreate jobs to run concurrently:

# isi_gconfig -t job-config jobs.types.changelistcreate.allow_multiple_instances=true

In the next article, we’ll walk through an example of creating, accessing and managing a changelist via both the CLI and platform API.

OneFS Caching – L3 Performance and Sizing

In the final article in this caching series we’ll take a look at some of the L3 cache’s performance benefits and attributes – plus how to size the cache and other considerations and good practices.

One of the goals of L3 is to deliver solid benefits right out of the box for a wide variety of workloads. However, L3 cache usually provides more benefit for random and aggregated workloads than for sequential and optimized workflows – typically delivering similar IOPS as SmartPools metadata-read strategy, for user data retrieval (reads).

Although the benefit of L3 caching is highly workflow dependent, the following general rules can be assumed:

  • During data prefetch operations, streaming requests are intentionally sent directly to the spinning disks (HDDs), while utilizing the L3 cache SSDs for random IO.
  • SmartPools metadata-write strategy may be the better choice for metadata write and/or overwrite heavy workloads, for example EDA and certain HPC workloads.
  • L3 cache can deliver considerable latency improvements for repeated random read workflows over both non-L3 nodepools and SmartPools metadata-read configured nodepools.
  • L3 can also provide improvements for parallel workflows, by reducing the impact to streaming throughput from random  reads (streaming meta-data).
  • The performance of OneFS job engine jobs can also be increased by L3 cache

L3 cache is enabled by default for Isilon A200, A200 and the older Gen5 NL and HD nodes that contain SSDs, and cannot be disabled. On these platforms, L3 cache runs in a metadata only mode. By storing just metadata blocks, L3 cache optimizes the performance of operations such as system protection and maintenance jobs, in addition to metadata intensive workloads.

Figuring out the size of the active data, or working set, for your environment is the first step in an L3 cache SSD sizing exercise.

L3 cache utilizes all available SSD space over time. As a rule, L3 cache benefits more with more available SSD space. However, sometimes losing spindle count hurts more than adding cache helps a workflow. If possible add a larger capacity SSD rather than multiple smaller SSDs.

L3 cache sizing involves calculating the correct amount of SSD space to fit the working data set. This can be done by using the isi_cache_stats command to periodically capture L2 cache statistics on an existing cluster.

Run the following commands based on the workload activity cycle, at job start and job end. Initially run isi_cache_stats –c in order to reset, or zero out, the counters. Then run isi_cache_stats –v at workload activity completion and save the output. This will help determine an accurate indication of the size of the working data set, by looking at the L2 cache miss rates for both data and metadata on a single node.

These cache miss counters are displayed as 8KB blocks. So an L2_data_read.miss value of 1024 blocks represents 8 MB of actual missed data.

The formula for calculating the working set size is:

(L2_data_read.miss + L2_meta_read.miss) = working_set size

Once the working set size has been calculated, a good rule of thumb is to size L3 SSD capacity per node according to the following formula:

L2 capacity + L3 capacity >= 150% of working set size.

There are diminishing returns for L3 cache after a certain point. With too high an SSD to working set size ratio, the cache hits decrease and fail to add greater benefit. Conversely, when compared to SmartPools SSD strategies, another benefit of using SSDs for L3 cache is that performance will degrade much more gracefully if metadata does happen to exceed the SSD capacity available.

Repeated random read workloads will typically benefit most from L3 cache via latency improvements. When sizing L3 SSD capacity, the recommendation is to use a small number (ideally no more than two) of large capacity SSDs rather than multiple small SSDs to achieve the appropriate capacity of SSD(s) that will fit your working data set.

When it comes to replacing failed L3 cache SSDs, the same procedure should be employed as for replacing other storage drives. However, L3 cache SSDs do not require FlexProtect or AutoBalance to run post replacement, so it’s typically a much faster process.

For a legacy node pool using a SmartPools metadata-write strategy, the conventional wisdom is to avoid converting it to L3 cache unless:

  1. The SSDs are seriously underutilized.
  2. The overall I/O mix has changed and represents a significant drop in metadata write percentage.
  3. The SSDs in the pool are oversubscribed and spilling over to hard disk.
  4. Your primary concern is SSD longevity.

OneFS Caching – The Key to L3

Unlike L1 and L2 cache, which are always present and operational in storage nodes, L3 cache is enabled per node pool via a simple on or off configuration setting. Other than this, there are no additional visible configuration settings to change. When enabled, L3 consumes all the SSD in node pool. Also, L3 cannot coexist with other SSD strategies, with the exception of Global Namespace Acceleration. However, since they’re exclusively reserved, L3 Cache node pool SSDs cannot participate in GNA.

Note that L3 cache is typically enabled by default on any new node pool containing SSDs.

Once the SSDs have been reformatted and are under the control of L3 cache, the WebUI removes them from usable storage:

There is also a global setting which governs whether to enable L3 cache by default for new node pools.

When converting the SSDs in a particular nodepool to use L3 cache rather than SmartPools, progress can be estimated by periodically tracking SSD space (used capacity) usage over the course of the conversion process. Additionally, the Job impact policy of the Flexprotect_Plus or SmartPools job responsible for the L3 conversion can be reprioritized to run faster or slower. This has the effect of conversely increasing or decreasing the impact of the conversion process on cluster resources.

OneFS provides tools to accurately assess the performance of the various levels of cache at a point in time. These cache statistics can be viewed from the OneFS CLI using the isi_cache_stats command. Statistics for L1, L2 and L3 cache are displayed for both data and metadata.

# isi_cache_stats

Totals            

l1_data: a 446G 100% r 579G  85% p 134G  89%, l1_encoded: a 0.0B   0% r 0.0B   0% p 0.0B   0%, l1_meta: r  82T 100% p 219M  92%,

l2_data: r 376G  78% p 331G  81%, l2_meta: r 604G  96% p 1.7G   4%,

l3_data: r   6G  19% p 0.0B   0%, l3_meta: r  24G  99% p 0.0B   0%

For more detailed and formatted output, a verbose option of the command is available using the ‘isi_cache_stats -v’ option:

# isi_cache_stats -v

------------------------- Totals -------------------------

l1_data:

        async read (8K blocks):
                aread.start:              58665103 / 100.0%
                aread.hit:                58433375 /  99.6%
                aread.miss:                 231378 /   0.4%
                aread.wait:                    350 /   0.0%


        read (8K blocks):
                read.start:               89234355 / 100.0%
                read.hit:                 58342417 /  65.4%
                read.miss:                13082048 /  14.7%
                read.wait:                  246797 /   0.3%
                prefetch.hit:             17563093 /  19.7%


        prefetch (8K blocks):
                prefetch.start:           19836713 / 100.0%
                prefetch.hit:             17563093 /  88.5%


l1_encoded:
        async read (8K blocks):
                aread.start:                     0 /   0.0%
                aread.hit:                       0 /   0.0%
                aread.miss:                      0 /   0.0%
                aread.wait:                      0 /   0.0%


        read (8K blocks):
                read.start:                      0 /   0.0%
                read.hit:                        0 /   0.0%
                read.miss:                       0 /   0.0%
                read.wait:                       0 /   0.0%
                prefetch.hit:                    0 /   0.0%


        prefetch (8K blocks):
                prefetch.start:                  0 /   0.0%
                prefetch.hit:                    0 /   0.0%


l1_meta:
        read (8K blocks):
                read.start:              11030213475 / 100.0%
                read.hit:                11019567231 /  99.9%
                read.miss:                 8070087 /   0.1%
                read.wait:                 2548102 /   0.0%
                prefetch.hit:                28055 /   0.0%


        prefetch (8K blocks):
                prefetch.start:              30483 / 100.0%
                prefetch.hit:                28055 /  92.0%


l2_data:
        read (8K blocks):
                read.start:               63393624 / 100.0%
                read.hit:                  5916114 /   9.3%
                read.miss:                 4289278 /   6.8%
                read.wait:                 9815412 /  15.5%
                prefetch.hit:             43372820 /  68.4%


        prefetch (8K blocks):
                prefetch.start:           53327065 / 100.0%
                prefetch.hit:             43372820 /  81.3%


l2_meta:
        read (8K blocks):
                read.start:               82823463 / 100.0%
                read.hit:                 78959108 /  95.3%
                read.miss:                 3643663 /   4.4%
                read.wait:                    1758 /   0.0%
                prefetch.hit:               218934 /   0.3%


        prefetch (8K blocks):
                prefetch.start:            5517237 / 100.0%
                prefetch.hit:               218934 /   4.0%


l3_data:
        read (8K blocks):
                read.start:                4418424 / 100.0%
                read.hit:                   817632 /  18.5%
                read.miss:                 3600792 /  81.5%
                read.wait:                       0 /   0.0%
                prefetch.hit:                    0 /   0.0%


        prefetch (8K blocks):
                prefetch.start:                  0 /   0.0%
                prefetch.hit:                    0 /   0.0%


l3_meta:
        read (8K blocks):
                read.start:                3104472 / 100.0%
                read.hit:                  3087217 /  99.4%
                read.miss:                   17255 /   0.6%
                read.wait:                       0 /   0.0%
                prefetch.hit:                    0 /   0.0%


        prefetch (8K blocks):
                prefetch.start:                  0 /   0.0%
                prefetch.hit:                    0 /   0.0%


l1_all:
        prefetch.start:                   19867196 / 100.0%
        prefetch.misses:                         0 /   0.0%

l2_all:
        prefetch.start:                   58844302 / 100.0%
        prefetch.misses:                     48537 /   0.1%

It’s worth noting that for L3 cache, the prefetch statistics will always read zero, since it’s a pure eviction cache and does not utilize data or metadata prefetch.

Due to balanced data distribution, automatic rebalancing, and distributed processing, OneFS is able to leverage additional CPUs, network ports, and memory as the system grows. This also allows the caching subsystem (and, by virtue, throughput and IOPS) to scale linearly with the cluster size.

OneFS Caching – Workings and Mechanics

In this article we’ll dig into the workings and mechanics of OneFS read caching a bit deeper…

L1 cache interacts with the L2 cache on any node it requires data from, and the L2 cache interacts with both the storage subsystem and L3 cache. L3 cache can be enabled or disabled at a nodepool level. L3 cached blocks are stored on one or more SSDs within the node and each node in the same node nodepool has to have L3 cache enabled

Here are the relative latency of OneFS Cache Hits and Misses:

Cache Hit Miss
L1 10us L2
L2 100us L3, (or Hard Disk)
L3 200us Hard Disk
Hard Disk 1-10ms x

Note: These latency numbers may vary in an active cluster.

L2 is typically more beneficial than L1 because a hit avoids a higher latency operation. An L1 cache hit avoids a back-end round-trip to fetch the data, whereas an L2 cache hit avoids a SATA disk seek in the worst case. This is a dramatic difference in both relative and absolute terms. For SATA drives, an L2 miss is two orders of magnitude above a hit compared to one for L1, and a single back-end round-trip is typically a small portion of a full front-end operation.

L2 is preferable because it is accessible to all nodes. Assuming a workflow with any overlap among nodes, it is preferable to have the cluster’s DRAM holding L2 data rather than L1. In L2, a given data block is only cached once and invalidated much less frequently. This is why storage nodes are configured with a drop-behind policy on file data. Nodes without disks will not drop behind since there is no L2 data to cache.

When a read request arrives from a client, OneFS determines whether the requested data is in local cache. Any data resident in local cache is read immediately. If data requested is not in local cache, it is read from disk. For data not on the local node, a request is made from the remote nodes on which it resides. On each of the other nodes, another cache lookup is performed. Any data in the cache is returned immediately, and any data not in the cache is retrieved from disk. When the data has been retrieved from local and remote cache (and possibly disk), it is returned back to the client.

Each level of OneFS’ cache hierarchy utilizes a different strategy for cache eviction, to meet the particular needs of that cache type. For L1 cache in storage nodes, cache aging is based on a drop-behind algorithm. L2 cache utilizes a Least Recently Used algorithm, or LRU, since it is relatively simple to implement, low-overhead, and performs well in general. By contrast, the L3 cache employs a first-in, first-out eviction policy (or FIFO) since it’s writing to what is effectively a specialized linear filesystem on SSD.

For OneFS, a drawback of LRU is that it is not scan resistant. For example, a OneFS Job Engine job or backup process that scans a large amount of data can cause the L2 cache to be flushed. This is mitigated to a large degree by the L3 cache. Other eviction policies have the ability to promote frequently accessed entries such that they are not evicted by scanning entries, which are accessed only once.

OneFS uses two primary sources of information for predicting a file’s access pattern and pre-populate the cache with data and metadata blocks before they’re requested:

  1. OneFS attributes that can be set on files and directories to provide hints to the filesystem.
  2. The actual read activity occurring on the file.

This technique is known as ‘prefetching’, whereby the latency of an operation is mitigated by predictively copying data into a cache before it has been requested. Data prefetching is employed frequently and is a significant benefactor of the OneFS flexible file allocation strategy.

Flexible allocation involves determining the best layout for a file based on several factors, including cluster size (number of nodes), file size, and protection level (e.g.+2 or +3). The performance effect of flexible allocation is to place a file on the largest number of drives possible, given the above constraints.

The most straightforward application of prefetch is file data, where linear access is common for unstructured data, such as media files. Reading and writing of such files generally starts at the beginning and continues unimpeded to the end of the file. After a few requests, it becomes highly likely that a file is being streamed to the end.

OneFS data prefetch strategies can be configured either from the command line or via SmartPools. File data prefetch behavior can be controlled down to a per-file granularity using the ‘isi set/get’ command’s access pattern setting. The available selectable file access patterns include concurrency (the default), streaming, and random.

# isi get tstfile1

POLICY    LEVEL PERFORMANCE COAL  FILE

default   6+2/2 streaming on    tstfile1

# isi set -l random tstfile1

# isi get tstfile1

POLICY    LEVEL PERFORMANCE COAL  FILE

default   6+2/2 random      on    tstfile1

Metadata prefetch occurs for the same reason as file data. Metadata scanning operations, such as finds and treewalks, can benefit. However, the use of metadata prefetch is less common because most accesses are random and unpredictable.

OneFS also provides a mechanism for prefetching files based on their nomenclature. In film and TV production, “streaming” often takes a different form as opposed to streaming an audio file. Each frame in a movie will often be contained in an individual file. As such, streaming reads a set of image files and prefetching across files is important. The files are often a subset of a directory, so directory entry prefetch does not apply. Ideally, this would be controlled by a client application, however in practice this rarely occurs.

To address this, OneFS has a file name prefetch facility. While file name prefetch is disabled by default, as with file data prefetch, it can be enabled with file access settings. When enabled, file name prefetch guesses the next sequence of files to be read by matching against several generic naming patterns.

Flexible file handle affinity (FHA) is a read-side algorithm designed to better utilize the internal threads used to read files. Using system configuration options and read access profiling, the number of operations per thread can be tuned to improve the efficiency of reads. FHA maps file handles to worker threads according to a combination of system settings, locality of the read requests (in terms of how close the requested addresses are), and the latency of the thread(s) serving requests to a particular client.

Note that prefetch does not apply to the L3 cache, since L3 is populated with ‘interesting’ L2 blocks dropped from memory by L2’s least recently used cache eviction algorithm.

Blocks evicted from L2 are candidates for inclusion in L3, and a filter is employed to reduce the quantity and increase the value of incoming blocks. Because L3 is a first in, first out (FIFO) cache, filtering is performed ahead of time. By selecting blocks that are more likely to be read again, L3 can both limit SSD churn and enhance the quality of the L3 cache contents.

The L3 filter uses several heuristics to evaluate which candidate blocks will likely be most valuable and should go to L3 cache. In general, L3 prefers metadata/inode to data blocks. And the guiding principle for data blocks is that the per-block cost of re-reading a sequential cluster of blocks from disk is much lower than performing random reads from disk. For example, if a block is a “random” read (ie. there are no neighboring blocks on this disk in L2), then it is always included in L3. Conversely, If the block is part of a sequential cluster of 16 or more blocks (128KB), it is not evicted to L3. As such, the L3 cache can be most effective, per capacity, by addressing random reads.

The most frequently accessed data and metadata on a node should just remain in L2 cache and not get evicted to L3. For the next tier of cached data that’s accessed frequently enough to live in L3, but not frequently enough to always live in RAM, there’s a mechanism in place to keep these semi-frequently accessed blocks in L3.

To maintain this L3 cache persistence, when the kernel goes to read a metadata or data block, the following steps are performed:

1) First, L1 cache is checked. Then, if no hit, L2 cache is consulted.

2) If a hit is found in memory, it’s done.

3) If not in memory, L3 is then checked.

4) If there’s an L3 hit, and that item is near the end of the L3 FIFO (last 10%), a flag is set on the block which causes it to be evicted into L3 again when it is evicted out of L2.

Additionally, any un-cached job engine metadata requests will always come from disk and bypass L3 cache, so they do not displace user-cached blocks from L3 cache. As new versions are written, the journal notifies L3, which invalidates and removes the dirty block(s) from its cache.