In the previous article, we took a look at the preparation and activation of OneFS security hardening. Now we turn out attention to its management and troubleshooting.
Once the STIG profile has been successfully activated, the bulk of the administrative attention is typically then focused on monitoring. However, applying a hardening profile is one of multiple steps needed to configure a truly STIG-compliant PowerScale cluster. These additional components include:
| Component | Tasks |
| Audit | Configure remote syslog servers for auditing. |
| Authentication | Configure secure auth provider, SecurityAdmin account, and default restricted shell. |
| CELOG | Create event channel for security officers and system admin to monitor /root and /var partition usage, audit service, security verification, and account creation. |
| MFA | Enable and configure multi-factor authentication. |
| NTP | Configure secure NTP servers with SHA256 keys. |
| SMB | Configure SMB global settings and defaults.
Enable SMB encryption on shares. |
| SNMP | Enable SNMP and configure SNMPv3 settings. |
| SSO | Configure single sign-on. |
| SyncIQ | Configure SyncIQ to use CA certificates so both the source and target clusters (primary and secondary DSCs) have both Server Authentication and Client Authentication set in their Extended Key Usages fields. |
We will cover the above topics and related tasks in detail in the next article in this series.
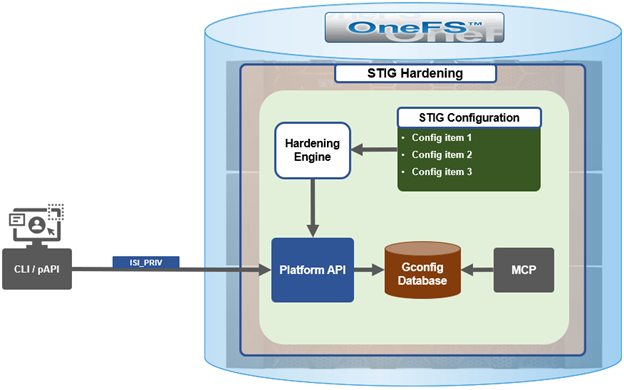
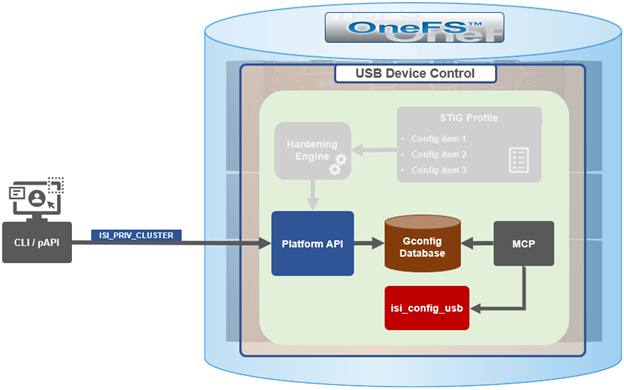
When hardening is activated, the security hardening engine reads the STIG configuration from its config files. Sets of rules, or config items, are applied to the hardening configuration to increase security and/or ensure STIG compliance. These rules are grouped by profile, which contain collections of named rules. Profiles are now stored in separate .xml files under /etc/isi_hardening/profiles.
Currently there is just one profile available (STIG), but the infrastructure is in place to support additional profiles as an when they are required.
Similarly, the individual rules are stored in separate .xml files under /etc/isi_hardening/rules.
In OneFS 9.5 and later, these rules are grouped by functional area affected vs. release, and can now apply to platform API configuration ‘collections’. For example, a rule can be applied to all NFS exports or all SyncIQ policies. In addition to actionable rules, ‘check-only’ rules are supported which apply no changes.
As may be apparent by now, OneFS security hardening is currently managed from the CLI and platform API only. There is currently no WebUI area for hardening configuration.
Note that is strongly advised not to perform administrative actions until after STIG security profile activation has completed across all nodes in the cluster.
When it comes to troubleshooting the enablement and operation of a STIG hardening profile on a cluster, there are a cope of useful places to look.
The first step is to check the hardening report. In OneFS 9.5 and later, the hardening engine reporting infrastructure enables detailed reports to be generated that indicate which hardening rules are applied or not – as well as the cluster’s overall compliance status. For example, from the following non-compliant cluster:
# isi hardening reports create

...............Hardening operation complete.

# isi hardening reports list

Name  Applied  Status        Creation Date            Report Age

-----------------------------------------------------------------

STIG  No       Not Compliant Sat Apr 22 04:28:40 2023 2m1s

-----------------------------------------------------------------

Total: 1

# isi hardening reports view STIG | more

Name                              Location  Status      Setting

----------------------------------------------------------------------------------------------

logout_zsh_clear_screen           Node 1    Not Applied /etc/zlogout

logout_profile_clear_screen       Node 1    Not Applied /etc/profile

logout_csh_clear_screen           Node 1    Not Applied /etc/csh.logout

require_password_single_user_mode Node 1    Not Applied /etc/ttys

set_password_min_length_pam_01    Node 1    Not Applied /etc/pam.d/system

set_password_min_length_pam_02    Node 1    Not Applied /etc/pam.d/other

set_password_min_length_pam_03    Node 1    Not Applied /etc/pam.d/passwd

set_password_min_length_pam_04    Node 1    Not Applied /etc/pam.d/passwd

disable_apache_proxy              Node 1    Not Applied /etc/mcp/templates/isi_data_httpd.conf

disable_apache_proxy              Node 1    Not Applied /etc/mcp/templates/isi_data_httpd.conf

disable_apache_proxy              Node 1    Not Applied /etc/mcp/templates/isi_data_httpd.conf

set_shell_timeout_01              Node 1    Not Applied /etc/profile

set_shell_timeout_02              Node 1    Applied     /etc/zshrc

set_shell_timeout_03              Node 1    Not Applied /etc/zshrc

set_shell_timeout_04              Node 1    Not Applied /etc/csh.cshrc

set_dod_banner_02                 Node 1    Not Applied symlink:/etc/issue

check_node_default_umask          Node 1    Applied     umask

--More—(byte 2185)
As indicated in the truncated output above, the vast majority of the hardening elements on node 1 of this cluster have not been successfully applied. Note that these reports can be generated regardless of cluster hardening status.
Next, there are a couple of logfiles that can often yield useful clues and information:
- /var/log/hardening.log
- /var/log/hardening_engine.log
After scrutinizing these logfiles, manually running the hardening worker process and monitoring its output (stdout and stderr) is typically the next course of action.
The hardening service can be shut down if it’s running as follows:
# isi services -a | grep -i hard

   hardening_service    Hardening Service                        Enabled

# isi services -a hardening_service disable

# ps -auxw | grep -i hard

#
The following syntax can be used to manually run the hardening worker process on a node:
# /usr/bin/isi_hardening/hardening_worker.py --profile STIG --action <action>
In the above, ‘<action>’ can be one of ‘apply’, ‘defaults’, or ‘report_create’.
De-activating Hardening
After applying the STIG hardening profile to a OneFS 9.5 or later cluster, it is possible to re-apply the default (non-hardened) configuration with the following CLI syntax, which will undo the changes that hardening invoked. For example:
# isi hardening disable STIG

.........Hardening operation complete.
Note that with OneFS 9.5 and earlier, the ‘disable’ attempts to undo the effects of hardening, but does not guarantee a full restore of a prior cluster configuration.
This differs from the OneFS 9.4 and earlier, which uses the ‘isi hardening revert’ CLI command and process:
# isi hardening revert

Revert Started

This may take several minutes

……

Reverting Hardening profile successful

#

# isi hardening status

Cluster Name:  TME1

Hardening Status:  Not Hardened
Note that OneFS 9.5 security hardening does not support CEE (as well as ICAP and a number of other protocols). Specifically, CEE currently does not support TLS, and the STIG hardening profile disables non-TLS communications.
The STIG security profile In OneFS 9.5 and later automatically enables the host-based firewall, enforcing the specific ports and protocols required for the various cluster services. Ensure that the default OneFS port numbers and protocols do not conflict with any custom port or protocol configuration.
After the STIG security profile is activated on a cluster, certain STIG rules do not apply. For example, when a new user is added to the cluster, some values are system defaults rather than STIG defaults. After configuration changes are complete, reapply the STIG security profile for STIG defaults. Run a new hardening report to confirm if any parameters are no longer STIG compliant. The recommendation is to check the hardening report frequently, especially after running administrative commands, to detect whether any parameters are no longer STIG compliant.
Additionally, the following table lists the components and protocols that are not currently supported by OneFS 9.5 STIG hardening or do not meet FIPS compliance requirements:
| Protocol / Component | Detail |
| SMB without encryption | Without SMB3 encryption enabled, the SMB protocol relies on weak cryptography, and does not meet FIPS requirements. |
| NFS without krb5p | The NFS protocol without Kerberos (krb5p) relies on weak cryptography, and does not meet FIPS requirements. |
| HDFS | The Hadoop HDFS protocol relies on weak cryptography, and does not meet FIPS requirements. |
| S3 via HTTP | The S3 protocol over HTTP relies on weak cryptography, and does not meet FIPS requirements. |
| CEE | Dell Common Event Enabler (CEE) relies on weak cryptography, and does not meet FIPS requirements. |
| ICAP/CAVA | ICAP and CAVA antivirus protocols rely on weak cryptography, and do not meet FIPS requirements. |
| NIS | NIS protocol relies on weak cryptography, and does not meet FIPS requirements. |
| SFTP | SFTP protocol lacks file audit capabilities. |
| SmartLock | A cluster configured for SmartLock compliance mode is incompatible with STIG hardening. |