OneFS 9.14 introduced HTTPS support for the Common AntiVirus Agent (CAVA), enhancing the existing scanning solution with secure communication between the PowerScale cluster and Dell Common Event Enabler (CEE) server and enabling operation in hardening mode.
CAVA a service that runs on the CEE server, often referred to as CEE‑CAVA. It receives file access requests from the CAVA client interface on OneFS (also known as OneFS‑CAVA) and attempts to access the specified file over SMB. During this process, the antivirus engine residing on the CEE server scans the file. If CEE‑CAVA can successfully access and scan the file without detecting any threats, it returns a response indicating that the file is not infected. Conversely, if a threat is identified or access conditions indicate an issue, it responds with a message indicating that the file is infected.
Prior to OneFS 9.14, communication between the OneFS‑CAVA agent and the CEE‑CAVA service was conducted over HTTP, which did not provide secure transport. As a result, CAVA was automatically disabled on clusters operating in hardening mode. However, customers have expressed a strong requirement to enable CAVA while maintaining compliance with hardening mode security standards.
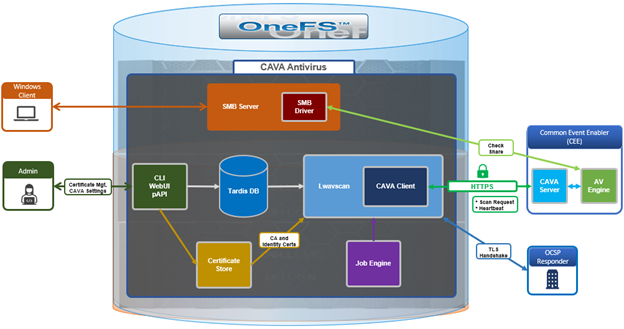
CAVA HTTPS support requires CEE version 9.1.2 or later in conjunction with OneFS 9.14 or newer, while existing antivirus licensing continues to be sufficient.
Configuring and enabling CAVA with HTTPS entails the following high-level process:

Note that the CAVA over HTTPS capability only becomes available after the upgrade to OneFS 9.14 has been fully committed. Additionally, upgrading to OneFS 9.14 does not impact existing legacy scanning workflows that continue to use standard HTTP transport.
- Setup CA certificates

From the OneFS CLI, import the CA certificate(s) using its full path on the cluster:
# isi antivirus cava certificates ca import --name=ca_unit --certificate-path=/ifs/certs/ca.pem Imported certificate: 4c6d3f0d1c3128ed09e02a78a1d9e3104edbfeb9c327c5e735afb3b48cd5bdbc
Once done, verify that the CA certificate was imported successfully:
# isi antivirus cava certificates ca list ID Name Not Before Not After Status -------------------------------------------------------------------------------------------------------------------------- 4c6d3f0d1c3128ed09e02a78a1d9e3104edbfeb9c327c5e735afb3b48cd5bdbc ca_unit 2025-08-28T07:39:22 2125-08-04T07:39:22 valid -------------------------------------------------------------------------------------------------------------------------- Total: 1 # isi antivirus cava certificates ca view 4c6d3f0d1c3128ed09e02a78a1d9e3104edbfeb9c327c5e735afb3b48cd5bdbc ID: 4c6d3f0d1c3128ed09e02a78a1d9e3104edbfeb9c327c5e735afb3b48cd5bdbc Name: ca_unit Status: valid Not Before: 2025-08-28T07:39:22 Not After: 2125-08-04T07:39:22 Description: Fingerprints Type: SHA1 Value: f1:0e:34:d0:0c:65:99:b8:86:58:f3:b3:36:21:9a:64:7a:e6:b5:03 Type: SHA256 Value: 4c:6d:3f:0d:1c:31:28:ed:09:e0:2a:78:a1:d9:e3:10:4e:db:fe:b9:c3:27:c5:e7:35:af:b3:b4:8c:d5:bd:bc Subject: C=IN, ST=DCU, L=Gotham, O=Wayne Enterprises, OU=Batman, CN=batmanCA, emailAddress=batmanCA@bat.man Issuer: C=IN, ST=DCU, L=Gotham, O=Wayne Enterprises, OU=Batman, CN=batmanCA, emailAddress=batmanCA@bat.man
Or from the WebUI under Data Protection > Antivirus > CAVA, where OneFS 9.14 introduces a new Certificates section which includes three tabs: Authority, Identity, and Settings:
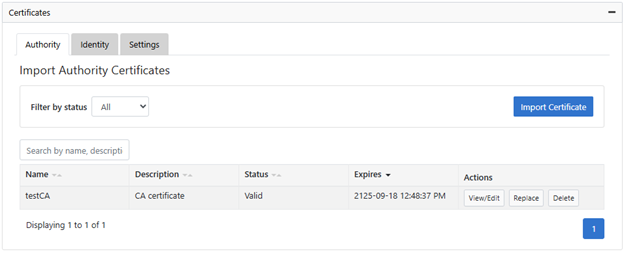
Users with the ‘ISI_PRIV_ANTIVIRUS’ RBAC privilege can manage CA and identity certificates, including performing operations such as ‘import’, ‘edit’, ‘replace’, and ‘delete’.
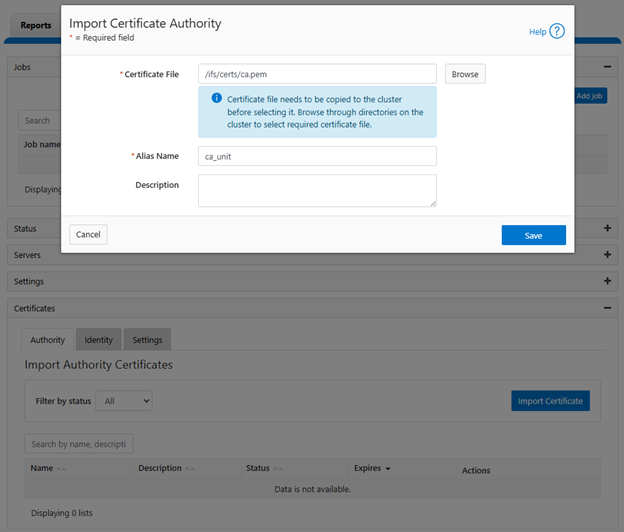
Import the certificate authority (CA) under Data Protection > Antivirus > CAVA > Certificates > Authority:
- Setup Identity Certificates

Next, import the identity certificate(s) as follows, specifying the full path to the cert and key files:
# isi antivirus cava certificates identity import --name=onefs_cava --certificate-path=/ifs/certs/signed_id_cert.pem --certificate-key-path=/ifs/certs/id_cert.key --skip-certificate-passphrase Imported certificate: 70b6734399785ff5d512a789836bdf45e4ee35cf464e6da36d16cda5db6ef353
Once complete, verify that the identity certificate was imported successfully:
# isi antivirus cava certificates identity list ID Name Not Before Not After Status --------------------------------------------------------------------------------------------------------------------------- 70b6734399785ff5d512a789836bdf45e4ee35cf464e6da36d16cda5db6ef353 onefs_cava 2026-01-21T13:51:12 2125-12-28T13:51:12 valid --------------------------------------------------------------------------------------------------------------------------- Total: 1 # isi antivirus cava certificates identity view 70b6734399785ff5d512a789836bdf45e4ee35cf464e6da36d16cda5db6ef353 ID: 70b6734399785ff5d512a789836bdf45e4ee35cf464e6da36d16cda5db6ef353 Name: onefs_cava Status: valid Not Before: 2026-01-21T13:51:12 Not After: 2125-12-28T13:51:12 Description: Fingerprints Type: SHA1 Value: 79:68:ab:a2:5d:95:31:53:6c:90:a7:5c:99:d5:f7:95:a7:db:99:22 Type: SHA256 Value: 70:b6:73:43:99:78:5f:f5:d5:12:a7:89:83:6b:df:45:e4:ee:35:cf:46:4e:6d:a3:6d:16:cd:a5:db:6e:f3:53 Subject: C=IN, ST=DCU, L=Gotham, O=Wayne, OU=Batman, CN=robinOnefs, emailAddress=robinOnefs@bat.man Issuer: C=IN, ST=DCU, L=Gotham, O=Wayne Enterprises, OU=Batman, CN=batmanCA, emailAddress=batmanCA@bat.man
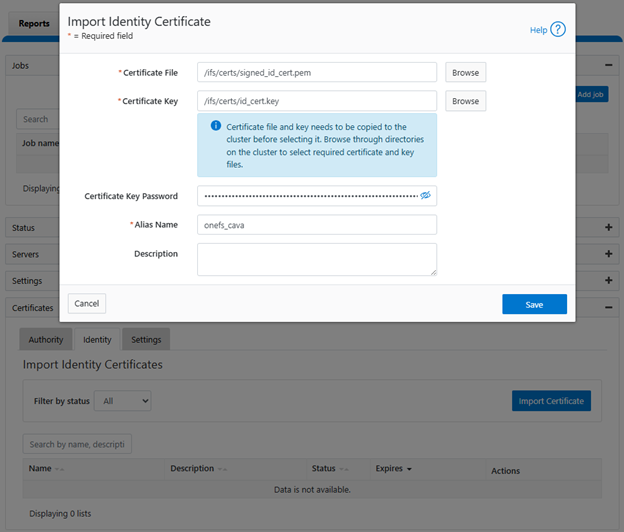
Or from the WebUI under Data Protection > Antivirus > CAVA > Certificates > Identity:
- Add CAVA server

Next, create the CAVA server configuration on the cluster:
# isi antivirus cava servers create CAVA1 https://10.10.20.50:12443/cee --enabled 1
Once done, verify that the CAVA server was added successfully:
# isi antivirus cava servers list Server Name Server URI Enabled Server Type ------------------------------------------------------------------ CAVA1 https://10.10.20.50:12443/cee Yes CEE/CAVA ------------------------------------------------------------------ Total: 1 # isi antivirus cava servers view CAVA1 Server Name: CAVA1 Server URI: https://10.10.20.50:12443/cee Enabled: Yes Server Type: CEE/CAVA
Or from the WebUI under Data Protection > Antivirus > CAVA > Servers:
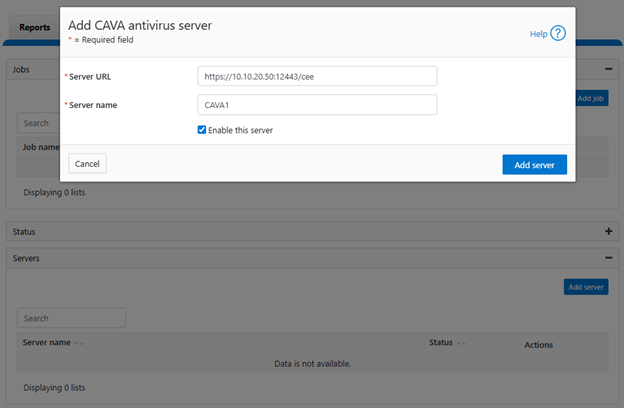
Note that, when adding the server, specify protocol as https:// and port number in the URI.
If needed, a CAVA server can also be removed with the following CLI syntax:
# isi antivirus cava servers delete CAVA1
- Configure identity certificate ID and Enable TLS in CAVA global settings

The ‘–enforce-tls’ global configuration parameter is set to ‘false’ by default, permitting CAVA to use regular HTTP transport. By setting this flag to ‘true’, CAVA over HTTPS communication is enabled.
From the CLI:
# isi antivirus cava settings modify --enforce-tls=true --certificate-id=7ba9188a5f6bb120c8ea3e499b662b38319587804492cf444df02b33b1d4a86c # isi antivirus cava settings view Service Enabled: Yes Scan Access Zones: System IP Pool: groupnet0.subnet0.cavapool Report Expiry: 8 weeks, 4 days Scan Timeout: 1 minute Cloudpool Scan Timeout: 1 minute Maximum Scan Size: 0.00kB Certificate ID: 7ba9188a5f6bb120c8ea3e499b662b38319587804492cf444df02b33b1d4a86c Enforce TLS: Yes
Note that omitting the client certificate ID will result in the following error:
# isi antivirus cava settings modify --enforce-tls=true
TLS cannot be enabled as no client certificate ID is configured.
This can also be configured from the WebUI under Data protection > Antivirus > CAVA > Settings. Disabled by default, in order to activate this option, users must select an identity certificate, which is a prerequisite for enforcing TLS:
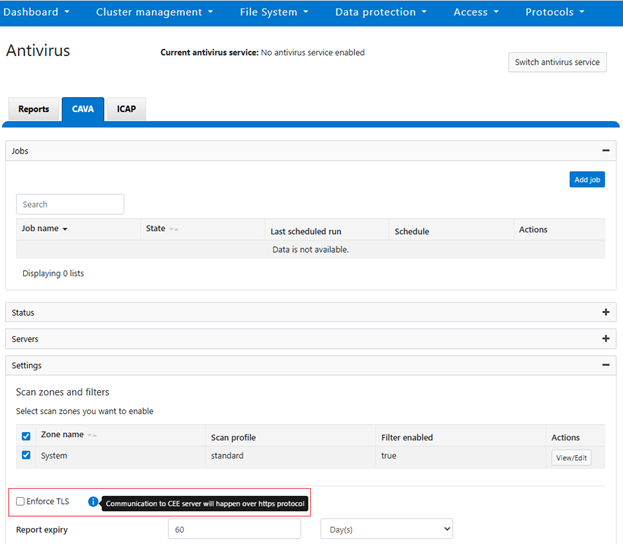
Note that attempts to activate TLS enforcement on a cluster without any identity certificates will generate the following pop-up warning:
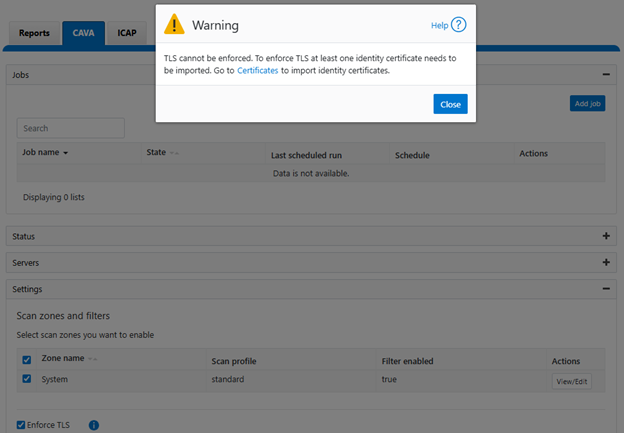
This warning includes a link, which opens the identity certificate import and configuration portal.
Optionally add an OCSP server URI and set revocation mode:
# isi antivirus cava certificates settings view OCSP Responder URI: OCSP Revocation Mode: None Strict Hostname Check: No # isi antivirus cava certificates settings modify --ocsp-responder-uri=http://10.1.100.20 --ocsp-revocation-mode=Strict
- CEE configuration

On the common event enabler (CEE) server side, there are a few prerequisites and registry configuration changes that are required to support CAVA over HTTPS.
a. First, the server needs to be running CEE version 9.2.1.0 or later.
b. The CEE port configuration needs to be configured to use HTTPS (tcp/12243) in the server’s Windows Registry. This can be achieved by running the following commands on the server:
reg add HKEY_LOCAL_MACHINE\SOFTWARE\EMC\CEE\Configuration\Security\Https /v ServerEnabled /t REG_DWORD /d 1 /f
c. Upload and configure the following CA and identity certificates on CEE server.
CA certificates:
- pem
- key
Identity Certificates
- pem
- key
These certificates should be copied from the PowerScale cluster to a configured path on the CEE server, for example C:\CEE_CERTS\ as in the configuration example below:
First, configure the paths for CEE identity certificate and key in the CEE server’s registry:
reg add HKEY_LOCAL_MACHINE\SOFTWARE\EMC\CEE\Configuration\Security\Https /v PrivateKey /t REG_SZ /d "C:\CEE_CERTS\cee_id_cert.key" /f reg add HKEY_LOCAL_MACHINE\SOFTWARE\EMC\CEE\Configuration\Security\Https /v Certificate /t REG_SZ /d "C:\CEE_CERTS\cee_signed_id_cert.pem" /f
Next, install the CA certificate into the Windows certificate store:
> certutil -addstore "Root" "C:\CEE_CERTS\ca.pem"
d. Finally, confirm the CEE registry settings have been applied successfully from the Windows registry editor (regedit):
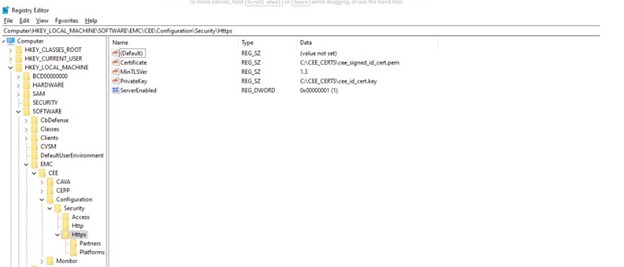
- Verify CAVA status.

Once all the configuration steps above are completed, check the CAVA status and confirm ‘Good Heartbeats’ are being reported:
# isi antivirus cava status System Status: RUNNING Fault Message: - CEE Version: 9.2.0.0 DTD Version: 2.5.3 AV Vendor: MS Forefront Last Signature Update: Fri Feb 13 02:10:19 2026 # isi antivirus cava status –-servers Server Name Server State Good Heartbeats Heartbeat RTT Scan RTT Scan Requests Connections ------------------------------------------------------------------------------------- TLS Active 235 14.0ms 0.0ms 0 6 -------------------------------------------------------------------------------------- # /usr/likewise/bin/lw-av active-servers Active Anti-virus Servers: Number of servers: 1 Server Name: CAVA1 Server Type: CAVA Server Enabled: Yes Server State: Active Server URI: https://cava.lab.com:12443/cee Good Heartbeats: 235 Heartbeat Round-Trip-Time (ms): 14 Number of Scan Requests: 0 Average Scan Round-Trip-Time (ms): 0 Target Connection Count: 6 Connection Count from Node: 6
If needed, CAVA HTTPS enforcement can also be easily disabled from the CLI via the following global settings configuration change:
# isi antivirus cava settings modify --enforce-tls=false
In addition to WebUI and CLI configuration options, OneFS 9.14 also sees the introduction and modification of the following CAVA platform API (pAPI) endpoints related to HTTPS support:
| Function | API Endpoint | Status |
| CA certificates | /25/avscan/cava/certificates/ca
/25/avscan/cava/certificates/ca/<ID> |
New |
| Identity certificates | /25/avscan/cava/certificates/identity
/25/avscan/cava/certificates/identity/<ID> |
New |
| Certificate settings | /25/avscan/cava/certificates/settings | New |
| CAVA global settings | /25/avscan/cava/settings | Modified |
| CAVA server management | /25/avscan/servers | Modified |