The previous article in this series focused on provisioning and configuring a PowerScale cluster to support MetadataIQ. Now, we turn our focus to the server side deployment and setup.
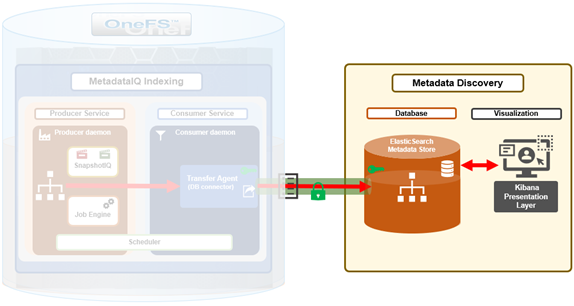
MetadataIQ is introduced in OneFS 9.10 and requires a cluster to be running a fresh install or committed upgrade of 9.10 or later in order to run.
Either a physical Linux client or a virtual machine instance with sufficient disk space (20+GB is recommended) and virtual memory (minimum 256MB) is required to run the ElasticSearch database, which houses the off-cluster metadata, and Kibana visualization dashboard.
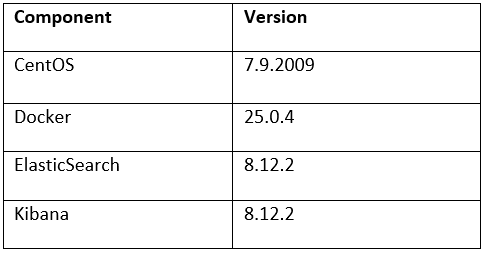
OneFS MetadataIQ has been verified in-house with the following components and versions:
Install Docker on the client system using the Linux distribution’s native package manager.
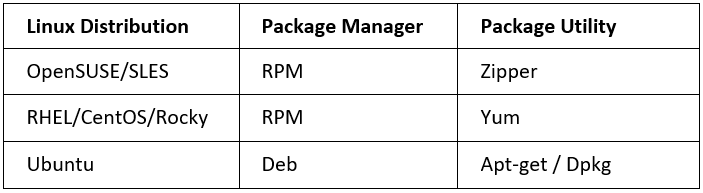
For example, to install the latest version of Docker using the Yum package manager:
# sudo yum install docker-ce docker-ce-cli containerd.io docker-buildx-plugin docker-compose-plugin
While the above command installs Docker and creates a ‘docker’ group, it does not add any users to the group by default.
Once successfully installed, the Docker container service can be enabled as follows:
# sudo systemctl start docker
If needed, detailed installation and management instructions are available in the Docker installation guide.
OneFS MetadataIQ requires an off-cluster ElasticSearch database for the metadata store.
ElasticSearch and can be installed on a Linux client via the following procedure. Note that this procedure assumes that Docker has already been successfully installed on the Linux client.
- First, install ElasticSearch as follows:
# docker network create elastic

# docker run --name es01 --net elastic -p 9200:9200 -e "http.publish_host=<x.x.x.x>" -it docker.elastic.co/elasticsearch/elasticsearch:8.12.2
Where <x.x.x.x> is the Linux client’s IP address.
Note that the ElasticSearch database typically uses TCP port 9200 by default.
Additional instructions and information can be found in the ‘getting started’ section of the ElasticSearch configuration guide.
The next step is to install and configure the Kibana dashboard.
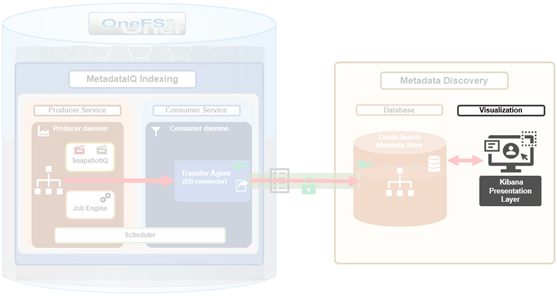
The Kibana binaries can be installed as follows:
# docker pull docker.elastic.co/kibana/kibana:8.12.2

# docker run --name kibana --net elastic -p 5601:5601 docker.elastic.co/kibana/kibana:8.12.2
Note that Kibana typically runs by default on TCP port 5601.
Additional instructions and information can be found in the Kibana installation guide.
Once the ElasticSearch database is up and running, the next step is to generate a new security API token. This can be performed from the Kibana web interface, by navigating to Dev Tools > Console and using the following JSON ‘POST’ syntax:
POST /_security/api_key
{
  "name": "mdidx-api-key",
  "role_descriptors”: {
    "role-a": {
      "cluster": ["all"],
      "indices": [
        {
          "names": ["isi_metadata_index"],
          "privileges": ["all"]
        }
      ]
    }
  },
  "metadata": {
    "application": "my-application",
    "environment": {
       "level": 1,
       "trusted": true,
       "tags": ["dev", "staging"]
    }
  }
}
The JSON request (above) is entered into the left hand pane of the Kibana dev tools console, and the output is displayed in the right hand pane. For example:
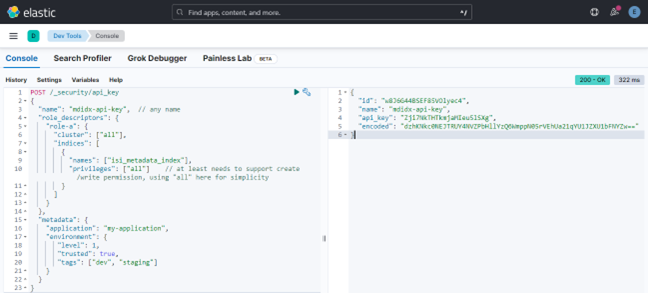
A successful request returns a JSON structure containing the API key, plus its name, ID, and encoding. Output is of the form:
{

  "id": "w8J6G44BSEF85VOlyec4",

  "name": "mdidx-api-key",

  "api_key": "Zji7NkTHTkmjaMIeu5lSXg",

  "encoded": "dzhKNkc0NEJTRUY4NVZPbHllYzQ6WmppN05rVEhUa21qYU1JZXU1bFNYZw=="

}
Instructions describing this API key generation process in detail can be found in the ElasticSearch getting started guide.
The bulk API is used to update the ElasticSearch database. Note that the role does require the following privileges:
- Create
- Index
- Write index
More information on using the ElasticSearch bulk API can be found in the ElasticSearch configuration guide.
An SSL certificate file is required in order for the cluster to securely connect to the ElasticSearch database. This SSL certificate file must be copied from the Linux client to the PowerScale cluster.
On the Linux client, the SSL certificate can be copied from the Docker container to the cluster as follows:
# docker cp es01:/usr/share/elasticsearch/config/certs/http_ca.crt ./

# scp ./http_ca.crt <x.x.x.x>:/ifs
Where <x.x.x.x> is the cluster’s IP address.
Authentication between the ElasticSearch instance and the PowerScale cluster can be verified from OneFS as follows:
# curl --cacert /ifs/http_ca.crt -H "Authorization: ApiKey <encode in api_key response from above>" https://<x.x.x.x>:9200/
Once the file transfer is complete, the certificate can be validated by confirming a matching checksum on the client and cluster using the ‘md5sum’ command for Linux and ‘md5’ command for PowerScale OneFS respectively. For example:
# md5 /ifs/http_ca.crt

MD5 (http_ca.crt) = 8d8f1ffe34812df1011d6c0c3652e9eb
More information on how to configure the database security can be found in the ElasticSearch configuration guide.
When it comes to right-sizing the ElasticSearch database for a MetadataIQ deployment , Elastic’s documentation provides the following shard sizing and benchmarking and sizing guidance for storing logs and metrics.
Three parameters drive a sizing consideration:
- Shard count
- Node count
- CPU threads per node.
A shard is ElasticSearch’s fundamental unit of storage, holding both indexed files and any redundant replica copies. More shards increase search and insertion parallelism, but only up to a point. Oversized or overly numerous shards can actually degrade performance, rather than improving it. As such:
- A shard should be kept between 10 GB and 50 GB, and index fewer than 200 million files and directories.
- 16 to 32 GB of RAM per node is generally sufficient, with a RAM-to-storage ratio of 1:160 for a warm tier.
- One CPU thread per shard is recommended when performing searches.
ElasticSearch defaults to int((allocated processors × 3) / 2) + 1 threads per node. An 8 core, hyperthreaded node (16 logical cores) therefore supports a maximum of 25 shards. A more capable node supports more shards; a lower count is tolerable if slower indexing and search performance is acceptable.
By this math, a 32 GB node holds roughly 100 shards (32 GB × 160 GB/GB RAM × 1 shard/50 GB = 102.4), a 16 GB node holds roughly 50, and a 64 GB node holds roughly 200. The recommendation is to favor smaller (8 to 16 GB) nodes in greater number, since this improves the thread-to-shard ratio.
When calculating storage, RAM, and node count, typically favor the high end of the above parameters and assume a warm tier, consistent with how MetadataIQ operates:
- Indexing runs only a few times per day, while queries dominate.
- File churn tracks the metadata change rate on the cluster, not the underlying data change rate.
- A high-change-rate cluster warrants more nodes.
Each MetadataIQ file occupies approximately 512 bytes after compression with a single replica. At 50 GB per shard, a single shard holds approximately 100 million files:
(50 GB/Shard) * (1 million files/0.5 GB) = 100 million files
Total data size is the estimated file count, plus capacity for deleted (but sill pending garbage collection) files, plus a margin, multiplied by the replica count:
Total data = files × 50 GB / 100,000,000 files × 1.2 × number_of_replicas
This uses one fewer replica than Elastic’s recommendation, since MetadataIQ’s index can be rebuilt through re-indexing and its loss is less consequential. This can be tuned to the actual site requirements.
For example, consider a scenario with a PowerScale cluster containing 3 billion files and 2 replicas:
(3,000,000,000 documents * 50 GB/100,000,000 documents * 1.2 (margin and change rate) * 2 replicas = 3,600 GB
Number of shards = 3,600 GB / 50 = 72
Elastic suggests the following formula to estimate the total storage required:
Total Storage = Total data (GB) * (1 + 0.15 disk Watermark threshold + 0.1 margin of error)
So, for 3 billion files, the total storage would be:
Total storage = 3,600 GB * (1.25) = 4,500 GB
The formula to calculate the number of nodes required is:
Total Data Nodes = ROUNDUP(Total storage (GB) / Memory per data node / Memory:Data ratio)
Using the 3 billion files example above for a 16GB node yields:
Total Data Nodes = (4500 / 16 / 160) = 1.75
Which rounds up to 2 nodes.
Similarly, for an 8 GB node (in order to improve indexing and search performance):
Total Data Nodes = (4500 / 8 / 160) = 3.51
Which rounds up to 4 nodes.
So, in summary, sizing an ElasticSearch cluster for MetadataIQ comes down to estimating the file count, adding a margin for change rate, and deriving storage and node count from there, adjusted to the actual environment. An under-sized cluster is easy to correct in production since adding a node automatically triggers shard rebalancing. However, the exception is extremely large file-count clusters, where the initial file walk itself can take substantial time on an under-provisioned cluster. In such cases, over-sizing is the prudent choice.
In the next article in this series, we’ll examine the process involved for using and managing an ElasticSearch instance and Kibana visualization portal.