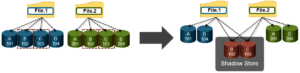
In the previous article, we looked at an overview of the shadow store and its three primary use cases within OneFS. Now, let’s look at shadow store mechanics, reporting, and job engine integration.
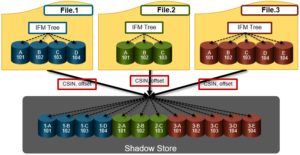
Under the hood, OneFS provides a SIN cache, which helps facilitate shadow store allocations. This provides a mechanism to create a shadow store on demand when required, and then cache that shadow store in memory on the local node so that it can be shared with subsequent allocators. The SIN cache separates stores by disk pool, protection policy and whether or not the store is a container.
When referencing data in a shadow store, blocks are identified with a SIN (shadow identification number) and LBN pair. A file with shadow store blocks will have protection group (PG) information that points to SINs. For example:
# isi get -DD /ifs/data/file.dup | head -100

POLICY  W  LEVEL PERFORMANCE COAL  ENCODING      FILE              IADDRS

default  4+2/2 concurrency on    UTF-8         file.dup     <1,6,35008000:512>, <2,3,236753920:512>, <3,5,302813184:512>

...

PROTECTION GROUPS

       lbn 0: 4+2/2

               4000:0001:0067:0009@0#64

               0,0,0:8192#32
The ‘isi get’ CLI command will display information about a particular shadow store when using the –L flag and the SIN:
# isi get –DDL <SIN>
# isi get -DDL 4000:0001:003c:0005 | head -20

isi: Could not find a path to LIN:0x40000001003c0005/SNAP:18446744073709551615: Invalid argument

No valid path for LIN 0x40000001003c0005

POLICY  W  LEVEL PERFORMANCE COAL  ENCODING      FILE              IADDRS

+2:1  18   4+2/2 concurrency off   N/A           <unlinked>        <1,9,168098816:512>, <2,6,269270016:512>, <3,6,33850368:512> ct:  1337648672 rt: 0

*************************************************

* IFS inode: [ 1,9,168098816:512, 2,6,269270016:512, 3,6,33850368:512 ]

*************************************************

*

*  Inode Version:      6

*  Dir Version:        2

*  Inode Revision:     1

*  Inode Mirror Count: 3

*  Recovered Flag:     0

*  Recovered Groups:   0

*  Link Count:         2

*  Size:               133660672

*  Mode:               0100000

*  Flags:              0

*  Physical Blocks:    19251

*  LIN:                4000:0001:003c:0005
The protection group information for a SIN will also contain ‘reference count’ (refcount) information.
lbn 384: 4+2/2

               1,4,5054464:8192#16

               1,7,450527232:8192#16

               2,9,411435008:8192#16

               2,11,556056576:8192#16

               3,5,678928384:8192#16

               3,8,579436544:8192#16

               REF(    384): { 3, 3, 3, 3, 3, 3, 3, 3 }

               REF(    392): { 3, 3, 3, 3, 3, 3, 3, 3 }

               REF(    400): { 3, 3, 3, 3, 3, 3, 3, 3 }

               REF(    408): { 3, 3, 3, 3, 3, 3, 3, 3 }

               REF(    416): { 3, 3, 3, 3, 3, 3, 3, 3 }

               REF(    424): { 3, 3, 3, 3, 3, 3, 3, 3 }

               REF(    432): { 3, 3, 3, 3, 3, 3, 3, 3 }

               REF(    440): { 3, 3, 3, 3, 3, 3, 3, 3 }
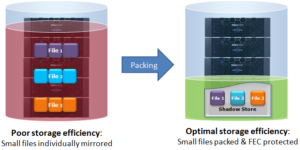
The isi_sstore stats command can be used to display aggregate container statistics, alongside those of regular, or block, shadow stores. The output also includes storage efficiency stats. For example:
# isi_sstore stats

Block SIN stats:

33 GB user data takes 6 MB in shadow stores, using 11 MB physical space.

10792K physical average per shadow store.


5708.92 refs per block.

Reference efficiency 99.9825%.

Storage efficiency 57.0892%


Container SIN stats:

0 B user data takes 0 B in shadow stores, using 0 B physical space.


Raw counts={ type 0 num_ss=1 lsize=6209536 pblk=1349 refs=4328123 }{ type 1 num_ss=0 lsize=0 pblk=0 refs=0 }
Running the ‘isi_sstore list’ command in its verbose (-v) form also displays the type of SIN, the ‘fragmentation score’ (frag score) metric and whether a container is ‘underfull’, amongst other things:
# isi_sstore list –v | head –n 2

SIN                 lsize   psize    refs    filesize date         sin type underfull frag score

4000:0001:0002:0000 6209536 11003392 4328123 2121080K Jan 29 21:09 block    no 0.01
When it comes to the job engine, there are several jobs that interact with and cater to shadow stores – in addition to the dedupe job and SmartPools for small file packing. These include:
The Flexprotect job has two phases which are of particular relevance to shadow stores.
- The ‘LIN reverify’ phase: Metatree transfers are allowed, even if a file is under repair. Since metatree transfer goes in opposite direction from linscan, the LIN table needs to be re-verified to ensure a file is not missed during the first LIN verify. Note that both LIN verify and reverify will scan only the LIN potion of the LIN table.
- The ‘SIN verify’ phase: Once it’s determined that all the LINs are good, the SINs are inspected to ensure they are all correct. This is necessary since a cloning operation during Flexprotect, for example, might have moved an un-repaired block to a shadow store. This phase scans only the SIN portion of the table.
In general, the collect job isn’t required for (logical) blocks stored in shadow stores isn’t, since the freeing system is resilient to failure. The one exception is that references from files intentionally leaked by removing a LIN table entry to a file will not be freed, so collect will deal with these.
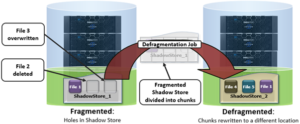
The ShadowStoreDelete job examines each shadow store for allocated blocks that have no external references (other than the shadow store’s reference) and frees the blocks. If all blocks in a shadow store have been freed then the shadow store is removed. A good practice is to run the ShadowStoreDelete job prior to running IntegrityScan on clusters with file clones and/or running SmartDedupe or small file storage efficiency jobs.
The ShadowStoreProtect job updates the protection level of shadow stores which are referenced by a LIN with a higher requested protection. Shadow stores that require a protection level change are added to a persistent queue (PQ) and consumed by this job.
There is also a SinReport job engine job which can be run to find LINs with SINs within the file system.
All the jobs which can change the protection contain an additional phase for SINs. For every LIN pointing to a particular SIN, if the LINs new protection policy is higher than that of the shadow store, it will update the SIN’s protection policy. In the SIN phase, the highest recorded policy will be used to protect the shadow store. In the case of disk pools, shadow stores may inherit the effective protection from the disk pool but not the disk pool itself.
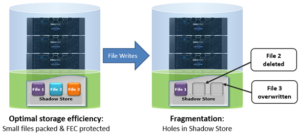
As we have seen, to a large degree shadow stores store data like regular files. However, blocks from regular files are moved or copied to shadow stores and the original blocks in the source file are replaced with references to the blocks in the shadow store. If any of the logical blocks in the source file are written to, a copy on write (COW) event is triggered, which causes a local allocation of a block for the source file to replace the shadow reference. There may be multiple files with references to the same logical block in a shadow store. When all external references to a block in a shadow store have been released the block in the shadow store is now unused and will never be referenced again. The background garbage collection job, ShadowStoreDelete, periodically scans all the shadow stores and frees these unreferenced blocks. Once all the blocks in a shadow store are released, the shadow store itself can then be removed.
Be aware that files which reference shadow stores may also behave differently from regular files in that reading shadow-store references can be slower than reading data directly. Specifically, reading non-cached shadow-store references is slower than reading non-cached data. Reading cached shadow-store references takes no more time than reading cached data.
When files that reference shadow stores are replicated to another Isilon cluster or backed up via NDMP, the shadow stores are not transferred to the target Isilon cluster or backup device. The files are transferred as if they contained the data that they reference from shadow stores. On the target Isilon cluster or backup device, the files consume the same amount of space as if they had not referenced shadow stores.
When OneFS creates a shadow store, OneFS assigns the shadow store to a storage pool of a file that references the shadow store. If you delete the storage pool that a shadow store resides on, the shadow store is moved to a pool occupied by another file that references the shadow store.
OneFS does not delete a shadow-store block immediately after the last reference to the block is deleted. Instead, OneFS waits until the ShadowStoreDelete job is run to delete the unreferenced block. If a large number of unreferenced blocks exist on the cluster, OneFS might report a negative deduplication savings until the ShadowStoreDelete job is run.
Shadow stores are protected at least as much as the most protected file that references it. For example, if one file that references a shadow store resides in a storage pool with +2 protection and another file that references the shadow store resides in a storage pool with +3 protection, the shadow store is protected at +3.
Quotas account for files that reference shadow stores as if the files contained the data referenced from shadow stores; from the perspective of a quota, shadow-store references do not exist. However, if a quota includes data protection overhead, the quota does not account for the data protection overhead of shadow stores.