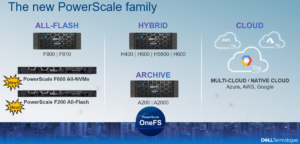
In this article, we’ll take a quick peek at the new PowerScale F200 and F600 hardware platforms. For reference, here’s where these new nodes sit in the current hardware hierarchy:

The PowerScale F200 is an entry-level all flash node that utilizes affordable SAS SSDs and a single-CPU 1U PowerEdge platform. It’s performance and capacity profile makes it ideally suited for use cases such as remote office/back office environments, factory floors, IoT, retail, smaller organizations, etc. The key advantages to the F200 are its low entry capacities and price points and the flexibility to add nodes individually, as opposed to a chassis/2 node minimum for the legacy Gen6 platforms.
The F200 contains four 3.5” drive bays populated with a choice of 960GB, 1.92TB, or 3.84TB enterprise SAS SSDs.
Inline data reduction, which incorporates compression, dedupe, and single instancing, is included as standard and requires no additional licensing.
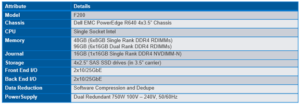
Under the hood, the F200 node is based on the PowerEdge R640 server platform. Each node contains a single Socket Intel CPU, and 10/25 GbE Front-End and Back-End networking,
![]()
Configurable memory options of 48GB or 96GB per node are available.
In contrast, the PowerScale F600 is a mid-level all-flash platform that utilizes NVMe SSDs and a dual-CPU 1U PowerEdge platform. The ideal use cases for the F600 include performant workflows, such as M&E, EDA, HPC, and others, with some cost sensitivity and less demand for capacity.
The F600 contains eight 2.5” drive bays populated with a choice of 1.92TB, 3.84TB, or 7,68TB enterprise NVMe SSDs. Inline data reduction, which incorporates compression, dedupe, and single instancing, is also included as standard.
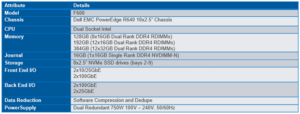
The F600 is also based on the 1U R640 PowerEdge server platform, but, unlike the F200, with dual socket Intel CPUs. Front-End networking options include 10/25 GbE or 40/100 GbE and with 100 GbE for the Back-End network.
![]()
Configurable memory options include 128GB, 192GB, or 384GB per node.
For Ethernet networking, the 10/40GbE environment uses SFP+ and QSFP+ cables and modules, whereas the 25/100GbE environment uses SFP28 and QSFP28 cables and modules. These cables are mechanically identical and the 25/100GbE NICs and switches will automatically read cable types and adjust accordingly. However, be aware that the 10/40GbE NICS and switches will not recognize SFP28 cables.
The 40GbE and 100GbE connections are actually four lanes of 10GbE and 25GbE respectively, allowing switches to ‘breakout’ a QSFP port into 4 SFP ports. While this is automatic on the Dell back-end switches, some front-end switches may need configuring
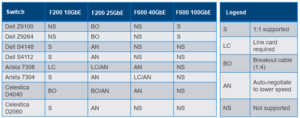
The F200 has a single NIC configuration comprising both a 10/25GbE front-end and back-end. By comparison, the F600 nodes are available in two configurations, with a 100GbE back-end and either a 25GbE or 100GbE front-end and.
Here’s what the back-end NIC/Switch Support Matrix looks like for the PowerScale F200 and F600:
Drive subsystem-wise, the PowerEdge R640 platform’s bay numbering scheme starts with 0 instead of 1. On the F200, there are four SAS SSDs, numbered from 0 to 3.
![]()
The F600 has ten total bays, of which numbers 0 and 1 on the far left are unused. The eight NVMe SSDs therefore reside in bays 2 to 9.
![]()
Support has been added to OneFS 9.0 for NVMe. alongside the legacy SCSI and ATA interfaces. Note that NVMe drives are only currently supported on the F600 nodes, and these drives use the NVMe and NVD drivers. The NVD is a block device driver that exposes an NVMe namespace like a drive and is what most OneFS operations act upon, and each NVMe drive has a /dev/nvmeX, /dev/nvmeXnsX and /dev/nvdX device entry. From a drive management standpoint, the CLI and WebUI are pretty much unchanged. While NVMe has been added as new drive type, the ’isi devices’ CLI syntax stays the same and the locations remain as ‘bays’. Similarly, the CLI drive utilities such as ‘isi_radish’ and ‘isi_drivenum’ also operate the same, where applicable
The F600 and F200 nodes’ front panel has limited functionality compared to older platform generations and will simply allow the user to join a node to a cluster and display the node name after the node has successfully joined the cluster.
Similar to legacy Gen6 platforms, a PowerScale node’s serial number can be found either by viewing /etc/isilon_serial_number or running the ‘isi_hw_status | grep SerNo’ CLI command syntax. The serial number reported by OneFS will match that of the service tag attached to the physical hardware and the /etc/isilon_system_config file will report the appropriate node type. For example:
# cat /etc/isilon_system_config

PowerScale F600