As we’ve seen in prior articles in this series, OneFS and the PowerScale platforms support a variety of Ethernet speeds, cable and connector styles, and network interface counts, depending on the node type selected. However, unlike the back-end network, Dell does not specify particular front-end switch models, allowing PowerScale clusters to seamlessly integrate into the data link layer (layer 2) of an organization’s existing Ethernet IP network infrastructure. For example:

A layer 2 looped topology as above extends VLANs between the distribution/aggregation switches, with spanning tree protocol (STP) preventing network loops by shutting down redundant paths. The access layer uplinks may be used to load balance VLANs. This distributed architecture allows the cluster’s external network to connect to multiple access switches, affording each node similar levels of availability, performance, and management properties.
Link aggregation can be used to combine multiple Ethernet interfaces into a single link-layer interface, and is implemented between a single switch and PowerScale node, where transparent failover or switch port redundancy is required. Link aggregation assumes all links are full duplex, point to point, and at the same data rate, providing graceful recovery from link failures. If a link fails, traffic is automatically sent to the next available link without disruption.
Quality of service (QoS) can be implemented through differentiated services code point (DSCP), by specifying a value in the packet header that maps to an ‘effort level’ for traffic. Since OneFS does not provide an option for tagging packets with a specified DSCP marking, the recommended practice is to configure the first hop ports to insert DSCP values on the access switches connected to the PowerScale nodes. OneFS does retain headers for packets that already have a specified DSCP value, however.
When designing a cluster, the recommendation is that each node have at least one front-end interface configured, preferably in at least one static SmartConnect zone. Although a cluster can be run in a ‘not all nodes on the network’ (NANON) configuration, where feasible, the recommendation is to connect all nodes to the front-end network(s). Additionally, cluster services such as SNMP, ESRS, ICAP, and auth providers (AD, LDAP, NIS, etc) prefer each node to have an address that can reach the external servers.
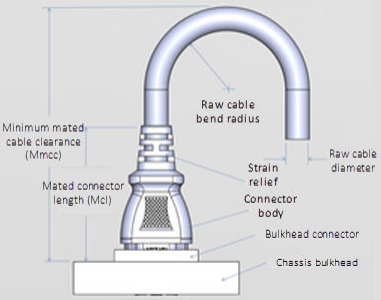
In contrast with scale-up NAS platforms that use separate network interfaces for out-of-band management and configuration, OneFS traditionally performs all cluster network management in-band. However, PowerScale nodes typically contain a dedicated 1Gb Ethernet port that can be configured for use as a management network via ICMP or iDRAC, simplifying administration of a large cluster. OneFS also supports using a node’s serial port as an RS232 out-of-band management interface, and this practice is highly recommended for large clusters. Serial connectivity can provide reliable BIOS-level command line access for on-site or remote service staff to perform maintenance, troubleshooting and installation operations.
SmartConnect provides a configurable allocation method for each IP address pool:
| Allocation Method | Attributes |
| Static | • One IP per interface is assigned, will likely require fewer IP’s to meet minimum requirements
• No Failover of IP’s to other interfaces |
| Dynamic | • Multiple IP per interface is assigned, will require more IP’s to meet minimum requirements
• Failover of IP’s to other interfaces, Failback policies are needed |
The default ‘static’ allocation assigns a single persistent IP address to each interface selected in the pool, leaving additional pool IP addresses unassigned if the number of addresses exceeds the total interfaces.
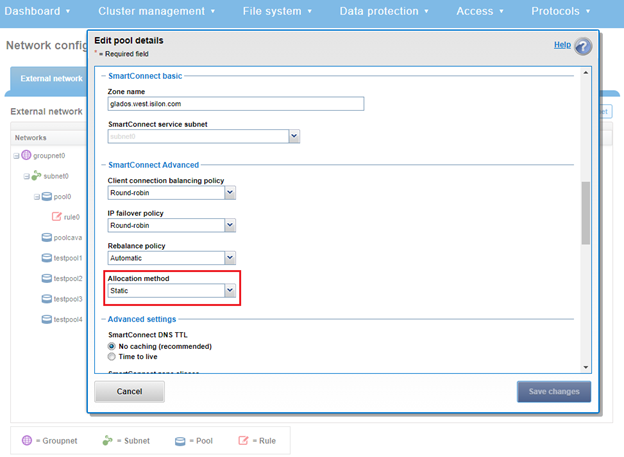
The lowest IP address of the pool is assigned to the lowest Logical Node Number (LNN) from the selected interfaces, subsequently for the second-lowest IP address and LNN, etc. If a node or interface becomes unavailable, this IP address does not move to another node or interface. Also, when the node or interface becomes unavailable, it is removed from the SmartConnect zone, and new connections will not be assigned to the node. Once the node is available again, SmartConnect will automatically add it back into the zone and assign new connections.
By contrast, ‘dynamic’ allocation divides all available IP addresses in the pool across all selected interfaces, and OneFS attempts to assign the IP addresses as evenly as possible. However, if the interface-to-IP address ratio is not an integer value, a single interface might have more IP addresses than another. As such, wherever possible, ensure that all the interfaces have the same number of IP addresses.
In concert with dynamic allocation, dynamic failover provides high availability by transparently migrating IP addresses to another node when an interface is not available. If a node becomes unavailable, all the IP addresses it was hosting are reallocated across the new set of available nodes in accordance with the configured failover load-balancing policy. The default IP address failover policy is round robin, which evenly distributes IP addresses from the unavailable node across available nodes. Because the IP address remains consistent, irrespective of which node it resides on, failover to the client is transparent, so high availability is seamless.
The other available IP address failover policies are the same as the initial client connection balancing policies, that is, connection count, throughput, or CPU usage. In most scenarios, round robin is not only the best option but also the most common. However, the other failover policies are available for specific workflows.
The decision on whether to implement dynamic failover is highly dependent on the protocol(s) being used, general workflow attributes, and any high-availability design requirements:
| Protocol | State | Suggested Allocation Strategy |
| NFSv3 | Stateless | Dynamic |
| NFSv4 | Stateful | Dynamic or Static, depending on mount daemon, OneFS version, and Kerberos. |
| SMB | Stateful | Dynamic or Static |
| SMB Multi-channel | Stateful | Dynamic or Static |
| S3 | Stateless | Dynamic or Static |
| HDFS | Stateful | Dynamic or Static. HDFS uses separate name-node and data-node connections. Allocation strategy depends on need for data locality and/or multi-protocol. Ie:
HDFS + NFSv3 : Dynamic Pool HDFS + SMB : Static Pool |
| HTTP | Stateless | Static |
| FTP | Stateful | Static |
| SyncIQ | Stateful | Static required |
Assigning each workload or data store to a unique IP address enables OneFS SmartConnect to move each workload to one of the other interfaces, minimizing the additional work that a remaining node in the SmartConnect pool must absorb and ensuring that the workload is evenly distributed across all the other nodes in the pool.
Static IP pools require one IP address for each logical interface within the pool. Since each node provides two interfaces for external networking, if link aggregation is not configured, this would require 2*N IP addresses for a static pool.
Determining the number of IP addresses within a dynamic allocation pool varies depending on the workflow, node count, and the estimated number of clients that would be in a failover event. While dynamic pools need, at a minimum, the number of IP addresses to match a pool’s node count, the ‘N * (N – 1)’ formula can often prove useful for calculating the required number of IP addresses for smaller pools. In this equation, N is the number of nodes that will participate in the pool
For example, a SmartConnect pool with four-node interfaces, using the ‘N * (N – 1)’ model will result in three unique IP addresses being allocated to each node. A failure on one node interface will cause each of that interface’s three IP addresses to fail over to a different node in the pool. This ensures that each of the three active interfaces remaining in the pool receives one IP address from the failed node interface. If client connections to that node are evenly balanced across its three IP addresses, SmartConnect will evenly distribute the workloads to the remaining pool members. For larger clusters, this formula may not be feasible due to the sheer number of IP addresses required.
Enabling jumbo frames (Maximum Transmission Unit set to 9000 bytes) typically yields improved throughput performance with slightly reduced CPU usage than standard frames, where the MTU is set to 1500 bytes. For example, with 40 Gb Ethernet connections, jumbo frames provide about five percent better throughput and about one percent less CPU usage.
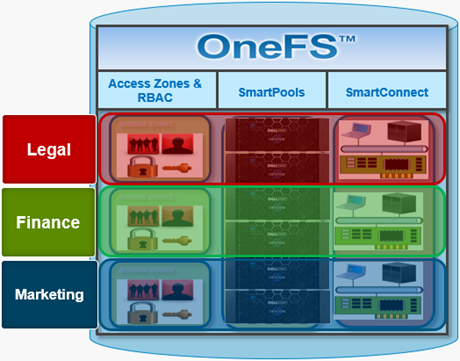
OneFS provides the ability to optimize storage performance by designating zones to support specific workloads or subsets of clients. Different network traffic types can be segregated on separate subnets using SmartConnect pools.
For large clusters, partitioning the cluster’s networking resources and allocating bandwidth to each workload can help minimize the likelihood that heavy traffic from one workload will affect network throughput for another. This is particularly true for SyncIQ replication and NDMP backup traffic, which can frequently benefit from its own set of interfaces, separate from user and client IO load.
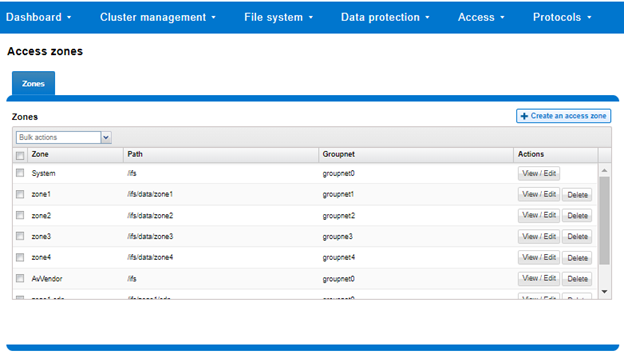
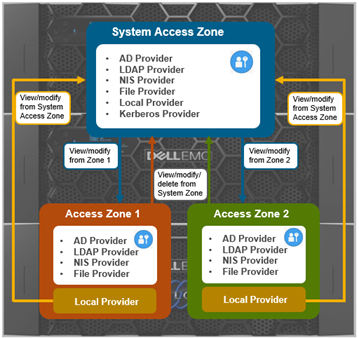
The ‘groupnet’ networking object is part of OneFS’ support for multi-tenancy. Groupnets sit above subnets and pools and allow separate multi-tenant access zones to contain distinct DNS settings.
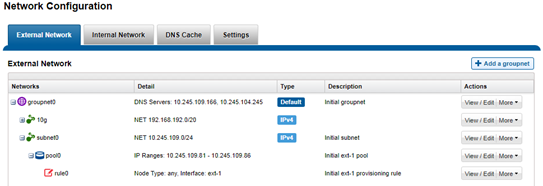
The management and data network(s) can then be incorporated into different multi-tenant access zones, each with their own DNS, directory access services, and routing, as appropriate.