In the first blog of this series, we looked at OneFS SmartSync’s architecture and attributes. Next, we’ll delve into the configuration side of things, and walk through a basic setup.
Since there’s no SmartSync WebUI yet in OneFS 9.4, the bulk of the SmartSync configuration is performed via the ‘isi dm’ CLI tool, which contains the following the principal subcommands:
| Subcommand | Description |
| isi dm accounts | Manage Datamover accounts. An activate SyncIQ license is required to create Datamover accounts. |
| isi dm base-policies | Manage Datamover base-policy. Base policies are templates to provide common values to groups of related concrete Datamover policies. Eg. Define a base policy to override the run schedule of a concrete policy. |
| isi dm certificates | Manage Datamover certificates. |
| isi dm config | Show Datamover Manual Configuration. |
| isi dm datasets | Show Datamover Dataset Information. |
| isi dm historical-jobs | Manage Datamover historical jobs. |
| isi dm jobs | Manage Datamover jobs. |
| isi dm policies | Manage Datamover policy. Policies can be either:
CREATION – Creates/replicates a dataset, either once or on a schedule. COPY – Defines a one-time copy of a dataset to or from a remote system |
| isi dm throttling | Manage Datamover bandwidth and CPU throttling. Bandwidth throttling rules can be configured for each Datamover job. |
The high-level view of the SmartSync setup and configuration process is as follows:
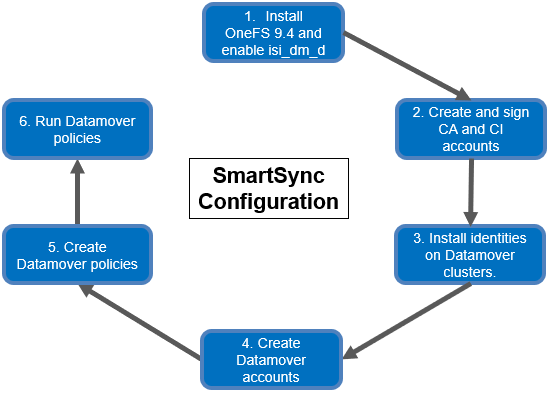
- The first step involves installing or upgrading the cluster to OneFS 9.4. SmartSync replication is handled by the ‘isi_dm_d’ service, which is disabled by default and needs to be enabled prior to configuring and using SmartSync. This can be easily accomplished with the following CLI syntax:
# isi services -a isi_dm_d

Service 'isi_dm_d' is disabled.

# isi services -a isi_dm_d enable

The service 'isi_dm_d' has been enabled.
- SmartSync uses TLS (transport layer security, or SSL) and, as such, requires trust to be established between the source and target clusters. In addition to a Certificate Authority (CA) and Certificate Identity (CI) for authorization and authentication, both clusters also require encryption to be enabled in order for the isi_dm_d service to run. The best practice is to use a local CA to sign each cluster’s CI, but self-signed certificates can be used instead in the absence of a suitable CA.
Before creating accounts, certificates must be generated and copied to the appropriate clusters. The following Certificate Authorities (CA) and trust hierarchies are required:
| Requirement | Description |
| TLS certificates | ● A mutually authenticated TLS handshake is required. Authorization, authentication, and encryption are provided by TLS certificates.
● TLS certificates are always required for daemon startup and all communication between Datamover engines. ● Encryption can be disabled, but authorization and authentication cannot be disabled. |
| Certificate Authorities (CA) | ● One or more Certificate Authorities (CA) are required on each Datamover system.
● Dell recommends that customers use a new, Datamover-specific CA for signing Datamover identity certificates. ● The CA that signs an identity certificate does not need to be installed on the system that the identity certificate is installed on. Two systems trust each other if they have the CAs that signed each other’s identity certificates. |
| Identity certificates | ● The certificate that provides authentication of the identity claimed.
● Exactly one identity certificate must exist on each Datamover system. ● Identity certificates are signed by one of the CAs deployed on the systems that the system is going to communicate with. |
| Trust hierarchies | ● Two systems trust each other if they have the CAs that signed each other’s identity certificates.
● There is no concept of unidirectional trust—trust is entirely mutual. |
The following steps can be used to generate and copy the pertinent TLS certificates to the source and target Datamover clusters:
| Step | Cluster | Action | Commands |
| 1 | Source | Generate Certificate Authority (CA). | # openssl genrsa -out ca-s.key 4096
# openssl req -x509 -new -nodes -key ca-s.key -sha256 -days 1825 -out ca-s.pem
|
| 2 | Source | Copy source cluster’s CA to target cluster. | # scp ca-s.pem [Target Cluster IP]:/:/root |
| 3 | Source | Generate Certificate Identity (CI). | # openssl genrsa -out identity-s.key 4096
# openssl req -new -key identity-s.key -out identity-s.csr |
| 4 | Source | Create a CI on source cluster. | # cat << EOF > identity-s.ext authorityKeyIdentifier=keyid,issuer
basicConstraints=CA:FALSE keyUsage=digitalSignature,nonRepudiation,keyEncipherment,dataEncipherment EOF |
| 5 | Source | Sign source cluster’s CI with source cluster’s CA. | # openssl x509 -req -in identity-s.csr -CA ca-s.pem -CAkey ca-s.key -CAcreateserial -out identity-s.crt -days 825 -sha256 -extfile identity-s.ext |
| 6 | Target | Generate a CA on target cluster. | # openssl genrsa -out ca-t.key 4096
# openssl req -x509 -new -nodes -key ca-t.key -sha256 -days 1825 -out ca-t.pem |
| 7 | Target | Copy target cluster CA to source cluster. | # scp ca-t.pem [Source Cluster IP]:/root |
| 8 | Target | Generate CI on target cluster. | # openssl genrsa -out identity-t.key 4096
# openssl req -new -key identity-t.key -out identity-t.csr |
| 9 | Target | Create a CI on target cluster. | # cat << EOF > identity-t.ext authorityKeyIdentifier=keyid,issuer basicConstraints=CA:FALSE keyUsage=digitalSignature,nonRepudiation,keyEncipherment,dataEncip herment EOF |
| 10 | Target | Sign this CI with target cluster’s CA. | # openssl x509 -req -in identity-t.csr -CA ca-t.pem -CAkey ca-t.key -CAcreateserial -out identity-t.crt -days 825 – sha256 -extfile identity-t.ext |
- Next, the various CAs and CIs are installed across the two clusters.
| Step | Cluster | Action | Command |
| 1 | Source | Install source cluster’s CA. | # isi dm certificates ca create “$PWD”/ca-s.pem –name <source-cluster-ca> |
| 2 | Source | Install target cluster’s CA. | # isi dm certificates ca create “$PWD”/ca-t.pem –name <target-cluster-ca> |
| 3 | Source | Install source cluster’s CI. | # isi dm certificates identity create “$PWD”/identity-s.crt –certificate-key-path “$PWD”/identity-s.key –name <source-cluster-identity> |
| 4 | Target | Install target cluster’s CA. | # isi dm certificates ca create “$PWD”/ca-t.pem –name <target-cluster-ca>
|
| 5 | Target | Install source cluster’s CA. | # isi dm certificates ca create “$PWD”/ca-s.pem –name <source-cluster-ca>
|
| 6 | Target | Install target cluster’s CI. | # isi dm certificates identity create “$PWD”/identity-t.crt –certificate-key-path “$PWD”/identity-t.key –name <target-cluster-identity> |
Note that the certificates must be located under /ifs when performing the import, otherwise an error similar to the following will be returned:
Invalid certificate path: /root/ca-s.pem [CERTS_CERT_INVALID]
At this point, encryption is now configured on the source and target clusters.
- By default, a local account, ‘DM Local Account’, is already configured. The ‘isi dm accounts list’ command can be used to display this ‘DM Local Account.’
# isi dm accounts list

ID                                               Name             URI             Account Type  Auth Mode   Local Network Pool  Remote Network Pool

----------------------------------------------------------------------------------------------------------------------------------------------------

0060167118de5018ab62800ce595db9bdb40000000000000 DM Local Account dm://[::1]:7722 DM            CERTIFICATE

----------------------------------------------------------------------------------------------------------------------------------------------------

Total: 1
The following steps illustrate configuring a push policy from the source cluster. Note that a single account can be used for both a push and pull policy, depending on the replication topology. After encryption is configured, the next step is to add a replication account to the source cluster, pointing replication to a target cluster.
On the source cluster, add a replication account using the ‘isi dm accounts create’ CLI command:
# isi dm accounts create DM dm://[Target Cluster IP]:7722 [‘target-acct’]
If desired, local and remote SmartConnect pools can be specified for the source and target clusters, respectively, with the –local-network-pool and –remote-network-pool flags.
The ‘isi dm accounts list’ command can be used to verify successful account creation:
# isi dm accounts list

ID                                               Name             URI             Account Type  Auth Mode   Local Network Pool  Remote Network Pool

----------------------------------------------------------------------------------------------------------------------------------------------------

f8f21e66c32476412b621d182495f22d3e31000000000000 DM Local Account dm://[::1]:7722 DM            CERTIFICATE

000c38b4ga22e3810d53ff27449b285b98c8000000000000 rmt-acct          dm://10.20.50.130:7722 DM

----------------------------------------------------------------------------------------------------------------------------------------------------

Total: 2
In the above, the ‘DM Local Account’ is the source cluster’s account, and ‘rmt-acct’ is the target cluster’s account, plus IP address.
- Two policies are needed here. First, the ‘isi dm policies create’ CLI command can be run with the ‘CREATION’ policy option in order to create a dataset. The syntax for this command to run at ‘normal’ priority is:
# isi dm policies create [Policy Name] NORMAL true CREATION -- creation-account-id=[DM local account] --creation-base-path= -- creation-dataset-retention-period= --creation-dataset-reserve= -- creation-dataset-expiry-action=DELETE ––recurrence=”cron expression” --start-time="YYYY-MM-DD HH:MM:SS"
The configuration parameters for the ‘isi dm policies create’ command include:
| Parameter | Description |
| policy-type | Specifies the type of policy. Options are:
● CREATION —the process of creating the dataset ● COPY —used for one-time data transfers ● REPEAT_COPY —used for repeated transfers ● EXPIRATION —how long the snapshot is stored |
| priority | Assigns a priority to this policy. The options are: LOW | NORMAL | HIGH. |
| true | Specifies that the policy is enabled. |
| creation-account-id | The DM local account ID specified in the isi dm accounts list command. |
| creation-base-path | For SmartSync this specifies the directory path or file for the dataset. For cloud copy, this specifies the object store key prefix. |
| creation-dataset-retention-period | How long the dataset is retained in seconds before expiration. |
| creation-dataset-reserve | how many datasets to keep in reserve that are protected from expiration, irrespective of the creation-dataset-retention-period. |
| creation-dataset-expiry-action | Specifies what happens with the dataset after expiration. With OneFS 9.4, the only expiration option is DELETE. |
| recurrence | How often the policy runs. |
| Start-time | The date and time when the policy runs. If a prior date is entered, the policy runs immediately. |
The following CLI command creates a Datamover CREATION policy named createTestDataset. The policy creates a dataset with the base filepath /ifs/test/dm/data1. The creation account is the local Datamover account. The dataset expires 1,500 seconds (25 minutes) after its creation, after which it is deleted. The policy starts running June 1, 2022, at 12pm.
# isi dm policies create --name=createTestDataset --enabled=true --priority=low --policy-type=CREATION --creation-base-path=/ifs/test/dm/data1 --creation-account-id=local --creation-dataset-expiry-action=DELETE --creation-dataset-retention-period=1500 --start-time "2022-12-01 12:00:00"
To list the Datamover policies:
# isi dm policies list

ID   Validity  Name              Enabled  Disabled By DM  Priority  Policy Type  Base Policy ID  Date Times  Recurrence  Start Time          Parent Exec Policy ID

-------------------------------------------------------------------------------------------------------------------------------------------------------------------

1 Yes createTestDataset Yes No LOW    CREATION - - - 2022-12-01 12:00:00 -

-------------------------------------------------------------------------------------------------------------------------------------------------------------------
The ‘isi dm policies view’ CLI syntax can be used to inspect details of a policy, in this case ‘createTestDataset’ with an ID of 1 above:
# isi dm policies view 1

                        ID: 1

                  Validity: Yes

                      Name: createProdDataset

                   Enabled: Yes

            Disabled By DM: No

                  Priority: LOW

                   Run Now: No

            Base Policy ID: -

     Parent Exec Policy ID: -

                  Schedule

                    Date Times: -

                    Recurrence: -

                    Start Time: 2022-12-01 12:00:00

Policy Specific Attributes

                        Policy Type: CREATION

                    Creation Policy

                           Account ID: local

                            Base Path: /ifs/test/dm/data1

                            Retention

               Dataset Retention Period: 1500

                        Dataset Reserve: 2

                  Dataset Expiry Action: DELETE
In addition to the newly configured CREATION policy, a COPY policy is also required to perform the data move. This can be created as follows:
# isi dm policies create archive-restore NORMAL true COPY --copy-source-base-path=/ifs/test/dm/data1 --copycreate-dataset-on-target=true --copy-base-base-account-id= f8f21e66c32476412b621d182495f22d3e31000000000000 --copy-base-source-accountid= f8f21e66c32476412b621d182495f22d3e31000000000000--copy-base-target-account-id=000c38b4ga22e3810d53ff27449b285b98c8000000000000--copy-base-target-basepath=/ifs/test/dm/data1 --copy-base-target-dataset-type=FILE --copy-base-dataset-retention-period=3600 --copy-base-dataset-reserve=2 --copy-base-policy-dataset-expiry-action=DELETE
Confirm both the COPY and CREATION Datamover policies are present:
# isi dm policies list

ID   Validity  Name              Enabled  Disabled By DM  Priority  Policy Type  Base Policy ID  Date Times  Recurrence  Start Time          Parent Exec Policy ID

-------------------------------------------------------------------------------------------------------------------------------------------------------------------

1 Yes createTestDataset Yes No LOW    CREATION -      -     -     -

2 Yes archive-restore   Yes No NORMAL COPY     -      -     -     –

-------------------------------------------------------------------------------------------------------------------------------------------------------------------
- The next step is to run the CREATION policy (ID = 1) in order to create the dataset:
# isi dm policies modify 1 --run-now=true
The running job can be inspected as follows:
# isi dm jobs list

ID Job Type Job Priority Job Policy ID Job Control Request Job Start Time Job End Time Job State Job State Flags

----------------------------------------------------------------------------------------------------------------

201 DATASET_CREATION_JOB NORMAL  1  NONE  2022-06-23T14:52:22 2022-06-23T14:53:04 finishing   No failure

----------------------------------------------------------------------------------------------------------------

Total: 1
Once the job has completed, the ‘isi dm historical-jobs list’ CLI command allows the dataset creation policy’s status to be queried.
# isi dm historical-jobs list

ID Job Type Job Priority Job Policy ID Job Control Request Job Start Time Job End Time Job State Job State Flags

----------------------------------------------------------------------------------------------------------------

201 DATASET_CREATION_JOB NORMAL  1  NONE  2022-06-23T14:52:22 2022-06-23T14:54:51 finished   No failure

----------------------------------------------------------------------------------------------------------------

Total: 1
Finally, run the COPY policy (ID = 2) to replicate the dataset from the source to target cluster:
# isi dm policies modify 2 --run-now=true

# isi dm jobs list

ID Job Type Job Priority Job Policy ID Job Control Request Job Start Time Job End Time Job State Job State Flags

----------------------------------------------------------------------------------------------------------------

202 DATASET_BASELINE_COPY_JOB NORMAL  2  NONE   2022-06-23T14:55:11 2022-06-23T14:56:48 running   No failure

----------------------------------------------------------------------------------------------------------------

Total: 1
When the COPY job has completed, the ‘historical-jobs’ output will now show both the CREATION and COPY job details:
# isi dm historical-jobs list

ID Job Type Job Priority Job Policy ID Job Control Request Job Start Time Job End Time Job State Job State Flags

----------------------------------------------------------------------------------------------------------------

202 DATASET_BASELINE_COPY_JOB NORMAL  2  NONE   2022-06-23T14:55:11 2022-06-23T14:57:06 finished   No failure

201 DATASET_CREATION_JOB NORMAL  1  NONE  2022-06-23T14:52:22 2022-06-23T14:54:51 finished   No failure

----------------------------------------------------------------------------------------------------------------

Total: 2
Once created, the new dataset can be inspected via the ‘isi dm datasets list’ command output:
# isi dm datasets list

ID Dataset State Dataset Type Dataset Base Path Dataset Subpaths Dataset Creation Time Dataset Expiry Action Dataset Retention Period

-------------------------------------------------------------------------------------------------------------------------------------

1  COMPLETE FILE  /ifs/test/dm/data1   - 2022-06-23T14:54:51  DELETE  2022-06-23T15:54:51

-------------------------------------------------------------------------------------------------------------------------------------

Total: 1
To view Datamover policies:
# isi dm policies view
Note that the procedure above configures push replication of a dataset from a source to target. Conversely, to perform a pull from the target cluster, the replication account is instead added to the target cluster, and with the source cluster’s IP used:
# isi dm accounts create DM dm://[Source Cluster IP]:7722 [‘source-acct’]
Object data replication to public cloud or Dell ECS targets can also be configured with the ‘isi dm accounts create’ CLI command, but does require a couple of additional parameters, namely:
| Parameter | Description |
| Object store type | AWS_S3, Azure, or ECS_S3 |
| URI | {http,https}://hostname:port/bucketname |
| Auth | Access ID, Secret Key |
| Proxy | Optional proxy information |
For example:
# isi dm accounts create AWS_S3 https://aws-host:5555/bucket dm-account-name --authmode CLOUD --access-id aws-access-id --secret-key aws-secret-key
Be aware that a dataset must be available before a copy, or repeat-copy data replication policy runs, or the policy will fail.
Behind the scenes, dataset creation leverages a SnapshotIQ snapshot, which can be inspected via the ‘isi snapshot list’ command. These DM dataset snapshots are easily recognizable due to their ‘isi_dm’ prefixed naming convention.
In the final article in this series, we’ll take a look at SmartSync management, monitoring, and troubleshooting.