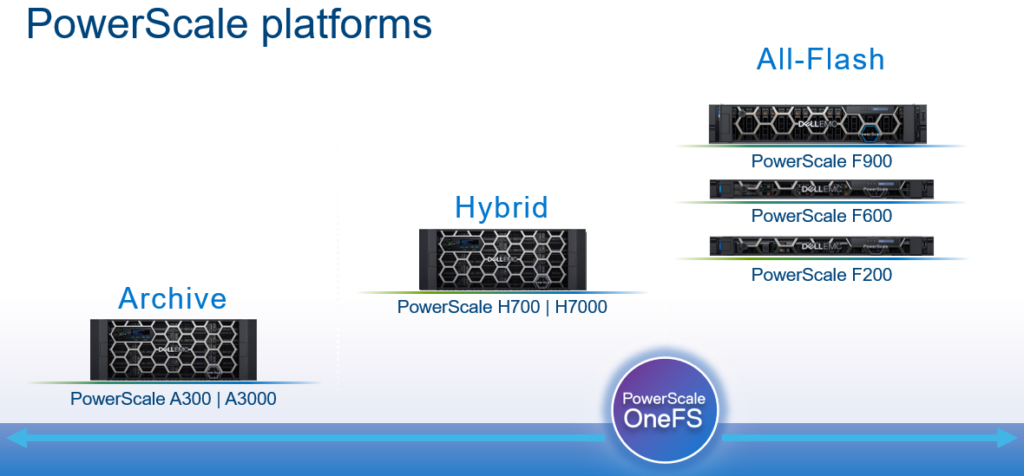
In this article, we’ll take a quick peek at the new PowerScale Hybrid H700/7000 and Archive A300/3000 hardware platforms that were released last month. So the current PowerScale platform family hierarchy is as follows:
Here’s the lowdown on the new additions to the hardware portfolio:
| Model | Tier | Drive per Chassis & Drives | Max Chassis Capacity (16TB HDD) | CPU per Node | Memory per Node | Network |
| H700 | Hybrid/Utility | Standard:
60 x 3.5” HDD |
960TB | CPU: 2.9Ghz, 16c | Mem: 384GB | FE: 100GbE
BE: 100GbE or IB |
| H7000 | Hybrid/Utility | Deep:
80 x 3.5” HDD |
1280TB | CPU: 2.9Ghz, 16c | Mem: 384GB | FE: 100GbE
BE: 100GbE or IB |
| A300 | Archive | Standard:
60 x 3.5” HDD |
960TB | CPU: 1.9Ghz, 6c | Mem: 96GB | FE: 25GbE
BE: 25GbE or IB |
| A3000 | Archive | Deep:
80 x 3.5” HDD |
1280TB | CPU: 1.9Ghz, 6c | Mem: 96GB | FE: 25GbE
BE: 25GbE or IB |
The PowerScale H700 provides performance and value to support demanding file workloads. With up to 960 TB of HDD per chassis, the H700 also includes inline compression and deduplication capabilities to further extend the usable capacity
The PowerScale H7000 is a versatile, high performance, high capacity hybrid platform with up to 1280 TB per chassis. The deep chassis based H7000 is an ideal to consolidate a range of file workloads on a single platform. The H7000 includes inline compression and deduplication capabilities
On the active archive side, the PowerScale A300 combines performance, near-primary accessibility, value, and ease of use. The A300 provides between 120 TB to 960 TB per chassis and scales to 60 PB in a single cluster. The A300 includes inline compression and deduplication capabilities
PowerScale A3000: is an ideal solution for high performance, high density, deep archive storage that safeguards data efficiently for long-term retention. The A3000 stores up to 1280 TB per chassis and scales to north of 80 PB in a single cluster. The A3000 also includes inline compression and deduplication.
These new H700/7000 and A300/3000 nodes require OneFS 9.2.1, and can be seamlessly added to an existing cluster, offering the full complement of OneFS data services including snapshots, replication, quotas, analytics, data reduction, load balancing, and local and cloud tiering. All also contain SSD
Unlike the all-flash PowerScale F900, F600, and F200 stand-alone nodes, which required a minimum of 3 nodes to form a cluster, a single chassis of 4 nodes is required to create a cluster, with support for both InfiniBand and Ethernet backend network connectivity.
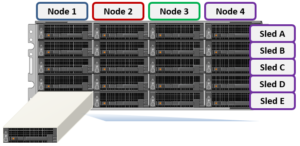
Each F700/7000 and A300/3000 chassis contains four compute modules (one per node), and five drive containers, or sleds, per node. These sleds occupy bays in the front of each chassis, with a node’s drive sleds stacked vertically:
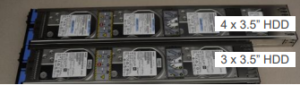
The drive sled is a tray which slides into the front of the chassis, and contains between three and four 3.5 inch drives in an H700/0 or A300/0, depending on the drive size and configuration of the particular node. Both regular hard drives or self-encrypting drives (SEDs) are available in 2,4, 8, 12, and 16TB capacities.
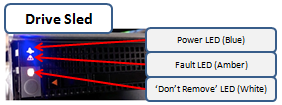
Each drive sled has a white ‘not safe to remove’ LED on its front top left, as well as a blue power/activity LED, and an amber fault LED.
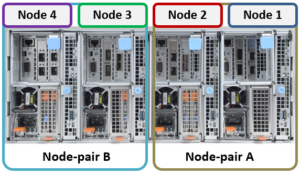
The compute modules for each node are housed in the rear of the chassis, and contain CPU, memory, networking, and SSDs, as well as power supplies. Nodes 1 & 2 are a node pair, as are nodes 3 & 4. Each node-pair shares a mirrored journal and two power supplies:
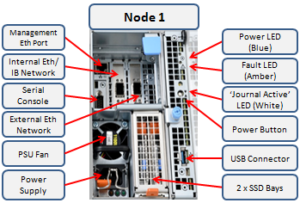
Here’s the detail of an individual compute module, which contains a multi core Cascade Lake CPU, memory, M2 flash journal, up to two SSDs for L3 cache, six DIMM channels, front end 40/100 or 10/25 Gb ethernet, 40/100 or 10/25 Gb ethernet or Infiniband, an ethernet management interface, and power supply and cooling fans:
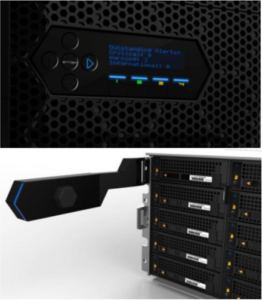
On the front of each chassis is an LCD front panel control with back-lit buttons and 4 LED Light Bar Segments – 1 per Node. These LEDs typically display blue for normal operation or yellow to indicate a node fault. This LCD display is hinged so it can be swung clear of the drive sleds for non-disruptive HDD replacement, etc:
So, in summary, the new PowerScale hardware delivers:
- More Power
- More cores, more memory and more cache
- A300/3000 up to 2x faster than previous generation (A200/2000)
- More Choice
- 100GbE, 25GbE and Infiniband options for cluster interconnect
- Node compatibility for all hybrid and archive nodes
- 30TB to 320TB per rack unit
- More Value
- Inline data reduction across the PowerScale family
- Lowest $/GB and most density among comparable solutions