In the previous article in this series, we looked at configuring Dynamic Licensing from the WebUI and CLI. In this article, we’ll focus on the management and troubleshooting of Dynamic Licensing.
Note that the OneFS 9.13 WebUI only supports the configuration and monitoring of Dynamic Licensing. Additional operations such as license reduction, deregistration, etc, can only be performed via the CLI or WebUI.
A cluster’s product registration may be expanded with additional features, capacity, quantity, or term via an updated registration request, which adds or removes entitlements from the pool, resulting in the intended action.
| Action |
Details |
| Hardware expansion |
When a new node is added to the cluster, the Dynamic Licensing cron job detects the change and initiates the registration process using the Service Tag of the newly added node. |
| Hardware reduction |
When a node is removed from the cluster, the cron job detects the change and initiates the reduction process using the Service Tag of the removed node. |
| Software expansion |
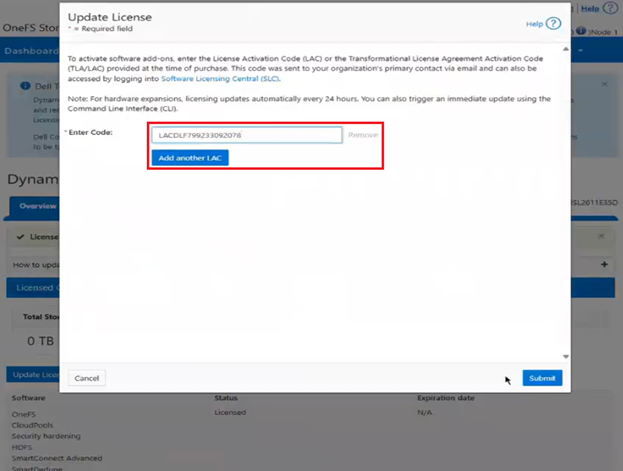
When a customer purchases additional capacity or term, they need to provide the License Activation Code (LAC) to update the registered installation with more entitlements. |
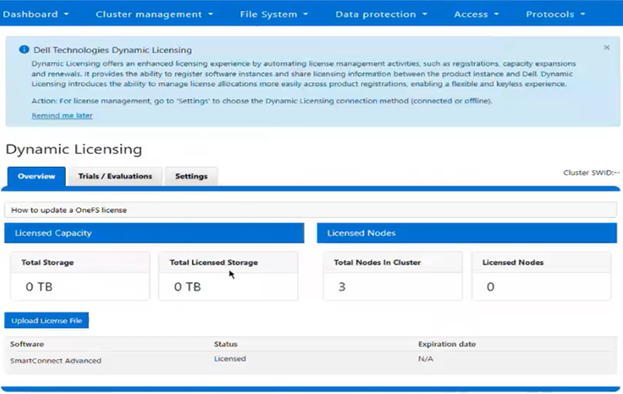
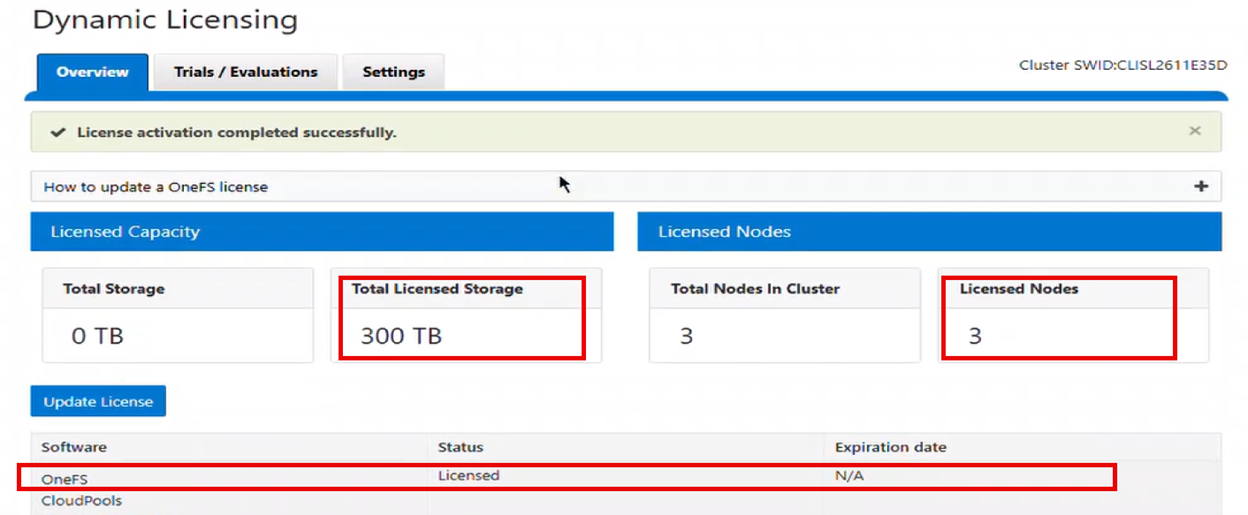
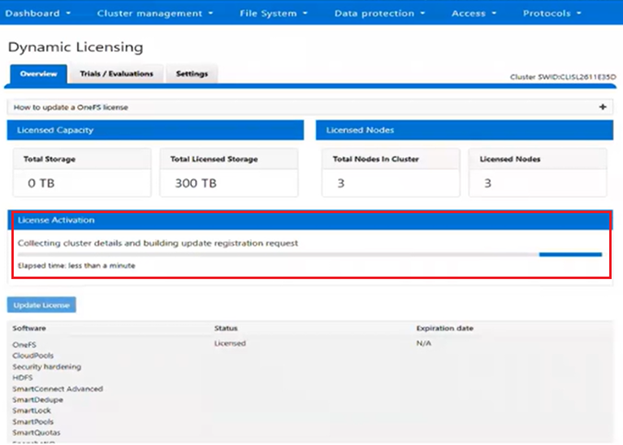
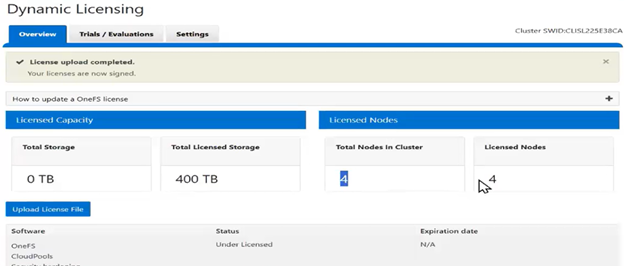
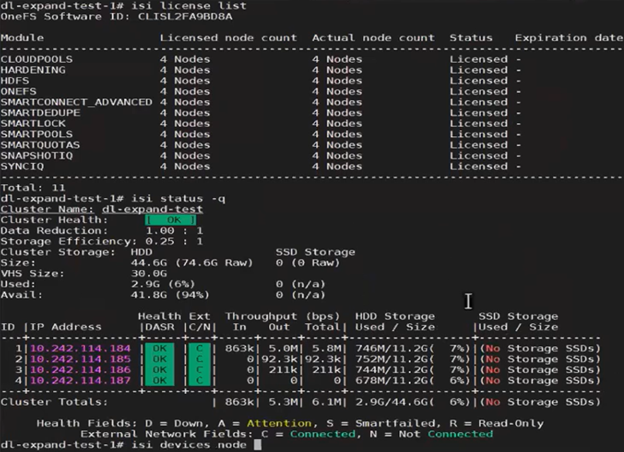
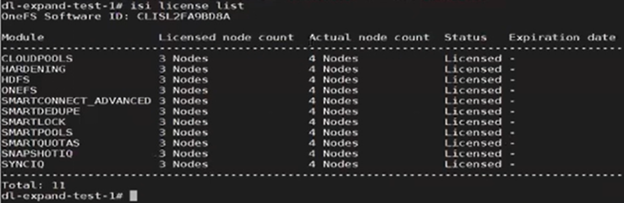
For example, the following cluster is configured for Dynamic Licensing, and all four nodes are registered:
Next, one of the nodes is SmartFailed, removing it from the cluster:
# isi devices node smartfail –lnn 4
You are about to begin smartfailing node lnn 4. Are you sure? (yes/[no]): yes
However, Dynamic Licensing still reports the cluster as having four registered nodes:
Next, the ‘isi license modify’ CLI command can be used to remove the SmartFailed node’s license:
# isi license modify
Product licensing process initiated.
Use ‘isi license status’ to monitor.
# isi license status
Product update registration completed successfully.
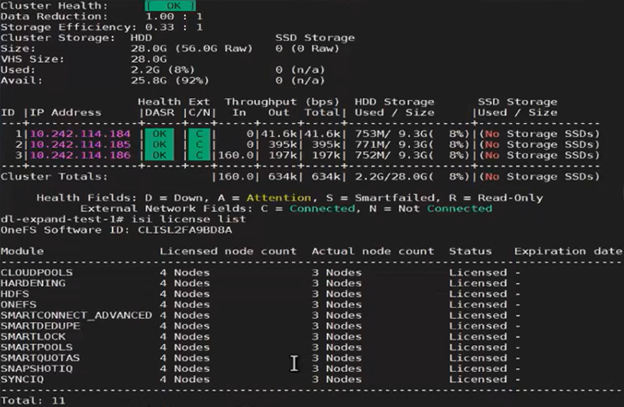
The output above indicates that the product registration has been successfully executed, and the reduced node count is now reflected in the ‘isi license output’:
Note that a Dynamic Licensing runs a cron job to capture licensing updates from cluster changes, but this job is only run once daily. The CLI options can be used for a more timely, on-demand cluster license update.
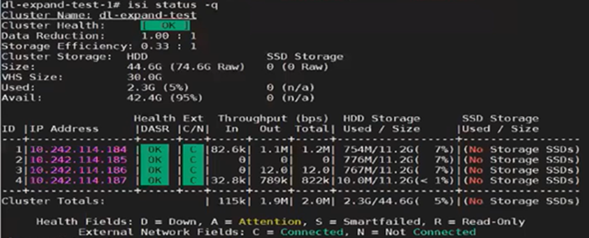
A similar process can be employed for cluster expansion. For example, re-adding the fourth node to the same cluster:
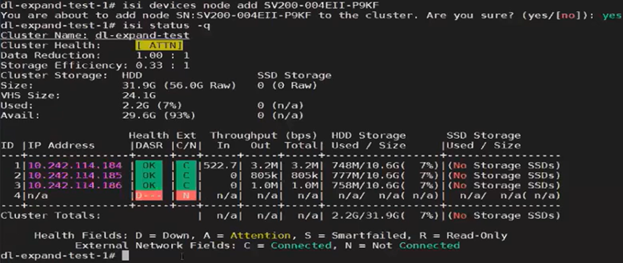
The licensing CLI now reports four cluster nodes, but only three are licensed:
The ‘isi devices’ CLI command now shows the fourth node up and joined to the cluster:
Next, the ‘isi license modify’ CLI command is used to re-run the registration update process, which reports the ‘perform_expansion’ task as ‘IN_PROGRESS’:
# isi license modify
Product licensing process initiated.
Use ‘isi license status’ to monitor.
# isi license status
Dynamic_license_update_registration is IN_PROGRESS state, sub state : perform_expansion.
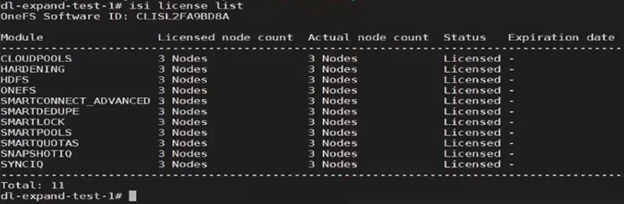
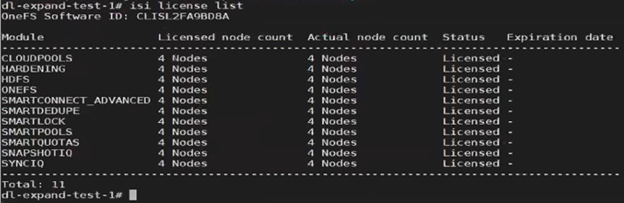
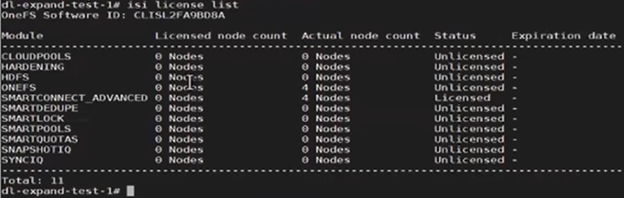
Once the registration update process has successfully completed, Dynamic Licensing reports that all four nodes are available and licensed:
For changes to cluster capacity, composition, and/or licensed data service modules, the ‘–lacs=’ argument can be used with the ‘isi license modify’ CLI command. For example:
# isi license modify –-lacs=LACPSA210920250504
Product licensing process initiated.
Use ‘isi license status’ to monitor.
# isi license status
Product update registration completed successfully.
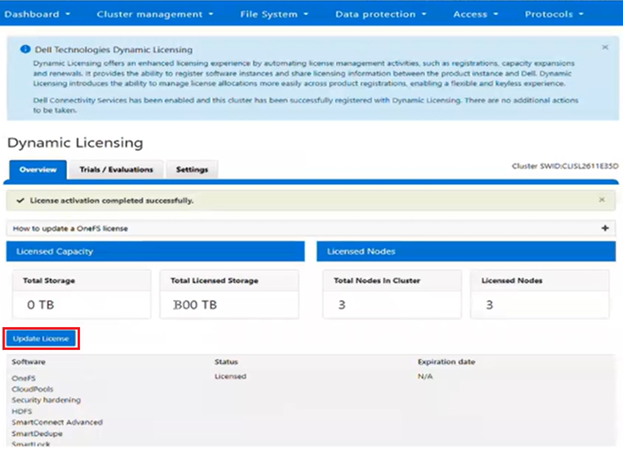
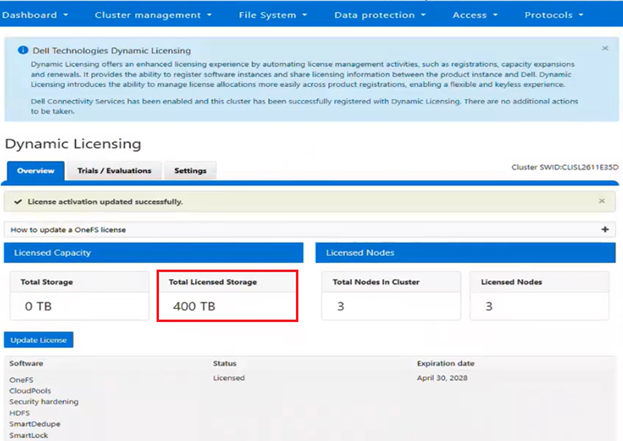
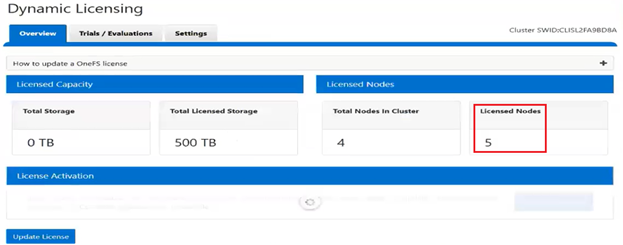
In this case, we’ve added an additional OneFS license to the entitlements, so the ‘Licensed node count’ now reports five nodes, while the ‘Actual node count’ still shows the cluster’s four nodes. This is similarly reported from the WebUI:
Note that Dynamic Licensing’s consumption workflow is not available from the WebUI, CLI, or pAPI. Instead, a cron job is used, which runs hourly to collect the consumption data, and then daily once in a day to upload the aggregated consumption data to the Dynamic Licensing back-end. Based on this consumption data, the Dynamic Licensing back-end performs the license assessment and sends OneFS a compliance report. The PowerScale cluster then process the compliance report, and, if necessary, generates any required events and alerts in case of any feature violations. For example, say a customer has purchased 100TB of capacity and they attempt to exceed that limit. In this case OneFS will generate over-capacity alerts. Additionally, OneFS will attempt to resolve those alerts once the capacity utilization returns below the 500TB limit.
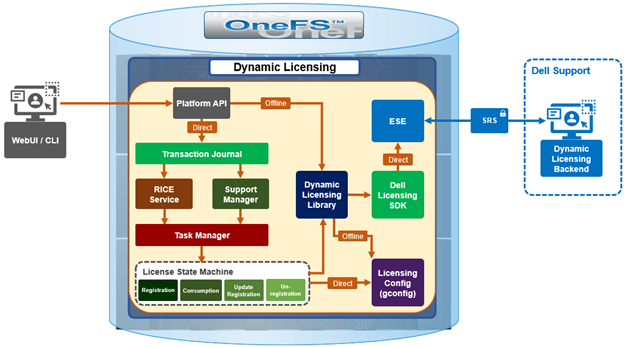
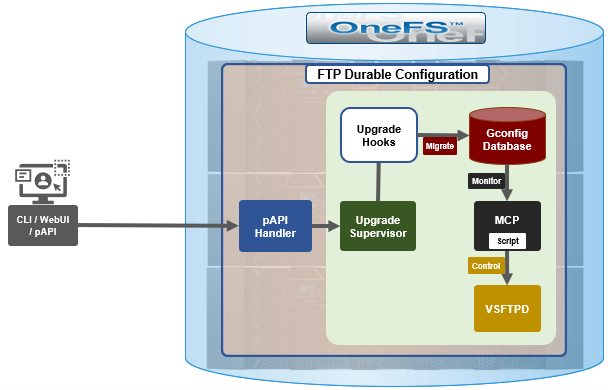
In the event of hardware and software expansion or reduction, gconfig is updated to reflect the licensing changes on the cluster. The existing OneFS license state machine is used, along with a new ‘dynamic_license_update_registration’ sub-task.
In addition to the automated cron process, customers can also initiate expansion or reduction on-demand via the OneFS CLI or platform API (pAPI). For example:
# isi license add
The process to register the product with Dynamic Licensing backend has been initiated.
The ‘isi license’ CLI command set is expanded in OneFS 9.13 with the addition of ‘deregister’ and modify options, plus removal of the legacy ‘activation’ option, resulting in a general syntax as follows:
# isi license -h
Description:
    Manage software licenses.

Required Privileges:
    ISI_PRIV_LICENSE

Usage:
    isi license <action>
        [--timeout <integer>]
        [{--help | -h}]

Actions:
    add           Registers the product with Dynamic Licensing or applies
                  offline registration file
    deregister    Deregister the product from the Dynamic Licensing backend.
    generate      Generate license activation file.
    list          Retrieve license information of all licensable features.
    modify        Update the product registration in the Dynamic Licensing
                  backend.
    status        Check licensing process status.
    view          Retrieve license information of a licensable feature.
When a PowerScale is deprovisioned, it is necessary to deregister its license registration. This process ensures that the cSWID is removed from the reservation pool and entitlements are returned to the available state. In the process, deregistration removes the license from the cluster’s gconfig configuration store, and post-deregistration, the cluster is unlicensed.
Dynamic Licensing deregistration, say if the cluster is being deprovisioned or reimaged, can be performed from the CLI (or platform API), but not the WebUI. For example:
# isi license deregister
Deregistering product process initiated.
Use ‘isi license status’ to monitor.
# isi license status
Product deregistration completed successfully.
As expected, after successful deregistration, the ‘isi license status’ CLI command now reports zero licensed nodes:
This means that the nodes’ licenses have been reset, and can now be successfully re-registered when the nodes have been reprovisioned.
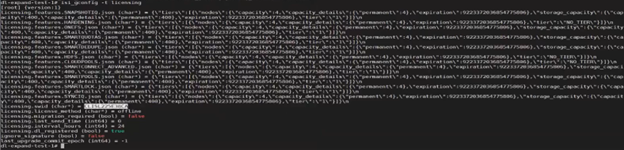
Correspondingly, the Dynamic Licensing gconfig status now reflects that the cluster is no longer registered (licensing.dl_registered (bool) = false), and the default licensing method is now set to ‘offline’ (licensing.license_method (char*) = offline). For example:
# isi_gconfig -t licensing
[root] {version:1}
(empty dir licensing.features)
licensing.swid (char*) = <null>
licensing.license_method (char*) = offline
licensing.migration_required (bool) = false
licensing.last_send_time (int64) = 0
licensing.interval_hours (int64) = 24
licensing.dl_registered (bool) = false
ignore_signature (bool) = false
last_upgrade_commit_epoch (int64) = -1
If a cluster needs to be reimaged for whatever reason, first the cluster admin must deregister the PowerScale license registration. Failure to do so results in the product registration call failing, as the hardware entitlements are tied to a different cSWID. In cases where the customer fails to deregister the license and proceeds with reimaging the cluster, Dell support will need to remove the older cSWID. Note that a future solution is in progress to handle this scenario without requiring Dell Support’s involvement.
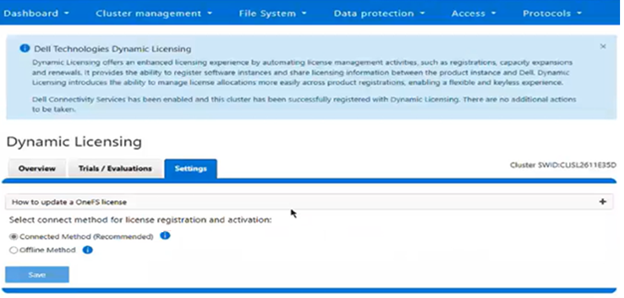
The license topology can be modified at any time, and whenever a topology change occurs the pertinent Dynamic Licensing gconfig settings are updated to reflect the new topology details. When the licensing mode is set to Direct and connectivity is enabled, the system behaves as follows in case of a temporary disconnection:
- The licensing mode remains as ‘Direct’, even if a temporary disconnect occurs.
- The cron job continues to perform its scheduled tasks without interruption.
- As soon as the connectivity is re-established, all workflows resume their normal operation.
Clusters with DTCS/SRS enabled and connected to the Dell backend are automatically migrated to Dynamic Licensing upon upgrade to OneFS 9.13 or later, using the Key-to-Dynamic Upgrade Product Registration. For connected customers, the migration process occurs seamlessly, with the cluster handling the transition to Dynamic Licensing as part of the upgrade process.
Conversely, when a disconnected cluster upgrades to OneFS 9.13 or later, it continues to use the legacy XML-based licensing. However, the option is available to migrate to Dynamic Licensing at a later time, using either the direct-connected’ or offline registration modes.
Under the hood, Dynamic Licensing introduces a new ‘migration_required’ flag, which has a default value of ‘false’. In the event of an upgrade to OneFS 9.13 or later, the value of this flag is set to ‘true’.
In OneFS 9.13 or later with Dynamic Licensing enabled, a ‘cron’ scheduling job runs on an hourly and daily basis. Running as root, this cron job’s primary responsibilities include:
- Collecting consumption data on an hourly basis
- Sending the collected data to the Dynamic Licensing (DL) backend at least once a day, or at intervals defined in the global configuration (gConfig)
The cron job uses the OneFS licensing state machine’s ‘send_consumption’ subtask to send the consumption data to the backend.
The cron job monitors for changes to the node configuration, including additions or removals, and updates the registration in the Dynamic Licensing backend accordingly. This involves registering new nodes or decreasing the registration count when nodes are removed. If no changes are detected during expansion or reduction, the cron job will call the get registration API to retrieve the latest licensing information from the backend. The cron job utilizes the ‘dynamic_license_update_registration’ subtask of the license state machine for expansion, reduction, and get-registration operations.
The cron job uses the following gconfig parameters to send consumption data, and the job typically runs as root to allow it to operate in OneFS compliance mode:
| Parameter |
Default Value |
Description |
| int64_t last_send_time |
0 |
Timestamp when last consumption data was sent. |
| int64_t interval_hours |
24 |
Time interval in hours to send consumption data. |
For example:
# isi_gconfig -t licensing | grep int
licensing.last_send_time (int64) = 0
licensing.interval_hours (int64) = 24
Security-wise, Dynamic Licensing is available and supported in the following PowerScale cluster security modes:
- Compliance
- Hardening
- Root Lockdown Mode (RLM)
Additionally, the ‘ISI_PRIV_LICENSE’ OneFS RBAC privilege is required.
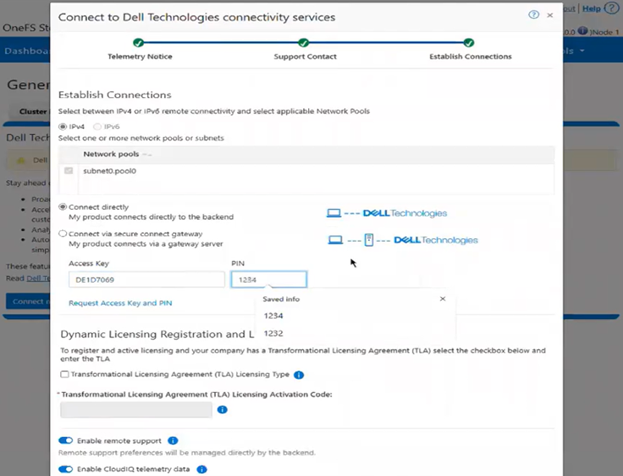
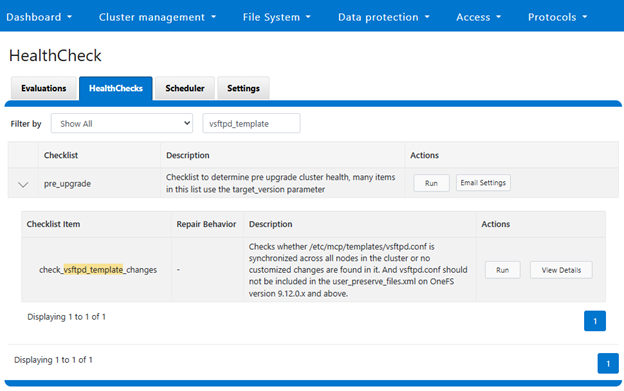
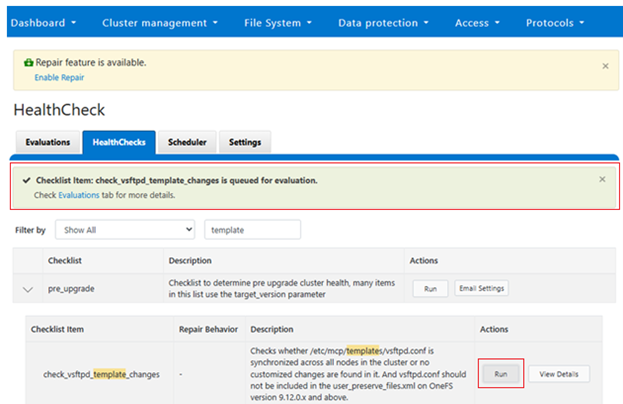
When it comes to monitoring and/or troubleshooting Dynamic Licensing, there are several events, alerts, and healthchecks to provide warning, in addition to diagnostic logs. There are also WebUI banners that provide warnings and context for licensing issues. For example, the following will be displayed if the node serial numbers are already registered:
OneFS sends the meter licensed feature consumption/usage across the cluster as regular license health checks, and send it to the Dynamic Licensing back-end in a timely manner (typically at least once per day). The response to a license consumption call provides the latest state of the reservation pool (i.e., what entitlements exist) and compliance events generated after running the license assessment.
The assessment results are provided to the PowerScale cluster, which sends the latest consumption information to the Dynamic Licensing system.
The License Assessment measures result in 5 levels of concern, as mentioned below, with Level 1 being the lowest level of concern (OK) and Level 5 indicating the highest level of concern (critical). These tiers/concern levels need to be mapped to threshold values accordingly in the license policy based on what messaging & enforcement actions the products want to define.
A PowerScale cluster processes compliance events from the consumption response from Dynamic Licensing and will raise the events for Warn, Alert and Critical in the Direct mode. In the offline case, alerting is based on local compliance, which is determined by capacity usage.
The cluster creates events for all licensed features, and based on the compliance response, will raise an event for a particular feature if it fails compliance. Once the customer purchases new entitlements and compliance failures are resolved, the cluster quiesces the pertinent events for those licensed features.
OneFS raises a ‘SW_SUPPORTASSIST_DISCONNECTED’ event whenever connectivity is lost between the PowerScale cluster and the Dell Backend (DTCS/ESE). Additionally, OneFS also raises ‘WARN’ and ‘CRITICAL’ alerts when it is unable to connect to the Dell Backend.
The following diagnostic logs can provide considerable insight into Dynamic Licensing operation and issues, too:
| Component |
Logfile |
Description |
|
| ESE |
/usr/local/ese/var/log/ESE.log |
ESE communication log. |
|
| RICE |
/var/log/isi_rice_d.log |
Dynamic Licensing tasks log. |
|
| CRISPIES |
/var/log/isi_crispies_d.log |
RICE and ESE startup logs. |
|
| CRON |
/var/log/isi_license_d.log |
Cron log for expansion/reduction/consumption. |
|
| pAPI |
/var/log/isi_papi_d.log |
Platform API log. |
|
Some additional Dynamic Licensing caveats and considerations that are worth noting include:
| Consideration |
Details |
| Compliance |
Customers at dark sites who have manually migrated to Dynamic Licensing are required to upload consumption data quarterly to remain compliant. |
| Deregistration |
If a customer fails to complete Dynamic Licensing de-registration for an asset, any future registration attempts (e.g., after a cluster re-image) will fail. |
| Entitlements |
After migration to Dynamic Licensing, feature-level expiration dates are no longer be visible in the cluster WebUI. Customers must use the SLC Portal to view entitlement details. |
| Reverting |
Reverting from Dynamic Licensing to the legacy licensing model is not officially supported and cannot be performed by the customer. If required, manual intervention by Dell Support will be needed. |
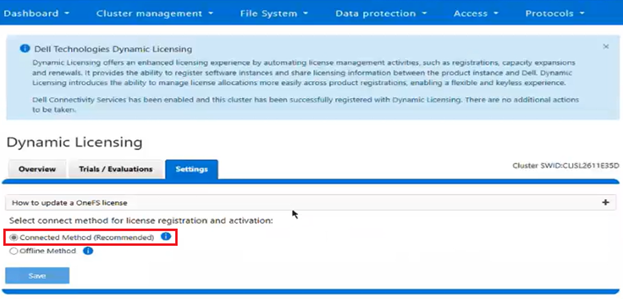
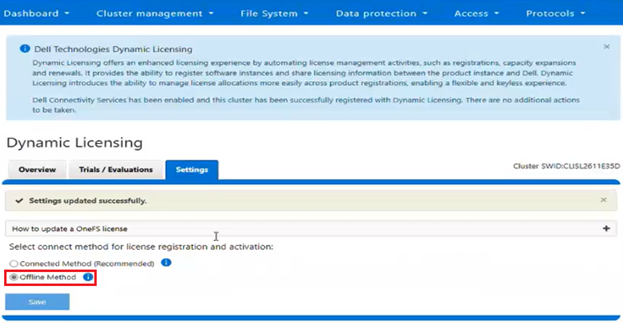
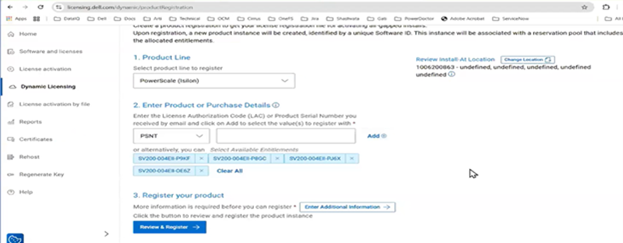
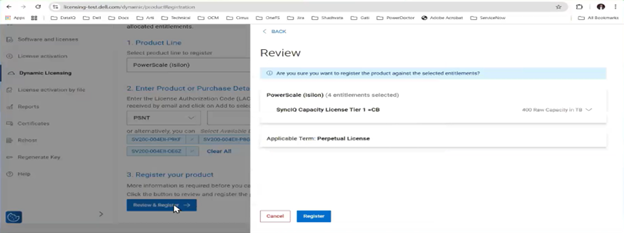
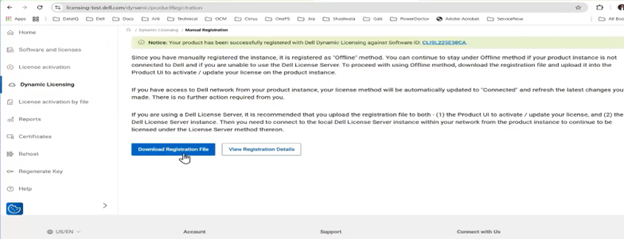
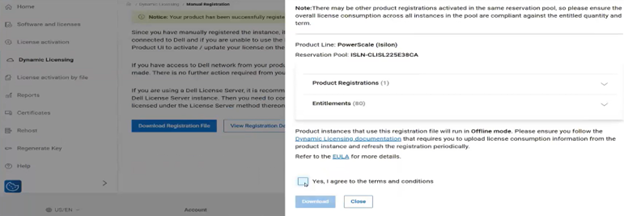
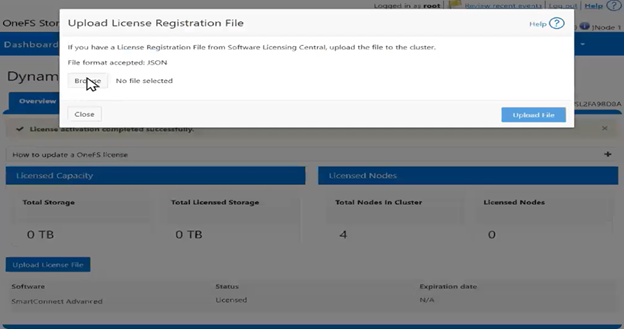
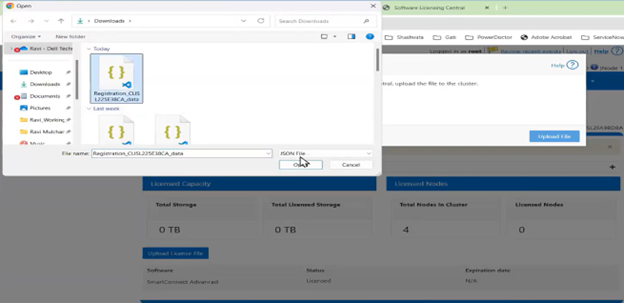
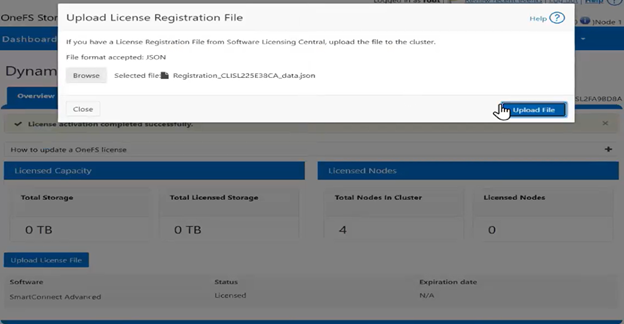
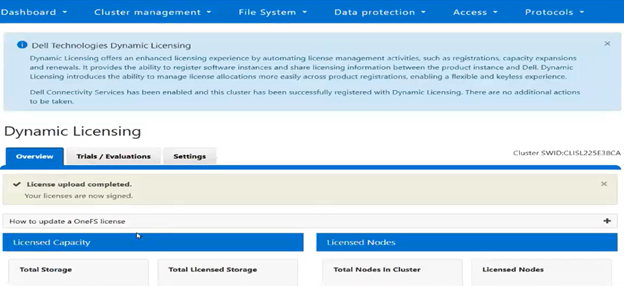
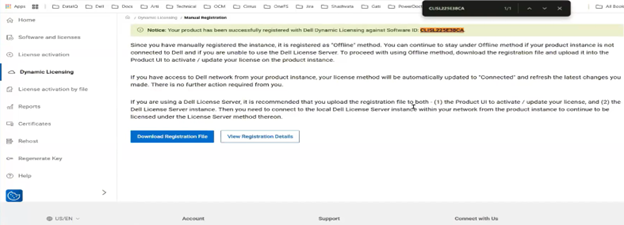
If registration with Dynamic Licensing fails, customers may instead manually register their PowerScale cluster through the Dell Software Licensing portal and upload the corresponding license file to the system from there.
Note that the legacy evaluation mechanism remains in OneFS 9.13 and later for enabling limited time trial licenses for specific data services. For example, to enable trial licenses for SmartPools and SyncIQ from the CLI:
# isi license add --evaluation SyncIQ --evaluation SmartPools