It’s been a sizzling summer for Dell PowerScale to date! Hot on the heels of the OneFS 9.12 launch comes the unveiling of the innovative new PowerScale InsightIQ 6.1 release.
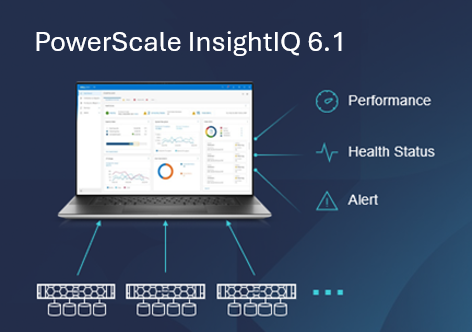
InsightIQ provides powerful performance and health monitoring and reporting functionality, helping to maximize PowerScale cluster efficiency. This includes advanced analytics to optimize applications, correlate cluster events, and the ability to accurately forecast future storage needs.
So what new goodness does this InsightIQ 6.1 release add to the PowerScale metrics and monitoring mix?
Additional functionality includes:
| Feature | New IIQ 6.1 Functionality |
| Ecosystem support | · InsightIQ is qualified on Ubuntu |
| Flexible Alerting | · Defining custom alerts on the most used set of granular metrics.
· Nine new KPIs for a total of 16 KPIs. · Increased granularity of alerting and many more |
| Online Migration from Simple to Scale | · Customers with InsightIQ 6.0.1 Simple (OVA) can now migrate data and functionalities to InsightIQ 6.1.0 Scale. |
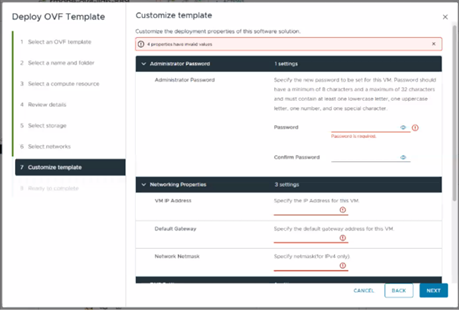
| Self-service Admin Password Reset | · Administrators can reset their own password through a simple, secure flow with reduced IT dependency |
InsightIQ 6.1 continues to offer the same two deployment models as its predecessors:
| Deployment Model | Description |
| InsightIQ Scale | Resides on bare-metal Linux hardware or virtual machine. |
| InsightIQ Simple | Deploys on a VMware hypervisor (OVA). |
The InsightIQ Scale version resides on bare-metal Linux hardware or virtual machine, whereas InsightIQ Simple deploys via OVA on a VMware hypervisor.
InsightIQ v6.x Scale enjoys a substantial breadth-of-monitoring scope, with the ability to encompass 504 nodes across up to 20 clusters.
Additionally, InsightIQ v6.x Scale can be deployed on a single Linux host. This is in stark contrast to InsightIQ 5’s requirements for a three Linux node minimum installation platform.
Deployment:
The deployment options and hardware requirements for installing and running InsightIQ 6.x are as follows:
| Attribute | InsightIQ 6.1 Simple | InsightIQ 6.1 Scale |
| Scalability | Up to 10 clusters or 252 nodes | Up to 20 clusters or 504 nodes |
| Deployment | On VMware, using OVA template | RHEL, SLES, or Ubuntu with deployment script |
| Hardware requirements | VMware v15 or higher:
· CPU: 8 vCPU · Memory: 16GB · Storage: 1.5TB (thin provisioned); Or 500GB on NFS server datastore |
Up to 10 clusters and 252 nodes:
· CPU: 8 vCPU or Cores · Memory: 16GB · Storage: 500GB Up to 20 clusters and 504 nodes: · CPU: 12 vCPU or Cores · Memory: 32GB · Storage: 1TB |
| Networking requirements | 1 static IP on the PowerScale cluster’s subnet | 1 static IP on the PowerScale cluster’s subnet |
Ecosystem support:
The InsightIQ ecosystem itself is also expanded in version 6.1 to also include Ubuntu 24.04 Online deployment and OpenStack RHOSP 21 with RHEL 9.6, in addition to SLES 15 SP4 and Red Hat Enterprise Linux (RHEL) versions 9.6 and 8.10. This allows customers who have standardized on Ubuntu Linux to now run an InsightIQ 6.1 Scale deployment on a v24.04 host to monitor the latest OneFS versions.
| Qualified on | InsightIQ 6.0 | InsightIQ 6.1 |
| OS (IIQ Scale Deployment) | RHEL 8.10, RHEL 9.4, and SLES 15 SP4 | RHEL 8.10, RHEL 9.6, and SLES 15 SP4 |
| PowerScale | OneFS 9.4 to 9.11 | OneFS 9.5 to 9.12 |
| VMware ESXi | ESXi v7.0U3 and ESXi v8.0U3 | ESXi v8.0U3 |
| VMware Workstation | Workstation 17 Free Version | Workstation 17 Free Version |
| Ubuntu | – | Ubuntu 24.04 Online deployment |
| OpenStack | RHOSP 17 with RHEL 9.4 | RHOSP 21 with RHEL 9.6 |
Similarly, in addition to deployment on VMware ESXi 8, the InsightIQ Simple version can also be installed for free on VMware Workstation 17, providing the ability to stand up InsightIQ in a non-production or lab environment for trial or demo purposes, without incurring a VMware licensing charge.
Additionally, the InsightIQ OVA template is now reduced in size to under 5GB, and with an installation time of less than 12 minutes.
Online Upgrade
The IIQ upgrade in 6.1 is a six step process:

First, the installer checks the current Insight IQ version, verifies there’s sufficient free disk space, and confirms that setup is ready. Next, IIQ is halted and dependencies met, followed by the installation of the 6.1 infrastructure and a migration of legacy InsightIQ configuration and historical report data to the new platform. The cleanup phase removes the old configuration files, etc, followed by the final phase which upgrades alerts and removes the lock, leaving InsightIQ 6.1 ready to roll.
| Phase | Details |
| Pre-check | • docker command
• IIQ version check 6.0.1 • Free disk space • IIQ services status • OS compatibility |
| Pre-upgrade | • EULA accepted
• Extract the IIQ images • Stop IIQ • Create necessary directories |
| Upgrade | • Upgrade addons services
• Upgrade IIQ services except alerts • Upgrade EULA • Status Check |
| Post-upgrade | • Update admin email
• Update IIQ metadata |
| Cleanup | • Replace scripts
• Remove old docker images • Remove upgrade and backup folders |
| Upgrade Alerts and Unlock | • Trigger alert upgrade
• Clean lock file |
The prerequisites for upgrading to InsightIQ 6.1 are either a Simple or Scale deployment with 6.0.1 installed, and with a minimum of 40GB free disk space.
The actual upgrade is performed by the ‘upgrade-iiq.sh’ script:

Specific steps in the upgrade process are as follows:
- Download and uncompress the bundle
# tar xvf iiq-install-6.1.0.tar.gz
- Enter InsightIQ folder and un-tar upgrade scripts
# cd InsightIQ
# tar xvf upgrade.tar.gz
- Enter upgrade scripts folder
# cd upgrade/
- Start upgrade. Note that the usage is same for both the Simple and Scale InsightIQ deployments.
# ./upgrade-iiq.sh -m <admin_email>
Upon successful upgrade completion, InsightIQ will be accessible via the primary node’s IP address.
Online Simple-to-Scale Migration
The Online Simple-to-Scale Migration feature enables seamless migration of data and functionalities from InsightIQ version 6.0.1 to version 6.1. This process is specifically designed to support migrations from InsightIQ 6.0.1 Simple (OVA) deployments to InsightIQ 6.1 Scale deployments.
Migration is supported only from InsightIQ version 6.0.1. To proceed, the following prerequisites must be met:
- An InsightIQ 6.0.1 Simple deployment running IIQ 6.0.1.
- An InsightIQ Scale deployment running IIQ 6.1.0 installed and the EULA accepted.
The ‘iiq_data_migration’ script can be run as follows to initiate a migration:
# cd /usr/share/storagemonitoring/online_migration
# bash iiq_data_migration.sh
Additionally, detailed logs are available at the following locations for monitoring and verifying the migration process:
| Logfile | Location |
| Metadata Migration Log | /usr/share/storagemonitoring/logs/online_migration/insightiq_online_migration.log |
| Cluster Data Migration Log | /usr/share/storagemonitoring/logs/clustermanagement/insightiq_cluster_migration.log |
Self-service Admin Password Reset
InsightIQ 6.1 introduces a streamlined self-service password reset feature for administrators. This secure process allows admins to reset their own passwords without IT intervention.
Key features include one-time password (OTP) verification, ensuring only authorized users can reset passwords. Timeout enforcement means OTPs expire after 5 minutes for added security, and accounts are locked after five failed attempts to prevent brute-force attacks.
Note that SMTP must be configured in order to receive OTPs via email.
Flexible Alerting
InsightIQ 6.1 enhances alerting capabilities with 16 total KPIs/metrics, including 9 new ones. Key improvements include:
- Greater granularity (beyond cluster-level alerts)
- Support for sub-filters and breakouts
- Multiple operators and unit-based thresholding
- Aggregator and extended duration support
Several metrics have been transformed and/or added in version 6.1. For example:
| IIQ 6.1 Metric | IIQ.6.0 Metric |
| Active Clients | · Active Clients NFS
· Active Clients SMB1 · Active Clients SMB2 |
| Average Disk Hardware Latency | |
| Average Disk Operation Size | |
| Average Pending Disk Operation Count | · Pending Disk Operation Count |
| Capacity | · Drive Capacity
· Cluster Capacity · Node Capacity · Nodepool Capacity |
| Connected Clients | · Connected Clients NFS
· Connected Clients SMB |
| CPU Usage | · CPU Usage |
| Disk Activity | |
| Disk Operations Rate | · Pending Disk Operation Count |
| Disk Throughput Rate | |
| External Network Errors Rate | |
| External Network Packets Rate | |
| External Network Throughput Rate | · Network Throughput Equivalency |
| File System Throughput Rate | |
| Protocol Operations Average Latency | · Protocol Latency NFS
· Protocol Latency SMB |
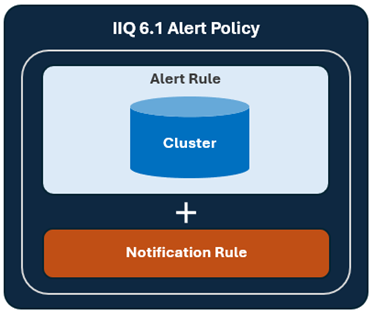
Also, clusters can now be directly associated with alert rules:
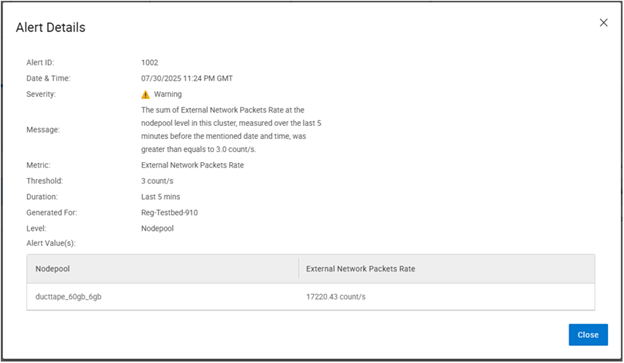
The generated alerts page sees the addition of a new ‘Metric’ field:
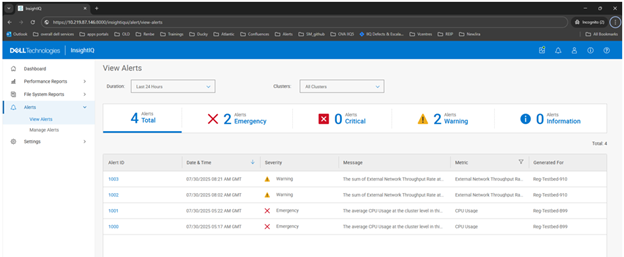
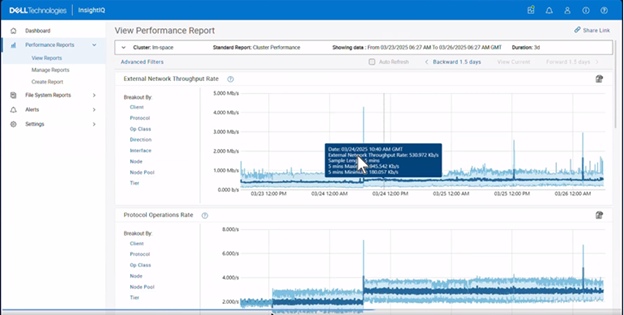
For example, an alert can now be generated at the nodepool level for the metric ‘External Network Throughput Rate’:
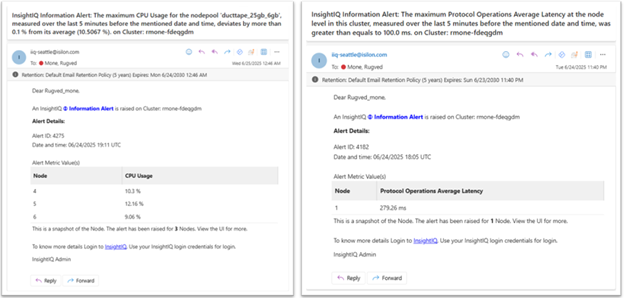
IIQ 6.1 also includes an updated email format, as follows:
Alert Migration
The alerting system has transitioned from predefined alerting to flexible alerting. During this migration, all alert policies, associated rules, resources, notification rules, and generated alerts are automatically migrated—no additional steps are required.
Key differences include:
| IIQ 6.1 Flexible Alerting | IIQ 6.0 Predefined Alerting |
| · Each alert rule is associated with only one cluster (1:1 mapping). | · Alert rules and resources are tightly coupled with alert policies. |
| · A policy can still have multiple rules, but resources are now linked directly to rules, not policies.
· This results in N × M combinations of alert rules and clusters (N = resources, M = rules). |
· A single policy can be linked to multiple rules and resources. |
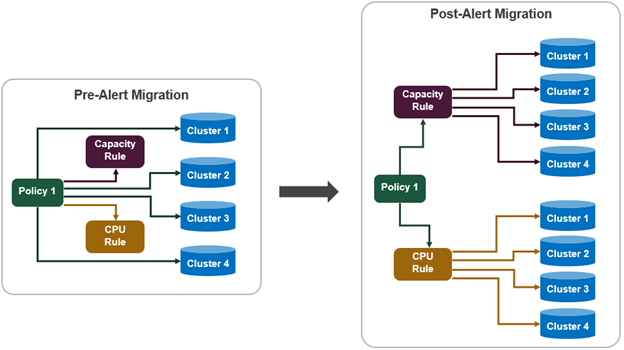
For example, imagine the following scenario:
- Pre-upgrade (Predefined Alerting):
An IIQ 6.0 1 instance has a policy (Policy1), which is associated with two rules (CPU Rule & Capacity Rule) and 4 clusters (Cluster1-4).
- Post-Upgrade (Flexible Alerting):
Since only one resource can be associated with one alert rule, a separate alert rule will be created for each cluster. So, after upgrading to IIQ 6.1, Policy1 will now have four individual cluster CPU Alert rules and four individual cluster Capacity Alert rules:
If an IIQ 6.1 upgrade happens to fail due to alert migration, a backup of the predefined alerting database is automatically created. To retry the migration, run:
# bash /usr/share/storagemonotoring/scripts/retrigger_alerts_upgrade.sh
Plus, for additional context and troubleshooting, the alert migration logs can be found at:
/usr/share/storagemonitoring/logs/alerts/alerts_migration.log
Durable Data Collection
Data collection and processing in IIQ 6.x provides both performance and fault tolerance, with the following decoupled architecture:
| Component | Role |
| Data Processor | Responsible for processing and storing the data in TimescaleDB for display by Reporting service. |
| Temporary Datastore | Stores historical statistics fetched from PowerScale cluster, in-between collection and processing. |
| Message Broker | Facilitates inter-service communication. With the separation of data collection and data processing, this allows both services to signal to each other when their respective roles come up. |
| Timescale DB | New database storage for the time-series data. Designed for optimized handling of historical statistics. |
InsightIQ TimescaleDB database stores long-term historical data via the following retention strategy:

Telemetry data is summarized and stored in the following cascading levels, each with a different data retention period:
| Level | Sample Length | Data Retention Period |
| Raw table | Varies by metric type. Raw data sample lengths range from 30s to 5m. | 24 hours |
| 5m summary | 5 minutes | 7 days |
| 15m summary | 15 minutes | 4 weeks |
| 3h summary | 3 hours | Infinite |
Note that the actual raw sample length may vary by graph/data type – from 30 seconds for CPU % Usage data up to 5 minutes for cluster capacity metrics.
Meanwhile, the new InsightIQ v6.1 code is available for download on the Dell Support site, allowing both the installation of and upgrade to this new release.