As we saw in the prior article in this series, the auto-remediation capability introduced in OneFS 9.12 implements an automated fault recovery mechanism to enhance cluster availability and reduce administrative overhead. Leveraging the HealthCheck framework, the system continuously monitors for OneFS anomalies and triggers corrective workflows without operator intervention. Upon detection of a known failure signature, auto-remediation executes a predefined repair procedure—such as service restarts or configuration adjustments—to restore operational integrity. By orchestrating these recovery actions programmatically, the feature minimizes manual troubleshooting and reduces mean time to repair (MTTR).
Auto-remediation is disabled by default in OneFS 9.12 to ensure administrators maintain full control over automated repair operations. Cluster administrators have the ability to enable or disable this functionality at any time through system settings. When a cluster is upgraded to OneFS 9.12, the WebUI HealthCheck page provides a notification banner informing users of the newly available auto-remediation capability:
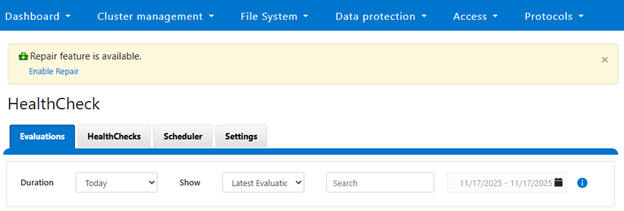
This banner serves as an entry point for administrators to activate the feature if desired. If selected, the following enablement option is displayed:
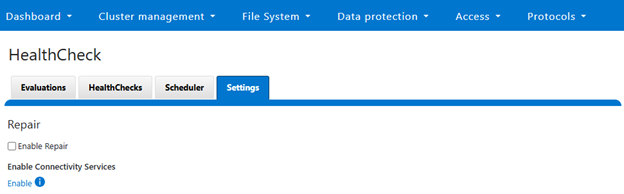
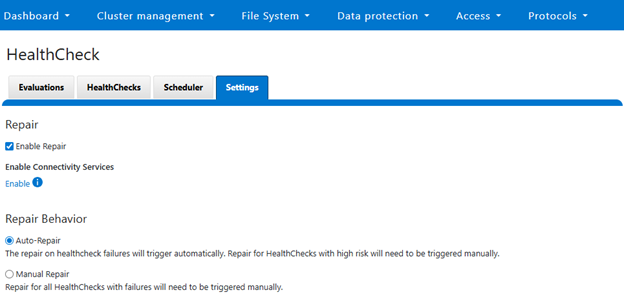
Checking the ‘Enable Repair’ box provides the option to select either ‘Auto-repair’ or ‘Manual Repair’ behavior, with ‘Manual’ being the default:

Selecting ‘Auto-Repair’ will allow OneFS to automatically trigger and perform remediation on regular healthcheck failures:
Or from the CLI:
# isi repair settings view

Repair Behavior: manual

Repair Enabled: No

# isi repair settings modify --repair-enabled True --repair-behavior Auto

# isi repair settings view

Repair Behavior: auto

 Repair Enabled: Yes

# isi services -a | grep -i repair

   isi_repair           Repair Daemon                            Enabled
Once enabled, auto-remediation can automatically trigger repair actions in response to HealthCheck failures, reducing the need for manual intervention and improving operational efficiency.
The following repair actions are currently available in OneFS 9.12:
| Repair Action | Description |
| fix_leak_freed_blocks | Disables the ‘leak_freed_blocks’ settings on all nodes where it is enabled, allowing the cluster to claim free disk space on file deletions. Note that if there is an active SR then this leak_freed_blocks must be enabled intentionally, in such case do not run this repair |
| fix_igi_ftp_insecure_upload | Disables insecure FTP upload of ISI gather |
| fix_mcp_running_status | Enables the MCP service |
| fix_smartconnect_enabled | Enable the SmartConnect service |
| fix_flexnet_running | Enable the flexnet service |
| fix_synciq_service_suggestion | Disables the SyncIQ service |
| fix_job_engine_enabled | Enables the ‘isi_job_d’ Job Engine service |
These can also be viewed from the WebUI under Cluster management > HealthCheck > HealthChecks, and filtering by ‘Repair Available’:
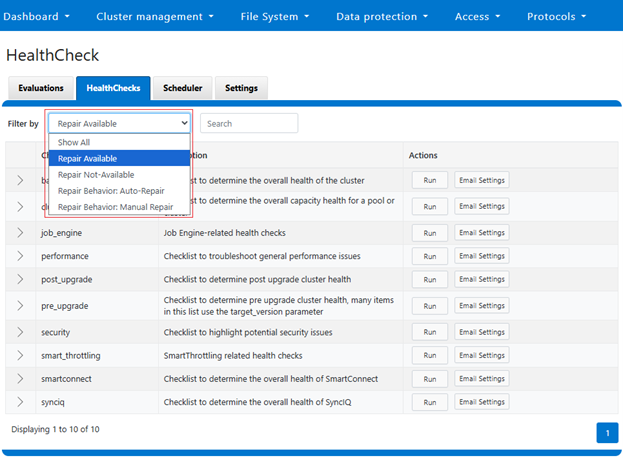
This will display the following checklist, each of which contain ‘Repair Available’ healthchecks:

For example, the ‘basic’ checklist can be expanded to show its seven health checks which have the ‘repair available’ option. In addition to the description and actions, there’s a ‘repair behavior’ field which indicates a check’s repair type – either ‘auto’ or ‘manual’:

Under the hood, these repair actions are defined in the ‘/usr/libexec/isilon/repair-actions/mapping.json’ file on each node. For example, the repair action for the job engine, which has a ‘cluster’ level scope and ‘auto’ repair behavior:
"job_engine_enabled": {

            "script": "fix_job_engine_enabled.py",

            "script_type": "python",

            "enabled": true,

            "behavior": "auto",

            "risk": "low",

            "description": "This repair will enable isi_job_d service",

            "scope": "cluster"

        }
Note that any repair actions which are considered ‘high-risk’ will still need to be manually initiated, even with the repair behavior configured for ‘auto’. The ‘smartconnect_enabled’ repair action is an example of a high-risk action, so it has a ‘manual’ behavior type, as well as a node-level repair type, or scope, as can be seen in its definition:
“smartconnect_enabled”: {

      “script”: “fix_smartconnect_enable.py”,

      “script_type”: “python”,

      “enabled”: true,

      “behavior”: “manual”,

      “risk”: “high”,

      “description”: “This repair will enable the smartconnect service”,

      “scope”: “node”

},
The principal auto-remediation configuration, definition, and results files can typically be found in the following locations:
| FIles | Location |
| repair_actions | /usr/libexec/isilon/repair-actions |
| mapping.json | /usr/libexec/isilon/repair-actions/mapping.json |
| global_request | /ifs/.ifsvar/modules/repair/requests |
| global_result | /ifs/.ifsvar/modules/repair/results |
| node_requests | /ifs/.ifsvar/modules/repair/requests/<devID>/ |
| node_results | /ifs/.ifsvar/modules/repair/results/<devID>/ |
Auto-remediation is disabled when the PowerScale cluster operates in certain restricted modes. These include Compliance, Hardening, Read-Only, Upgrade Pre-Commit, and Root Lockdown Mode (RLM). These restrictions are in place to maintain security and compliance during critical operational states, ensuring that automated changes do not compromise system integrity.
Since auto-remediation is implemented as a new ‘isi_repair’ service within OneFS 9.12, the first step in troubleshooting any issues is to verify that the service is running and to check its operational status.
The service status can be checked using the following CLI command syntax:
# isi services -a isi_repair

Service 'isi_repair' is enabled.
Additionally, repair logs are available for review in the following location on each node:
/var/log/isi_repair.log
These utilities help to provide visibility into repair operations and assist in diagnosing issues related to auto-remediation.