OneFS S3 Data Protection Mode Configuration and Usage

One of the object protocol enhancements introduced in OneFS 9.12 is the S3 Data Protection Mode (DPM). This feature integrates OneFS Multi-Party Authorization (MPA) with S3 data services to deliver stronger security controls, reducing risks associated with both accidental errors and malicious actions.

In the previous article in this series, we looked at the architecture and underpinnings of OneFS S3 Data Protection Mode. Now, we’ll turn our attention to the configuration and management of DPM.

From the OneFS WebUI, the S3 bucket configuration can be found under Protocols > S3 > Buckets. In the following example, ‘dpmtest’ has been created and configured as an immutable S3 bucket, with its lock protection mode configured to ‘Bucket Lock’:

Clicking on the adjacent ‘View/Edit’ button reveals that its retention period is currently set to ‘100 days’, and access logging is ‘enabled’:

Next, the retention period is reduced to 50 days, and access logging is disabled:

Or from the CLI:

# isi s3 buckets modify dpmtest –-default-retention-days 50 –-access-loging 0

Since there are both S3 protected actions, the WebUI displays the following warning banner, notifying that the actions are paused pending approval, and recommending checking the MPA request status:

After logging into the WebUI with an MPA approver account and navigating to Access > Multi-Party Authorization > Requests, the two above S3 privileged action requests are displayed, one for reducing the immutable bucket retention period and the other for disabling server access logging:

Or from the CLI:

# isi mpa requests list

The approver(s) then use their time-based one-time password (TOTP) authenticator application to generate a security code: 

This TOTP code is then entered into the approval request’s ‘security code’, plus an additional comment and expiration time, if desired:

Or via the CLI:

# isi mpa requests list

# isi mpa requests approve <id> <comment> <approved> --totp-code <******> --approval-valid-before <timestamp> --zone <zone>

Once approved, the WebUI displays the success banner, and reports the current request status. In this case, one request approved and one still pending:

Or from the CLI:

# isi mpa requests list

Moving on to the pending ‘disable access logging’ request:

Or from the CLI:

# isi mpa requests view <id>

After approving the above request in the same way, the MPA status shows both requests successfully approved:

Or from the CLI:

# isi mpa requests list

Reviewing the request details from the S3 bucket status page under Protocols > S3 > Buckets > Requests, reveals that the bucket retention period has been successfully reduced to ’50 days’ and access logging disabled, as expected:

Or from the CLI:

# isi s3 buckets view dpmtest

In the next article in this series, we’ll turn our attention to the usage of DPM from the S3 API, plus some issue investigation and troubleshooting options.

OneFS S3 Data Protection Mode

Tucked among the object protocol enhancements that were introduced in OneFS 9.12 lies S3 data protection mode (DPM). DPM integrates OneFS Multi-Party Authorization (MPA) into the S3 data services to provide enhanced security control, mitigating risks caused either by mistakes or by malicious intent.

In OneFS 9.12 and later, the DPM functionality is not independently configurable. Rather, it is implicitly enabled when MPA is activated. As such, once MPA is enabled, all S3 privileged actions need to be approved before executed. The MPA activation and configuration process is covered in-depth within the following article:   http://www.unstructureddatatips.com/onefs-multi-party-authorization-configuration

The two primary DPM capabilities that are introduced in OneFS 9.12 are:

Function Details
Reduction in bucket retention for an immutable bucket. •      Immutable Bucket is a bucket with lock-protection mode set to BucketLock.

•      Reduction of the retention period is only supported in governance mode.

S3 Server Logs Support


•      Disabling or reconfiguring the target bucket or target prefix is protected by DPM.

•      All these reconfiguration operations are treated as the same MPA request and are not distinguished.


Reducing the retention period for an immutable bucket is only supported when the bucket is in governance mode. An immutable bucket is defined as a bucket with its lock-protection mode set to ‘BucketLock’.

For S3 server logs, disabling or reconfiguring the target bucket or target prefix is protected by DPM. All such reconfiguration operations are treated as a single MPA request and are not distinguished individually.

The MPA level should be set to the bucket protection level. This is because any modification to an object is governed by the immutable bucket’s retention period, so there is no need for separate MPA approval.

S3 DPM takes effect when both MPA and S3 service are enabled on a cluster running OneFS 9.12 or later, and the specific S3-related MPA privileged actions that are supported include:

Service/

Component

Action Description 
S3 reduce_immutable_bucket_retention Reduction in bucket retention for an immutable bucket.
S3 modify_server_access_logging_config Changing configuration of access logging for a bucket.
Platform reduce_immutable_bucket_retention Reduction in bucket retention for an immutable bucket.
Platform modify_server_access_logging_config Changing configuration of access logging for a bucket.

Under the hood, the S3 DPM workflow can be represented as follows:

As such, the basic flow involves the following steps:

  1. First, the client initiates a protected action, either from posting an S3 API or platform API request, or a CLI or WebUI action.
  2. Next, OneFS checks whether MPA is enabled.
  3. If MPA is disabled, the privileged action executes directly without the protection of DPM.
  4. If MPA is activated, a request is auto-generated via ‘isi_mpa_common’.
  5. If the request is approved, the operation proceeds. If not approved or pending, the requesting user will receive a notification with an HTTP 403 response code.

DPM auto-creation privileged actions can be configured through WebUI under Protocols > Object Storage (S3) > Buckets.

When a privileged action is not approved for a s3 user. MPA requests can be created manually through editing the bucket configuration. The MPA requests will be created automatically if the internal system found there is not an approved request in system.

Users can also generate a privileged action request manually via the WebUI under Access > Multi-Party Authorization > Requests:

For example, to create a ‘Platform’ service request to reduce the retention for an immutable bucket to 2 days:

In the next article in this series, we’ll take a closer look at the configuration and management of S3 Data Protection Mode.

PowerScale OneFS 9.13

Dell PowerScale ushers in the holiday season with the release of OneFS 9.13, launched on December 16, 2025. This latest version introduces comprehensive enhancements across security, serviceability, synchronization, and protocol support, reinforcing PowerScale’s position as a unified software platform for both on-premises and cloud deployments.

OneFS 9.13 is designed for a broad range of workloads, including traditional file shares, home directories, and vertical applications such as media and entertainment, healthcare, life sciences, and financial services, as well as emerging use cases in generative AI, machine learning, deep learning, and advanced analytics.

PowerScale’s scale-out architecture offers deployment flexibility across on-site environments, co-location facilities, and customer-managed instances in AWS and Microsoft Azure, delivering core-to-edge-to-cloud scalability and performance for unstructured data workflows.

Recognizing the critical importance of security and resilience in today’s threat landscape, OneFS 9.13 introduces advanced features to enhance data protection, monitoring, and availability.

Protocol Enhancements: The release includes significant improvements to the S3 object protocol, featuring fast-path functionality for optimized multipart upload completion times. Administrators can now reconfigure the S3 HTTPS port from the default TCP 443 to any port within the range of 1024–65,535 via WebUI or CLI, with warnings provided if port 443 is already in use by the PowerScale HTTP service.

Data Management: OneFS 9.13 delivers SmartSync enhancements for incremental file-to-object replication, supporting multiple policies per bucket and improved telemetry for cloud replication jobs. Cloud tiering capabilities are expanded through CloudPools URI support for Amazon VPC endpoints, enabling more secure and efficient cloud integration.

Security: To strengthen ransomware protection and secure data paths, OneFS 9.13 introduces TLS 1.3 support for HTTP transport within Apache-based services, including RESTful Access to Namespace (RAN), WebDAV, and WebHDFS components. TLS 1.3 is now enabled by default across these interfaces.

Usability: The release provides official support for the PowerScale SDK, offering tools, documentation, and code samples for developers to build applications that interact with PowerScale clusters. The SDK includes Python bindings for programmatic access to OneFS APIs, simplifying integration with both the Platform API (pAPI) and RESTful Access to Namespace (RAN).

Support and Licensing: OneFS 9.13 introduces Dell Dynamic Licensing, a modern licensing framework that eliminates manual activation, supports appliance, hybrid, and cloud deployments, and enables seamless asset movement between clusters without licensing friction. This replaces traditional key-based licensing for PowerScale.

Hardware Innovations: On the hardware front, OneFS 9.13 adds support for 400Gb Ethernet connectivity on the all-flash PowerScale F910 platform and introduces in-field backend NIC swap capabilities for previous-generation all-flash platforms, including F900, F600, and F200 storage nodes, plus the B100 and P100 accelerator nodes.

With these advancements, OneFS 9.13 delivers enhanced security, operational simplicity, and performance scalability, making PowerScale an ideal solution for organizations managing diverse and demanding unstructured data workloads across hybrid and multi-cloud environments.

In summary, OneFS 9.13 brings the following new features and functionality to the Dell PowerScale ecosystem:

Area Feature
Platform ·         400Gb Ethernet support for PowerScale F910 front-end and back-end networking.

·         In-field support for back-end NIC changes for F900, F600, F200, B100, and P100

Protocol ·         S3 multi-part uploads.

·         S3 port configuration.

Security ·         HTTP transport layer security TLS 1.3 enhancements.
Replication ·         SmartSync incremental file to object enhancements.
Support ·         Dynamic cluster licensing.
Usability ·         Software developer kit (SDK) official support.

We’ll be taking a deeper look at OneFS 9.13’s new features and functionality in future blog articles over the course of the next few weeks.

Meanwhile, the new OneFS 9.13 code is available on the Dell Support site, as both an upgrade and reimage file, allowing both installation and upgrade of this new release.

For existing clusters running a prior OneFS release, the recommendation is to open a Service Request with to schedule an upgrade. To provide a consistent and positive upgrade experience, Dell is offering assisted upgrades to OneFS 9.13 at no cost to customers with a valid support contract. Please refer to Knowledge Base article KB544296 for additional information on how to initiate the upgrade process.

OneFS Auto-Remediation Configuration and Management

As we saw in the prior article in this series, the auto-remediation capability introduced in OneFS 9.12 implements an automated fault recovery mechanism to enhance cluster availability and reduce administrative overhead. Leveraging the HealthCheck framework, the system continuously monitors for OneFS anomalies and triggers corrective workflows without operator intervention. Upon detection of a known failure signature, auto-remediation executes a predefined repair procedure—such as service restarts or configuration adjustments—to restore operational integrity. By orchestrating these recovery actions programmatically, the feature minimizes manual troubleshooting and reduces mean time to repair (MTTR).

Auto-remediation is disabled by default in OneFS 9.12 to ensure administrators maintain full control over automated repair operations. Cluster administrators have the ability to enable or disable this functionality at any time through system settings. When a cluster is upgraded to OneFS 9.12, the WebUI HealthCheck page provides a notification banner informing users of the newly available auto-remediation capability:

This banner serves as an entry point for administrators to activate the feature if desired. If selected, the following enablement option is displayed:

Checking the ‘Enable Repair’ box provides the option to select either ‘Auto-repair’ or ‘Manual Repair’ behavior, with ‘Manual’ being the default:

Selecting ‘Auto-Repair’ will allow OneFS to automatically trigger and perform remediation on regular healthcheck failures:

Or from the CLI:

# isi repair settings view

Repair Behavior: manual

Repair Enabled: No

# isi repair settings modify --repair-enabled True --repair-behavior Auto

# isi repair settings view

Repair Behavior: auto

 Repair Enabled: Yes

# isi services -a | grep -i repair

   isi_repair           Repair Daemon                            Enabled

Once enabled, auto-remediation can automatically trigger repair actions in response to HealthCheck failures, reducing the need for manual intervention and improving operational efficiency.

The following repair actions are currently available in OneFS 9.12:

Repair Action Description
fix_leak_freed_blocks Disables the ‘leak_freed_blocks’ settings on all nodes where it is enabled, allowing the cluster to claim free disk space on file deletions. Note that if there is an active SR then this leak_freed_blocks must be enabled intentionally, in such case do not run this repair
fix_igi_ftp_insecure_upload Disables insecure FTP upload of ISI gather
fix_mcp_running_status Enables the MCP service
fix_smartconnect_enabled Enable the SmartConnect service
fix_flexnet_running Enable the flexnet service
fix_synciq_service_suggestion Disables the SyncIQ service
fix_job_engine_enabled Enables the ‘isi_job_d’ Job Engine service

These can also be viewed from the WebUI under Cluster management > HealthCheck > HealthChecks, and filtering by ‘Repair Available’:

This will display the following checklist, each of which contain ‘Repair Available’ healthchecks:

For example, the ‘basic’ checklist can be expanded to show its seven health checks which have the ‘repair available’ option. In addition to the description and actions, there’s a ‘repair behavior’ field which indicates a check’s repair type – either ‘auto’ or ‘manual’:

Under the hood, these repair actions are defined in the ‘/usr/libexec/isilon/repair-actions/mapping.json’ file on each node. For example, the repair action for the job engine, which has a ‘cluster’ level scope and ‘auto’ repair behavior:

"job_engine_enabled": {

            "script": "fix_job_engine_enabled.py",

            "script_type": "python",

            "enabled": true,

            "behavior": "auto",

            "risk": "low",

            "description": "This repair will enable isi_job_d service",

            "scope": "cluster"

        }

Note that any repair actions which are considered ‘high-risk’ will still need to be manually initiated, even with the repair behavior configured for ‘auto’. The ‘smartconnect_enabled’ repair action is an example of a high-risk action, so it has a ‘manual’ behavior type, as well as a node-level repair type, or scope, as can be seen in its definition:

“smartconnect_enabled”: {

      “script”: “fix_smartconnect_enable.py”,

      “script_type”: “python”,

      “enabled”: true,

      “behavior”: “manual”,

      “risk”: “high”,

      “description”: “This repair will enable the smartconnect service”,

      “scope”: “node”

},

The principal auto-remediation configuration, definition, and results files can typically be found in the following locations:

FIles Location
repair_actions /usr/libexec/isilon/repair-actions
mapping.json /usr/libexec/isilon/repair-actions/mapping.json
global_request /ifs/.ifsvar/modules/repair/requests
global_result /ifs/.ifsvar/modules/repair/results
node_requests /ifs/.ifsvar/modules/repair/requests/<devID>/
node_results /ifs/.ifsvar/modules/repair/results/<devID>/

Auto-remediation is disabled when the PowerScale cluster operates in certain restricted modes. These include Compliance, Hardening, Read-Only, Upgrade Pre-Commit, and Root Lockdown Mode (RLM). These restrictions are in place to maintain security and compliance during critical operational states, ensuring that automated changes do not compromise system integrity.

Since auto-remediation is implemented as a new ‘isi_repair’ service within OneFS 9.12, the first step in troubleshooting any issues is to verify that the service is running and to check its operational status.

The service status can be checked using the following CLI command syntax:

# isi services -a isi_repair

Service 'isi_repair' is enabled.

Additionally, repair logs are available for review in the following location on each node:

/var/log/isi_repair.log

These utilities help to provide visibility into repair operations and assist in diagnosing issues related to auto-remediation.

OneFS Auto-Remediation

The new PowerScale Auto-Remediation feature introduced in OneFS 9.12 delivers an automated healing capability designed to improve cluster resilience and reduce operational overhead. This functionality leverages the HealthCheck framework to detect failures and initiate corrective actions without requiring manual intervention. When a known failure is identified, the system executes a predefined repair action to restore normal operation. By automating these processes, auto-remediation significantly reduces the number of incoming service requests and accelerates recovery times. Furthermore, repair actions can be delivered independently of the OneFS release cycle, enabling rapid deployment of critical fixes without waiting for a major upgrade.

Auto-remediation relies on the following key concepts:

Component Description
Repair Action Repair script/executable that fixes an issue.
Repair Behavior Settings per repair action that determines if repair can run automatically or can only be invoked manually:

·         Manual Repair: Type of repair that will always be manually initiated by user.

·         Auto Repair: Type of repair that will be automatically triggered when required conditions are met and global auto repair setting is enabled.

Cluster Level Repair Repair that requires cluster level resolution and does not need node level execution.
Node Level Repair Repair that needs to run on each node that needs it.

A ‘repair action’ refers to a script or executable that resolves a specific issue within the cluster. Each repair action is governed by ‘repair behavior’, which determines whether the action runs automatically or requires manual initiation. Repairs classified as ‘manual’ must always be triggered by the user, whereas ‘auto’ repairs execute automatically when the required conditions are met and the global auto repair setting is enabled. Repairs may also be scoped at different levels: ‘cluster-level repairs’ address issues affecting the entire cluster and do not require node-level execution, while ‘node-level repairs’ run individually on each affected node.

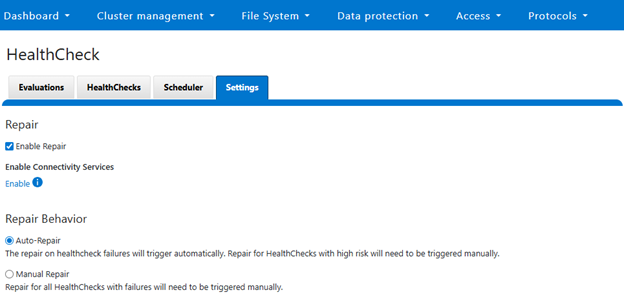
The OneFS auto-remediation feature provides administrators with flexible control over repair operations. Users can enable or disable the global auto repair setting at any time. When enabled, repairs can be triggered automatically in response to HealthCheck failures, ensuring timely resolution of issues. Administrators also retain the ability to manually initiate repairs for failed HealthChecks when necessary. The system supports both node-level and cluster-level repairs, offering comprehensive coverage for a wide range of failure scenarios. Additionally, repair actions can be updated outside the standard OneFS release cycle, allowing for rapid deployment of new fixes as they become available.

The auto-remediation architecture in OneFS 9.12 is designed to enhance system reliability by automating the detection and resolution of known failures. This architecture operates by leveraging the HealthCheck framework to identify issues within the cluster.

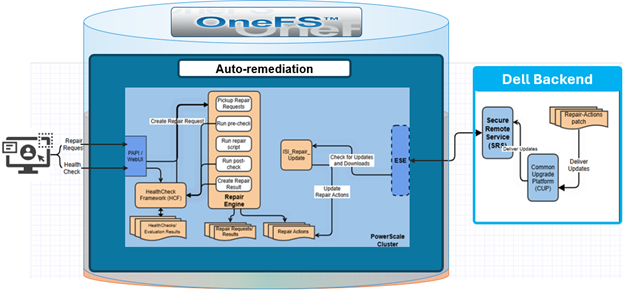
Once a failure is detected, the system executes a series of scripts and executables—referred to as repair actions—to restore normal functionality. By automating these processes, the architecture significantly reduces the number of incoming service requests, thereby improving operational efficiency and minimizing downtime.

OneFS 9.12 includes several repair actions to address common failure scenarios. The architecture is designed for continuous evolution, so additional repair actions will be incorporated both within and independent from future releases to expand coverage and improve resilience. As such, a key feature of this design is its ability to deliver repair actions outside the standard OneFS release cycle. This is achieved through updates to the HealthCheck package, allowing new repair actions to be added without waiting for a major software upgrade. As new repair actions become available, storage admins can update their cluster via Dell Connectivity Services (DTCS), ensuring timely access to the latest remediation capabilities.

The auto-remediation architecture in OneFS 9.12 consists of two primary components: the PowerScale cluster residing within the customer’s data center, and the Dell Secure Remote Services (SRS) backend. OneFS utilizes the HealthCheck framework to detect issues within the cluster. When a failure is identified, the HealthCheck framework invokes the Repair Engine, a newly introduced service responsible for applying the appropriate corrective action for the detected issue.

The repair process supports two operational modes: automatic and manual.

Repair Mode Description
Auto Triggered automatically when required conditions are met and global auto repair setting is enabled.
Manual Repair will always be invoked manually by user.

This dual-mode approach provides flexibility, allowing organizations to balance automation with administrative oversight based on their operational policies.

In an automatic scenario, the cluster admin initiates a HealthCheck, and if the check fails, the OneFS determines whether the conditions for auto repair are met. The Repair Engine is then called immediately to execute the corresponding repair action without user intervention. In contrast, the manual scenario requires explicit admin input. After a HealthCheck fails, OneFS waits for the administrator to either click the repair button in the WebUI or submit a repair request through the CLI. Once the request is received, the Repair Engine begins its workflow.

The Repair Engine follows a structured sequence to ensure accuracy and reliability. First, it retrieves the repair request and performs a ‘pre-check’ to validate the current state of the system. This step is particularly important for manual repairs, where the initial HealthCheck may have been executed several days earlier. If the pre-check confirms that the issue persists, the engine proceeds to execute the repair script associated with the failed HealthCheck. Each repair action is mapped one-to-one with a specific HealthCheck, ensuring precise remediation. The repair script is stored locally on the PowerScale cluster and is executed directly from that location.

After the repair script completes, the engine runs a ‘post-check’ to verify that the corrective action resolved the issue. If the post-check is successful, the system generates a repair result and stores it in the file system for future reference and reporting. This ensures transparency and provides administrators with a historical record of remediation activities.

In addition to the core repair workflow, the architecture includes an automated repair update mechanism. A scheduled ‘isi_repair_update’ process runs daily (by default) to check for new repair action packages available for the cluster. This process requires DTCS to be enabled on the cluster, and communicates with the SRS backend to retrieve updates. By decoupling repair action updates from the OneFS release cycle, the system ensures that customers can access the latest remediation capabilities without waiting for a major upgrade.

The Repair Engine’s workflow begins when a repair request is received. The trigger for this request can originate from two sources:

  • Automated HealthCheck failure
  • User-initiated repair action.

When the request is received, the engine first determines whether it was triggered by the HealthCheck framework (HCF) or by the user. An HCF-triggered request indicates an automatic repair scenario, while a user-triggered request corresponds to a manual repair.

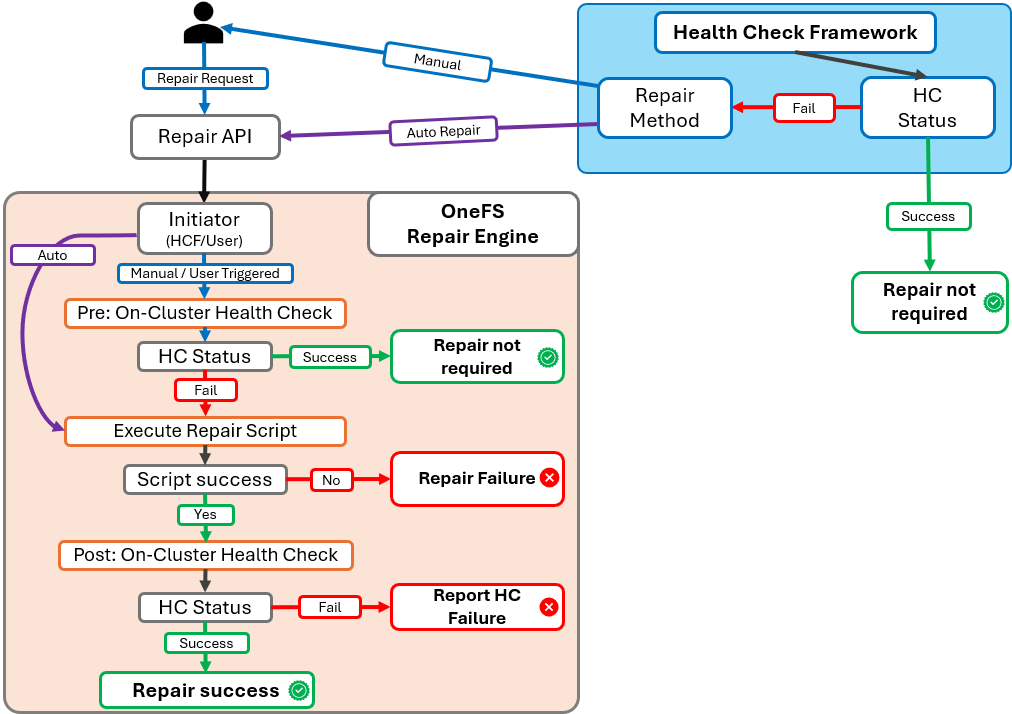
For automatic repairs, the engine bypasses the pre-check phase because the HealthCheck failure has just occurred, and the system state is already validated. In contrast, manual repairs require an additional verification step. The engine performs a pre-check to confirm that the issue detected by the original HealthCheck still exists. This step is critical because the initial HealthCheck may have been executed some time ago, and the system state could have changed.

If the pre-check confirms that the issue persists, the engine proceeds to execute the repair script associated with the failed HealthCheck. Each repair script is mapped one-to-one with a specific HealthCheck, ensuring precise remediation. Upon successful execution of the repair script, the engine performs a post-check to validate that the corrective action resolved the issue. If the post-check passes, the engine updates the repair status and records the outcome in the system, marking the repair as successful.

In the next article in this series, we’ll focus on the configuration and management of OneFS auto-remediation.