The previous article in this series looked at the OneFS Multi-party Authorization architecture, which requires that one or more additional trusted parties sign off on requested changes for certain privileged actions within a PowerScale cluster.
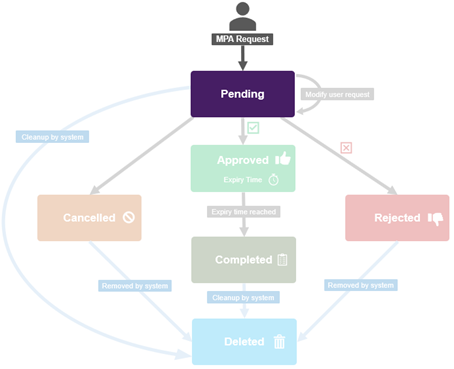
At a high-level, the MPA workflow is as follows:
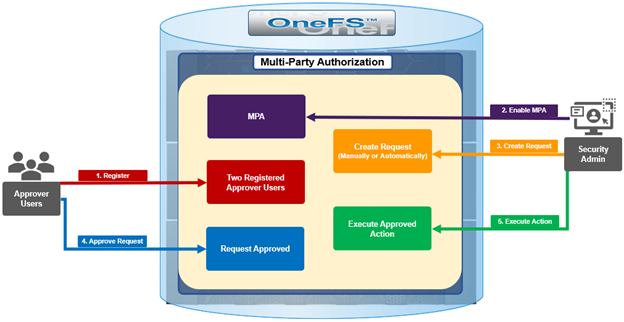
- The first step is registration, which requires two users with the approval privilege, both registered as internal approvers. And note that merely having an RBAC approval privilege is not enough – there is a secure process to register the users. Once there are two registered approval users, then it’s on to step #2, where the approval admin can enable the MPA feature.
- Once MPA is enabled, any of the predefined ‘privileged actions’ will require explicit approval from internal approvers.
- Step three involves generating a Privileged Action Approval Request (PAA) – either manually, or automatically when a privileged action is attempted.
- Next, one of the registered MPA approvers blesses or rejects the PAA Request.
- And finally, assuming approval was granted, the requesting administrator can now go ahead and execute their privileged action.
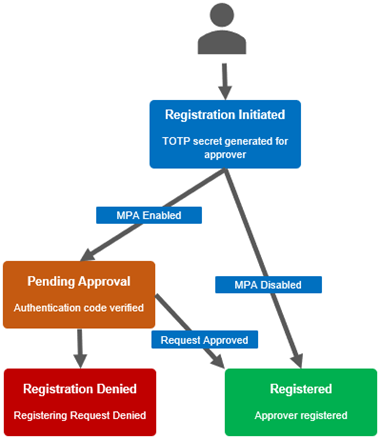
In order to approve requests, an approver needs to complete a secure one-time registration by entering the six-digit TOTP code, etc.
MPA can be configured and managed via the OneFS CLI, platform API, or WebUI. OneFS 9.12 sees the addition of a new ‘isi mpa’ CLI command set who’s basic syntax is as follows:
# isi mpa
Description:
    Manage Multi-Party Authorization.

Usage:
    isi mpa {<action> | <subcommand>}
        [--timeout <integer>]
        [{--help | -h}]

Actions:
    complete-registration    Complete Multi-Party Authorization registration.
    initiate-registration    Initiate Multi-Party Authorization registration.

Subcommands:
    approvers                Manage Multi-Party Authorization approvers.
    ca-certificates          Manage CA-Certificates for Multi-Party
                             Authorization.
    requests                 Manage Multi-Party Authorization requests.
    settings                 Manage Multi-Party Authorization settings.
For example, the CLI syntax to view the MPA global settings:
# isi mpa settings global view

Multi Party Authorization is enabled
Similarly, the platform API MPA endpoints reside under ‘/platform/23/mpa’. For example, the endpoint to get the MPA global settings:
https://<cluster_ip_addr>:8080/platform/23/mpa/settings/global

{

"last_update_time" : 1753132456,

"mpa_enabled" : true

}
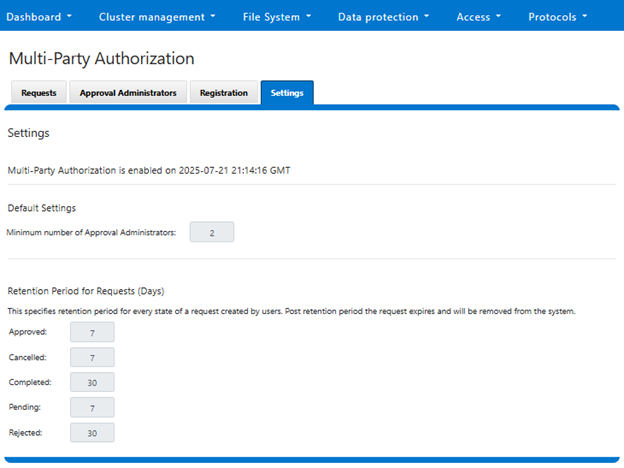
The WebUI configuration and management portal for MPA is located at Access > Multi-Party Authorization. For example, navigating to Access > Multi-Party Authorization will yield the MPA global settings:
The CLI commands and platform API endpoints for registration, query, and approval are as follows:
| MPA Action | CLI Command | Platform API Endpoint |
| Initiate (re)registration | isi mpa initiate-registration (–force) | POST /platform/23/mpa/initiate-registration (?force) |
| Complete registration | isi mpa complete-registration –totp_code xxxxxx | PUT /platform/23/mpa/complete-registration -d ‘{“totp_code“ : xxxxxx}’ |
| List all approvers | isi mpa approver list | GET /platform/23/mpa/approvers |
| Query an approver | isi mpa approver view <ID> | GET /platform/23/mpa/approvers/<ID> |
| Approve a request | isi mpa requests approve <id> –totp xxxxxx –approved true | POST /platform/23/mpa/approval/<MPA-req-id> |
Note that the ability to disable multi-party authorization is not supported in OneFS 9.12, so consider this carefully before activating the MPA feature.
The five basic steps for the MPA configuration and management are as follows:

- First, Create users and grant approval privilege.

The approver registration and enablement workflow is as follows:

Approver registration be configured from the CLI with the following set of commands.
First, configure two approver users – in this case ‘mpa-approver1’ and ‘mpa-approver2’:
# isi auth users create mpa-approver1 --enabled true --password <passwd>

# isi auth users create mpa-approver2 --enabled true --password <passwd>
Next, create a group for these users. Eg. ‘mpa-group’:
# isi auth group create mpa-group
Add the approver users to their new group:
# isi auth group modify mpa-group --add-user mpa-approver1

# isi auth group modify mpa-group --add-user mpa-approver2
Then add the new group (mpa-group) to the RBAC ApprovalAdmin role:
# isi –-debug auth roles modify ApprovalAdmin --add-group mpa-group
If needed, configure approvers’ SSH login to the cluster.
# isi auth roles create ssh-role

# isi auth roles modify ssh-role --add-group mpa-group --add-priv-read ISI_PRIV_LOGIN_SSH
Next, add the approver users to MPA and complete their registration. This involves the approver user logging in to their account and initiating registration, using the secret or embedded URL in conjunction with a third party code generator to create a time-based one-time password or TOTP.
Here, the ‘mpa-approver1’ user is registering first:
# isi mpa initiate-registration

   Initiated registration successfully: (Online utility can be used to   convert URL to QR code for use with authenticator)

   account:  Dell Technologies

   algorithm:  SHA1

   digits:  6

   issuer:  mpa-approver1

   period:  30

   secret:  5KHIHISJZPB7UTPRNEBLSIMI5L4R6K6UI

   url:  otpath://totp/Dell%Technologies:mpa-approver1?secret=5KHIHISJZPB7UTPRNEBLSIMI5L4R6K6UI&issuer=Dell%20Technologies&algorithm=SHA1&digits=6&period=30
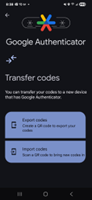
The user secret or URL returned can be used to set up a TOTP in Google Authenticator, or another similar application.
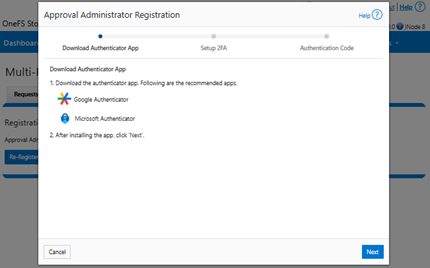
Specifically, this secure one-time registration involves:
a. First, initiating the OneFS registration process to obtain a URI, which can then be generated into a QR code by a 3rd party app if desired. For example:
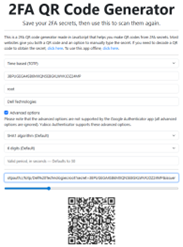
b. Next, converting the QR code or URI into a time-based one-time password code via Google Authenticator, Microsoft Authenticator, or another TOTP app:
c. Finally, completing the OneFS approver registration wizard:
Or from the CLI:
# isi mpa complete-registration

totp_code:  ******

Approver registered.
This process should then be repeated for the second (ie. ‘mpa-approver2’) role.
- Once the approvers are registered, MPA can now be enabled via its global settings.

MPA can be enabled from the WebUI under Access > Multi-Party Authorization > Settings:
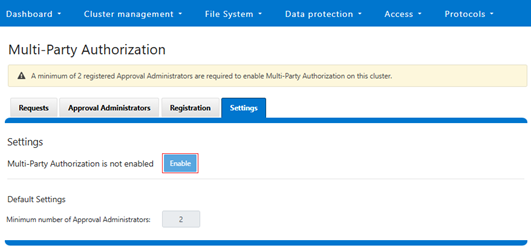
Note that MPA cannot be enabled on clusters without having at least two registered approvers:
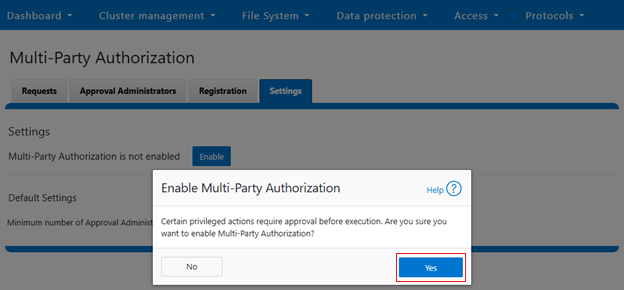
When successfully enabled, the following status banner will be displayed: 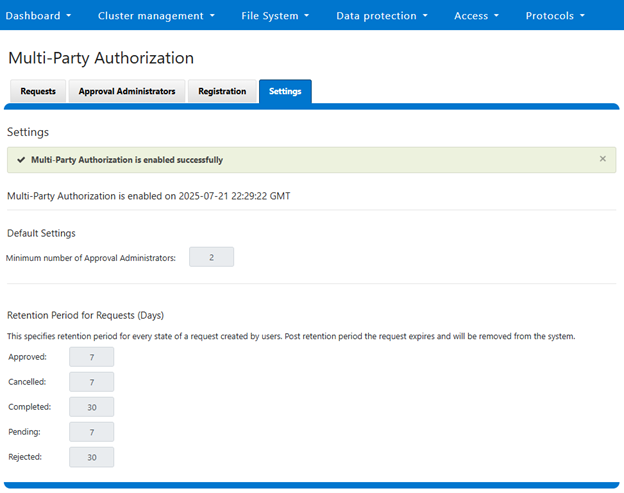
Alternatively, enabling via the CLI can be done with the following command syntax:
# isi mpa settings global modify –enable true

# isi mpa settings global view

Multi Party Authorization is enabled
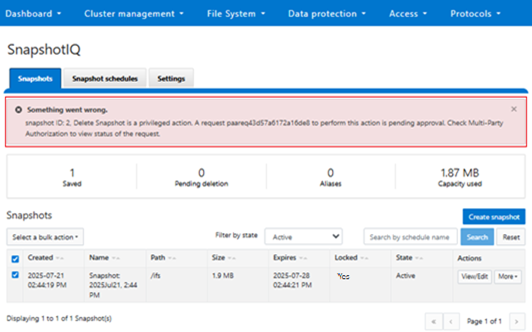
- Now MPA is up and running, privileged action requests can be generated.

We’ll use the new OneFS 9.12 Secure Snapshots feature as an example.
Once MPA is enabled on a cluster, any requests to execute a privileged request are paused pending approval.
In this case, an attempt to delete a secure snapshot results in a warning, and the requested action is suspended until approved by an authorizing party.
- Request Approval.

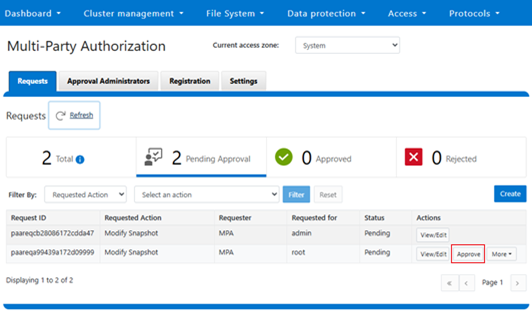
The privileged action requests can now be approved or rejected, as appropriate.
To private consent for the operation, the authorizing administrator clicks the ‘Approve’ button for the pending request, located under Access > Multi-Party Authorization > Requests:
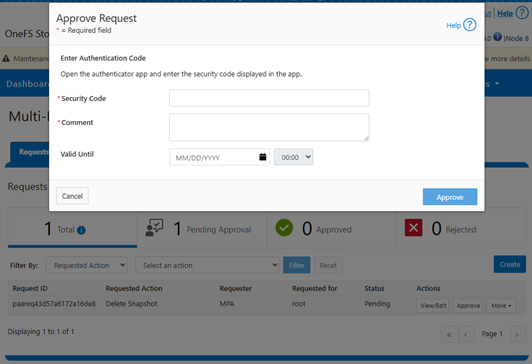
The authorizing party is prompted for their time-based one-time password (TOTP) security authentication code as part of the approval process:
Or via the CLI:
# isi mpa requests list

# isi mpa requests approve <id> <comment> <approved> --totp-code <******> --approval-valid-before <timestamp> --zone <zone>
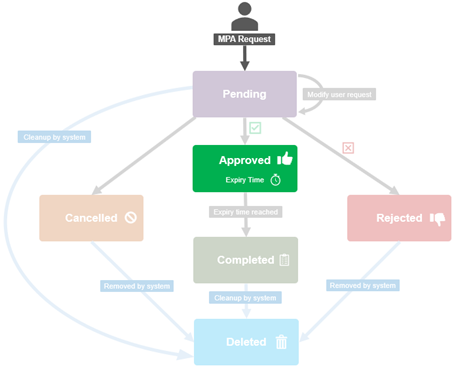
- Finally, the privileged action is ready to be executed.

Once approval has been granted, the WebUI reports a successful approval status.

The privileged secure snapshot delete operation is now able to proceed as expected:

Or from the CLI:
# isi mpa requests view <id>
In the next and final article in this series, we’ll turn our attention to MPA management and troubleshooting.