In the previous article in this OneFS firewall series, we reviewed the upgrade, activation, and policy selection components of the firewall provisioning process.

Now, we turn our attention to the firewall rule configuration step of the process.
As stated previously, role-based access control (RBAC) explicitly limits who has access to manage the OneFS firewall. So ensure that the user account which will be used to enable and configure the OneFS firewall belongs to a role with the ‘ISI_PRIV_FIREWALL’ write privilege.
- Configuring Firewall Rules

Once the desired policy is created, the next step is to configure the rules. Clearly, the first step here is decide what ports and services need securing or opening, beyond the defaults.
The following CLI syntax will return a list of all the firewall’s default services, plus their respective ports, protocols, and aliases, sorted by ascending port number:
# isi network firewall services list

Service Name     Port  Protocol  Aliases

---------------------------------------------

ftp-data         20    TCP       -

ftp              21    TCP       -

ssh              22    TCP       -

smtp             25    TCP       -

dns              53    TCP       domain

                       UDP

http             80    TCP       www

                                 www-http

kerberos         88    TCP       kerberos-sec

                       UDP

rpcbind          111   TCP       portmapper

                       UDP       sunrpc

                                 rpc.bind

ntp              123   UDP       -

dcerpc           135   TCP       epmap

                       UDP       loc-srv

netbios-ns       137   UDP       -

netbios-dgm      138   UDP       -

netbios-ssn      139   UDP       -

snmp             161   UDP       -

snmptrap         162   UDP       snmp-trap

mountd           300   TCP       nfsmountd

                       UDP

statd            302   TCP       nfsstatd

                       UDP

lockd            304   TCP       nfslockd

                       UDP

nfsrquotad       305   TCP       -

                       UDP

nfsmgmtd         306   TCP       -

                       UDP

ldap             389   TCP       -

                       UDP

https            443   TCP       -

smb              445   TCP       microsoft-ds

hdfs-datanode    585   TCP       -

asf-rmcp         623   TCP       -

                       UDP

ldaps            636   TCP       sldap

asf-secure-rmcp  664   TCP       -

                       UDP

ftps-data        989   TCP       -

ftps             990   TCP       -

nfs              2049  TCP       nfsd

                       UDP

tcp-2097         2097  TCP       -

tcp-2098         2098  TCP       -

tcp-3148         3148  TCP       -

tcp-3149         3149  TCP       -

tcp-3268         3268  TCP       -

tcp-3269         3269  TCP       -

tcp-5667         5667  TCP       -

tcp-5668         5668  TCP       -

isi_ph_rpcd      6557  TCP       -

isi_dm_d         7722  TCP       -

hdfs-namenode    8020  TCP       -

isi_webui        8080  TCP       apache2

webhdfs          8082  TCP       -

tcp-8083         8083  TCP       -

ambari-handshake 8440  TCP       -

ambari-heartbeat 8441  TCP       -

tcp-8443         8443  TCP       -

tcp-8470         8470  TCP       -

s3-http          9020  TCP       -

s3-https         9021  TCP       -

isi_esrs_d       9443  TCP       -

ndmp             10000 TCP       -

cee              12228 TCP       -

nfsrdma          20049 TCP       -

                       UDP

tcp-28080        28080 TCP       -

---------------------------------------------

Total: 55
Similarly, the following CLI command will generate a list of existing rules and their associated policies, sorted in alphabetical order. For example, to show the first 5 rules:
# isi network firewall rules list –-limit 5

ID                                            Index  Description                                                                             Action

----------------------------------------------------------------------------------------------------------------------------------------------------

default_pools_policy.rule_ambari_handshake    41     Firewall rule on ambari-handshake service                                               allow

default_pools_policy.rule_ambari_heartbeat    42     Firewall rule on ambari-heartbeat service                                               allow

default_pools_policy.rule_catalog_search_req  50     Firewall rule on service for global catalog search requests                             allow

default_pools_policy.rule_cee                 52     Firewall rule on cee service                                                            allow

default_pools_policy.rule_dcerpc_tcp          18     Firewall rule on dcerpc(TCP) service                                                    allow

----------------------------------------------------------------------------------------------------------------------------------------------------

Total: 5
Both the ‘isi network firewall rules list’ and ‘isi network firewall services list’ commands also have a ‘-v’ verbose option, plus can return their output in csv, list, table, or json formats with the ‘–flag’.
The detailed info for a given firewall rule, in this case the default SMB rule, can be viewed with the following CLI syntax:
# isi network firewall rules view default_pools_policy.rule_smb

          ID: default_pools_policy.rule_smb

        Name: rule_smb

       Index: 3

 Description: Firewall rule on smb service

    Protocol: TCP

   Dst Ports: smb

Src Networks: -

   Src Ports: -

      Action: allow
Existing rules can be modified and new rules created and added into an existing firewall policy with the ‘isi network firewall rules create’ CLI syntax. Command options include:
| Option | Description |
| –action | Allow, which mean pass packets.
Deny, which means silently drop packets. Reject which means reply with ICMP error code. |
| id | Specifies the ID of the new rule to create. The rule must be added to an existing policy. The ID can be up to 32 alphanumeric characters long and can include underscores or hyphens, but cannot include spaces or other punctuation. Specify the rule ID in the following format:
<policy_name>.<rule_name> The rule name must be unique in the policy. |
| –index | the rule index in the pool. the valid value is between 1 and 99. the lower value has the higher priority. if not specified, automatically go to the next available index (before default rule 100). |
| –live | The live option must only be used when a user issues a command to create/modify/delete a rule in an active policy. Such changes will take effect immediately on all network subnets and pools associated with this policy. Using the live option on a rule in an inactive policy will be rejected, and an error message will be returned. |
| –protocol | Specify the protocol matched for the inbound packets. Available value are tcp,udp,icmp,all. if not configured, the default protocol all will be used. |
| –dst-ports | Specify the network ports/services provided in storage system which is identified by destination port(s). The protocol specified by –protocol will be applied on these destination ports. |
| –src-networks | Specify one or more IP addresses with corresponding netmasks that are to be allowed by this firewall policy. The correct format for this parameter is address/netmask, similar to “192.0.2.128/25”. Multiple address/netmask pairs should be separated with commas. Use the value 0.0.0.0/0 for “any”. |
| –src-ports | Specify the network ports/services provided in storage system which is identified by source port(s). The protocol specified by –protocol will be applied on these source ports. |
Note that, unlike for firewall policies, there is no provision for cloning individual rules.
The following CLI syntax can be used to create new firewall rules. For example, to add ‘allow’ rules for the HTTP and SSH protocols, plus a ‘deny’ rule for port TCP 9876, into firewall policy fw_test1:
# isi network firewall rules create  fw_test1.rule_http  --index 1 --dst-ports http --src-networks 10.20.30.0/24,20.30.40.0/24 --action allow

# isi network firewall rules create  fw_test1.rule_ssh  --index 2 --dst-ports ssh --src-networks 10.20.30.0/24,20.30.40.0/16 --action allow

# isi network firewall rules create fw_test1.rule_tcp_9876 --index 3 --protocol tcp --dst-ports 9876  --src-networks 10.20.30.0/24,20.30.40.0/24 -- action deny
When a new rule is created in a policy, if the index value is not specified, it will automatically inherit the next available number in the series (ie. index=4 in this case).
# isi network firewall rules create fw_test1.rule_2049 --protocol udp -dst-ports 2049 --src-networks 30.1.0.0/16 -- action deny
For a more draconian approach, a ‘deny’ rule could be created using the match-everything ‘*’ wildcard for destination ports and a 0.0.0.0/0 network and mask, which would silently drop all traffic:
# isi network firewall rules create fw_test1.rule_1234 --index=100--dst-ports * --src-networks 0.0.0.0/0 --action deny
When modifying existing firewall rules, the following CLI syntax can be used, in this case to change the source network of an HTTP allow rule (index 1) in firewall policy fw_test1:
# isi network firewall rules modify fw_test1.rule_http --index 1 --protocol ip --dst-ports http --src-networks 10.1.0.0/16 -- action allow
Or to modify an SSH rule (index 2) in firewall policy fw_test1, changing the action from ‘allow’ to ‘deny’:
# isi network firewall rules modify fw_test1.rule_ssh --index 2 --protocol tcp --dst-ports ssh --src-networks 10.1.0.0/16,20.2.0.0/16 -- action deny
Also, to re-order the custom TCP 9876 rule form the earlier example from index 3 to index 7 in firewall policy fw_test1.
# isi network firewall rules modify fw_test1.rule_tcp_9876 --index 7
Note that all rules equal or behind index 7 will have their index values incremented by one.
When deleting a rule from a firewall policy, any rule reordering is handled automatically. If the policy has been applied to a network pool, the ‘–live’ option can be used to force the change to take effect immediately. For example, to delete the HTTP rule from the firewall policy ‘fw_test1’:
# isi network firewall policies delete fw_test1.rule_http --live
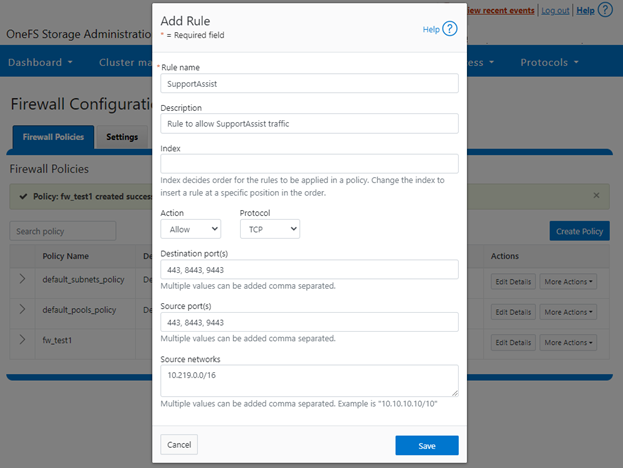
Firewall rules can also be created, modified and deleted within a policy from the WebUI by navigating to Cluster management > Firewall Configuration > Firewall Policies. For example, to create a rule that permits SupportAssist and Secure Gateway traffic on the 10.219.0.0/16 network:

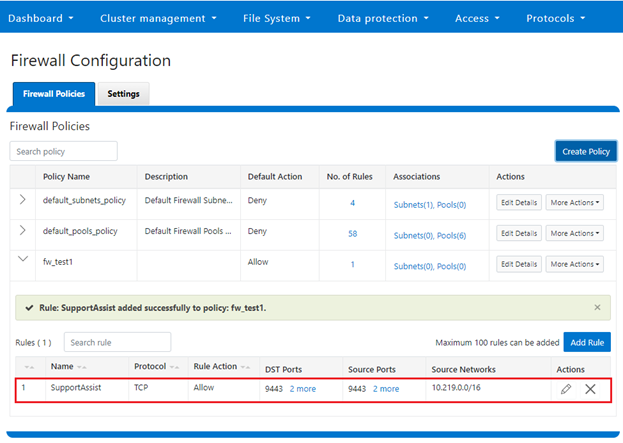
Once saved, the new rule is then displayed in the Firewall Configuration page:

- Firewall management and monitoring.

In the next and final article in this series, we’ll turn our attention to managing, monitoring, and troubleshooting the OneFS firewall (step 5).