Enable RFC2307 for OneFS and Active Directory

Windows Active Directory(AD) supports authenticate the Unix/Linux clients with the RFC2307 attributes ((e.g. GID/UID etc.). The Isilon OneFS is also RFC2307 compatible. So it is recommended to use Active Directory as the OneFS authentication provider to enable the centric identity management and authentication. This post will talk about the configurations to integrate AD and OneFS with RFC2307 compatible. In this post, Windows 2012R2 AD and OneFS 8.1.0 is used to show the process.

Prepare Windows 2012R2 AD for Unix/Linux

Unlike Windows 2008, Windows 2012 comes equipped with the UNIX attributes already loaded within the schema. And as of this release the Identity Services for UNIX feature has been deprecated, although still available until Windows 2016 the NIS and Psync services are not required.

The UI elements to configure RFC2307 attributes are not as nice as they were in 2008 since the IDMU MMC snap-in has also been depreciated. So we will install the IDMU component first to make it easier to configure the UID/GID attributes. With the following command, you can install the IDMU component in Windows 2012R2.

  • To install the administration tools for Identity Management for UNIX.
dism.exe /online /enable-feature /featurename:adminui /all
  • To install Server for NIS.
dism.exe /online /enable-feature /featurename:nis /all
  • To install Password Synchronization.
dism.exe /online /enable-feature /featurename:psync /all

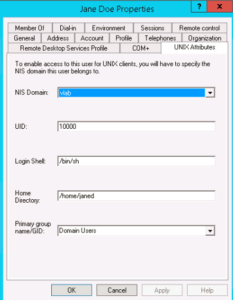
After restarting the AD, you can see the UI element(UNIX Attributes) tab same as Windows 2008R2, shown as below. Now you can configure your AD users/groups to compatible with Unix/Linux environment. Recommended to configure the UID/GID to 10000 and above, meanwhile, do not overlap with the OneFS default auto-assign UID/GID range (1000000 – 2000000).

Configure the OneFS  Active Directory authentication provider to enable RFC2307

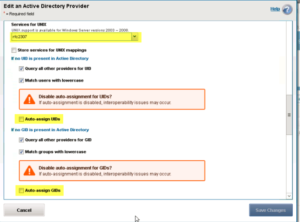
For mixed mode(Unix/Linux/Windows) authentication operations, there are several advanced options Active Directory authentication provider will need to be enabled.

  • Services for UNIX: rfc2307 – This leverages the Identity Management for UNIX services in the Active Directory schema
  • Auto-Assign UIDs: No – OneFS by default will generate pseudo UIDs for users it cannot match to SIDs this can cause potential user mapping issues.
  • Auto-Assign GIDs: No – OneFS by default will generate pseudo GIDs for groups it cannot match to SIDs as with the user mapping equally a group-mapping mismatch could occur.

You can do this configuration using both WebUI and CLI, with command isi auth ads modify EXAMPLE.LOCAL –sfu-support=rfc2307 –allocate-uids=false –allocate-gids=false. Or change the settings from the WebUI, shown below:

After the configurations above, the OneFS can use Active Directory as identity source for Unix/Linux client, and in this method, you can also simplify the identity management, as you have a centric identity source (AD) to be used for both Unix/Linux clients and Windows clients.

Configure SSH Multi-Factor Authentication on OneFS 8.2 Using Duo

SSH Multi-Factor Authentication (MFA) with Duo is a new feature introduced in OneFS 8.2. Currently, OneFS supports SSH MFA with Duo service through SMS (short message service), phone callback, and Push notification via the Duo app. This blog will cover the configuration to integrate OneFS SSH MFA with Duo service.

Duo provides service to many kinds of applications, like Microsoft Azure Active Directory, Cisco Webex, Amazon Web Services and etc. For an OneFS cluster, it is represented as a “Unix Application” entry.  To integrate OneFS with Duo service, configuration is required on Duo service and OneFS cluster. Before configuring OneFS with Duo, you need to have Duo account. In this blog, we used a trial version account for demonstration purposes.

Failback mode

By default, the SSH failback mode for Duo in OneFS is “safe”, which will allow common authentication if Duo service is not available. The “secure” mode will deny SSH access if Duo service is not available, including the bypass users, because the bypass users are defined and validated in the Duo service. To configure the failback mode in OneFS, specify –failmode  option using command isi auth duo modify .

Exclusion group

By default, all groups are required to use Duo unless the Duo group is configured to bypass Duo auth. The groups option allows you to exclude or specify dedicated user groups from using Duo service authentication. This method provides a way to configure users that can still SSH into the cluster even when the Duo service is not available and failback mode is set to “secure”. Otherwise, all users may be locked out of cluster in this situation.

To configure the exclusion group option, add an exclamation character “!” before the group name and preceded by an asterisk to ensure that all other groups use Duo service. An example is shown as below:

# isi auth duo modify --groups=”*,!groupname”

Note: zsh shell requires the “!” to be escaped. In this case, the example above should be changed to isi auth duo modify –groups=”*,\!groupname”

Prepare Duo service for OneFS

  1. Use your new Duo account to log into the Duo Admin Panel. Select the “Application” item from the left menu. And then click “Protect an Application”, Shown in Figure 1.
Figure 1 Protect an Application
  1. Type “Unix Application” in the search bar. Click “Protect this Application” to create a new Unix Application entry. See Figure 2.
Figure 2 Search for Unix Application
  1. Scroll down the creation page and find the “Settings” section. Type a name for the new Unix Application. It is recommended to use a name which can recognize your OneFS cluster, shown as Figure 3. In this section, you can also find the Duo’s name normalization setting. By default, Duo username normalization is not AD aware, it will alter incoming usernames before trying to match them to a user account. For example, “DOMAIN\username”, “username@domain.com“, and “username” are treated as the same user. For other options, refer to here.
Figure 3 Unix Application Name
  1. Check the required information for OneFS under “Details” section, including API hostnameintegration key, and secret key. Shown as Figure 4
Figure 4 Required Information for OneFS
  1. Manually enroll a user. In this example, we will create a user named “admin” which is the default OneFS administrator user. Switch the menu item to “Users” and click “Add User” button, shown as Figure 5. For details about user enrollment on Duo service, refer to Duo documentation Enrolling Users.
Figure 5 User Enrollment
  1. Type the user name, shown as Figure 6.
Figure 6 Manually User Enrollment
  1. Find the “Phones” settings in the user page and click “Add Phone” button to add a device for the user. Shown in Figure 7.
Figure 7 Add Phone for User
  1. Type your phone number.
Figure 8 Add New Phone
  1. (optional) If you want to use Duo push authentication methods, you need to install Duo Mobile app in the phone and activate the Duo Mobile. As highlighted in Figure 9, click the link to activate the Duo Mobile.
Figure 9 Activate Duo Mobile

OneFS Configuration and Verification

  1. By default, the authentication setting template is set for “any”. To use OneFS with Duo service, the authentication setting template must not be set to “any” or “custom”. It should be set to “password”, “publickey”, or “both”. In this example, we configure the setting to “password”, which will use user password and Duo for SSH MFA. Shown as the following command:
# isi ssh modify --auth-settings-template=password
  1. Confirm the authentication method using the following command:
# isi ssh settings view| grep "Auth Settings Template"
      Auth Settings Template: password
  1. Configure required Duo service information and enable it for SSH MFA, shown as below, use the information when we set up Unix Application in Duo, including API hostname, integration key, and secret key.
# isi auth duo modify --enabled=true --failmode=safe --host=api-13b1ee8c.duosecurity.com --ikey=DIRHW4IRSC7Q4R1YQ3CQ --set-skey

Enter skey:

Confirm:
  1. Verify SSH MFA using the user “admin”. An SMS passcode and user’s password are used for authentication in this example, shown as Figure 10.
Figure 10 SSH MFA Verification