OneFS FTP Persistent Custom Configuration

In the spirit of seamless cluster upgrade experience, OneFS 9.12 and later releases enable automatic migration of customized FTP settings during upgrade. This helps avoid potential customer impact caused by lost custom configurations when up-revving a PowerScale cluster.

Prior to OneFS 9.12, edits to the FTP daemon’s template file, vsftpd.conf, were not persistent across OneFS upgrades. As such, any custom configuration changes made by customers to PowerScale’s default supported FTP configuration would be overwritten during a cluster code upgrade operation. This necessitated the manual migration and replacement of the vstftpd.conf file post-cluster upgrade.

Such a situation could have potentially resulted in disruptions to SFTP workflows for a period while the old custom configuration file was retrieved and copied back into place.

This new durable configuration functionality in OneFS 9.12 and later is designed to enhance the customer upgrade experience by ensuring that customized FTP settings are automatically migrated during system upgrades. The primary objective is to prevent disruptions that could occur if custom configuration data is overwritten.

Currently, any changes made to temporary configuration files—such as those supporting customized SFTP settings—are lost during an upgrade. These settings are often essential for workflows that involve scaled content support.

Under the hood, a dedicated template file is introduced to store customized settings, ensuring they are not overwritten during upgrades. Additionally, new migration logic is implemented which transfers existing custom configurations into this new template during the upgrade process.

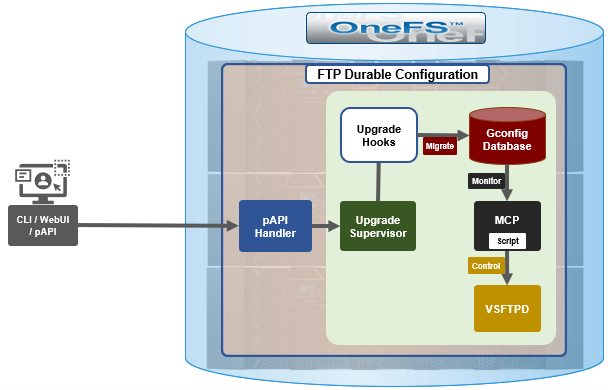
Architecturally, upgrade hooks detect any customized settings and migrate them into the new template file. Additionally, the configuration generation process is enhanced such that the final VSFTP configuration is an amalgam of the original template plus the new custom template.

The FTP upgrade workflow in OneFS 9.12 and later consists of the following components:

Component Description
Pre-Upgrade Phase Identify customized settings.
Post-Upgrade Phase Save these settings into the new template file and apply them.
Backup A backup of all relevant files is created for safety purposes.
Pre-Check Prevent customers from adding unsupported files to the preserved configuration set.
Health Check Detect modifications to temporary files and issue warnings if changes could be lost during downgrade or upgrade.

First, the pre-upgrade phase identifies any customized settings. Next, during the post-upgrade phase, these settings are saved into the new template file and applied. As a precaution, a backup of all relevant files is also created. The pre-check phase prevents customers from adding unsupported files to the preserved configuration set. Furthermore, a health check is introduced to detect modifications to temporary files and issue appropriate warnings if changes could potentially be lost during downgrade or upgrade. Details of this new FTP configuration healthcheck include:

Healthcheck Component Details
Checklist Name check_vsftpd_template_changes
Healthcheck Description The possible outputs of this item are: * OK: The /etc/mcp/templates/vsftpd.conf file is synchronized on all nodes in the cluster and no customized changes are found. * WARNING: File /etc/mcp/templates/vsftpd.conf is included in the /etc/mcp/override/user_preserve_files.xml unexpectedly, The upgrade process will fail if target version is 9.12.0.x or above. Please consider to remove it from the /etc/mcp/override/user_preserve_files.xml file. * CRITICAL: Please ensure /etc/mcp/templates/vsftpd.conf is synchronized and avoid modifying template files. File /etc/mcp/templates/vsftpd.conf should not be included in the /etc/mcp/override/user_preserve_files.xml if cluster version is 9.12.0.x or above. Please consider to remove it from the /etc/mcp/override/user_preserve_files.xml file. * UNSUPPORTED: Unsupported OneFS version to check template conf file: /etc/mcp/templates/vsftpd.conf.
Knowledge Base For further help, please reach out to Dell Technologies Support as the relevant Knowledge Base article is currently unavailable.

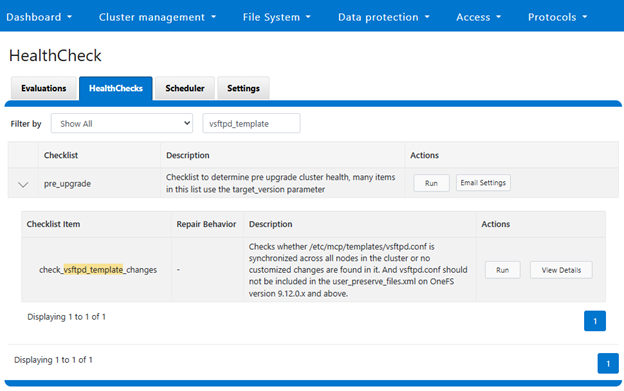
The above healthcheck can be viewed in the WebUI under Cluster management > HealthCheck > HealthChecks:

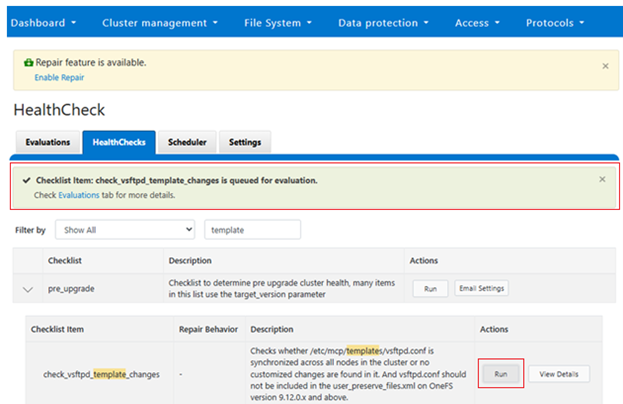
Or to run the healthcheck:

Similarly, from the CLI:

# isi healthcheck items view check_vsftpd_template_changes

              Name: check_vsftpd_template_changes

           Summary: Checks whether /etc/mcp/templates/vsftpd.conf is synchronized across all nodes in the cluster or no customized changes are found in it. And vsftpd.conf should not be

                    included in the user_preserve_files.xml on OneFS version 9.12.0.x and above.

             Scope: Per node

         Freshness: Now

        Parameters: -

       Description:   The possible outputs of this item are:

                    * OK: The /etc/mcp/templates/vsftpd.conf file is synchronized on all nodes in the cluster and no customized changes are found.

                    * WARNING: File /etc/mcp/templates/vsftpd.conf is included in the /etc/mcp/override/user_preserve_files.xml unexpectedly, The upgrade process will fail if target version is 9.12.0.x or above. Please consider to remove it from the /etc/mcp/override/user_preserve_files.xml file.

                    * CRITICAL: Please ensure /etc/mcp/templates/vsftpd.conf is synchronized and avoid modifying template files. File /etc/mcp/templates/vsftpd.conf should not be included in the /etc/mcp/override/user_preserve_files.xml if cluster version is 9.12.0.x or above. Please consider to remove it from the /etc/mcp/override/user_preserve_files.xml file.

                    * UNSUPPORTED: Unsupported OneFS version to check template conf file: /etc/mcp/templates/vsftpd.conf.

        Resolution:   Customized changes may be lost if the cluster are upgrading to 9.11.0.x or lower. Please consider preserve this file and re-apply the customized changes after upgrade. If upgrade target version is 9.12.0.x or above, consider saving customized changes in /etc/mcp/templates/vsftpd_custom.conf

Repair Description: -

    Repair enabled: No

   Repair behavior: -

       Repair risk: -

     Repair script: -

Repair script type: -

For issue investigation and troubleshooting, first review the upgrade logs, which include details of hook execution. Additionally, check the VSFTP logs for configuration generation and template comparison, as well as the project upgrade logs to identify any migration anomalies.

Log file Description
isi_upgrade_logs For upgrade hooks logs
/var/log/vsftpd.log For vsftpd log
/ifs/.ifsvar/upgrade/logs/: For pre-upgrade hook log

PowerScale InsightIQ 6.2 Features

In this second article in the InsightIQ 6.2 series, we’ll dig into the details of the additional functionality that debuts in this new IIQ release. These include:

Feature IIQ 6.2 Functionality
Expanded Ecosystem ·         Ecosystem support extended to include ESXi v9.0.1 and PowerScale OneFS 9.13.
Trusted Domain Support ·         Enables seamless authentication and unified access across domains, while ensuring automatic trust management.
Customizable partitions and networking ·         Enables the user to select datastore path of their choice.

·         Resolves network conflicts.

Datastore Migration ·         Admin can change the datastore path after installation.
Link & Launch ·         Simplifies WebUI access directly from IIQ Dashboard and Reports.
Configurable Network Port ·         Enables monitoring PowerScale with user defined TCP port.

Starting with code updates, the simple and robust InsightIQ 6.2 online upgrade process follows the following flow:

First, the installer checks the current Insight IQ version, verifies there’s sufficient free disk space, and confirms that setup is ready. Next, IIQ is halted and dependencies met, followed by the installation of the 6.2 infrastructure and a migration of legacy InsightIQ configuration and historical report data to the new platform. The cleanup phase removes the old configuration files, etc, followed by the final phase which upgrades alerts and removes the lock, leaving InsightIQ 6.2 ready to roll.

Phase Details
Pre-check •       docker command

•        IIQ version check 6.0.1 or 6.1

•       Free disk space

•       IIQ services status

•       OS compatibility

Pre-upgrade •       EULA accepted

•       Extract the IIQ images

•       Stop IIQ

•       Create necessary directories

Upgrade •       Upgrade addons services

•       Upgrade IIQ services except alerts (if 6.0.1)

•       Upgrade EULA

•       Status Check

Post-upgrade •       Update admin email (if 6.0.1)

•       Update network

•       Update IIQ metadata

Cleanup •       Replace scripts

•       Remove old docker images

•       Remove upgrade and backup folders

Upgrade Alerts and Unlock •       Trigger alert upgrade (if 6.0.1)

•       Clean lock file

The prerequisites for upgrading to InsightIQ 6.2 are either a Simple or Scale deployment with 6.0.1 or 6.1 installed, and with a minimum of 40GB free disk space.

The actual upgrade is performed by the ‘upgrade-iiq.sh’ script:

The specific steps in the upgrade process are as follows:

  • Download and uncompress the bundle:
# tar xvf iiq-install-6.2.0.tar.gz
  • From within the InsightIQ directory, un-tar the upgrade scripts as follows:
# cd InsightIQ

# tar xvf upgrade.tar.gz
  • Enter the resulting ‘upgrade’ directory which contains the scripts:
# cd upgrade/
  • Initiate the IIQ upgrade. Note that the usage is same for both the Simple and Scale InsightIQ deployments.
# ./upgrade-iiq.sh -m <admin_email>

Upon successful upgrade completion, InsightIQ will be accessible via the primary node’s IP address.

Trusted Domain Support

InsightIQ 6.2 introduces Trusted Domain Support, enabling seamless authentication and unified access across multiple domains with automatic trust management. The release adds Active Directory (AD) as a new authentication provider, allowing organizations to leverage existing AD infrastructure for simplified configuration and improved compliance. Joining AD requires three mandatory parameters—domain name, username, and password—along with optional advanced settings such as mapping to the primary domain, ignoring trusted domains, and specifying domains to always recognize or ignore.

Access to InsightIQ is controlled through AD groups, and administrators must assign users from the AD forest or cross-forest to these groups to grant appropriate privileges. InsightIQ supports a single AD connection, and prerequisites include InsightIQ 6.2 installed on Simple or Scale machines, EULA acceptance, and ensuring no conflicting LDAP configuration exists for the same domain. Additionally, Windows AD and DNS servers must be properly configured, and the InsightIQ virtual machine must use the correct DNS server.

With this enhancement, organizations can enable login from multiple trusted domains, providing seamless cross-domain authentication, unified resource access, automatic trust management, and consistent security enforcement.

When investigating troubleshooting AD configurations, the InsightIQ logs can be found under /usr/share/storagemonitoring/logs/iam/, and include krb5_trace.log, error.log, insightiq_iam.log, and insightiq_iam_access.log.

Customizable Partition

InsightIQ 6.2 introduces customizable partition support, allowing dynamic data to be stored in a user-specified local directory on any partition. This capability applies only to fresh installations of InsightIQ Scale; for upgrade scenarios, datastore mobility should be used after the upgrade. NFS configurations remain unchanged. Static data continues to reside under /usr and /var, while dynamic data can now be placed in a user-defined location.  By default, this is under /usr/share/storagemonitoring.

Updated storage prerequisites are as follows: for 0–32 nodes, allocate 75 GB for static data partitions (/usr + /var) and 250 GB for dynamic data; for 32–252 nodes, dynamic data requires 500 GB; and for 252–504 nodes, 1 TB is needed. If /usr and /var are mounted on separate partitions, /usr must have at least 25 GB and /var a minimum of 50 GB.

An absolute path for the datastore can be specified in the InsightIQ install script using the ‘-d’ flag, as below:

Customizable Network Config

InsightIQ 6.2 introduces a new customizable configuration option for the internal network IP address in both Simple and Scale deployments. A single iiq_network will be used, and the docker0 bridge has been removed. An IP range of 255 addresses is reserved for iiq_network, with a default range of 172.18.254.0/24. If an IP conflict is detected during installation, the user can provide an alternative IP up to three times before the process exits. To bypass the conflict check, use the –skip-network-conflict-check option, for example:

# bash install_iiq.sh -m <admin_email> --skip-network-conflict-check
Installation logs are available at:
/usr/share/storagemonitoring/logs/installer.log.

The network IP address can be specified in the OVF template as below:

Or from the Scale installer as follows:

REST APIs

InsightIQ 6.2 now includes RESTful API endpoints for all its configuration and settings, enhancing the existing API framework by adopting the OpenAPI standard and providing comprehensive Swagger documentation. The documentation includes detailed request and response models, endpoint descriptions, and usage examples. These API primitives are version-safe and cover all InsightIQ settings and alerts, including user management, SMTP, LDAP, Active Directory, monitored cluster management, and alert configurations.

The Swagger specification file can be found at /usr/share/storagemonitoring/scripts/insightiq-swagger.json.

Online Migration from Simple to Scale

InsightIQ 6.2 introduces online migration from Simple to Scale within the same version, enabling seamless transfer of data and functionality without downtime. This feature supports migration from InsightIQ 6.2 Simple (OVA) deployments to InsightIQ 6.2 Scale environments, with migration only available for IIQ version 6.2 and later.

Prerequisites for online migration include an InsightIQ Simple machine running v6.2 and an InsightIQ Scale machine with v6.2 installed and the EULA accepted. Migration can be initiated by running the following migration script:

# cd /usr/share/storagemonitoring/scripts/online_migration

# bash iiq_data_migration.sh

In addition to the script’s output, the migration’s general status and progress can also be monitored from the WebUI as follows:

Datastore Mobility

InsightIQ 6.2 provides deployment support for migrating both Simple and Scale environments. This capability is designed to enable smooth migration across these deployment types without disruption. Migration is supported for configurations that include NFS or non-root partitions. Specifically, the following configurations are supported for each InsightIQ installation type:

Scale Simple
·         Local to NFS

·         NFS to NFS

·         Default partition to non-root partition.

·         Local to NFS

·         NFS to NFS

For NFS-based setups, the NFS directory must be created with validated permissions. For non-root partition movement, the required partition should be created before initiating migration. To perform the migration, navigate to the scripts directory and run the migration script with the following syntax:

# iiq_datastore_change -t nfs -n <x.x.x.x> -p /ifs/

Link and launch

InsightIQ 6.2 introduces the Link and Launch feature, which simplifies access to the OneFS WebUI directly from the InsightIQ dashboard and reports. The objective of this enhancement is to provide a quick-launch button that opens the OneFS WebUI within InsightIQ, reducing the time and effort required for navigation. This integration streamlines workflows by eliminating multiple navigation steps, enhances user productivity, and minimizes the time spent accessing cluster management tools. Overall, it improves the user experience through seamless integration between InsightIQ and a PowerScale OneFS cluster.

Configurable IIQ Listening Port

InsightIQ 6.2 introduces support for a configurable listening port, allowing PowerScale WebUI and PAPI to operate on an alternate port. This enhancement enables InsightIQ to monitor PowerScale using a user-defined port rather than the default. When adding a cluster, an additional field is provided to specify the port, which defaults to 8080. The same option is available when editing credentials, and the configured port is preserved during import and export operations. The Link and Launch feature also redirects to the user-defined port. This capability provides flexibility for environments that require monitoring PowerScale on a non-default port.

Download

Meanwhile, the new InsightIQ v6.2 code is available for download on the Dell Support site, allowing both the installation of and upgrade to this new release.

So, in summary, InsightIQ 6.2 offers the following attributes and functionality:

Function Attribute Description
Scope Monitoring scope Up to 20 clusters and 504 nodes
Ecosystem OS support RHEL 8.10, RHEL 9.4, and SLES 15 SP4
Platform Resources Reduced CPUs, memory and disk requirement
Scale option requires just one node
Size Smaller package size: OVA package < 5GB
Install and upgrade Installation Installation time:  < 12 mins
Migration Direct migration from 4.x
Online migration from InsightIQ 6.2 Simple (OVA) to InsightIQ 6.2 Scale
Resilience Data collection Resilient data collection – no data loss
OS Support Simple ecosystem support InsightIQ Simple 6.2 can be deployed on the following platforms:

·         VMware virtual machine running ESXi version 8.0U3 or 9.0.1.

·         VMware Workstation 17 (free version) InsightIQ Simple 6.2 can monitor PowerScale clusters running OneFS versions 9.5 through 9.13, excluding 9.6.

Scale ecosystem support InsightIQ Scale 6.2 can be deployed on Red Hat Enterprise Linux versions 8.10 or 9.4 (English language versions) and SUSE Enterprise Linux (SLES) 15 SP4. InsightIQ Scale 6.2 can monitor PowerScale clusters running OneFS versions 9.5 through 9.13, excluding 9.6.
Upgrade In-place upgrade from InsightIQ 5.1.x to 6.x The upgrade script supports in-place upgrades from InsightIQ 5.1.x to 6.x.
Direct database migration from InsightIQ 4.4.1 to InsightIQ 6.x Direct data migration from an InsightIQ 4.4.1 database to InsightIQ 6.2.0 is supported.
Reporting Maximum and minimum ranges on all reports All live Performance Reports display a light blue zone that indicates the range of values for a metric within the sample length. The light blue zone is shown regardless of whether any filter is applied. With this enhancement, users can observe trends in values on filtered graphs.
Graphing and report vizualzation Reports are designed to maximize the number of graphs that can appear on each page.

·         Excess white space is eliminated.

·         The report parameters section collapses when the report is run. The user can expand it manually.

·         Graph heights are decreased when possible.

·         Page scrolling occurs while the collapsed parameters section remains fixed at the top.

User interface What’s New dialog All InsightIQ users can view a brief introduction to new functionality in the latest release of InsightIQ. Access the dialog from the banner area of the InsightIQ web application. Click About > What’s New.
Compact cluster performance view on the Dashboard The IIQ dashboard provides:.

·         Summary information for six clusters appears in the initial dashboard view. A sectional scrollbar controls the view for additional clusters.

·         The capacity section has its own scrollbar.

·         The navigation side bar is collapsible into space-saving icons. Use the << icon at the bottom of the side bar to collapse it.


PowerScale InsightIQ 6.2

Hot on the heels of the OneFS 9.13 launch comes the unveiling of the innovative new PowerScale InsightIQ 6.2 release.

InsightIQ provides powerful performance and health monitoring and reporting functionality, helping to maximize PowerScale cluster efficiency. This includes advanced analytics to optimize applications, correlate cluster events, and the ability to accurately forecast future storage needs.

So what new goodness does this InsightIQ 6.2 release add to the PowerScale metrics and monitoring mix?

Additional functionality includes:

Feature IIQ 6.2 Functionality
Expanded Ecosystem ·         Ecosystem support extended to include ESXi v9.0.1 and PowerScale OneFS 9.13.
Trusted Domain Support ·         Enables seamless authentication and unified access across domains, while ensuring automatic trust management.
Customizable partitions and networking ·         Enables the user to select datastore path of their choice.

·         Resolves network conflicts.

Datastore Migration ·         Admin can change the datastore path after installation.
Link & Launch ·         Simplifies WebUI access directly from IIQ Dashboard and Reports.
Configurable Network Port ·         Enables monitoring PowerScale with user defined TCP port.

The PowerScale InsightIQ 6.2 release introduces several significant enhancements aimed at improving flexibility, security, and usability. One of the key features is Trusted Domain, which enables seamless authentication and unified access across multiple domains while ensuring automatic trust management for secure and efficient operations. Another important enhancement is Customizable Partition and Network Settings, allowing administrators to select a preferred data store path and configure network settings to resolve potential conflicts, thereby providing greater control over system configuration.

The release also includes Data Store Migration, which gives administrators the ability to change the data store path after installation. This feature offers improved flexibility and operational advantages, which will be demonstrated in the upcoming walkthrough and demo sessions. Additionally, the Link and Launch capability simplifies navigation by enabling direct access to the web UI from the InsightIQ dashboard and reports, reducing the complexity of switching between InsightIQ and PowerScale applications. Finally, the introduction of a Configurable IQ Listening TCP Port allows users to customize the listening port for InsightIQ, enabling tailored monitoring of PowerScale environments.

InsightIQ 6.2 continues to offer the same two deployment models as its predecessors:

Deployment Model Description
InsightIQ Scale Resides on bare-metal Linux hardware or virtual machine.
InsightIQ Simple Deploys on a VMware hypervisor (OVA).

The InsightIQ Scale version resides on bare-metal Linux hardware or virtual machine, whereas InsightIQ Simple deploys via OVA on a VMware hypervisor.

InsightIQ v6.x Scale enjoys a substantial breadth-of-monitoring scope, with the ability to encompass 504 nodes across up to 20 clusters.

Additionally, InsightIQ v6.x Scale can be deployed on a single Linux host. This is in stark contrast to InsightIQ 5’s requirements for a three Linux node minimum installation platform.

The specific deployment options and hardware requirements for installing and running InsightIQ 6.x are as follows:

Attribute InsightIQ 6.2 Simple InsightIQ 6.2 Scale
Scalability Up to 10 clusters or 252 nodes Up to 20 clusters or 504 nodes
Deployment On VMware, using OVA template RHEL, SLES, or Ubuntu with deployment script
Hardware requirements VMware v15 or higher:

·         CPU: 8 vCPU

·         Memory: 16GB

·         Storage: 1.5TB (thin provisioned);

Or 500GB on NFS server datastore

Up to 10 clusters and 504 nodes:

·         CPU: 8 vCPU or Cores

·         Memory: 16GB

·         Storage: 500GB

Up to 20 clusters and 504 nodes:

·         CPU: 12 vCPU or Cores

·         Memory: 32GB

·         Storage: 1TB

Networking requirements 1 static IP on the PowerScale cluster’s subnet 1 static IP on the PowerScale cluster’s subnet

The InsightIQ ecosystem itself is also expanded in version 6.2 to also include VMware ESXi v9.0.1 in addition to VMware v8 OU3, Ubuntu 24.04 Online deployment and OpenStack RHOSP 21 with RHEL 9.6, SLES 15 SP4, and Red Hat Enterprise Linux (RHEL) versions 9.6 and 8.10. This allows customers who have standardized on VMware to now run an InsightIQ 6.2 Scale deployment image on an ESXi 9.0.1 hypervisor to monitor the latest OneFS versions.

Qualified on InsightIQ 6.1 InsightIQ 6.2
OS (IIQ Scale Deployment) RHEL 8.10, RHEL 9.6, and SLES 15 SP4 RHEL 8.10, RHEL 9.6, and SLES 15 SP4
PowerScale OneFS 9.5 to 9.12 OneFS 9.5 to 9.13
VMware ESXi ESXi v8.0U3 ESXi v8.0U3, and ESXi v9.0.1
VMware Workstation Workstation 17 Free Version Workstation 17 Free Version
Ubuntu Ubuntu 24.04 Online deployment Ubuntu 24.04 Online deployment
OpenStack RHOSP 21 with RHEL 9.6 RHOSP 21 with RHEL 9.6

Similarly, in addition to deployment on VMware ESXi 8 and 9, the InsightIQ Simple version can also be installed for free on VMware Workstation 17, providing the ability to stand up InsightIQ in a non-production or lab environment for trial or demo purposes, without incurring a VMware licensing charge.

Additionally, the InsightIQ OVA template is now under 5GB in size, and with an installation time of generally less than 12 minutes.

In the next article in this series, we’ll dig into the details of the additional functionality that debuts in this new InsightIQ 6.2 release.

OneFS S3 Data Protection Mode Management and Troubleshooting

One of the object protocol enhancements introduced in OneFS 9.12 is the S3 Data Protection Mode (DPM). This feature integrates OneFS Multi-Party Authorization (MPA) with S3 data services to deliver stronger security controls, reducing risks associated with both accidental errors and malicious actions.

In the previous article in this series, we looked at the configuration and management of OneFS S3 Data Protection Mode from the WebUI. Now, we’ll turn our attention to the usage of DPM from the S3 API, plus some issue investigation and troubleshooting options.

In the following example, ‘dpmtest’ has been created and configured as an immutable S3 bucket, with its lock protection mode configured to ‘Bucket Lock and its retention period currently set to ‘10 days’:

Or from the CLI:

# isi s3 buckets list

Bucket Name  Path                Owner  Object ACL Policy  Object Lock Enabled  Lock Protection Mode  Description

-------------------------------------------------------------------------------------------------

s3bucket     /ifs/data/dpmtest   root   replace            Yes                  Bucket Lock

s3buckettgt  /ifs/data/target    root   replace            No                   -

-------------------------------------------------------------------------------------------------

Using the S3 API endpoints, the following example shows the DPM auto-creation method, with a ‘PUT’ request to reconfigure the access logging for a bucket, creative named named ‘dpmtest’.

PUT  http:// {{S3_ENDPOINT}} /dpmtest/?logging

<BucketLoggingStatus>

      <LoggingEnabled>

            <TargetBucket>target2</TargetBucket>

            <TargetPrefix>newlog</TargetPrefix>

      </LoggingEnabled>

</BucketLoggingStatus>

The response includes an HTTP 403 error code notifying that the ‘modify_server_access_login_config’ action request is pending approval, plus the unique ID number of the associated MPA request:

403 Forbidden

<?xml version=”1.0” encoding=”UTF-8”?>

<Error>

      <Code>AccessDenied</Code>

      <Message>AccessDenied</Message>

      <Resource></Resource>

      <RequestId>675969624</RequestId>

      <MpaRequestId>paareqf2c58360e0ce84cd</MpaRequestId>

      <DpmMessage>Action  ‘modify_server_access_login_config’  pending approval  -  request [paareqf2c58360e0ce84cd]  submitted.</DpmMessage>

Similarly, an S3 auto-creation method to reduce retention for the ‘dpmtest’ immutable bucket from 10 days to 2 days:

PUT  http:// {{S3_ENDPOINT}} /dpmtest/?object_lock

<ObjectLockConfiguration>

      <ObjectLockEnabled>Enabled</ObjectLockEnabled>

      <Rule>

            <DefaultRetention>

                  <Mode>GOVERNANCE</Mode>

                  <days>2</Days>

            </DefaultRetention>

</Rule>

</ObjectLockConfiguration>

Followed by a similar MPA approval pending HTTP 403 error response:

403 Forbidden

<?xml version=”1.0” encoding=”UTF-8”?>

<Error>

      <Code>AccessDenied</Code>

      <Message>AccessDenied</Message>

      <Resource></Resource>

      <RequestId>675969625</RequestId>

      <MpaRequestId>paareqc00c7e920e0ce8413</MpaRequestId>

      <DpmMessage>Action  ‘reduce_immutable_bucket_retention’  pending approval  -  request [paareqc00c7e920e0ce8413]  submitted.</DpmMessage>

After logging in as an MPA approver, pending MPA requests can be viewed and approved via the WebUI under Access > Multi-Party Authorization > Requests, and clicking on the pertinent ‘Approve’ buttons. For example:

The approver(s) uses their preferred TOTP authenticator application to generate a security code:

This security code is then added to the approval request, plus and additional comment and expiration time, if desired:

Once approved, the WebUI displays the success banner, and reports the current request status. In this case, one request approved and one still pending:

One caveat to be aware of is that MPA requests are service-sensitive. This means that, for, MPA treats the ‘S3’ and ‘platform’ services as separate requests, even if all their other fields are identical. For example:

This distinction is important when users create MPA requests manually. For example, if a user creates a request and selects the ‘S3’ service, approval of that request will only allow privileged actions through the S3 API. The user will not be able to perform those actions via the platform API (or OneFS WebUI or CLI). The same applies in reverse, where requests created for platform services will only work through their respective APIs.

When investigating or troubleshooting S3 DPM issues, the preferred course of action is typically to enable and increase the verbosity of both the platform API log and S3 log. This can be done via the CLI with the following command syntax:

# isi_ilog -a papi --level debug+

# /usr/likewise/bin/lwsm set-log-level s3 - debug

Once done, check both isi_papi.log and s3.log for pertinent MPA and DPM debug messages.