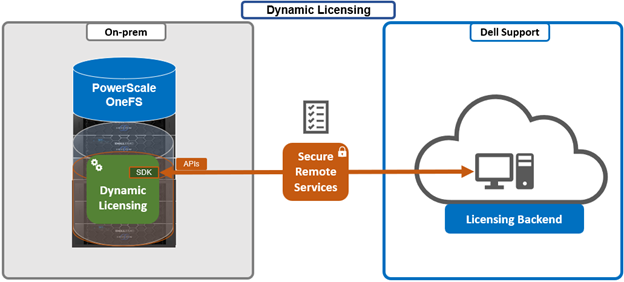
OneFS 9.13 introduces a new user‑lockout security mechanism for file‑provider accounts to protect against brute‑force and password‑guessing attacks. While PowerScale has long supported lockout controls for local authentication providers, this release extends equivalent protection to file‑provider accounts.
The OneFS user account security architecture can be summarized as follows:
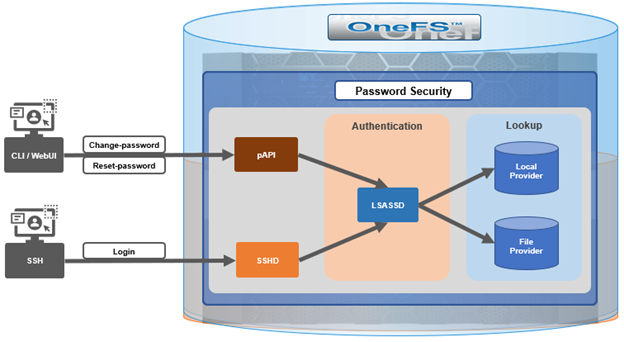
Within the OneFS security subsystem, authentication is handled in OneFS by LSASSD, the daemon used to service authentication requests for lwiod.
| Component | Description |
| LSASSD | The local security authority subsystem service (LSASS) handles authentication and identity management as users connect to the cluster. |
| File provider | The file provider includes users from /etc/password and groups from /etc/groups. |
| Local provider | The local provider includes local cluster accounts like ‘anonymous’, ‘guest’, etc. |
| SSHD | OpenSSH Daemon which provides secure encrypted communications between a client and a cluster node over an insecure network. |
| pAPI | The OneFS Platform API (PAPI), which provides programmatic interfaces to OneFS configuration and management via a RESTful HTTPS service. |
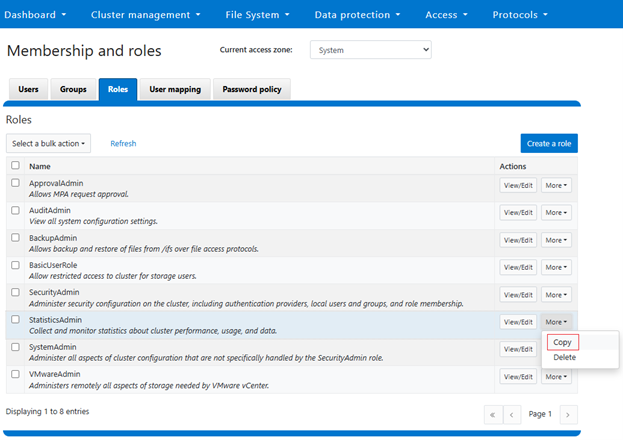
In OneFS Authentication, Identity Management, and Authorization (AIMA) there are several different kinds of backend providers: Local provider, file provider, AD provider, NIS provider, etc. Each provider is responsible for the management of users and groups inside the provider.
OneFS 9.13 introduces three new account lockout configuration parameters for the file provider. First, the ‘lockout‑threshold’ parameter specifies the number of failed authentication attempts required before the account is locked. ‘Lockout‑window’ defines the time interval during which failed attempts are counted. If the user does not exceed the threshold within this window, the counter resets after the window expires. Finally, the ‘lockout‑duration’ parameter determines how long the account remains locked once the threshold has been exceeded.
In practice, when a legitimate user or malicious attacker enters an incorrect password repeatedly and the number of failures reaches the configured threshold within the defined window, the account is locked for the duration specified. During the lockout period, the account cannot authenticate even with a correct password. Administrators can view the account’s status and manually unlock it as needed. If the threshold is set to zero, the lockout feature is disabled. Additionally, if failed attempts occur but the user either waits longer than the lockout window or successfully authenticates before reaching the threshold, the failure counter resets and no lockout occurs.
Because some file‑provider accounts, such as root and administrator, are essential for cluster maintenance, misconfiguration or malicious use of this feature could create operational or denial‑of‑service risks. To mitigate this, OneFS 9.13 introduces an exclusion list that prevents designated accounts from being subject to lockout. Administrators can configure and modify this gconfig-based exclusion list via the OneFS CLI. Modifying the exclusion list requires elevated operating‑system privileges, as it is intended to act as a safeguard rather than a routine configuration tool.
The lockout feature becomes available only after a OneFS 9.13 upgrade has been fully committed. Removing the upgrade also removes the associated configuration. No licensing is required to enable the feature. Three corresponding options are now available through the OneFS 9.13 CLI—lockout‑threshold, lockout‑window, and lockout‑duration—and can be set during provider creation or modified afterward.
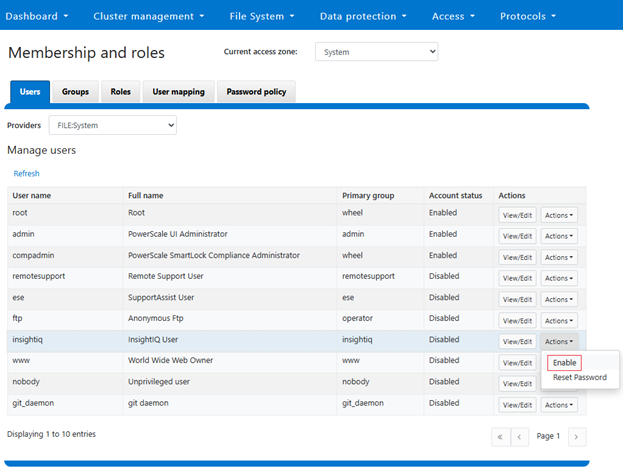
Configuration is accessible through the WebUI under the Access, Membership, and Roles section, where password policies for local or file providers can be adjusted. Administrators can specify the threshold, window, and duration values, and may manually unlock accounts if needed. Setting the lockout duration to zero results in a permanent lockout until an administrator intervenes. The exclusion list for the system file provider is managed using the isi_gconfig interface, while non‑system file‑provider exclusion lists must first be created and then modified individually.
For troubleshooting, a new SQL‑backed IDDB file has been introduced to store user‑lockout data. This DB file is located at /ifs/.ifsvar/modules/auth/file/filelockout.db. While typically not required for routine administration, it can assist in diagnosing unexpected lockout behaviors.
OneFS also support an exclusion list for user lock-out functionality. In OneFS, certain local system accounts, such as root and administrator, are critical to cluster management and system access. If the account lockout mechanism is unintentionally enabled for these accounts, or if repeated failed login attempts occur (whether accidental or malicious), the resulting lockout could render the system unmanageable. This also presents a potential denial‑of‑service (DoS) vector, since an attacker could intentionally trigger lockouts on privileged accounts.
To mitigate this risk, OneFS introduces a configurable exclusion list. Any account added to this list is exempt from the lockout mechanism and will not be disabled, regardless of failed authentication attempts. The exclusion list can be configured and modified through the CLI, WebUI, or Platform API. Because this mechanism functions as a safety measure and last line of defense, it is exposed only through privileged configuration interfaces (for example, via gconfig), requiring elevated OS‑level permissions.
The lockout feature is controlled by the lockout threshold. When this threshold parameter is set to a non‑zero numerical value, the feature is activated. Conversely, when the threshold is set to 0 (the default), the lockout function is disabled.
A user will be locked out if they repeatedly enter incorrect credentials within the configured lockout window and reach the specified threshold. Immediately after lockout, the user cannot authenticate, even with a correct password, until an administrator reviews the account status and manually unlocks it.
Alternatively, if the user waits longer than the defined lockout window between failed attempts, the failure counter is reset to zero. At this point, an access attempt with the correct password entered will be successful.
In a scenario where a user does become locked out, there are two recovery methods:
| Recovery Method | Details |
| Automatic unlock | After the lockout duration expires, the account unlocks automatically. |
| Administrative unlock | A cluster administrator can manually unlock the account at any time. |
Additionally, accounts may be added to the exclusion list, preventing them from being locked out in the future. OneFS distinguishes between the system file provider and non‑system file providers, and the procedure for adding accounts to the exclusion list differs slightly between the two.
Three new options have been added to the ‘isi auth file create/modify’ CLI command in OneFS 9.13 in support of this functionality:
| Command Option | Description |
| –lockout-duration | Sets duration of time that an account will be inaccessible after multiple failed login attempts. |
| –lockout-threshold | Sets the number of failed login attempts necessary for an account to be locked out. |
| –lockout-window | Sets the duration of time in which –lockout-threshold failed attempts must be made for an account to be locked out. |
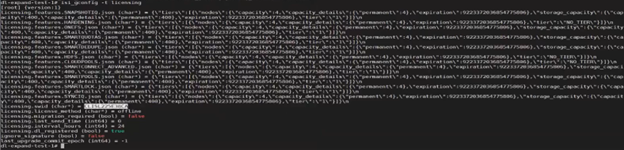
The currently configured lockout parameters can be viewed as follows:
# isi auth file view System | grep -i lockout

Lockout Duration: 10m

Lockout Threshold: 0

Lockout Window: 5m
Alternatively, the user lockout configuration can also be accessed from the OneFS WebUI by navigating to Access > Membership and roles > Password policy, and selecting the desired provider:
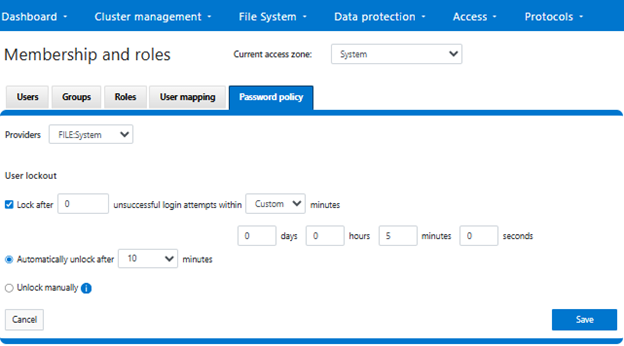
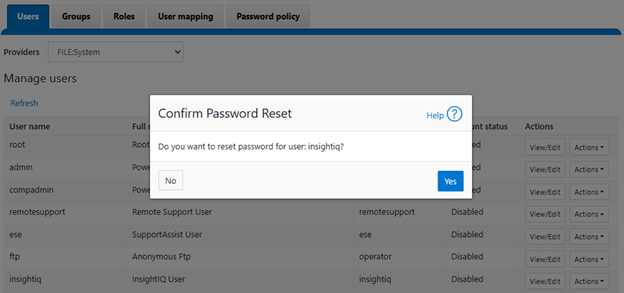
After selecting ‘FILE:System’ from the ‘Providers’ drop-down menu, the threshold lockout parameters are displayed and can be configured to specify how many unsuccessful login attempts within what length window (in minutes), and lock out for what duration. Alternatively, an option to ‘Unlock manually’ is also provided, if preferred. Note that the manual unlocking of a user account must be performed from the CLI or platform API since there is no WebUI support for this currently.
In the next article in this series, we will turn our focus to the configuration and management of the user account lockout functionality.