Skip to content

Unstructured Data Quick Tips

  • OneFS and CAVA Antivirus Scanning

Tag: Metadata

OneFS MetadataIQ Monitoring and Management

The previous article in this series focused on provisioning and configuring MetadataIQ. Now, in this final article in this series, we turn our attention to the tools and utilities that are helpful in monitoring and troubleshooting MetadataIQ.

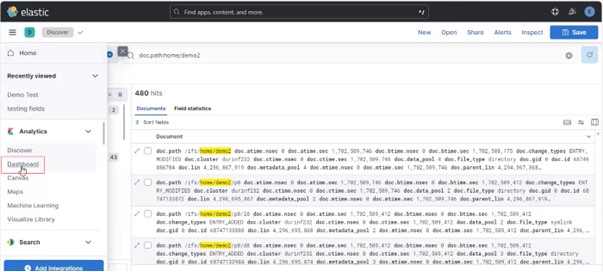
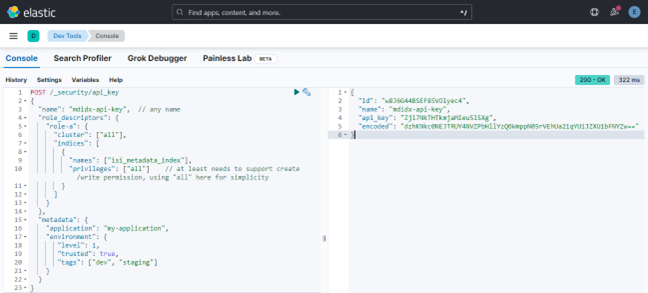
The actual metadata that MetadataIQ provides to the ElasticSearch database can be queried from the cluster CLI with the following command syntax:

# isi_metadataiq_transfer --show-mappings

MetadataIQ uses the Job Engine’s ChangelistCreate job and checkpoint (CCP) files to both track work progress and recover from unexpected termination. The ChangelistCreate job is run with its default impact and priority settings, and job progress can be monitored via the ‘isi job jobs view’ CLI command. Additionally, the job can also be modified, paused, and resumed. Once complete or terminated, a report of the job’s execution and progress can be accessed with the ‘isi job reports’ CLI syntax.

If needed, a ChangelistCreate job instance that is found to be in a paused or indeterminate state can be cancelled as follows. In this example, the culprit is job ID 51:

# isi job list

ID   Type             State       Impact  Policy  Pri  Phase  Running Time

---------------------------------------------------------------------------

51   ChangelistCreate User Paused Low     LOW     10   4/4    2s

---------------------------------------------------------------------------

Total: 1

# isi job cancel 51

Another useful MetadataIQ management lever is the ability to constrain MetadataIQ to a subset of cluster resources, along with the associated impact control ramifications. The ‘excluded_lnns’ option allows cluster admins to explicitly define which nodes MetadataIQ can run on. For example, the following CLI command will configure a MetadataIQ exclusion on the nodes with LNNs 3 and 5:

# isi metadataiq settings modify --excluded-lnns 3,5

# isi metadataiq settings view | grep -i lnn

         Excluded Lnns: 3, 5

On excluded nodes, the MetadataIQ producer log will typically contain entries of the form:

2024-09-29T18:39:15.109639+00:00 <3.3> TME-1(id1) isi_metadataiq_consumer_d[72402]: isi_metadataiq_consumer_d daemon is not allowed to run on current node, exiting..

Note that, in a PowerScale cluster, a node’s LNN (logical node number) is not always the same as its node ID, as reported by utilities like ‘isi status’. The ‘isi_nodes %{id} , %{lnn}’ CLI command can be used to correlate the two node numbering schemes

For a cluster where not all the nodes are connected to the front-end network (NANON), MetadataIQ automatically bypasses the unconnected node(s), so an LNN exclusion does not need to be manually configured in this case.

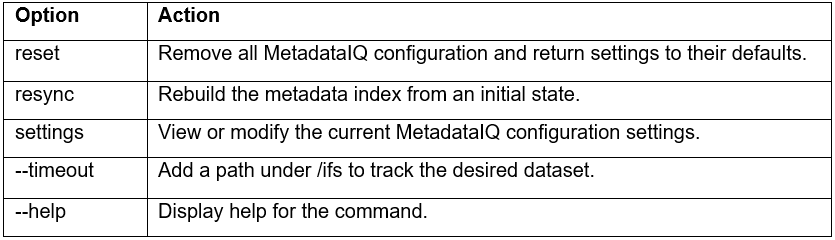
The ‘isi metadataiq’ CLI command also provides a ‘reset’ option, which can be used to remove any existing configuration settings, including the platform API parameters:

# isi metadataiq reset

The following configuration and log files can be helpful when investigating MetadataIQ issues:

While MetadataIQ is running, the following actions can be performed periodically to confirm proper operation or troubleshoot an issue:

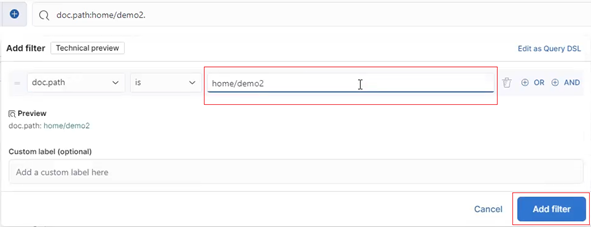
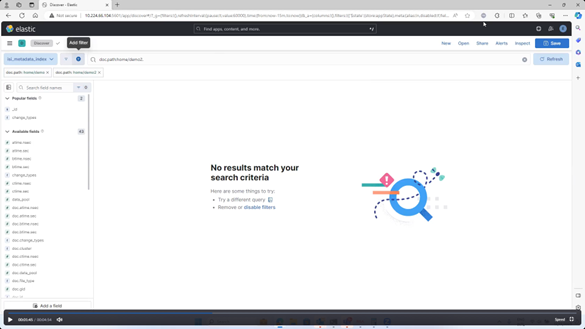
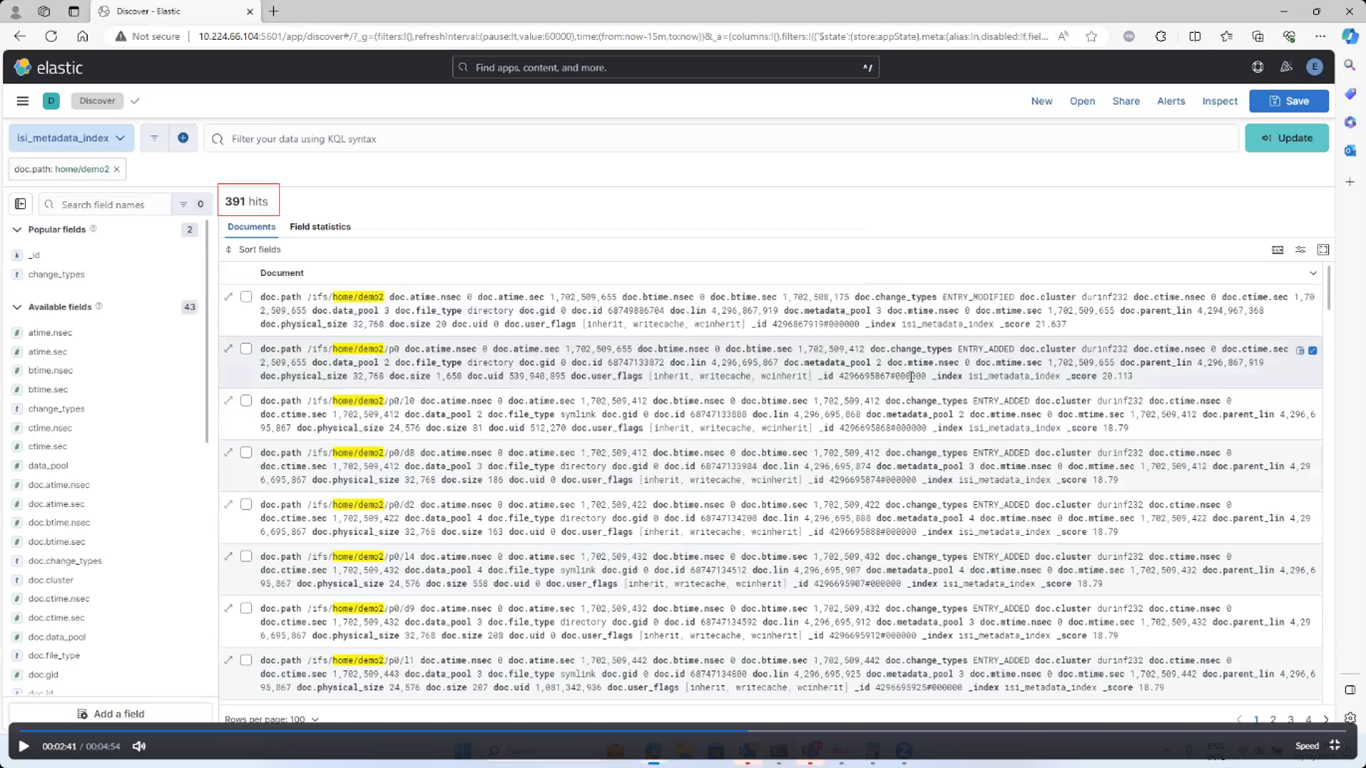
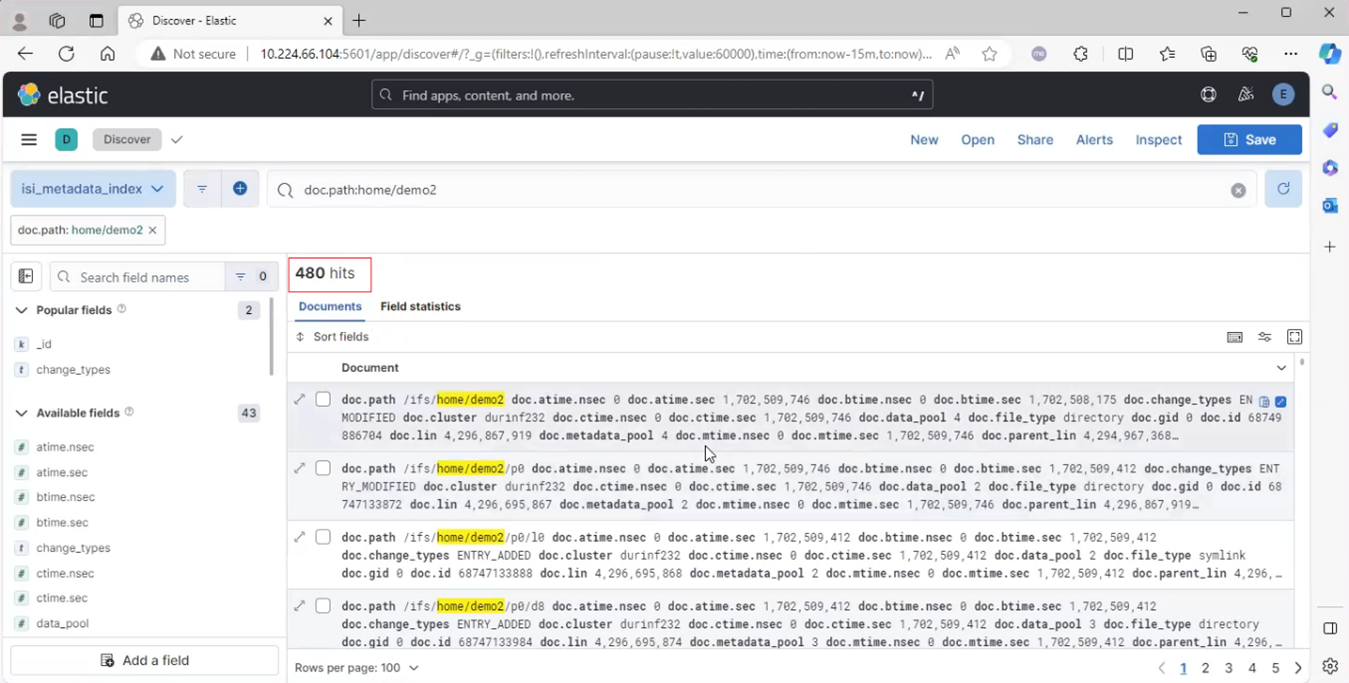
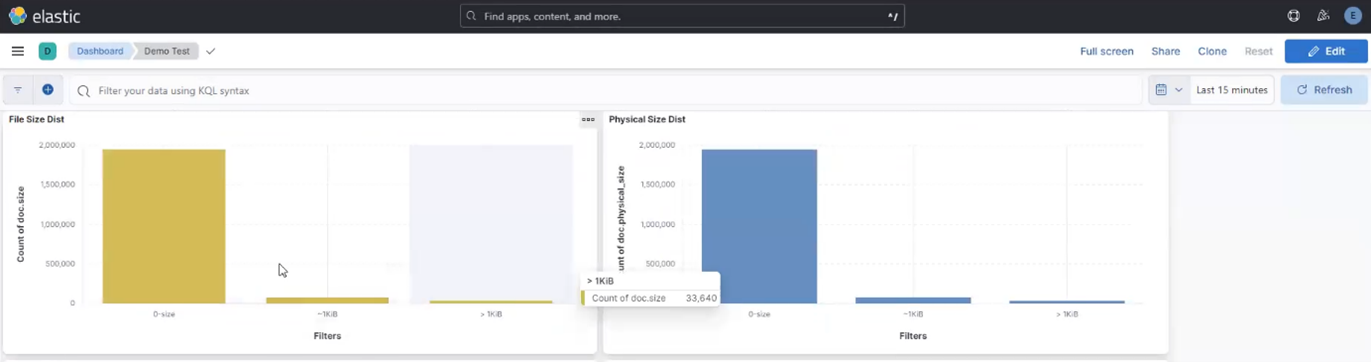
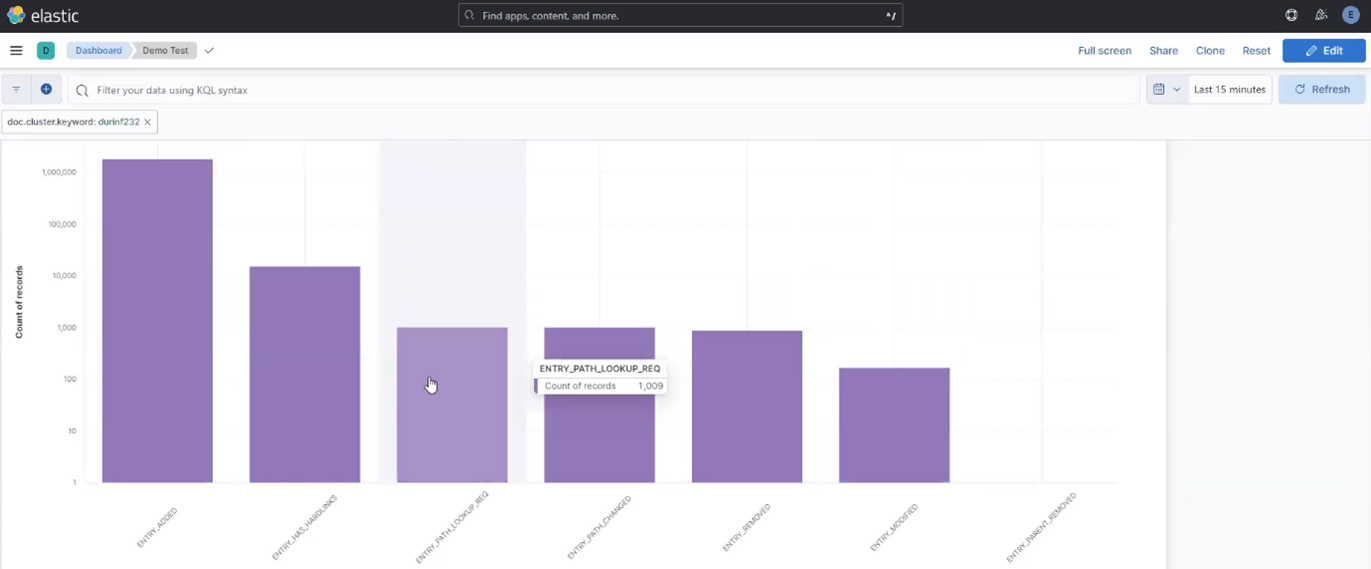
  1. Regularly monitor the ElasticSearch database with queries, ensuring the number of entries are in line with expectations.
  2. Check the health of the ChangelistCreate job(s).
# isi job jobs list | grep -i ChangelistCreate

ID Type             State     Impact Pri    Phase  Running Time

-----------------------------------------------------------------

3 ChangelistCreate Running   Low    5      2/4    9s

-----------------------------------------------------------------
  1. Monitor SnapshotIQ to ensure that there’s no buildup of MetadataIQ snapshots.
# isi snapshot snapshots list | grep -i metadataiq

3278 MetadataIQ_1730914225                        /ifs/data

3290 MetadataIQ_1730915287                        /ifs/data

...

Note that, in a healthy environment, if there are more than two MetadataIQ snapshots, the inactive snapshot(s) should automatically be removed during the next producer cycle

  1. Optionally, dump the checkpoint file:
# cat /ifs/.ifsvar/isi_metadata_index/checkpoint.json

The ChangelistCreate job report can be a particularly useful place to investigate. For example:

# isi job jobs list | grep 110

110  ChangelistCreate   Waiting Low     LOW     5    2/4    3h 35m

# isi job reports view 110

ChangelistCreate[110] phase 1 (2024-09-30T00:29:16)

---------------------------------------------------

Elapsed time  7384 seconds (2H3m4s)

Working time  187 seconds (3m7s)

Errors        0

Older snapid  152

Newer snapid  336

Mode          1

Entries found 2258681

Entries added 489031


ChangelistCreate[110] phase 2 (2024-10-01T19:24:04)

---------------------------------------------------

Elapsed time  154487 seconds (1D18H54m47s)

Working time  12729 seconds (3H32m9s)

Errors        0

Older snapid  152

Newer snapid  336

Mode          1

Entries found 0

Entries added 8716044


ChangelistCreate[110] Job Summary

---------------------------------

Final Job State  System Cancelled

Phase Executed   2

Similarly, a ChangeListCreate job’s status (in this case job ID 110 above) is also reported in the MetadataIQ producer Log, in the form of:

2024-10-01T18:48:45.933223+00:00 <3.7> TME-1 (id1) isi_metadataiq_producer_d[83055]: Job id: 110, status : 200, body  { "jobs" :  [  { "control_state" : "paused_priority", "create_time" : 1727648385, "current_phase" : 2, "description" : "", "human_desc" : "", "id" : 110, "impact" : "Low", "participants" :  [ 1, 2, 3, 4 ], "policy" : "LOW", "priority" : 5, "progress" : "Task results: found 0, added 8716044, 0 errors", "retries_remaining" : 0, "running_time" : 12916, "start_time" : 1727648770, "state" : "paused_priority", "total_phases" : 4, "type" : "ChangelistCreate" } ] }

2024-10-01T18:48:45.933317+00:00 <3.7> TME-1(id1) isi_metadataiq_producer_d[83055]: Job 110 state Waiting

The changelist that is created by the producer daemon should automatically be cleaned up after the subsequent metadata transfer cycle completes. The following CLI command can be used to report a cluster’s changelists:

# isi_changelist_mod -l

If a number of changelists are reported, the consumer daemon may be unable to transfer fully or otherwise keep up with changelist generation. Alternatively, some other cluster process may also be generating changelists.

If, for some reason, a MetadataIQ cycle fails in its entirety, an error of the following form will be reported:

Too many errors (...) encountered in this cycle. Failing this cycle and waiting for the next scheduled run

As described, no administrative intervention is required and MetadataIQ will automatically resume during its next scheduled run.

Similarly, Job Engine issues will typically result in the ChangelistCreate job being retried four times by default. After four failures, the following error is reported and job execution withheld until the next scheduled MetadataIQ cycle run.

ChangelistCreate job failed 4 times; giving up until next cycle

Note that the preferred job retry threshold can be specified with the ‘isi metadataiq settings modify –changelist-job-retries <integer>’ CLI syntax

For ElasticSearch server issues, such as the [500 document(s) failed to index] error, the following OneFS CLI utility can be used to verify the configuration and connectivity:

# isi_metadataiq_transfer –check

If for some reason a cluster’s /ifs file system has been placed into read-only mode, MetadataIQ will be unable to function and the following error message will be reported:

Error: Failed to open leader lock file (...): Read-only file system

If necessary, the MetadataIQ configuration can easily be completely removed. This can be required in the unlikely event that the following error message is reported:

In unrecoverable state. Please restart the MetadataIQ service or run a reset/resync

To start from scratch, first run a reset. For example:

# isi metadataiq reset

Once reset, the desired MetadataIQ configuration settings can be (re)applied via the ‘modify’ option:

# isi metadataiq settings modify --verify-certificate <boolean> --ca-certificate-path <string> --api-key <string> --hostname <string> --host-port <integer> --path <string> --schedule <string>
Author Nick TrimbeePosted on January 20, 2025January 13, 2025Categories PowerScale & IsilonTags Cluster, Dell, EMC, Isilon, Metadata, MetadataIQ, NAS, OneFS, PowerScale, Scale-outLeave a comment on OneFS MetadataIQ Monitoring and Management

Using OneFS MetadataIQ

The previous article in this series focused on provisioning and configuring MetadataIQ. Now, we turn our attention to actually using it.

After the initial cluster setup and configuration, each additional MetadataIQ job execution will populate the remote ElasticSearch database with updated metadata from the configured dataset.

Periodic synchronizations  keep the database updated with new metadata changes, and the recommendation is to configure a dataset-appropriate schedule for the OneFS MetadataIQ job. For example, the following CLI syntax entry will configure a schedule to run the metadata checkpointing job every five minutes:

# isi metadataiq settings modify --schedule "every day every 5 minutes"

With the producer services enabled, the first MetadataIQ cycle will start as soon as a valid schedule has been configured.

Once installed, the basic steps for using the ElasticSearch database and Kibana UI are as follows:

  1. First, from a browser, navigate to the URL for the Kibana instance. For example:
 http://<ip_to_host>:5601/app/home#/
  1. Log in to Kibana using your ELK credentials (username and password).

For example: Username ‘elastic’ and the corresponding password.

  1. Optionally, create a ‘dataview’ first by clicking on ‘create’ under the ‘discover’ tab and pasting ‘isi_metadata_index’ or ‘isi*’ as the index pattern.
  2. Use the ‘discover’ option to enter and execute search queries. The ‘discover’ link is typically located in the drop down menu on the top left of the GUI. From this drop down menu, click on ‘discover’ to open a search screen.
  3. Finally, queries can be entered to analyze the data as appropriate.

The following query syntax illustrates how basic ElasticSearch searches of the OneFS metadata can be expressed. For example:

  • To find regular files, residing in pool 3 on a particular cluster (<cluster_name>):
file_type equals regular and doc.metadata_pool equals 3 and doc.cluster equals <cluster_name>
  • Or to find files on a particular cluster with a modification time (-mtime) of Monday, October 21, 2024 9:00:00 PM, expressed as an epoch value:
doc.cluster equals <cluster_name> and doc.mtime.sec >= 1729544400
  1. Additionally, the Kibana ‘dashboard’ can be used to create data visualizations, if desired.

From the Kibana UI, the ‘Discover’ page notifies of a new data source once the ‘isi metadataiq’ utility has been successfully configured and executed on the cluster. For example:

Clicking on the ‘Create data view’ button brings up the ‘Create data view’ page, where the new metadata index (for example, ‘isi_metadata_index’) is recognized and listed as a matching data source. For example:

Creating a data view is a simple as entering ‘isi_metadata_index’ in the ‘Index pattern’ search field and clicking the ‘Save data view to Kibana’ button.

The dropdown menu also provides options to manage or add fields to this data view:

Under the ‘Analytics’ tab, the ‘Discover’ mode enables data queries to be easily crafted and executed:

One or more filters can be easily created to display a desired subset of metadata entries:

A list of the available fields is displayed on the left of the Kibana page. For example:

(Incomplete list)

Filters can be configured by clicking on the blue ‘plus’ icon to bring up the ‘Add filter’ pane:

From the ‘Add filter’ pane, first add the desired field by searching and selecting from the dropdown list:

In this case the ‘doc.path’ filter is selected:

Next, select an operator from the list:

In this case, the ‘is’ operator is selected. Next, add the dataset’s path under /ifs:

Finally, click the ‘Add filter’ button and the new filter(s) will search for the matching newly generated database entries under the path, in this case ./home/demo2.

This returns no new entries yet since the MetadataIQ services and ChangeList job are still running:

Refreshing the Kibana window with the ‘doc.path’ filter shows the new metadata entries, in this case 391 entries, under /ifs/home/demo2:

Once the next scheduled MetadataIQ cycle has successfully completed, refreshing the Kibana UI reports any changes in the number of ‘doc.path’ entries, or ‘hits’, in this case from 391 to 480.

The standard MetadataIQ configuration captures all of the ChangeList output into each document, so this can be either queried directly or represented graphically.

Within the Kibana UI, under the ‘Analytics’ tab, moving from ‘Discover’ mode to ‘Dashboard’ allows rich custom visualizations to be created:

Kibana provides multiple data presentation options. Bar charts can be useful for representing to the ‘file and physical size distributions’ data:

Pie charts can be helpful with illustrating metadata fields from multiple clusters. Up-leveled data can be collated and represented in the Kibana dashboard as interactive charts, the details of which can easily be drilled down into by clicking on the desired region. For example, the ‘file type and cluster source’ distribution metrics below:

The following chart displays the ‘entry path changed’ field from the ‘top 10 values of change_types’. Additional context for a chart region or field can be viewed with Kibana’s mouse ‘hover-over’ functionality:

In the final article in this series, we’ll examine the tools and options available for monitoring and troubleshooting MetadataIQ.

Author Nick TrimbeePosted on January 13, 2025January 2, 2025Categories PowerScale & IsilonTags Cluster, Dell, EMC, Isilon, Metadata, MetadataIQ, NAS, OneFS, PowerScale, Scale-outLeave a comment on Using OneFS MetadataIQ

OneFS MetadataIQ ElasticSearch and Kabana Configuration

The previous article in this series focused on provisioning and configuring a PowerScale cluster to support MetadataIQ. Now, we turn our focus to the server side deployment and setup.

MetadataIQ is introduced in OneFS 9.10 and requires a cluster to be running a fresh install or committed upgrade of 9.10 or later in order to run.

Either a physical Linux client or a virtual machine instance with sufficient disk space (20+GB is recommended) and virtual memory (minimum 256MB) is required to run the ElasticSearch database, which houses the off-cluster metadata, and Kibana visualization dashboard.

OneFS MetadataIQ has been verified in-house with the following components and versions:

Install Docker on the client system using the Linux distribution’s native package manager.

For example, to install the latest version of Docker using the Yum package manager:

# sudo yum install docker-ce docker-ce-cli containerd.io docker-buildx-plugin docker-compose-plugin

While the above command installs Docker and creates a ‘docker’ group, it does not add any users to the group by default.

Once successfully installed, the Docker container service can be enabled as follows:

# sudo systemctl start docker

If needed, detailed installation and management instructions are available in the Docker installation guide.

OneFS MetadataIQ requires an off-cluster ElasticSearch database for the metadata store.

ElasticSearch and can be installed on a Linux client via the following procedure. Note that this procedure assumes that Docker has already been successfully installed on the Linux client.

  1. First, install ElasticSearch as follows:
# docker network create elastic

# docker run --name es01 --net elastic -p 9200:9200 -e "http.publish_host=<x.x.x.x>" -it docker.elastic.co/elasticsearch/elasticsearch:8.12.2

Where <x.x.x.x> is the Linux client’s IP address.

Note that the ElasticSearch database typically uses TCP port 9200 by default.

Additional instructions and information can be found in the ‘getting started’ section of the ElasticSearch configuration guide.

The next step is to install and configure the Kibana dashboard.

The Kibana binaries can be installed as follows:

# docker pull docker.elastic.co/kibana/kibana:8.12.2

# docker run --name kibana --net elastic -p 5601:5601 docker.elastic.co/kibana/kibana:8.12.2

Note that Kibana typically runs by default on TCP port 5601.

Additional instructions and information can be found in the Kibana installation guide.

Once the ElasticSearch database is up and running, the next step is to generate a new security API token. This can be performed from the Kibana web interface, by navigating to Dev Tools > Console and using the following JSON ‘POST’ syntax:

POST /_security/api_key 
{ 
  "name": "mdidx-api-key", 
  "role_descriptors”: { 
    "role-a": { 
      "cluster": ["all"], 
      "indices": [ 
        { 
          "names": ["isi_metadata_index"], 
          "privileges": ["all"] 
        } 
      ] 
    } 
  }, 
  "metadata": { 
    "application": "my-application", 
    "environment": { 
       "level": 1, 
       "trusted": true, 
       "tags": ["dev", "staging"] 
    } 
  } 
}

The JSON request (above) is entered into the left hand pane of the Kibana dev tools console, and the output is displayed in the right hand pane. For example:

A successful request returns a JSON structure containing the API key, plus its name, ID, and encoding. Output is of the form:

{

  "id": "w8J6G44BSEF85VOlyec4",

  "name": "mdidx-api-key",

  "api_key": "Zji7NkTHTkmjaMIeu5lSXg",

  "encoded": "dzhKNkc0NEJTRUY4NVZPbHllYzQ6WmppN05rVEhUa21qYU1JZXU1bFNYZw=="

}

Instructions describing this API key generation process in detail can be found in the ElasticSearch getting started guide.

The bulk API is used to update the ElasticSearch database. Note that the role does require the following privileges:

  • Create
  • Index
  • Write index

More information on using the ElasticSearch bulk API can be found in the ElasticSearch configuration guide.

An SSL certificate file is required in order for the cluster to securely connect to the ElasticSearch database. This SSL certificate file must be copied from the Linux client to the PowerScale cluster.

On the Linux client, the SSL certificate can be copied from the Docker container to the cluster as follows:

# docker cp es01:/usr/share/elasticsearch/config/certs/http_ca.crt ./

# scp ./http_ca.crt <x.x.x.x>:/ifs

Where <x.x.x.x> is the cluster’s IP address.

Authentication between the ElasticSearch instance and the PowerScale cluster can be verified from OneFS as follows:

# curl --cacert /ifs/http_ca.crt -H "Authorization: ApiKey <encode in api_key response from above>" https://<x.x.x.x>:9200/

Once the file transfer is complete, the certificate can be validated by confirming a matching checksum on the client and cluster using the ‘md5sum’ command for Linux and ‘md5’ command for PowerScale OneFS respectively. For example:

# md5 /ifs/http_ca.crt

MD5 (http_ca.crt) = 8d8f1ffe34812df1011d6c0c3652e9eb

More information on how to configure the database security can be found in the ElasticSearch configuration guide.

In the next article in this series, we’ll examine the process involved for using and managing an ElasticSearch instance and Kibana visualization portal.

Author Nick TrimbeePosted on January 6, 2025January 6, 2025Categories PowerScale & IsilonTags Cluster, Dell, EMC, Isilon, Metadata, MetadataIQ, NAS, OneFS, PowerScale, Scale-outLeave a comment on OneFS MetadataIQ ElasticSearch and Kabana Configuration

OneFS MetadataIQ Cluster-side Configuration

In the prior article in this series, we took an in-depth look at MetadataIQ’s architecture and operation. Now, we turn our focus to its configuration and deployment.

MetadataIQ is introduced in OneFS 9.10 and requires a cluster to be running a fresh install or committed upgrade of 9.10 or later in order to run. The installation package for the OneFS 9.10 release is available at the Dell Support site.

Once the download has completed, the cluster can be upgraded and committed to OneFS 9.10 either from the CLI using the ‘isi upgrade cluster’ command, or via the WebUI by navigating to Cluster management > Upgrade.

Post upgrade to, or installation of, OneFS 9.10, the /ifs/.ifsvar/modules/metadataiq directory is created, which houses various MetadataIQ components and logs.

In addition to a PowerScale cluster running OneFS 9.10, MetadataIQ also requires that the following dependencies are met:

  1. MetadataIQ requires the OneFS ISI_PRIV_SNAPHSHOT privilege in order to run.

Confirm that SnapshotIQ is licensed across the cluster and that the snapshot service is enabled.

# isi license view snapshotiq | grep Status

Status: Evaluation

# isi services -a | grep -i snapshot

isi_snapshot_d       Snapshot Daemon                          Enabled
  1. Verify that the ElasticSearch packages are installed on the cluster by running the following CLI command:
# python -m pip list | grep -i elasticsearch

elasticsearch        6.3.1

elasticsearch-midx   8.14.0

MetadataIQ configuration and management in OneFS 9.10 is currently limited to the command line (CLI) or the platform API (pAPI) endpoints.

On the PowerScale cluster, the ‘isi metadataiq’ CLI command execution syntax is as follows:

Usage:

isi metadataiq {<action> | <subcommand>}

[--timeout <integer>]

[{--help | -h}]


Actions:

reset       Reset MetadataIQ to defaults.

resync      Rebuild metadata index from initial state.


Subcommands:

settings    Manage MetadataIQ settings.

As such, the following options are available for the ‘isi metadataiq’ CLI command:

OneFS MetadataIQ requires initialization and configuration before it can be successfully deployed. To this end, the ‘isi metadataiq settings modify’ CLI command can be used to edit the desired configuration fields, and the syntax is as follows:

Usage:

isi metadataiq settings modify

[--max-threads <integer>]

[--excluded-lnns <integer> | --clear-excluded-lnns | --add-excluded-lnns

<integer> | --remove-excluded-lnns <integer>]

[--nshards <integer>]

[--fetch-size <integer>]

[--work-queue-size <integer>]

[--verify-certificate <boolean>]

[--hostname <string>]

[--host-port <integer>]

[--path <string>]

[--schedule <string>]

[--changelist-job-retries <integer>]

[--changelist-job-tolerable-pause-hours <integer>]

[--changelist-job-tolerable-state-request-failures <integer>]

[--ca-certificate-path <string>]

[--api-key <string>]

[{--verbose | -v}]

[{--help | -h}]

When configuring MetadataIQ, the following client system credentials and parameters are required:

  • API ID
  • API Key
  • ElasticSearch database hostname
  • ElasticSearch port (typically 9200)
  • CA certificate path

For example:

# isi metadataiq settings modify --verify-certificate <boolean> --ca-certificate-path <string> --api-key <string> --hostname <string> --host-port <integer> --path <string> --schedule <string>

The ‘path’ parameter must be a path to a directory under the cluster’s /ifs filesystem. If left unspecified, the metadata path defaults to /ifs.

Note also that the ‘host-port’ value for the ElasticSearch database is typically TCP port 9200.

These configuration parameters are stored within gconfig on each node in the /etc/gconfig/metadataiq_config.gc file.

The OneFS platform API (pAPI) also offers an equivalent set of MetadataIQ configuration endpoints to the CLI, accessible under /platform/21/metadataiq/settings/.

For example:

# curl --insecure --basic --user <uname:passwd> https://<cluster_ip>:8080/platform/21/metadataiq/settings/
{
"settings" :
{
"consumer" :
{
"database_info" :
{
"api_key" : "A key is configured",
"certificate_path" :
 
"fa0e6e93f47c8d0074832c47bffd630ab1faad065f3d129b32e0aa7ae8de8595",
"database_type" : "ELK database",
"host_port" : 9200,
"hostname" : "https://10.224.101.214:9200",
"verify_certificate" : true
},
"excluded_lnns" : [],
"fetch_size" : 2048,

"max_threads" : 8,

"number_shards" : 8,

"work_queue_size" : 16

},

"producer" :

{

"changelist_job_retries" : 2,

"changelist_job_tolerable_pause_hours" : 24,

"changelist_job_tolerable_state_request_failures" : 720,

"path" : "/ifs/data",

"schedule" : "every day every 2 hours"

}

}

}

The following CLI commands can be used to control the operation of the MetadataIQ services:


Service Daemon/UtilityEnable/disable/view Commands
Producerisi_metadataiq_producer_disi services isi_metadataiq_producer_d enable
isi services isi_metadataiq_producer_d disable
isi services isi_metadataiq_producer_d
Consumerisi_metadataiq_consumer_disi services isi_metadataiq_consumer_d enable
isi services isi_metadataiq_consumer_d disable
isi services isi_metadataiq_producer_d
Transferisi_metadataiq_transfer# isi_metadataiq_transfer
# isi_metadataiq_transfer –check
# isi_metadataiq_transfer –consumer-checkpoint
# isi_metadataiq_transfer –-map-version
# isi_metadataiq_transfer –-show-mappings

For example, the two MetadataIQ services can be enabled from the CLI as follows:

# isi services -a isi_metadataiq_producer_d enable

The service 'isi_metadataiq_producer_d' has been enabled.

# isi services -a isi_metadataiq_consumer_d enable

The service 'isi_metadataiq_consumer_d' has been enabled.

In the next article in this series, we’ll examine the process involved in deploying and configuring an ElasticSearch instance and Kibana visualization portal.

Author Nick TrimbeePosted on December 30, 2024January 8, 2025Categories PowerScale & IsilonTags Cluster, Dell, EMC, Isilon, Metadata, MetadataIQ, NAS, OneFS, PowerScale, Scale-outLeave a comment on OneFS MetadataIQ Cluster-side Configuration

OneFS MetadataIQ Architecture and Operation

In this second article in the series, we’ll take an in-depth look at MetadataIQ’s architecture and operation.

The OneFS MetadataIQ framework is based on the following core components:

A ‘MetadataIQ cycle’ describes the complete series of steps run by the MetadataIQ service daemons, which represent the full sequence, from determining the changes between two snapshots through updating the ElasticSearch database.

On the cluster side there are three core MetadataIQ components that are added in OneFS 9.10: The Producer Service, Consumer Service, and Transfer agent.

The producer service daemon, isi_metadataiq_producer_d, is responsible for running a metadata scan of the specified OneFS file system path, according to a configured schedule.

When first started, or in response to a configuration change, the producer daemon first loads its configuration, which instructs it on parameters such as the file system path to use, what schedule to run on, etc. Once the producer has found a valid schedule configuration string, it will start its first execution process, or ‘producer cycle’, performing the following actions:

  1. A new snapshot of the configured file system path is taken.
  2. Next, a ChangelistCreate job is started between the previous snapshot and the newly-taken snapshot checkpoints.
  3. This ChangelistCreate job instance is monitored and, if necessary, restarted per a configurable number of retry attempts.
  4. A consumer checkpoint file (CCP) is generated.
  5. Finally, cleanup is performed and the old snapshot removed.

It’s worth noting that, in this initial version of MetadataIQ, only a single path may be configured.

Internally, the consumer checkpoint (CCP) is a JSON file containing a system b-tree created by the ChangelistCreate job, providing a delta between two input snapshots. These CCP files are created under the /ifs/.ifsvar/modules/metadataiq/cp/ directory with a ‘Checkpoint’ nomenclature followed by an incrementing ID. For example:

# ls /ifs/.ifsvar/modules/metadataiq/cp/

Checkpoint_0_2.json

To aid identification, the producer daemon creates its snapshots with a naming convention that includes both a ‘MetadataIQ’ prefix and creation timestamp naming convention for easy identification, plus an expiration value of one year. For example:

# isi snapshot snapshots list | grep -i metadata

3278 MetadataIQ_1730914225                        /ifs/data

During a producer cycle, once a CCP file is successfully generated, the old snapshot from the on-going cycle gets cleaned up. This snapshot deletion actually occurs in two phases: While the producer daemon initiates snapshot removal, the actual deletion is performed by the Job Engine’s SnapshotDelete job. As such, the contents of a ‘deleted’ snapshot may still exist until a SnapshotDelete job has run to completion and actually cleaned it up.

If a prior MetadataIQ execution cycle has not already completed, the old snapshot ID will automatically be set to HEAD (i.e.ID=0), and only the new snapshot will be used to report the current metadata state under the configured path.

Next, the MetadataIQ consumer service takes over the operations.

The consumer service relies on a set of database configuration parameters, including the CA certificate attributes, in order to securely connect to the remote ElasticSearch instance. These include:

Note that, in OneFS 9.10, MetadataIQ only supports the ElasticSearch database as its off-cluster metadata store.

Additionally, the consumer daemon, isi_metadataiq_consumer_d, also has a couple of configurable parameters to control and tune its behavior. There are:

The consumer daemon checks the queue for the arrival of a new checkpoint (CCP) file. When a CCP arrives, the daemon instructs the transfer agent to upload the metadata to the Elasticsearch database. The consumer daemon also continuously monitors the successful execution of the transfer agent, restarting it if needed.

If there happens to be more than one CCP in the queue, the consumer daemon will always select the file with the oldest timestamp.

The actual mechanics of uploading the consumer checkpoint (CCP) file to the remote database are handled by the transfer agent.

The transfer agent (isi_metadataiq_transfer), a python script, which is spawned on demand by the consumer daemon.

  1. The transfer script is invoked with the path to a CCP file specifying the target changelist.
  2. Next, the transfer script attempts to take an advisory lock on the CCP file to prevent more than one instance of the transfer script working on the same CCP file at a given time. This advisory lock is released whenever the transfer script completes or terminates.
  3. After acquiring the advisory lock, the transfer script validates that both the CCP file and changelist exist, and that the ElasticSearch database connection and mapping are valid. It will configure the index mappings if the index does not already exist.
  4. If everything is fine in the above step, the transfer script will start its ‘draining loop’, fetching and batching changelist entries and allocating them to a worker thread pool for data processing and transfer.
  5. Once the changelist is fully transferred to the ElasticSearch database, the transfer script removes the CCP file and changelist.
  6. Finally, the transfer script releases its advisory lock and exits normally.

In the event of a failure, the transfer agent is automatically restarted by the consumer daemon.

After the initial cluster setup and config, each additional MetadataIQ job run populates the remote ElasticSearch database with updated metadata from the configured dataset.

The ElasticSearch database and Kibana visualization portal reside on an off-cluster Linux host.

ElasticSearch typically uses TCP port 9200 by default, for communication and receiving metadata updates from the PowerScale cluster(s). Kibana typically runs by default on TCP port 5601.

Periodic synchronizations are needed to keep the database updated with new metadata changes, and the recommendation is to configure a dataset-appropriate schedule for the MetadataIQ job. And with the services enabled, the first MetadataIQ cycle begins as soon as a valid schedule has been configured.

In the next article in this series, we’ll examine the process involved in standing up and configuring a MetadataIQ environment.

Author Nick TrimbeePosted on December 23, 2024January 6, 2025Categories PowerScale & IsilonTags Cluster, Dell, EMC, Isilon, Metadata, MetadataIQ, NAS, OneFS, PowerScale, Scale-outLeave a comment on OneFS MetadataIQ Architecture and Operation

OneFS MetadataIQ

Prominent amongst the payload of the new OneFS 9.10 release is MetadataIQ – PowerScale’s new global metadata namespace solution.

Incorporating the ElasticSearch database and Kibana visualization dashboard, MetadataIQ facilitates data indexing and querying across multiple geo-distributed clusters.

OneFS MetadataIQ is purpose-built to provide robust metadata capabilities, allowing customers to index and discover the data they need for their workflows during file creation and modification, negating the need for time-consuming treewalks . The metadata catalog may be used for queries, data visualization, and data lifecycle management. As customers add analytics workflows, the ability to simply and efficiently query data, wherever it may reside, is vital for the time-to-results they require.

The MetadataIQ framework is used to transfer file system metadata from a cluster to an external ElasticSearch database instance. Internally, MetadataIQ leverages the venerable OneFS Job Engine’s ChangeListCreate job, which tracks the delta, or changelist, between two snapshots. MetadataIQ parses entries in each changelist in batches, updating the metadata index residing off-cluster in an ElasticSearch database. This database can store the metadata from multiple PowerScale clusters, providing a global catalog of an organization’s unstructured data repositories.

The exported OneFS file system metadata contains the fields and attributes which are typically reported by the ubiquitous ‘stat’ CLI command, including:

In addition to these standard metadata attributes, MetadataIQ also includes a number of cluster-specific fields, including path, LINs and parent LINs, disk and nodepool membership, associated snapshots, etc. The full schema, including the metadata categories, fields, types, and descriptions, will be presented in a future blog article in this series.

Behind the scenes, OneFS MetadataIQ comprises the following principal components:

The high level architecture of the MetadataIQ framework is as follows:

A ‘MetadataIQ cycle’ is the complete series of steps run by the MetadataIQ daemons, which represent a full sequence of analyzing the changes between two snapshots and updating the ElasticSearch database.

On the cluster side there are three core MetadataIQ components that are added in OneFS 9.10: The Producer Service, which coordinates snapshot generation and changelist job execution, according to a specified schedule, generating a consumer checkpoint file. The Consumer Service, which detects new checkpoint files and manages and monitors the database connectivity. And the Transfer agent, which, under the purview of the Consumer, actually performs the metadata uploads to the remote ElasticSearch instance.

Off-cluster, a Linux server running the Docker container service hosts the ‘ELK’ stack. This includes the ElasticSearch database that houses the metadata index, paired with the Kibana dashboard, which provides the query and data visualization engine.

After the initial cluster setup and config, each additional MetadataIQ job run populates the remote ElasticSearch database with updated metadata from the configured dataset. Periodic synchronizations are needed to keep the database updated with new metadata changes, and the recommendation is to configure a dataset-appropriate schedule for the MetadataIQ job. And with the services enabled, the first MetadataIQ cycle will start as soon as a valid schedule has been configured.

From the Kibana UI, the ‘Discover’ page notifies of a new data source once MetadataIQ has been successfully configured and run on the cluster. After this, creating a data view is a simple as selecting the desired index and clicking the ‘Save data view to Kibana’ button. Once done, Kibana’s ‘Discover’ mode allows you to craft and run data queries by creating one or more filters to display a desired subset of metadata entries. Moving from ‘Discover’ mode to ‘Dashboard’ allows rich custom visualizations to be created. Kibana provides multiple data presentation options, such as a bar chart, here representing ‘file and physical size distributions’ data.

Or a pie chart, here displaying metadata from multiple clusters.

Up-leveled data can be collated and represented in the dashboard as interactive charts, and clicking or hovering over the desired region allows you to easily access the details.

So there you have it – the new OneFS MetadataIQ, providing smart, efficient, and scalable metadata querying and management across a federated PowerScale metadata index. Plus, in addition to streamlining data access and boosting operation efficiency, MetadataIQ can also facilitate AI workflows such as intelligent chunking and retrieval-augmented generation (RAG).

In the next article in this series, we’ll take an in-depth look at MetadataIQ’s architecture and operation.

Author Nick TrimbeePosted on December 16, 2024January 6, 2025Categories PowerScale & IsilonTags Cluster, Dell, EMC, Isilon, Metadata, MetadataIQ, NAS, OneFS, PowerScale, Scale-outLeave a comment on OneFS MetadataIQ

Recent Posts

  • OneFS S3 Conditional Writes and Cluster Status Reporting API
  • OneFS and the PowerScale PA110 Performance Accelerator
  • OneFS Migration from ESRS to Dell Connectivity Services
  • OneFS and Software Journal Mirroring – Management and Troubleshooting
  • OneFS and Software Journal Mirroring – Architecture and Operation

Recent Comments

    Archives

    • June 2025
    • May 2025
    • April 2025
    • March 2025
    • February 2025
    • January 2025
    • December 2024
    • November 2024
    • October 2024
    • September 2024
    • August 2024
    • July 2024
    • June 2024
    • May 2024
    • April 2024
    • March 2024
    • February 2024
    • January 2024
    • December 2023
    • November 2023
    • October 2023
    • September 2023
    • August 2023
    • July 2023
    • June 2023
    • May 2023
    • April 2023
    • March 2023
    • February 2023
    • January 2023
    • December 2022
    • November 2022
    • October 2022
    • September 2022
    • August 2022
    • July 2022
    • June 2022
    • May 2022
    • April 2022
    • March 2022
    • February 2022
    • January 2022
    • December 2021
    • November 2021
    • October 2021
    • September 2021
    • August 2021
    • July 2021
    • June 2021
    • May 2021
    • April 2021
    • March 2021
    • February 2021
    • January 2021
    • December 2020
    • November 2020
    • October 2020
    • September 2020
    • August 2020
    • July 2020
    • June 2020
    • May 2020
    • April 2020
    • August 2019

    Categories

    • Analytics
    • ECS
    • PowerScale & Isilon
    • Uncategorized

    Meta

    • Log in
    • Entries feed
    • Comments feed
    • WordPress.org
    • OneFS and CAVA Antivirus Scanning
    Unstructured Data Quick Tips Proudly powered by WordPress