In the final article in this series, we’ll take a look at how writable snapshots co-exist in OneFS, and their integration and compatibility with the various OneFS data services.
Staring with OneFS itself, support for writable snaps is introduced in OneFS 9.3 and the functionality is enabled after committing an upgrade to OneFS 9.3. Non-disruptive upgrade to OneFS 9.3 and to later releases is fully supported. However, as we’ve seen over this series of articles, writable snaps in 9.3 do have several proclivities, caveats, and recommended practices. These include observing the default OneFS limit of 30 active writable snapshots per cluster (or at least not attempting to delete more than 30 writable snapshots at any one time if the max_active_wsnaps limit is increased for some reason).
There are also certain restrictions governing where a writable snapshot’s mount point can reside in the file system. These include not at an existing directory, below a source snapshot path, or under a SmartLock or SyncIQ domain. Also, while the contents of a writable snapshot will retain the permissions they had in the source, ensure the parent directory tree has appropriate access permissions for the users of the writable snapshot.
The OneFS job engine and restriping jobs also support writable snaps and, in general, most jobs can be run from inside a writable snapshot’s path. However, be aware that jobs involving tree-walks will not perform copy-on-read for LINs under writable snapshots.
The PermissionsRepair job is unable to fix the files under a writable snapshot which have yet to be copy-on-read. To prevent this, prior to starting a PermissionsRepair job, instance the `find` CLI command (which searches for files in directory hierarchy) can be run on the writable snapshot’s root directory in order to populate the writable snapshot’s namespace.
The TreeDelete job works for subdirectories under writable snapshot. TreeDelete, run on or above a writable snapshot, will not remove the root, or head, directory of the writable snapshot (unless scheduled through writable snapshot library).
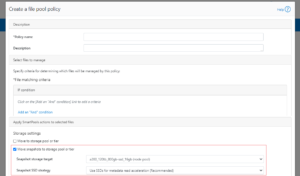
The ChangeList, FileSystemAnalyze, and IndexUpdate jobs are unable to see files in a writable snapshot. As such , the FilePolicy job, which relies on index update, cannot manage files in writable snapshot.
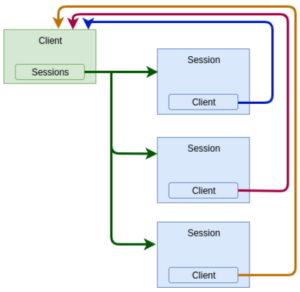
Writable snapshots also work as expected with OneFS access zones. For example, a writable snaps can be created in a different access zone than its source snapshot:
# isi zone zones list

Name     Path

------------------------

System   /ifs

zone1    /ifs/data/zone1

zone2    /ifs/data/zone2

------------------------

Total: 2

# isi snapshot snapshots list

118224 s118224              /ifs/data/zone1

# isi snapshot writable create s118224 /ifs/data/zone2/wsnap1

# isi snapshot writable list

Path                   Src Path          Src Snapshot

------------------------------------------------------

/ifs/data/zone2/wsnap1 /ifs/data/zone1   s118224

------------------------------------------------------

Total: 1
Writable snaps are supported on any cluster architecture that’s running OneFS 9.3, and this includes clusters using data encryption with SED drives, which are also fully compatible with writable snaps. Similarly, InsightIQ and DataIQ both support and accurately report on writable snapshots, as expected.
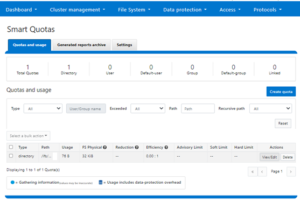
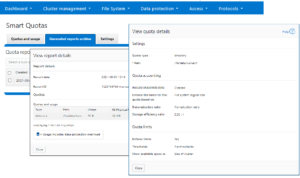
Writable snaps are also compatible with SmartQuotas, and use directory quotas capacity reporting to track both physical and logical space utilization. This can be viewed using the `isi quota quotas list/view` CLI commands, in addition to ‘isi snapshots writable view’ command.
Regarding data tiering, writable snaps co-exist with SmartPools, and configuring SmartPools above writable snapshots is supported. However, in OneFS 9.3, SmartPools filepool tiering policies will not apply to a writable snapshot path. Instead, the writable snapshot data will follow the tiering policies which apply to the source of the writable snapshot. Also, SmartPools is frequently used to house snapshots on a lower performance, capacity optimized tier of storage. In this case, the performance of a writable snap that has its source snapshot housed on a slower pool will likely be negatively impacted. Also, be aware that CloudPools is incompatible with writable snaps in OneFS 9.3 and CloudPools on a writable snapshot destination is currently not supported.
On the data immutability front, a SmartLock WORM domain cannot be created at or above a writable snapshot under OneFS 9.3. Attempts will fail with following messages:
# isi snapshot writable list

Path                  Src Path          Src Snapshot

-----------------------------------------------------

/ifs/test/rw-head     /ifs/test/head1   s159776

-----------------------------------------------------

Total: 1

# isi worm domain create -d forever /ifs/test/rw-head/worm

Are you sure? (yes/[no]): yes

Failed to enable SmartLock: Operation not supported

# isi worm domain create -d forever /ifs/test/rw-head/worm

Are you sure? (yes/[no]): yes

Failed to enable SmartLock: Operation not supported
Creating a writable snapshot inside a directory with a WORM domain is also not permitted.
# isi worm domains list

ID      Path           Type

---------------------------------

2228992 /ifs/test/worm enterprise

---------------------------------

Total: 1

# isi snapshot writable create s32106 /ifs/test/worm/wsnap

Writable Snapshot cannot be nested under WORM domain 22.0300: Operation not supported
Regarding writable snaps and data reduction and storage efficiency, the story in OneFS 9.3 is as follows. OneFS in-line compression works with writable snapshots data, but in-line deduplication is not supported, and existing files under writable snapshots will be ignored by in-line dedupe. However, inline dedupe can occur on any new files created fresh on the writable snapshot.
Post-process deduplication of writable snapshot data is not supported and the SmartDedupe job will ignore the files under writable snapshots.
Similarly, at the per-file level, attempts to clone data within a writable snapshot (cp -c) are also not permitted and will fail with the following error:
# isi snapshot writable list

Path                  Src Path          Src Snapshot

-----------------------------------------------------

/ifs/wsnap1           /ifs/test1        s32106

-----------------------------------------------------

Total: 31

# cp -c /ifs/wsnap1/file1 /ifs/wsnap1/file1.clone

cp: file1.clone: cannot clone from 1:83e1:002b::HEAD to 2:705c:0053: Invalid argument
Additionally, in a small file packing archive workload the files under a writable snapshot will be ignored by the OneFS small file storage efficiency (SFSE) process, and there is also currently no support for data inode inlining within a writable snapshot domain.
Turning attention to data availability and protection, there are also some writable snapshot caveats in OneFS 9.3 to bear in mind. Regarding SnapshotIQ:
Writable snaps cannot be created from a source snapshot of the /ifs root directory. They also cannot currently be locked or changed to read-only. However, the read-only source snapshot will be locked for the entire life cycle of a writable snapshot.
Writable snaps cannot be refreshed from a newer read-only source snapshot. However, a new writable snapshot can be created from a more current source snapshot in order to include subsequent updates to the replicated production dataset. Taking a read-only snapshot of a writable snap is also not permitted and will fail with the following error message:
# isi snapshot snapshots create /ifs/wsnap2

snapshot create failed: Operation not supported
Writable snapshots cannot be nested in the namespace under other writable snapshots, and such operations will return ENOTSUP.
Only IFS domains-based snapshots are permitted as the source of a writable snapshot. This means that any snapshots taken on a cluster prior to OneFS 8.2 cannot be used as the source for a writable snapshot.
Snapshot aliases cannot be used as the source of a writable snapshot, even if using the alias target ID instead of the alias target name. The full name of the snapshot must be specified.
# isi snapshot snapshots view snapalias1

               ID: 134340

             Name: snapalias1

             Path: /ifs/test/rwsnap2

        Has Locks: Yes

         Schedule: -

  Alias Target ID: 106976

Alias Target Name: s106976

          Created: 2021-08-16T22:18:40

          Expires: -

             Size: 90.00k

     Shadow Bytes: 0.00

        % Reserve: 0.00%

     % Filesystem: 0.00%

            State: active

# isi snapshot writable create 134340 /ifs/testwsnap1

Source SnapID(134340) is an alias: Operation not supported
The creation of SnapRevert domain is not permitted at or above a writable snapshot. Similarly, the creation of a writable snapshot inside a directory with a SnapRevert domain is not supported. Such operations will return ENOTSUP.
Finally, the SnapshotDelete job has no interaction with writable snapss and the TreeDelete job handles writable snapshot deletion instead.
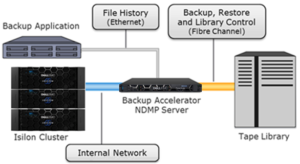
Regarding NDMP backups, since NDMP uses read-only snapshots for checkpointing it is unable to backup writable snapshot data in OneFS 9.3.
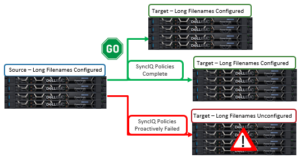
Moving on to replication, SyncIQ is unable to copy or replicate the data within a writable snapshot in OneFS 9.3. More specifically:
| Replication Condition | Description |
| Writable snapshot as SyncIQ source | Replication fails because snapshot creation on the source writable snapshot is not permitted. |
| Writable snapshot as SyncIQ target | Replication job fails as snapshot creation on the target writable snapshot is not supported. |
| Writable snapshot one or more levels below in SyncIQ source | Data under a writable snapshot will not get replicated to the target cluster. However, the rest of the source will get replicated as expected |
| Writable snapshot one or more levels below in SyncIQ target | If the state of a writable snapshot is ACTIVE, the writable snapshot root directory will not get deleted from the target, so replication will fail. |
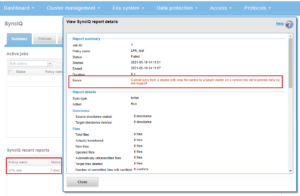
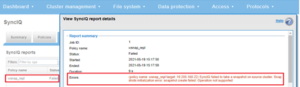
Attempts to replicate the files within a writable snapshot with fail with the following SyncIQ job error:
“SyncIQ failed to take a snapshot on source cluster. Snapshot initialization error: snapshot create failed. Operation not supported.”
Since SyncIQ does not allow its snapshots to be locked, OneFS cannot create writable snapshots based on SyncIQ-generated snapshots. This includes all read-only snapshots with a ‘SIQ-*’ naming prefix. Any attempts to use snapshots with an SIQ* prefix will fail with the following error:
# isi snapshot writable create SIQ-4b9c0e85e99e4bcfbcf2cf30a3381117-latest /ifs/rwsnap

Source SnapID(62356) is a SyncIQ related snapshot: Invalid argument
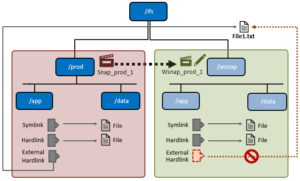
A common use case for writable snapshots is in disaster recovery testing. For DR purposes, an enterprise typically has two PowerScale clusters configured in a source/target SyncIQ replication relationship. Many organizations have a requirement to conduct periodic DR tests to verify the functionality of their processes and tools in the event of a business continuity interruption or disaster recovery event.
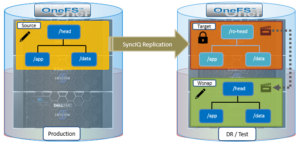
Given the writable snapshots compatibility with SyncIQ caveats described above, a writable snapshot of a production dataset replicated to a target DR cluster can be created as follows:
- On the source cluster, create a SyncIQ policy to replicate the source directory (/ifs/test/head) to the target cluster:
# isi sync policies create --name=ro-head sync --source-rootpath=/ifs/prod/head --target-host=10.224.127.5 --targetpath=/ifs/test/ro-head

# isi sync policies list

Name  Path              Action  Enabled  Target

---------------------------------------------------

ro-head /ifs/prod/head  sync    Yes      10.224.127.5

---------------------------------------------------

Total: 1
- Run the SyncIQ policy to replicate the source directory to /ifs/test/ro-head on the target cluster:
# isi sync jobs start ro-head --source-snapshot s14


# isi sync jobs list

Policy Name  ID   State   Action  Duration

-------------------------------------------

ro-head        1    running run     22s

-------------------------------------------

Total: 1


# isi sync jobs view ro-head

Policy Name: ro-head

         ID: 1

      State: running

     Action: run

   Duration: 47s

 Start Time: 2021-06-22T20:30:53


Target:
- Take a read-only snapshot of the replicated dataset on the target cluster:
# isi snapshot snapshots create /ifs/test/ro-head

# isi snapshot snapshots list

ID   Name                                        Path

-----------------------------------------------------------------

2    SIQ_HAL_ro-head_2021-07-22_20-23-initial /ifs/test/ro-head

3    SIQ_HAL_ro-head                          /ifs/test/ro-head

5    SIQ_HAL_ro-head_2021-07-22_20-25         /ifs/test/ro-head

8    SIQ-Failover-ro-head-2021-07-22_20-26-17 /ifs/test/ro-head

9    s106976                                   /ifs/test/ro-head

-----------------------------------------------------------------
- Using the (non SIQ_*) snapshot of the replicated dataset above as the source, create a writable snapshot on the target cluster at /ifs/test/head:
# isi snapshot writable create s106976 /ifs/test/head
- Confirm the writable snapshot has been created on the target cluster:
# isi snapshot writable list

Path              Src Path         Src Snapshot

----------------------------------------------------------------------

/ifs/test/head  /ifs/test/ro-head  s106976

----------------------------------------------------------------------

Total: 1


# du -sh /ifs/test/ro-head

 21M    /ifs/test/ro-head
- Export and/or share the writable snapshot data under /ifs/test/head on the target cluster using the protocol(s) of choice. Mount the export or share on the client systems and perform DR testing and verification as appropriate.
- When DR testing is complete, delete the writable snapshot on the target cluster:
# isi snapshot writable delete /ifs/test/head
Note that writable snapshots cannot be refreshed from a newer read-only source snapshot. A new writable snapshot would need to be created using the newer snapshot source in order to reflect and subsequent updates to the production dataset on the target cluster.
So there you have it: The introduction of writable snaps v1 in OneFS 9.3 delivers the much anticipated ability to create fast, simple, efficient copies of datasets by enabling a writable view of a regular snapshot, presented at a target directory, and accessible by clients across the full range of supported NAS protocols.