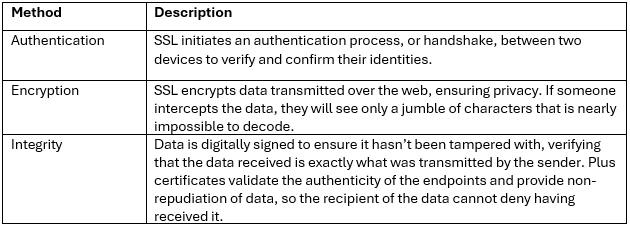
Secure Sockets Layer (SSL) protocols use cryptographic algorithms to encrypt data, reducing the potential for unauthorized individuals or bad actors to intercept or tamper with the data. This is achieved through three principle and complimentary methods:
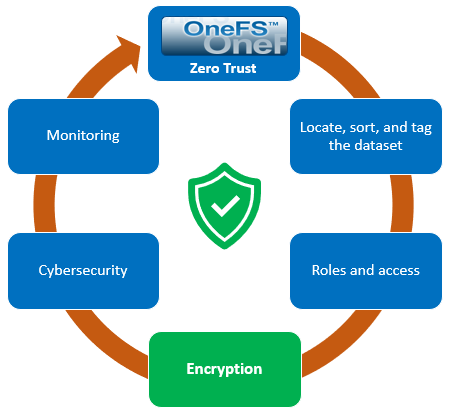
 When using either the OneFS WebUI or platform API (pAPI), all communication sessions are encrypted using SSL and the related Transport Layer Security (TLS). As such, SSL and TLS play a critical role in PowerScale’s Zero Trust architecture by enhancing security via encryption, validation, and digital signing.
In OneFS 9.10, OpenSSL has been upgraded from version 1.0.2 to version 3.0.14. This makes use of the newly validated OpenSSL 3.0.9 FIPS module, which is the latest version that has been blessed by the OpenSSL upstream project, and which is supported through September 2026.
Architecturally, SSL comprises four fundamental layers:
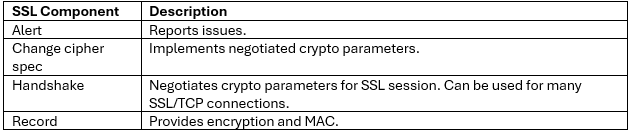
These reside within the stack as follows:
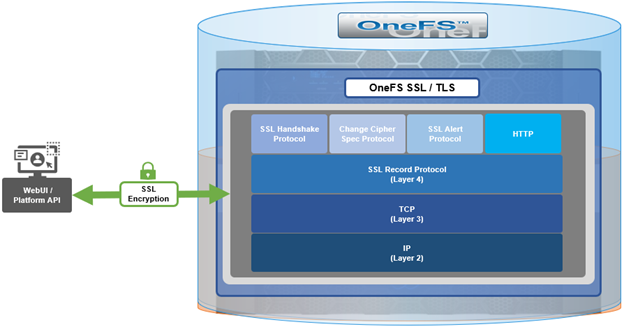
The basic handshake process begins with a client requesting an HTTPS WebUI session to the cluster. OneFS then returns the SSL certificate and public key. The client creates a session key, encrypted with the public key it’s received from OneFS. At this point, the client only knows the session key and it sends this encrypted session key to the cluster, which decrypts it using the private key. Now, both the client and OneFS know the session key so the session, encrypted via the symmetric key, can be established. OneFS automatically defaults to the best supported version of SSL, based on the client request.
As part of the OneFS 9.10 SSL upgrade, there’s a new implementation of FIPS mode that is compatible with OpenSSL 3, which all of the OneFS daemons make use of. But probably the most significant enhancement in the OpenSSL 3 upgrade is addition of library support for the TLS 1.3 ciphers, which are designed to meet the stringent Federal data-in-flight security requirements. The OpenSSL 3 upgrade also deprecates and removes some legacy algorithms as well, so those will no longer be supported and can be removed entirely from OneFS in the future. More detail is available in the OpenSSL 3 Migration Guide, which contains an exhaustive list of every changes that was made in OpenSSL 3.
In OneFS 9.10 the TLS 1.2 cipher configuration remains the same as in OneFS 9.9, except that three TLS 1.3 ciphers are added:
- TLS_AKE_WITH_AES_256_GCM_SHA384
- TLS_AKE_WITH_CHACHA20_POLY1305_SHA256
- TLS_AKE_WITH_AES_128_GCM_SHA256
Similarly, if FIPS mode is enabled, the same TLS 1.2 ciphers are available plus two TLS 1.3 ciphers are added:
- TLS_AKE_WITH_AES_256_GCM_SHA384
- TLS_AKE_WITH_AES_128_GCM_SHA256
There are no changes to the data path Apache HTTPD ciphers, so no addition of TLS 1.3 there – it still uses the same TLS 1.2 ciphers.
OneFS 9.10 also contains some changes to the SSH cryptography. So with FIPS mode disabled, the encryption algorithms, host key algorithms, or message authentication code algorithms all remain the same as in OneFS 9.9. however, support for the following four key exchange algorithms has been removed in 9.10:
- diffie-hellman-group-exchange-sha256
- diffie-hellman-group16-sha512
- diffie-hellman-group18-sha512
- diffie-hellman-group14-sha256
Similarly, with FIPS mode enabled, there are also no changes to encryption algorithms, source key, or message authentication codes. But support is removed for the following two key exchange algorithms.
- diffie-hellman-group-exchange-sha256
- diffie-hellman-group14-sha256
Note that the sha512 algorithms weren’t previously supported by FIPS mode anyway.
Moving on to TLS 1.3 phase one, OneFS 9.10 adds TLS 1.3 support for the WebUI and KMIP key management servers. Plus 9.10 also verifies that 1.3 is supported for the LDAP provider, for CELOG alert emails, for audit event and syslog forwarding, for the platform API and WebUI single sign-on, and also for SyncIQ.
Here’s a list of the capabilities:
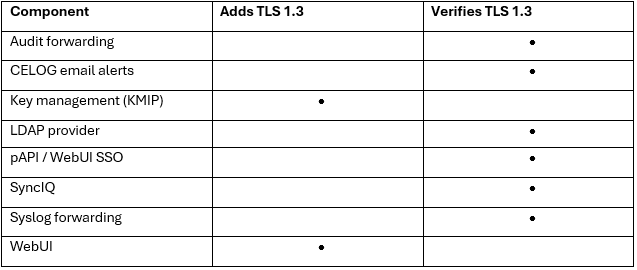
Note that the OneFS components that aren’t explicitly called out in the table above likely won’t support TLS 1.3 currently, but are candidates to be uprev’d in a future phase of OneFS TLS 1.3 enablement.
The TLS 1.3 phase 1 enhancement in OneFS 9.10 allows the above components to negotiate either a TLS 1.2 or TLS 1.3 connection. The negotiated TLS version depends on the configuration of the environment. So if client supporting both TLS 1.2 and 1.3 are present, then the cluster will automatically negotiate and use TLS 1.3 where possible, but it will fall back to 1.2 for clients that only support that level. Similarly TLS 1.3 exclusively for environments with all 1.3 clients. For the curious or paranoid, it’s worth noting that the only way to verify which version of TLS is being used is via packet inspection. So if you really need to know, grabbing and analyzing packet captures will be your friend here.
There are a couple of other idiosyncrasies with TLS 1.3 support in OneFS 9.11 that also bear mentioning.
- It’s not always possible to explicitly specify the minimum TLS protocol version currently since OneFS 9.10 does not expose these configuration options. This means that clients and servers on OneFS will decide automatically which version to use, and they should prefer 1.3.
- OneFS 9.10 does not allow customers to disable TLS 1.3 ciphers, but this should not be an issue since all the 1.3 ciphers are still considered very secure.
- OneFS also does not provide diagnostic information about which protocol version of TLS is in use. So in order to verify for certain that the cluster and/or client(s) are using a specific version of TLS, it will likely require taking and analyzing packet captures.