In OneFS, a domain defines a set of behaviors for a collection of files under a specified directory tree. More specifically, a protection domain is a marker which prevents a configured subset of files and directories from being deleted or modified.
If a directory has a protection domain applied to it, that domain will also affect all of the files and subdirectories under that top-level directory. As we’ll see, in some instances, OneFS creates protection domains automatically, but they can also be configured manually.
With the recent introduction of domain-based snapshots, OneFS now supports four types of protection domain:
- SnapRevert domains
- SmartLock domains
- SyncIQ domains
- Snapshot domains
The process of restoring a snapshot in full to its top level directory can easily be accomplished by the SnapRevert job. This enables cluster administrators to quickly revert to a previous, known-good recovery point – for example in the event of a virus or malware outbreak, The SnapRevert job can be run from the job engine WebUI or CLI, and simply requires adding the desired snapshot ID.
SnapRevert domains are assigned to directories that are contained in snapshots to prevent files and directories from being modified while a snapshot is being reverted. OneFS does not automatically create SnapRevert domains. The SnapRevert domain is described as a ‘restricted writer’ domain, in OneFS jargon. Essentially, this is a piece of extra filesystem metadata and associated locking that prevents a domain’s files being written to while restoring a last known good snapshot.
Because the SnapRevert domain is essentially just a metadata attribute, or marker, placed onto a file or directory, a preferred practice is to create the domain before there is data. This avoids having to wait for DomainMark or DomainTag (the aptly named Job Engine jobs that mark a domain’s files) to walk the entire tree, setting that attribute on every file and directory within it.
There are two main components to SnapRevert:
- The file system domain that the objects are put into.
- The job that reverts everything back to what’s in a snapshot.
The SnapRevert job itself actually uses a local SyncIQ policy to copy data out of the snapshot, discarding any changes to the original directory. When the SnapRevert job completes, the original data is left in the directory tree. In other words, after the job completes, the file system (HEAD) is exactly as it was at the point in time that the snapshot was taken. The LINs for the files/directories don’t change, because what’s there is not a copy.
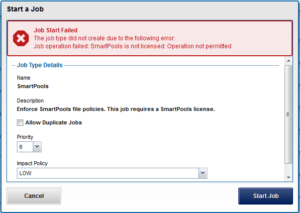
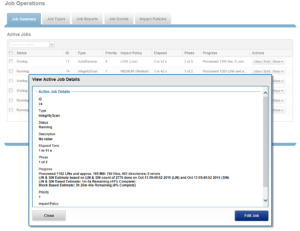
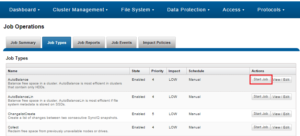
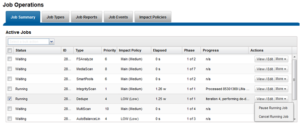
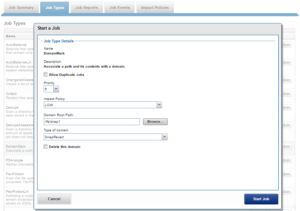
The SnapRevert job can either be scheduled or manually run from the OneFS WebUI by navigating to Cluster Management > Job Operations > Job Types > SnapRevert and clicking the ‘Start Job’ button.
A snapshot can’t be reverted until a SnapRevert domain has been created on its top level directory. If necessary, SnapRevert domains can also be nested. For example, domains could be successfully created on both /ifs/snap1 and /ifs/snap1/snap2. Also. A SnapRevert domain can easily be deleted if you no longer need to restore snapshots of that directory.
It’s worth noting that CloudPools also supports SnapRevert for SmartLink (stub) files. For example, if CloudPools archived “/ifs/cold_data”, the files in this directory would be replaced with stubs and the data moved off to the cloud provider of choice. If you then created a domain for the directory and ran the SnapRevert job, the original files would be restored to the directory, and CloudPools would remove any cloud data that was created as part of the original archive process.
SmartLock domains are assigned to WORM (write once, read many) immutable archive directories to prevent committed files from being modified or deleted. OneFS automatically sets up a SmartLock domain when a SmartLock directory is created. Note that a SmartLock domain cannot be manually deleted. However, if you remove a SmartLock directory, OneFS automatically deletes the associated SmartLock domain.
Once a file is SmartLocked (WORM committed) it cannot ever be modified or moved. It cannot be deleted until its ‘committed until’ or ‘expiry’ date has passed. Even when the expiry date has passed (ie. the file is in an ‘expired’ state) it cannot be modified or moved. All you can do with an expired file is either delete it or extend its ‘committed until’ date into the future.
SyncIQ domains can be assigned to both the source and target directories of replication policies. OneFS automatically creates a SyncIQ domain for the target directory of a replication policy the first time that the policy is run. OneFS also automatically creates a SyncIQ domain for the source directory of a replication policy during the failback process.
A SyncIQ domain can be manually created for a source directory before initiating the failback process, by configuring the policy for accelerated failback. However, a SyncIQ domain that marks the target directory of a replication policy cannot be deleted.
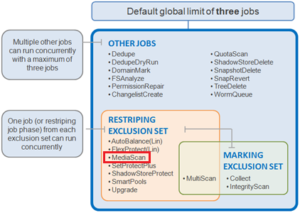
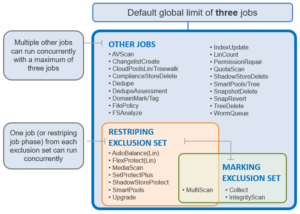
SnapshotIQ also uses a domain-based model for governance of scheduled snapshots in OneFS 8.2 and later releases. By utilizing the OneFS IFS domains infrastructure, recurring snapshot efficiency and performance is increased by limiting the scope of governance to a smaller, well defined domain boundary.
IFS Domains provide a Mark Job that proactively marks all the files in the domain. Creating a new snapshot on a fully marked domain will not cause further “painting” operations, thereby avoiding a significant portion of the resource overhead caused by taking a new snapshot.
Once a domain has been fully marked, subsequent snapshot creation operations will not cause any further painting. The new snapshot ID is simply added to the domain data section, so the creation of a new snapshot will not trigger a system-wide painting event anymore. Domains are re-used whenever possible.
Creating two domains of the same type on the same directory will cause the second domain to become an alias of the first domain. Aliases don’t require marking since they share the already existing marks. This benefits both snapshots and snapshot schedules taken on the same directory. For all these reasons, the number of I/O and locking operations needed to resolve snapshot governance is greatly reduced. Because the SnapIDs are stored in a single location (as opposed to being stored on individual inodes), this greatly simplifies Snapshot ID garbage collection whenever a Snapshot is deleted. By leveraging IFS Domains, creating a new snapshot on a domain that is fully marked will not cause further “painting” operations, so a significant portion of the performance impact caused by taking a new snapshot is avoided.
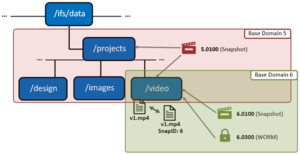
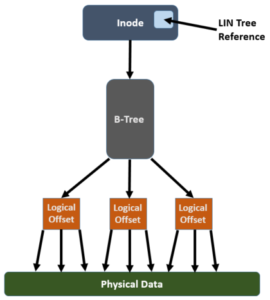
The illustration above shows an example of domain-based snapshots. In this case, a snapshot was taken on the ‘projects’ directory, and the on the directory named ‘video’. File v1.mp4 is tagged with the domain IDs, making it more efficient to determine snapshot governance.
A snapshot of file v1.mp4 creates a snap_ID in the domain’s SBT (system b-tree) providing a single place to store snapshot metadata. In previous OneFS versions, snapIDs were stored in the inode, which resulted in duplication of the snap_IDs and metadata usage.
Note that only snapshots taken after upgrade to OneFS 8.2 will use IFS domains backing. Any snapshots created prior to upgrade will not be converted and will remain in their original form.
Additionally, the new domain-based snapshot functionality in OneFS 8.2 brings other benefits including:
- Improved management of SnapIDs
- Reduced number of operations needed to resolve snapshot governance.
- More efficient use of metadata
- The automatic exclusion of the cluster’s /ifs/.ifsvar subtree from all root (/ifs) snapshots – although this behavior is configurable.
- The write cache, or coalescer, is enhanced to better support parallel snapshot creates.
- The snapshot create path is improved to reduce contention on the STF during copy-on-write.
Sync and snap domains can be easily created to enable snapshot revert and replication failover operations. However, SmartLock domains cannot be manually created, however, since OneFS automatically creates a domain upon creation of a SmartLock directory.
For example, the following CLI syntax will create a SnapRevert domain for /ifs/snap1:
# isi job jobs start domainmark --root /ifs/snap1 --dm-type SnapRevert
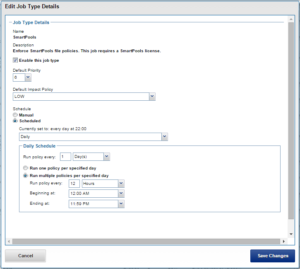
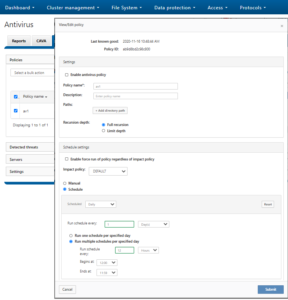
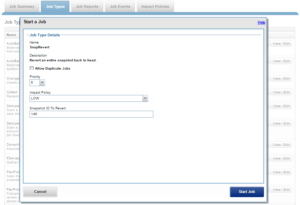
And from the WebUI:
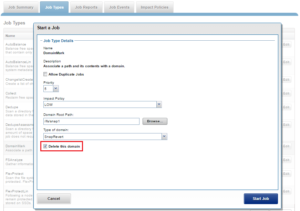
You can delete a replication or snapshot revert domain if you want to move directories out of the domain. However, SmartLock domains cannot be manually removed, but will be automatically removed upon deletion of a SmartLock directory.
The following CLI command will delete a SnapRevert domain on /ifs/snap1:
# isi job jobs start domainmark --root /ifs/snap1 --dm-type SnapRevert –delete
Similarly, via the WebUI:
Protection domains can (and usually should) be manually created before they are required by OneFS to perform certain actions. However, manually creating protection domains can limit the ability to interact with the data marked by the domain.
OneFS 8.2 and later releases provide an ‘isi_pdm’ CLI utility for managing protection domains, with the following syntax:
#isi_pdm -h

usage: isi_pdm [-h] [-v]

               {base,domains,exclusions,operations,ifsvar-sysdom} ...


positional arguments:

  {base,domains,exclusions,operations,ifsvar-sysdom}

    base                Read base domains.

    domains             Read or manipulate domain instances.

    exclusions          Add or list domain exclusions.

    operations          Read pending pdm operations.

    ifsvar-sysdom       Manage .ifsvar system domain.


optional arguments:

  -h, --help            show this help message and exit

  -v, --verbose
For example:
# isi_pdm domains list /ifs/data All

[ 2.0100, 315.0100 ]

# isi_pdm exclusions list 2.0100

{

    DomID = 16.8100

    Owner LIN = 1:0000:0001

}
Domain membership can also be viewed via the ‘isi get’ command.
Here are some OneFS domain recommendations, constraints, and considerations:
- Copying a large number of files into a protection domain can be a lengthy process, since each file must be marked individually as belonging to the protection domain.
- The best practice is to create protection domains for directories while the directories are empty, and then add files to the directory.
- Theisi sync policies create command contains an ‘—accelerated-failback true’ option, which automatically marks the domain. This can save considerable time during failback.
- If you use SyncIQ to create a replication policy for a SmartLock compliance directory, the SyncIQ and SmartLock compliance domains must be configured at the same root directory level. A SmartLock compliance domain cannot be nested inside a SyncIQ domain.
- If a domain is currently preventing the modification or deletion of a file, you cannot create a protection domain for a directory that contains that file. For example, if /ifs/data/smartlock/file.txt is set to a WORM state by a SmartLock domain, you cannot create a SnapRevert domain for /ifs/data/.
- Directories cannot be moved in or out of protection domains. However, you can move a directory to another location within the same protection domain.