In this next installment of the Job Engine series, we take a look at the configuration, control and management of jobs.
Although OneFS runs several critical system maintenance jobs automatically when necessary, the majority of the Job Engine’s jobs have no default schedule and can be manually started by a cluster administrator. For example, the Collect job, which reclaims free space that previously could not be freed because the node or drive was unavailable. The following CLI command syntax can be used to run the Collect job with a ‘medium’ impact policy and a higher priority.
# isi job jobs start Collect --policy MEDIUM --priority 2

Started job [9]
When the job starts, a message such as appears. In the output here, [9] represents the job ID number, which can be used as the argument to run other commands on the job.
For example, the following CLI command will cancel this collect job with ID 9:
# isi job jobs cancel 9
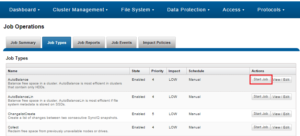
Similarly, to start a job from the OneFS WebUI, navigate to Cluster Management > Job Operations > Job Type and click on the ‘start’ button for the desired job. For example, to manually run AutoBalance:
Other jobs such as ComplianceStoreDelete, FilePolicy, FSAnalyze, MediaScan, ShadowStoreDelete, SmartPools, and WormQueue are normally started via a schedule. The default job execution schedule is shown in the table below.
| Job Name | Default Job Schedule |
| AutoBalance | Manual |
| AutoBalanceLIN | Manual |
| AVScan | Manual |
| ChangelistCreate | Manual |
| CloudPoolsLin/Treewalk | Manual |
| Collect | Manual |
| ComplianceStoreDelete | The 2nd Saturday of every month at 12am |
| Dedupe | Manual |
| DedupeAssessment | Manual |
| DomainMark/Tag | Manual |
| FilePolicy | Every day at 22:00 |
| FlexProtect | Manual |
| FlexProtectLIN | Manual |
| FSAnalyze | Every day at 22:00 |
| IndexUpdate | Manual |
| IntegrityScan | Manual |
| LinCount | Manual |
| MediaScan | The 1st Saturday of every month at 12am |
| MultiScan | Manual |
| PermissionRepair | Manual |
| QuotaScan | Manual |
| SetProtectPlus | Manual |
| ShadowStoreDelete | Every Sunday at 12:00am |
| SmartPools | Every day at 22:00 |
| SmartPoolsTree | Manual |
| SnapRevert | Manual |
| SnapshotDelete | Manual |
| TreeDelete | Manual |
| WormQueue | Every day at 02:00 |
The full list of jobs and schedules can be viewed via the CLI using the following syntax:
# isi job types list --verbose
This information can also be displayed via the WebUI, by navigating to Cluster Management > Job Operations > Job Types.
System maintenance jobs can be customized for a particular environment and/or workflow by configuring a schedule and modifying the default priority level or impact level for a particular job type. For example, the following CLI syntax can be used to set a schedule for the MediaScan job to run every Saturday morning at 9 AM. Note that the –force option overrides the confirmation step.
# isi job types modify mediascan --schedule 'every Saturday at 09:00' --force
Similarly, the following command removes the schedule for the job:
# isi job types modify mediascan --clear-schedule --force
As such, all subsequent iterations of the MediaScan job type will run with the new settings. However, if a MediaScan job is in progress, it will continue to use the old settings.
Finally, the following syntax modifies the default priority level and impact level for the MediaScan job type:
# isi job types modify mediascan --priority 2 --policy medium
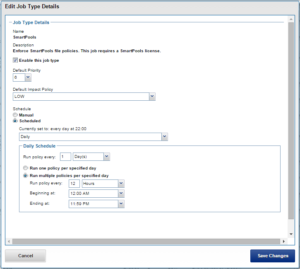
To create or edit a job’s schedule from the WebUI, click on the “View / Edit” button for the desired job, located in the “Actions” column of the “Job Types” WebUI tab above. From here, check the “Scheduled” radio button, and select between a Daily, Weekly, Monthly, or Yearly schedule, as appropriate. For each of these time period options, it’s possible to schedule the job to run either once or multiple times on each specified day.
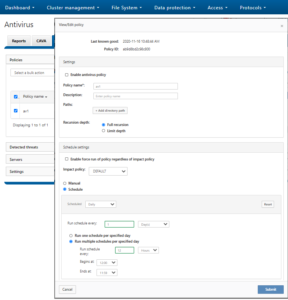
The Job Engine schedule for certain feature supporting jobs can be configured directly from the feature’s WebUI area, as well as from the Job Engine WebUI management pages. An example of this is Antivirus and the AVScan job.
The OneFS Job Engine can also initiate certain jobs on its own. For example, if the SnapshotIQ process detects that a snapshot has been marked for deletion, it will automatically queue a SnapshotDelete job.
The Job Engine will also execute jobs in response to certain system event triggers. In the case of a cluster group change, for example the addition or subtraction of a node or drive, OneFS automatically informs the job engine, which responds by starting a FlexProtect job. The coordinator notices that the group change includes a newly-smart-failed device and then initiates a FlexProtect job in response.
Job administration and execution can be controlled via the WebUI, the command line interface (CLI), or the OneFS RESTful platform API. For each of these control methods, additional administrative security can be configured using roles-based access control (RBAC). By restricting access via the ISI_PRIV_JOB_ENGINE privilege, it is possible to allow only a sub-set of cluster administrators to configure, manage and execute job engine functionality, as desirable for the security requirements of a particular environment.
When a job is started by any of the methods described above, in addition to starting and stopping, the job can also be paused.
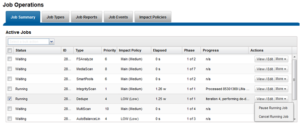
Once paused, the job can also easily be resumed, and execution will continue from where the job left off when it became paused. This is managed by utilizing the Job Engines’ check-pointing system, described below.
Alternatively, this can also be performed from the CLI:
# isi job jobs pause 28

# isi job jobs resume 28
For example, the above syntax will pause and resume the job with ID 28.