OneFS Secure Snapshots and SnapshotIQ Locks

In today’s landscape of heightened cyber threats and data breaches, the demand for immutable, tamper-resistant snapshots is growing rapidly. Often this need arises as part of a broader security mandate, ideally proactively, but oftentimes as a response to a security incident. OneFS addresses this requirement in the following ways:

On-cluster Off-cluster
·       Read-only snapshots

·       Snapshot locks

·       Role-based administration

·       Secure snapshots with multi-party authorization

·       SyncIQ snapshot replication

·       SmartSync snapshot replication

·       Cyber-vaulting


As we have seen over the course of this series of articles, the primary objective of Secure Snapshots, introduced in OneFS 9.12, is to ensure snapshot immutability, safeguarding them from accidental changes or deliberate tampering. Beyond protecting the snapshots themselves, Secure Snapshots also secures the associated snapshot schedules. Since these schedules govern the creation of future snapshots, any unauthorized modifications could lead to unintended outcomes—such as excessive snapshot generation that strains the cluster, or a complete halt in snapshot creation.

Secure Snapshots are built on the OneFS multi-party authorization (MPA) framework, which requires additional approvals before any changes can be made to snapshot configurations or schedules, effectively preventing unauthorized actions.

The Secure Snapshots functionality is in addition and complementary to traditional SnapshotIQ locking, which operates under the purview or the ‘isi snapshot locks’ CLI command set. As such, Secure Snapshots do not affect the addition, removal, or general operation of the regular SnapshotIQ snapshot locks.

Feature Availability Authorization Description
Secure snapshots OneFS 9.12 and later Multiple approvers One or more additional approvers must authorize snapshot privileged action.
SnapshotIQ locks OneFS 7.0 and later Single approver A single administrator can configure and manage snapshot locks.

While SnapshotIQ locks help prevent snapshots from being accidentally or unintentionally deleted, unlike Secure Snapshots, they do not offer the additional anti-tamper protection of Multi-party Authorization (MPA).

SnapshotIQ locks function as follows. For example, a manual snapshot, ‘snaploc1’ is taken of /ifs/test:

# isi snapshot snapshots create /ifs/test --name snaploc1

# isi snapshot snapshots list | grep snaploc1
79188 snaploc1                                     /ifs/test

A lock is then placed on it (in this case lock ID=1):

# isi snapshot locks create snaploc1

# isi snapshot locks list snaploc1
ID
----
1
----
Total: 1

Or from the WebUI:

Attempts to delete the snapshot fails because the lock prevents its removal:

# isi snapshot snapshots delete snaploc1

Are you sure? (yes/[no]): yes

Snapshot "snaploc1" can't be deleted because it is locked

The CLI command ‘isi snapshot locks delete <lock_ID>’ can be used to clear existing snapshot locks, if desired. For example,  to remove the only lock (ID=1) from snapshot ‘snaploc1’:

# isi snapshot locks list snaploc1
ID
----
1
----
Total: 1

# isi snapshot locks delete snaploc1 1
Are you sure you want to delete snapshot lock 1 from snaploc1? (yes/[no]): yes

# isi snap locks view snaploc1 1
No such lock

Or from the WebUI:

Once the lock is removed, the snapshot can then be deleted:

# isi snapshot snapshots delete snaploc1
Are you sure? (yes/[no]): yes

# isi snapshot snapshots list| grep -i snaploc1 | wc -l
       0

A snapshot can have up to a maximum of sixteen SnapshotIQ locks on it at any time. Also, lock numbers are continually incremented and not recycled upon deletion.

Similar to snapshot expiry configuration, snapshot locks can also have an expiry time configured too. For example, to set a lock on snapshot ‘snaploc1’ that expires at 12pm on April 1st, 2026:

# isi snap lock create snaploc1 --expires '2026-04-01T12:00:00'

# isi snap lock list snaploc1
ID
----
36
----
Total: 1

# isi snap lock view snaploc1 33
     ID: 36
Comment:
Expires: 2026-04-01T12:00:00
  Count: 1

Or from the WebUI:

Note that if the duration period of a particular snapshot lock expires but others remain, OneFS will not delete that snapshot until all the locks on it have been removed or expired.

Secure Snapshots Configuration and Management

As discussed in the previous article in this series, OneFS Secure Snapshots are designed to ensure the immutability of snapshots and safeguard them against accidental or malicious modification or deletion. Beyond protecting the snapshots themselves, the multi-party authorization requirement also secures the associated snapshot schedules. These schedules are critical for generating future snapshots, and any tampering – such as altering the frequency or disabling them entirely – could result in unintended consequences, including excessive snapshot creation that strains cluster resources or a complete halt in snapshot generation.

Once the cluster is committed to OneFS 9.12, snapshots are licensed, and two or more approval admins have been configured, MPA can be enabled. This preparatory work is covered in-depth in this MPA configuration article. MPA can be enabled from the WebUI under Access > Multi-Party Authorization > Settings:

Or via the CLI with the following command syntax:

# isi mpa settings global modify --enable true

The general flow of Secure Snapshot privileged command execution is as follows:

Once MPA is activated, any Secure Snapshot deletion, and other privileged action, requests are blocked pending approval.

As such, an attempt to delete a secure snapshot generates a warning, and the action is suspended until approved by an authorized user. For example:

Or from the CLI:

# isi snapshot list

ID   Name                                          Path

-----------------------------------------------------------------------------

40    Snapshot:2025July21.2:44PM                        /ifs/data

42    SIQ-8b30297763c5db7307e2d84504839c25-new      /ifs/data/zone1

# isi snapshot delete 40

Are you sure? (yes/[no]): yes

Delete Snapshot is a privileged action . A request paareqa99439a172d09999 to perform this action is pending approval. Check Multi-Party Authorization to view the status of the request.

Details of the requested snapshot privileged action can be viewed as follows:

Similarly, from the CLI:

# isi mpa requests view --id= paareqa99439a172d09999

ID: paareqa99439a172d09999

Action: delete_snapshot

Action Payload: -

Created By: MPA

Last Update Time: 2025-07-21T14:44:56

Resource IDs: 40

Resource Type: snapshot

Service: snapshot

Status: pending

Request For: 0

Assuming they sanction the privileged action, the authorizer(s) grant approval for the snapshot deletion, or other privileged action.

This is achieved by clicking the ‘Approve’ button for the pending request, under Access > Multi-Party Authorization > Requests:

The authorizer is then prompted for their TOTP security authorization code as part of the approval process:

Or via the CLI:

# isi mpa requests list

# isi mpa requests approve <id> <comment> <approved> --totp-code <******> --approval-valid-before <timestamp> --zone <zone>

Once approval has been granted, the privileged snapshot operation can complete as expected.

The WebUI reports a successful approval status as follows:

Or from the CLI:

# isi mpa requests approve --approved=true –id= paareqa99439a172d09999–comment=approved

totp_code: xxxxxx

Request paareqa99439a172d09999has been approved successfully.

# isi snapshot delete 40

Are you sure? (yes/[no]): yes

# isi snapshot list

ID   Name                                          Path

-----------------------------------------------------------------------------

42    SIQ-8b30297763c5db7307e2d84504839c25-new      /ifs/data/zone1

It’s worth noting that snapshot schedules will only generate secure snapshots if they are configured to create snaps with expiration dates. For example:

It’s also important to note that the new Secure Snapshots feature in OneFS 9.12 is designed to complement, rather than replace, the existing SnapshotIQ locking mechanism, which is managed via the ‘isi snapshot locks’ CLI command set.

Feature Availability Authorization Description
Secure snapshots OneFS 9.12 and later Multiple approvers One or more additional approvers must authorize snapshot privileged action.
SnapshotIQ locks OneFS 7.0 and later Single approver A single administrator can configure and manage snapshot locks.

Secure Snapshots operate independently and do not interfere with the creation, removal, or behavior of traditional SnapshotIQ locks. This topic will be covered in more depth in the next article in this series.

OneFS Secure Snapshots

OneFS 9.12 sees the addition of a new Secure Snapshots feature. The core ethos of this new functionality is to provide snapshot immutability, in order to protect them from being altered or deleted – either by accident or by a malicious actor. In addition to the snapshots themselves, Secure Snapshots functionality also includes protection of the snapshot schedules. Since these schedules are responsible for creating future snapshots, tampering with them could also lead to unforeseen and undesirable consequences, such as schedule modification which overwhelms the cluster with snapshots, or ceases to generate snapshots all together.

Secure snapshots are predicated upon OneFS multi-party authorization (MPA), which prevents a user from executing configuration changes on snapshots and snapshot schedules without additional approval.

Secure Snapshots in conjunction with MPA protect a subset of snapshot operations, or ‘privileged actions’. These include:

  • Deleting a snapshot prior to its expiry date
  • Shortening the expiry date of a snapshot
  • Renaming a snapshot using reserved name
  • Modifying a snapshot schedule

These following highlighted snapshot operations are privileged and require secondary approval when MPA is enabled:

Snapshot Operation MPA Required?
Deletion of a snapshot without an expiry date No
Deletion of a snapshot with an expiry date once that expiry date has passed No
Deletion of a snapshot that has an expiry date before that expiry date has passed Yes
Modifying a snapshot schedule Yes
Adding an expiry date to a snapshot No
Extending the expiry date of a snapshot No
Reducing the expiry date of a snapshot Yes
Renaming a snapshot using reserved name used Yes
Adding a lock to a snapshot No
Removing a lock from a snapshot No

With Secure Snapshots, you cannot delete or modify snapshots with expiration dates or modify a snapshot schedule without these actions going through MPA first. So when you make these requests, the information about the request is also sent to MPA so that approver can see what changes you’re trying to make so they know exactly what they are actually approving or not.

OneFS 9.12 also checks whether user-generated snapshots have overlapping names with snapshots that could be potentially created by demons on the cluster. So the basic workflow is that users will make a request to delete a snapshot or edit a snapshot and then will have to go through MPA and make the exact same request again. If the approver grants the request, the snapshot deletion will proceed. If the approver rejects or does not respond to the request, if they have approved the request, no action occurs. They’ve made the same request a second time, and if they haven’t responded or if they haven’t, if they’ve rejected the request, it just will not make the request or issue a new request.

There are three principal prerequisites for deploying Secure Snapshots, which are as follows:

  1. Secure Snapshots can only be enabled once the cluster has been committed to OneFS 9.12 or later.
  2. SnapshotIQ needs to be licensed and the ISI_PRIV_SNAPSHOT privilege is required.
  3. MPA must already be active on the cluster and configured for two or more approvers.

The MPA enablement and approver registration workflow is as follows:

1. First, Create users and grant approval privilege.

Approver registration be configured from the CLI with the following set of commands.

First, configure two approver users – in this case ‘mpa-approver1’ and ‘mpa-approver2’:

# isi auth users create mpa-approver1 --enabled true --password <passwd>

# isi auth users create mpa-approver2 --enabled true --password <passwd>

Next, create a group for these users. Eg. ‘mpa-group’:

# isi auth group create mpa-group

Add the approver users to their new group:

# isi auth group modify mpa-group --add-user mpa-approver1

# isi auth group modify mpa-group --add-user mpa-approver2

Then add the new group (mpa-group) to the RBAC ApprovalAdmin role:

# isi –debug auth roles modify ApprovalAdmin --add-group mpa-group

If needed, configure approvers’ SSH login to the cluster.

# isi auth roles create ssh-role

# isi auth roles modify ssh-role --add-group mpa-group --add-priv-read ISI_PRIV_LOGIN_SSH

Next, add the approver users to MPA and complete their registration. This involves initiating registration, using the secret or embedded URL in conjunction with a third party code generator to create a time-based one-time password or TOTP.

Here, the ‘mpa-approver1’ user is registered first:

# isi mpa initiate-registration

Initiated registration successfully: (Online utility can be used to   convert URL to QR code for use with authenticator)

account:  Dell Technologies

algorithm:  SHA1

digits:  6

issuer:  mpa-approver1

period:  30

secret:  5KHIHISJZPB7UTPRNEBLSIMI5L4R6K6UI

url:  otpath://totp/Dell%Technologies:mpa-approver1?secret=5KHIHISJZPB7UTPRNEBLSIMI5L4R6K6UI&issuer=Dell%20Technologies&algorithm=SHA1&digits=6&period=30

The user secret or URL returned can be used to set up a TOTP in Google Authenticator, or another similar application.

This secure one-time registration can be performed as follows:

a. First, initiate the OneFS registration process to obtain a URI, which can then be generated into a QR code by a 3rd party app. For example:

b. Next, convert the QR code (or URI) into a time-based one-time password code via Google Authenticator, Microsoft Authenticator, or another TOTP app:

c. Finally, complete the OneFS approver registration wizard:

This can be performed from the CLI as follows:

# isi mpa complete-registration

totp_code:  ******

Approver registered.

Or from the WebUI, under WebUI under Access > Multi-Party Authorization > Registration:

This process should then be repeated for the second (ie. ‘mpa-approver2’) role.

  1. Once the approvers are registered, MPA can now be enabled via its global settings.

This can be performed from the WebUI under Access > Multi-Party Authorization > Settings:

Note that MPA cannot be enabled on clusters without having at least two registered approvers.

When successfully enabled, the following status banner will be displayed:

Alternatively, enabling via the CLI can be done with the following command syntax:

# isi mpa settings global modify –enable true

# isi mpa settings global view

Multi Party Authorization is enabled

Once MPA is enabled on a cluster, any requests to delete Secure Snapshots or modify their schedules, etc, are paused pending approval. For example:

Or from the CLI:

# isi snapshot list

ID   Name                                          Path

-----------------------------------------------------------------------------

40    Snapshot:2025July21.2:44PM                        /ifs

42    SIQ-8b30297763c5db7307e2d84504839c25-new      /ifs/data/zone1

# isi snapshot delete 40

Are you sure? (yes/[no]): yes

Delete Snapshot is a privileged action . A request paareq43d57a6172a16de8 to perform this action is pending approval. Check Multi-Party Authorization to view the status of the request.

In the next article in this series, we’ll turn our attention to the configuration and management of Secure Snapshots.

Multi-party Authorization Management and Troubleshooting

OneFS Multi-party Authorization, or MPA, is an administrative approval mechanism that requires at least one additional trusted party to sign off on a requested change, for certain privileged actions within a PowerScale cluster. As such, MPA helps to reduce the likelihood of data loss or system configuration damage from critical actions, by mitigating the risk of accidental or malicious execution of consequential operations.

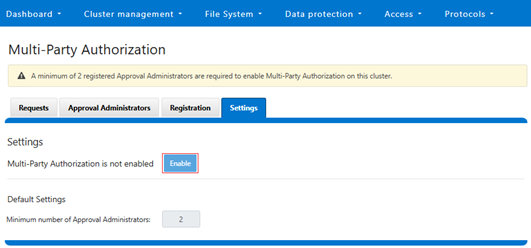
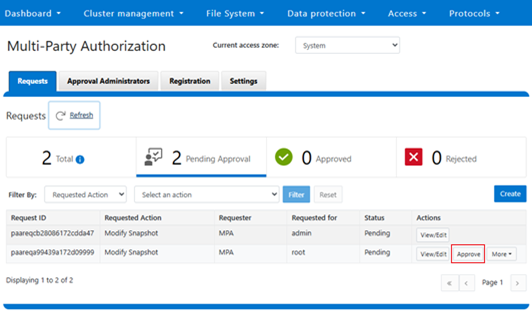
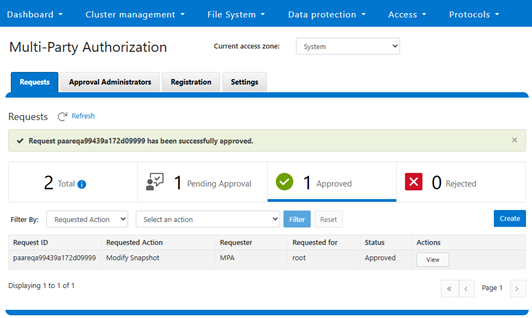
MPA can be managed via the OneFS WebUI, CLI, or platform API, and the WebUI portal can be found by navigating to Access > Multi-Party Authorization:

Similarly, the CLI uses ‘isi mpa’ command-set, with the following high-level options:

# isi mpa -h

Description:
    Manage Multi-Party Authorization.

Usage:
    isi mpa {<action> | <subcommand>}
        [--timeout <integer>]
        [{--help | -h}]

Actions:
    complete-registration    Complete Multi-Party Authorization registration.
    initiate-registration    Initiate Multi-Party Authorization registration.

Subcommands:
    approvers                Manage Multi-Party Authorization approvers.
    ca-certificates          Manage CA-Certificates for Multi-Party
                             Authorization.
    requests                 Manage Multi-Party Authorization requests.
    settings                 Manage Multi-Party Authorization settings.

Options:

  Display Options:
    --timeout <integer>
        Number of seconds for a command timeout (specified as 'isi --timeout NNN <command>').
    --help | -h
        Display help for this command.

See 'isi mpa <subcommand> --help' for more information on a specific subcommand.

Within the platform API (pAPI), the MPA endpoints all reside under http://<cluster_IP>:8080/platform/23/mpa/. Their hierarchy and syntax is as follows:

/23/mpa/approval/<ID>
/23/mpa/approvers
/23/mpa/approvers/<ID>
/23/mpa/complete-registration
/23/mpa/initiate-registration
/23/mpa/requests
/23/mpa/requests/<ID>
/23/mpa/settings/config/request-lifecycle
/23/mpa/settings/global
/23/mpa/settings/privilege-action/metadata
/23/mpa/signed-approval/<ID>
/23/mpa/trust-anchors

An MPA pAPI endpoint can be queried as follows:

https://<cluster_IP>:8080/platform/23/mpa/settings/global
{
"last_update_time" : -1,
"mpa_enabled" : true
}

Invalid MPA calls will return a fairly descriptive error message and code. For example, the following ‘AEC_BAD_REQUEST’ error and 400 code resulting from a request query of a nonexistent service and action:

# curl -u root:a -k 'https://<cluster_IP>:8080/platform/mpa/requests' --data '{"service":"TestService", "action":"TestAction"}'
{
"errors" :
[
{
"code" : "AEC_BAD_REQUEST",
"message" : "Invalid privileged action TestAction for service TestService"
}
]
}
Additionally, the API of choice can be ‘described’ as follows:
https://<cluster_IP>:8080/platform/23/mpa/approvers?describe
Resource URL: /platform/23/mpa/approvers

    Overview: List MPA approvers
     Methods: GET
********************************************************************************
Method GET: List MPA approvers
URL: GET /platform/23/mpa/approvers

Query arguments:
registration_status=<enum> Where <enum> is one of Registration_Initiated, Pending_Approval, Registered, Registration_Denied.

Registration status of a MPA approver.

GET response body schema:
{
  "type": [
    {
      "type": "object",
      "description": "A list of errors that may be returned.",
--<snip>--

When upgrading a cluster from an earlier release, the MPA framework’s privileged actions and approval system (PAAS) becomes available after committing the upgrade to OneFS 9.12. As part of the upgrade process, a pre-check is performed to ensure that no existing role named ‘ApprovalAdmin’ (case-insensitive) is present. If such a role exists, administrators will be prompted to rename it to avoid conflicts with the newly introduced system role. This is necessary because privileges associated with the new ApprovalAdmin role will not be applied to pre-existing roles of the same name.

Upon upgrading to OneFS 9.12, the feature upgrade flag (ERA2_MPA) is automatically set to ‘true’ when the upgrade is committed, thereby providing, but not enabling, MPA functionality. Additionally, all MPA-related APIs become accessible only after the upgrade is finalized.

It is important to note that MPA is not supported in Compliance Mode. If attempting to enable MPA on a compliance cluster, the following warning message is displayed:

# isi mpa settings global modify --enable=true

Cannot enable Multi-Party Authorization mode on clusters with compliance mode already enabled

Prior to initiating an upgrade to OneFS version 9.12, the system performs a validation check to ensure that no existing role named ApprovalAdmin—regardless of case sensitivity—is present. The Multi-Party Authorization (MPA) feature becomes available only after the upgrade has been successfully committed. MPA does not require any special licensing; however, for enhanced security, it is recommended to enable MPA in conjunction with Root Lockdown Mode (RLM), which is also introduced in OneFS 9.12. Activation of RLM requires that the compadmin user is enabled and that both the Hardening and SmartLock licenses are valid and active across the cluster.

Note that the ability to disable MPA is not supported in OneFS 9.12, so consider this before activating the MPA feature.

When troubleshooting MPA-related issues, particularly those involving Time-Based One-Time Passwords (TOTP), several factors should be considered. For example:

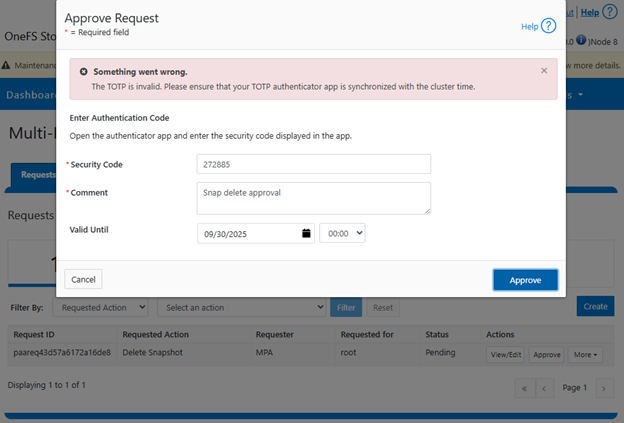
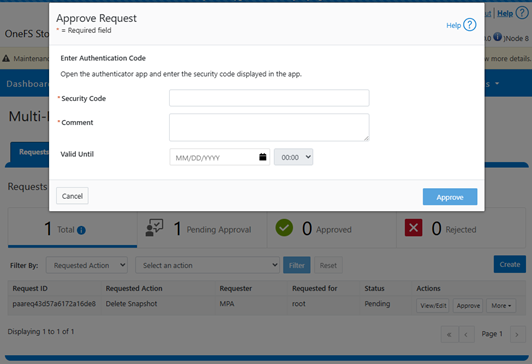
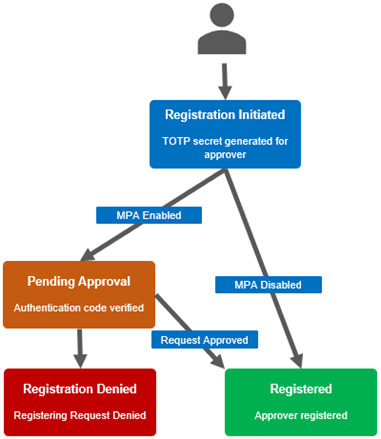
If a ‘TOTP is invalid’ error occurs during the approver registration process, verify that the TOTP code is being generated from the correct account in the third-party application. Time synchronization between the client and the cluster is critical, and any time skew can result in token validation failures. If an approver loses their TOTP token or secret key, they must reinitiate registration. When MPA is enabled, this re-registration becomes a privileged action and requires approval.

In a rare scenario where all the MPA approvers have lost access to their TOTP credentials and no one is available to approve privileged actions, OneFS does provide a last resort ‘break-glass’ mechanism to handle such cases. Where appropriate, Dell can issue a specific patch that allows the approval of a registration request for a new ApprovalAdmin. This patch must be executed by the root user and will internally run the ‘isi mpa request approve’ CLI command for the specific request ID. This bypasses the TOTP check and is limited to the ‘register_approval_admin’ action. If such a scenario is encountered, please contact Dell Support immediately.

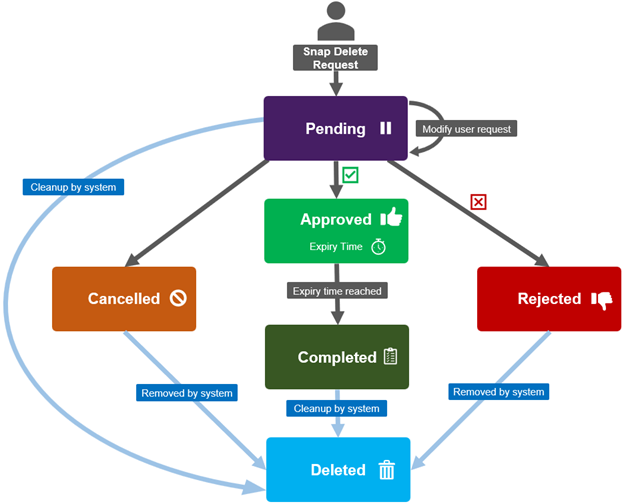
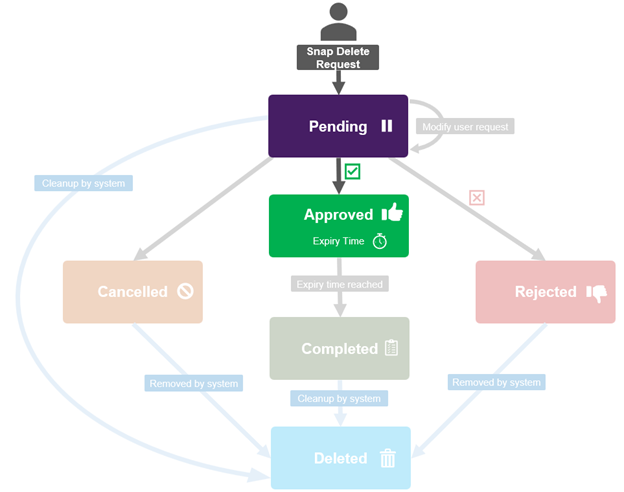
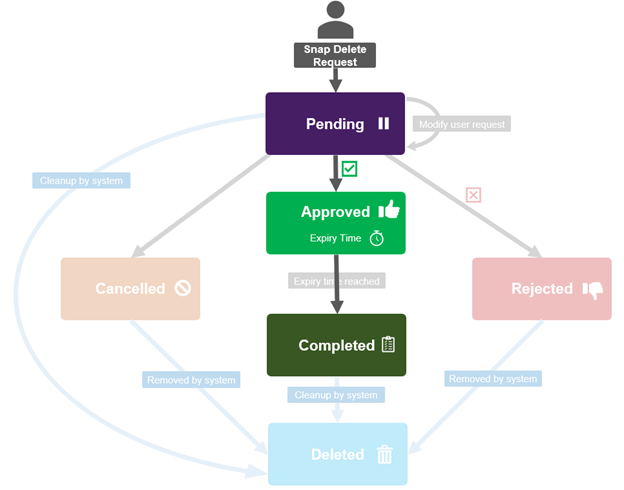
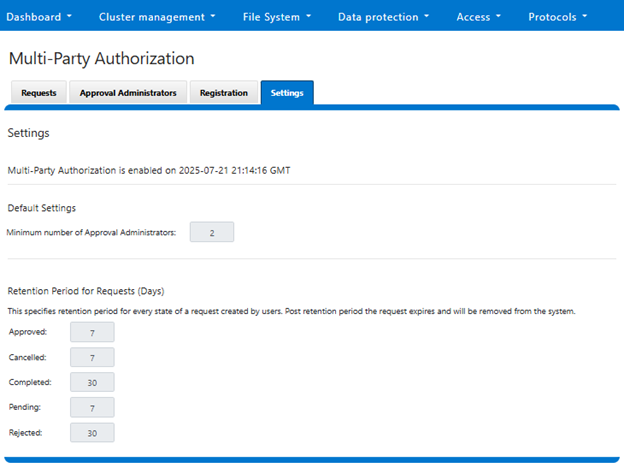
An MPA approval request can be in one of five states: Approved, Cancelled, Completed, Pending, or Rejected.

These states, and their various expiry times, can be viewed with the following CLI command syntax:

# isi mpa settings request-lifecycle list

Approved
    Description: expire in configured days for privilege action execution.
    Expire_time: 7d

Cancelled
    Description: remove from system in configured days.
    Expire_time: 7d

Completed
    Description: remove from system in configured days.
    Expire_time: 30d

Pending
    Description: expire in configured days can be updated by user or approver.
    Expire_time: 7d

Rejected
    Description: remove from system in configured days.
    Expire_time: 30d

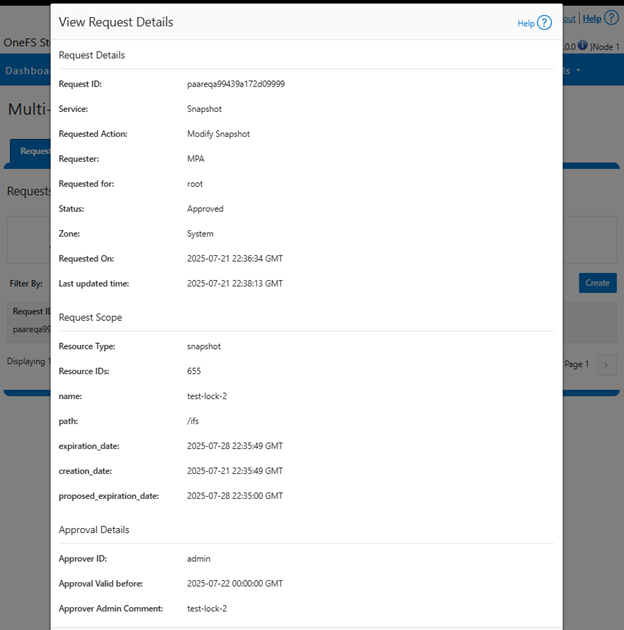
The MPA requests comprise the following attributes.

Request Attribute Description
action Name of privileged action
action_payload Set of key/value pairs for privileged action payload
cluster_guid Cluster GUID that uniquely identifies PowerScale
created_by Specified who created the request
creation_time Creation time of the request. Unix epoch time format
id Unique ID of MPA request.
last_update_time Last update time of the request.  Unix epoch time format
request_for User for whom request is created for.
resource_ids List of resources IDs requested for approval.
resource_type Type of resource requested for approval.
service Name of service or component in system that owns the privileged action
status Status of MPA request
system_created A privileged action approval request was auto created by the system or not.
zone_id Multi-tenant access zone ID of MPA request created.

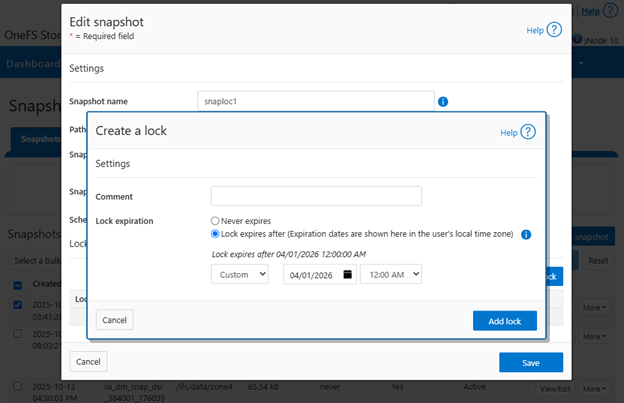
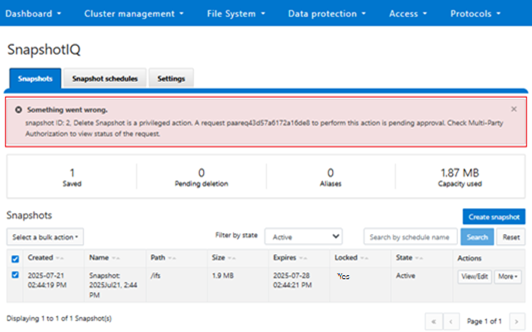
If a privileged action fails to execute despite an approved request, it is necessary to verify whether the approval has expired. For troubleshooting purposes, diagnostic logs related to MPA can be found in the PAPI logs (/var/log/isi_papi_d.log). A fair amount of detail and context is captured by default without the need to increase logging verbosity. For example, the following secure snaphshot delete request, which includes snap ID, warning message, MPA request ID, URI info, error codes, etc:

2025-09-21T21:45:09.734523+00:00 <3.6> GLaDOS-8(id8) isi_papi_d[46945]: STACK snapshot ID: 2, Delete Snapshot is a privileged action. A request paareq43d57a6172a16de8 to perform this action is pending approval. Check Multi-Party Authorization to view status of the request.     from --- (---:0):      isi_exception::isi_exception(int, char const*, __va_list_tag*) (OFFSET:134)     api_exception::api_exception(api_error_code, char const*, ...) (OFFSET:146)     snapshot_mpa_interface::initiate_mpa_request(mpa_lib::MpaMatchContext&, std::__1::basic_string<char, mpa_lib::MpaMatchContext&::char_traits<char>, mpa_lib::MpaMatchContext&::allocator<char> > const&) (OFFSET:281)     snapshot_snapshot_handler::http_delete(request const&, response&) (OFFSET:2136)     uri_handler::execute_http_method_internal(request&, response&) (OFFSET:253)     uri_handler::execute_http_method(request&, response&, bool, bool, bool) (OFFSET:1894)     uri_manager::execute_request(request&, response&, bool, bool, bool, bool, bool, bool) (OFFSET:1578)     std::__1::basic_filebuf<char, std::__1::char_traits<char> >::basic_filebuf(void) (OFFSET:7452)     std::__1::basic_filebuf<char, std::__1::char_traits<char> >::basic_filebuf(void) (OFFSET:11172)     typeinfo name for api_exception (OFFSET:16919)     typeinfo name for api_exception (OFFSET:13861)     ADDRESS (UNKNOWN:-1806659576)

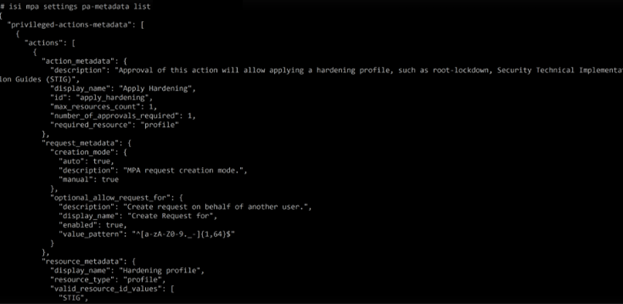
The OneFS services which include MPA privileged actions can be queried with the following CLI syntax:

# isi mpa settings pa-metadata list

For example:

For these MPA-integrated services, such as S3, service-specific logs can also provide useful additional diagnostics information. These MPA privileged actions and their associated logfiles in OneFS 9.12 include:

Service /

Component

Privileged Action   Logfile
Hardening apply_hardening

disable_hardening

/var/log/hardening.log

/var/log/hardening_engine.log

MPA register_approval_admin

upload_trust_anchor

/var/log/isi_papi_d.log
S3 reduce_immutable_bucket_retention

modify_server_access_logging_config

/var/log/s3.log
Snapshot delete_snapshot

modify_snapshot

delete_snapshot_schedule

modify_snapshot_schedule

/var/log/isi_snapshot_d.log

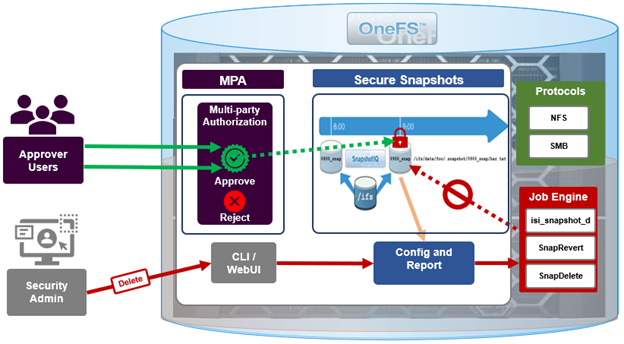
Complementary to MPA, OneFS 9.12 also introduces Root Lockdown Mode (RLM), which disables and blocks access to a cluster’s root account, forcing the use of roles-based access controls (RBAC). Since the root has explicit permission to bypass security controls, locking it down can also help to prevent a single bad actor from performing destructive operations on the data or storage platform.

As a best practice, enabling Root Lockdown Mode alongside Multi-party Authorization (MPA) provides a more secure and resilient configuration, ensuring full benefits of the MPA framework. To activate RLM, the compadmin user must be enabled, and both Hardening and SmartLock licenses are required. MPA and RLM can be enabled independently, and once MPA is activated, enabling RLM is a privileged action which requires an approval. RLM will be covered in-depth in a near-future article.

For disaster recovery in environments where both RLM and MPA are enabled, two procedures are available for recovering access to a node with a lost root password. After first contacting Dell Support, the preferred method involves smart-failing the node, re-imaging it, and rejoining it to the cluster. If this is not feasible, an alternative approach is to boot the node from alternate media and manually edit the System file provider to restore root access. After recovery, the Configurable Hardening Engine report should be reviewed to ensure all RLM rules are applied. If not, follow the documented steps to re-enable RLM.

To ensure the one-time usage of TOTP tokens, OneFS stores both the token and its generation counter in the MPA database under the approver’s record. When a new TOTP validation request is received, the system checks whether the token matches the previously used one. If it does, an error is triggered. The counter used to generate the token must be higher than the last used counter, ensuring that even unused older tokens cannot be reused once a newer token has been validated.

For example, if a token is generated at 12:00:00 and submitted at 12:00:20, the MPA uses the current time window (12:00:00–12:00:30) to generate the counter and validate the token. Once validated, both the token and counter are stored. If a malicious actor attempts to reuse the token, validation will fail either because the token matches the last used one or because the counter is outdated.