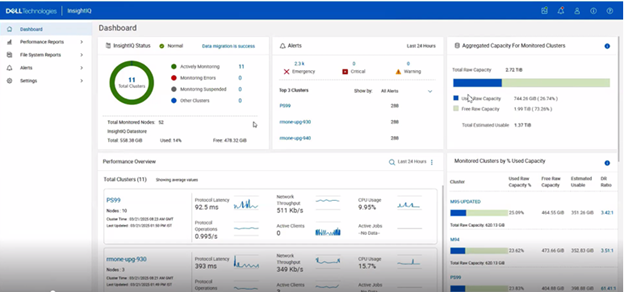
It’s been an active April for PowerScale already. Close on the tail of the OneFS 9.11 launch comes the unveiling of the new, innovative PowerScale InsightIQ 6.0 release.
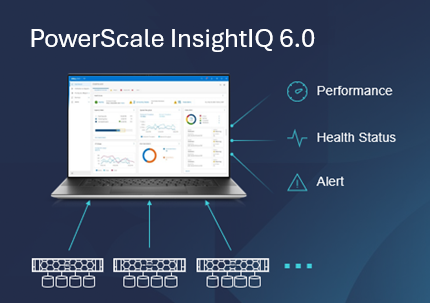
InsightIQ provides powerful performance monitoring and reporting functionality, helping to maximize PowerScale cluster performance and efficiency. This includes advanced analytics to optimize applications, correlate cluster events, and the ability to accurately forecast future storage needs.
So what new treats does this InsightIQ 6.0 release bring to the table?
Added functionality includes:
- Greater scale
- Expanded ecosystem support
- Enhanced reporting efficiency
- Streamlined upgrade and migration
InsightIQ 6.0 continues to offer the same two deployment models as its 5.x predecessors:
| Deployment Model | Description |
| InsightIQ Scale | Resides on bare-metal Linux hardware or virtual machine. |
| InsightIQ Simple | Deploys on a VMware hypervisor. |
The InsightIQ Scale version resides on bare-metal Linux hardware or virtual machine, whereas InsightIQ Simple deploys via OVA on a VMware hypervisor.
In v6.0, InsightIQ Scale enjoys a substantial boost in its breadth-of-monitoring scope and can now encompass up to 20 clusters or 504 nodes.
Additionally, with this new 6.0 version, InsightIQ Scale can now be deployed on a single Linux host. This is in stark contrast to InsightIQ 5’s requirements for a three Linux node minimum installation platform.
Deployment:
The deployment options and hardware requirements for installing and running InsightIQ 6.0 are as follows:
| Attribute | InsightIQ 6.0 Simple | InsightIQ 6.0 Scale |
| Scalability | Up to 10 clusters or 252 nodes | Up to 20 clusters or 504 nodes |
| Deployment | On VMware, using OVA template | RHEL or SLES with deployment script |
| Hardware requirements | VMware v15 or higher:
· CPU: 8 vCPU · Memory: 16GB · Storage: 1.5TB (thin provisioned); Or 500GB on NFS server datastore |
Up to 10 clusters and 252 nodes:
· CPU: 8 vCPU or Cores · Memory: 16GB · Storage: 500GB Up to 20 clusters and 504 nodes: · CPU: 12 vCPU or Cores · Memory: 32GB · Storage: 1TB |
| Networking requirements | 1 static IP on the PowerScale cluster’s subnet | 1 static IP on the PowerScale cluster’s subnet |
Ecosystem support:
The InsightIQ ecosystem itself is also expanded in version 6.0 to also include SUSE Linux Enterprise Server 15 SP4, in addition to Red Hat Enterprise Linux (RHEL) versions 8.10, 9.4, and RHOSP 17. This allows customers who have standardized on SUSE to now run an InsightIQ 6.0 Scale deployment on a V15 host to monitor the latest OneFS versions.
| Qualified on | InsightIQ 5.2 | InsightIQ 6.0 |
| OS (IIQ Scale Deployment) | RHEL 8.10 and RHEL 9.4 | RHEL 8.10, RHEL 9.4, RHOSP 17, and SLES 15 SP4 |
| PowerScale | OneFS 9.3 to 9.10 | OneFS 9.4 to 9.11 |
| VMware ESXi | ESXi v7.0U3 and ESXi v8.0U3 | ESXi v7.0U3 and ESXi v8.0U3 |
| VMware Workstation | Workstation 17 Free | Workstation 17 Free Version |
Similarly, in addition to deployment on VMware ESXi 7 & 8, the InsightIQ Simple version can also be installed for free on VMware Workstation 17, providing the ability to stand up InsightIQ in a non-production or lab environment for trial or demo purpose, without incurring a VMware charge. Plus, the InsightIQ 6.0 OVA template has now been reduced in size to under 5GB, and with an installation time of less than 12 minutes.

Online Upgrade
The prerequisites for upgrading to InsightIQ 6.0 are either a Simple or Scale deployment with InsightIQ v5.1.x or v5.2.x installed and running. Additionally, the free disk space must exceed 50% of the allocated capacity.
The upgrade in 6.0 is a five step process:

First, the installer checks the current Insight IQ version, verifies there’s sufficient free disk space, and confirms that setup is ready. Next, IIQ is halted and dependencies met, followed by the installation of the new 6.0 infrastructure and a migration of the legacy InsightIQ 5.x configuration and historical report data to the new platform. Finally, the cleanup phase removes the old configuration files, etc, and InsightIQ 6.0 is ready to go.
| Phase | Description |
| Pre-check | Check IIQ version; verify free disk space; confirm setup is ready |
| Pre-upgrade | Stop IIQ and install dependencies |
| Install and Migrate | Install IIQ 6.0 infrastructure and migrate IIQ Data |
| Post-upgrade | Migrate historical report data |
| Cleanup | Remove old configuration files |
During the upgrade of an InsightIQ Scale deployment to v6.0, the 3-node setup will be converted to 1-node configuration. After a successful upgrade, InsightIQ will be accessible via the primary node’s IP address.
Offline Migration
The offline migration functionality in this new release facilitates the transfer of data and configuration context from InsightIQ version 4.4.1 to version 6.0. This includes support for both InsightIQ Simple and InsightIQ Scale deployments.
Additionally, the process has been streamlined in InsightIQ 6.0 so that only a single ‘iiq_data_migrations.sh’ script needs to be run to complete the migration. For example:
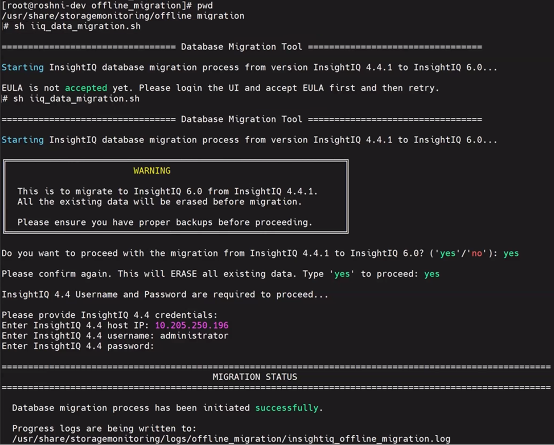
This is in contrast to prior IIQ releases, where separate import and export utilities were required for the migration process. Detailed migration logs are also provided in InsightIQ 6.0, located at /usr/share/storagemonitoring/logs/offline_migration/insightiq_offline_migration.log.
Durable Data Collection
Decoupled data collection and processing in IIQ 6.0 delivers gains in both performance and fault tolerance. Under the hood, InsightIQ 6.0 sees an updated architecture with the introduction of the following new components:
| Component | Role |
| Data Processor | Responsible for processing and storing the data in TimescaleDB for display by Reporting service. |
| Temporary Datastore | Stores historical statistics fetched from PowerScale cluster, in-between collection and processing. |
| Message Broker | Facilitates inter-service communication. With the separation of data collection and data processing, this allows both services to signal to each other when their respective roles come up. |
| Timescale DB | New database storage for the time-series data. Designed for optimized handling of historical statistics. |
Telemetry Down-sampling
InsightIQ 6.0’s new TimescaleDB database now permits the storage of long-term historical data via an enhanced retention strategy:

Unlike prior InsightIQ releases, which used two data formats, with v6.0 telemetry, summary data is now stored in the following cascading levels, each with a different data retention period:
| Level | Sample Length | Data Retention Period |
| Raw table | Varies by metric type. Raw data sample lengths range from 30s to 5m. | 24 hours |
| 5m summary | 5 minutes | 7 days |
| 15m summary | 15 minutes | 4 weeks |
| 3h summary | 3 hours | Infinite |
Note that the actual raw sample length may vary by graph/data type – from 30 seconds for CPU % Usage data up to 5 minutes for cluster capacity metrics.
Meanwhile, the new InsightIQ v6.0 code is available for download on the Dell Support site, allowing both the installation of and upgrade to this new release.