OneFS Management Interface

Another security enhancement that OneFS 9.5 brings to the table is the ability to configure 1GbE NIC ports dedicated to cluster management on the PowerScale F900, F600, F200 all-flash storage nodes and P100 and B100 accelerators. Since these platforms’ release, customers have been requesting the ability to activate the 1GbE NIC ports so that the node management activity and front end protocol traffic could be separated on physically distinct interfaces.

For background, the F600 and F900 have shipped with a quad port 1GbE rNDC (rack Converged Network Daughter Card) adapter since their introduction. However, these 1GbE ports were non-functional and unsupported in OneFS releases prior to 9.5. As such, the node management and front-end traffic was co-mingled on the front-end interface.

In OneFS 9.5 and later, 1GbE network ports are now supported on all of the PowerScale PowerEdge based platforms for the purposes of node management, and physically separate from the other network interfaces. Specifically, this enhancement applies to the F900, F600, F200 all-flash nodes, and P100 and B100 accelerators.

Under the hood, OneFS has been updated to recognize the 1GbE rNDC NIC ports as usable for a management interface. Note that the focus of this enhancement is on factory enablement and support for existing F600 customers that have that the unused 1GbE rNDC hardware. This functionality has also been back-ported to OneFS 9.4.0.3 and later RUPs. Since the introduction of this feature, there have been several requests raised about field upgrades, but that use case is separate and will be addressed in a later release via scripts, updates of node receipts, procedures, etc.

Architecturally, barring some device driver and accounting work, no substantial changes were required to the underlying OneFS or platform architecture in order to implement this feature. This means that, in addition to activating the rNDC, OneFS now supports the relocated front-end NIC in PCI slots 2 or 3 for the F200, B100, and P100.

OneFS 9.5 and later recognizes the 1GbE rNDC as usable for the management interface in the OneFS Wizard, in the same way it always has for the H-series and A-series chassis-based nodes.

All four ports in the 1GbE NIC are active, and, for the Broadcom board, the interfaces are initialized and reported as bge0, bge1, bge2, and bge3.

The ‘pciconf’ CLI utility can be used to determine whether the rNDC NIC is present in a node. If it is, a variety of identification and configuration details are displayed. For example, the following output from a Broadcom rNDC NIC in an F200 node:

# pciconf -lvV pci0:24:0:0

bge2@pci0:24:0:0: class=0x020000 card=0x1f5b1028 chip=0x165f14e4 rev=0x00 hdr=0x00

class       = network

subclass    = ethernet

VPD ident   = ‘Broadcom NetXtreme Gigabit Ethernet’

VPD ro PN   = ‘BCM95720’

VPD ro MN   = ‘1028’

VPD ro V0   = ‘FFV7.2.14’

VPD ro V1   = ‘DSV1028VPDR.VER1.0’

VPD ro V2   = ‘NPY2’

VPD ro V3   = ‘PMT1’

VPD ro V4   = ‘NMVBroadcom Corp’

VPD ro V5   = ‘DTINIC’

VPD ro V6   = ‘DCM1001008d452101000d45’

The ‘ifconfig’ CLI utility can be used to determine the specific IP/interface mapping on the Broadcom rNDC interface. For example:

# ifconfig bge0
TME-1: bge0: flags=8843<UP,BROADCAST,RUNNING,SIMPLEX,MULTICAST> metric 0 mtu 1500
TME-1:      ether 00:60:16:9e:X:X
TME-1:      inet 10.11.12.13 netmask 0xffffff00 broadcast 10.11.12.255 zone 1
TME-1:      inet 10.11.12.13 netmask 0xffffff00 broadcast 10.11.12.255 zone 0
TME-1:      media: Ethernet autoselect (1000baseT <full-duplex>)
TME-1:      status: active

In the above output, the first IP address of the management interface’s pool is bound to ‘bge0’, the first port on the Broadcom rNDC NIC.

The ‘isi network pools’ CLI command can be used to determine the corresponding interface. Within the system zone, the management interface is allocated an address from the configured IP range within its associated interface pool. For example:

# isi network pools list
ID                           SC Zone                       IP Ranges                   Allocation Method
---------------------------------------------------------------------------------------------------------
groupnet0.mgt.mgt          cluster_mgt_isln.com    10.11.12.13-10.11.12.20 static

# isi network pools view groupnet0.mgt.mgt | grep -i ifaces

Ifaces: 1:mgmt-1, 2:mgmt-1, 3:mgmt-1, 4:mgmt-1, 5:mgmt-1

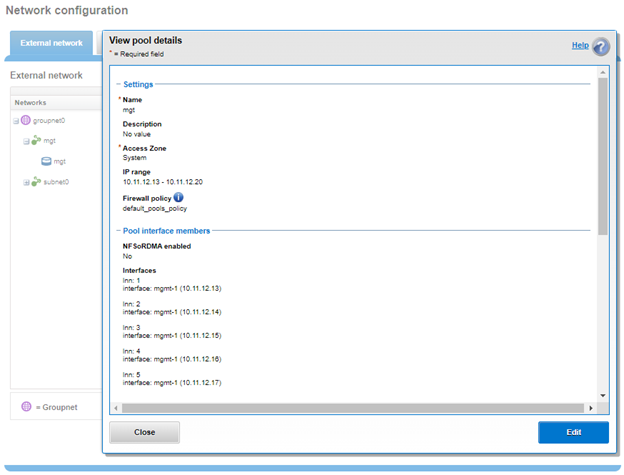
Or from the WebUI, under Cluster management >Network configuration > External network:

Drilling down into the ’mgt’ pool details show the 1GbE management interfaces as the pool interface members:

Note that the 1GbE rNDC network ports are solely intended as cluster management interfaces. As such, they are not supported for use with regular front-end data traffic.

While the F900 and F600 nodes already ship with a four port 1GbE rNDC NIC installed. However, the F200, B100, and P100 platform configurations have been updated to also include a quad port 1GbE rNDC card, and these new configurations have been shipping by default since January 2023. This necessitated relocating the front end network’s 25GbE NIC (Mellanox CX4) to PCI slot 2 in the motherboard.  Additionally, the OneFS updates needed for this feature has also allowed the F200 platform to now be offered with a 100GbE option, too. The 100GbE option utilizes a Mellanox CX6 NIC in place of the CX4 in slot 2.

With this 1GbE management interface enhancement, the same quad-port rNDC card (typically the Broadcom 5720) that has been shipped in the F900 and F600 since their introduction, is now included in the F200, B100 and P100 nodes as well. All four 1GbE rNDC ports are enabled and active under OneFS 9.5 and later, too.

Node port ordering continues to follow the standard, increasing numerically from left to right. However, be aware that the port labels are not visible externally since they are obscured by the enclosure’s sheet metal.

The following back-of-chassis hardware images show the new placements of the NICs in the various F-series and accelerator platforms:

PowerScale F600

PowerScale F900

For both the F600 and F900, the NIC placement remains unchanged, since these nodes have always shipped with the 1GbE quad port in the rNDC slot since their launch.

PowerScale F200

The F200 sees its front-end NIC moved to slot 3, freeing up the rNDC slot for the quad-port 1GbE Broadcom 5720.

PowerScale B100

Since the B100 backup accelerator has a fibre-channel card in slot 2, it sees its front-end NIC moved to slot 3, freeing up the rNDC slot for the quad-port 1GbE Broadcom 5720.

PowerScale P100

Finally, the P100 accelerator sees its front-end NIC moved to slot 3, freeing up the rNDC slot for the quad-port 1GbE Broadcom 5720.

Note that, while there is currently no field hardware upgrade process for adding rNDC cards to legacy F200 nodes or B100 and P100 accelerators, this will likely be addressed in a future release.

OneFS Security and USB Device Control

As we’ve seen over the course of the last several articles, OneFS 9.5 delivers a wealth of security focused features. These span the realms of core file system, protocols, data services, platform, and peripherals. Among these security enhancements is the ability to manually or automatically disable a cluster’s USB ports from either the CLI, platform API, or via activation of a security hardening policy.

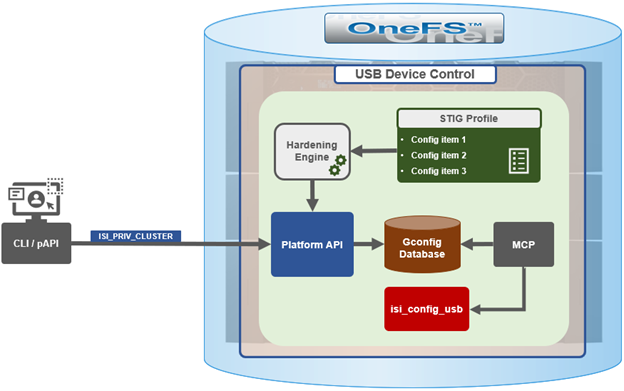
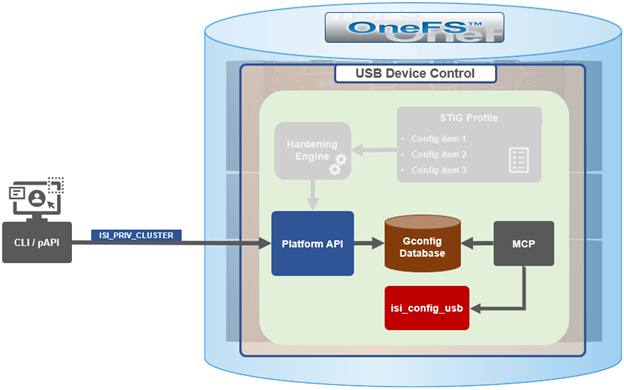
In support of this functionality, the basic USB port control architecture is as follows:

To facilitate this, OneFS 9.5 and subsequent releases see the addition of a new gconfig variable, ‘usb_ports_disabled’, in ‘security_config’, specifically to track the status of USB Ports on cluster. On receiving an admin request via either the CLI or platform API handler to disable the USB port, OneFS modifies the security config parameter in gconfig, as follows:

# isi_gconfig -t security_config | grep -i usb
usb_ports_disabled (bool) = true

Under the hood, the MCP (master control process) daemon watches for any changes to the ‘isi_security.gcfg’ security config file on the cluster. If the value for the ‘usb_ports_disabled’ variable in the ‘isi_security.gcfg’ file is updated, then MCP executes the ‘isi_config_usb’ utility to enact the desired change. Note that, since ‘isi_config_usb’ operates per-node but the MCP actions are global (executed cluster wide), isi_config_usb is invoked across each node via a python script to enable or disable the cluster’s USB Ports.

Be aware that the USB port control functionality is only supported PowerScale F900, F700, F200, H700/7000, and A300/3000 clusters running OneFS 9.5 or later.

Administratively, USB port control can be manually configured from either the CLI or platform API.

Note that there is no WebUI option at this time.

The CLI and platform API configuration options for USB port control in OneFS 9.5 and later are as follows

Action CLI Syntax Description
View isi security settings view Report the state of a cluster’s USB ports.
Enable isi security settings modify –usb-ports-disabled=False Activate a cluster’s USB ports.
Disable isi security settings modify –usb-ports-disabled=True Disable a cluster’s USB ports.

For example:

# isi security settings view | grep -i usb

      USB Ports Disabled: No

# isi security settings modify --usb-ports-disabled=True

# isi security settings view | grep -i usb

      USB Ports Disabled: Yes

Similarly, to re-enable a cluster’s USB ports:

# isi security settings modify --usb-ports-disabled=False

# isi security settings view | grep -i usb

      USB Ports Disabled: No

Note that a user account with the OneFS ISI_PRIV_CLUSTER RBAC privilege is required in order to configure USB port changes on a cluster.

In addition to the ‘isi security settings’ CLI command, there is also a node-local CLI utility:

# whereis isi_config_usb

isi_config_usb: /usr/bin/isi_hwtools/isi_config_usb

The general syntax of this utility is as follows:

 isi_config_usb [-h] [--nodes NODES] --mode {display,on,off}

As mentioned previously, ‘isi security settings’ acts globally on a cluster, using ‘isi_config_usb’ to effect its changes on each node.

Alternatively, cluster USB ports can also be enabled and disabled via the OneFS platform API with the following endpoints:

API Method Argument Output
/16/security/settings GET No argument required. JSON object for security settings with USB ports setting.
/16/security/settings PUT JSON object with boolean value for USB ports setting. None or Error.

For example:

# curl -k -u <username>:<passwd> https://localhost:8080/platform/security/settings”

{
"settings" :
{
"fips_mode_enabled" : false,
"restricted_shell_enabled" : false,
"usb_ports_disabled" : true
}
}

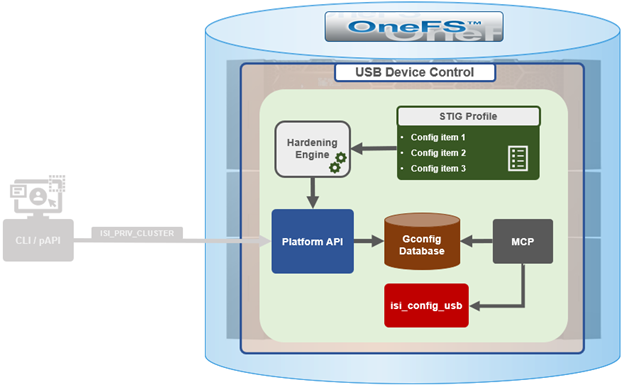
In addition to manual configuration, the USB ports are automatically disabled if the STIG security hardening profile is applied to a cluster:

This is governed by the following section of XML code in the cluster hardening configuration XML file, located at /etc/isi_hardening/profiles/isi_hardening.xml:

<CONFIG_ITEM id ="isi_usb_ports" version = "1">
             <PapiOperation>
                          <DO>
                                       <URI>/security/settings</URI>
                                       <BODY>{"usb_ports_disabled": true}</BODY>
                                       <KEY>settings</KEY>
                          </DO>
                          <UNDO>
                                       <URI>/security/settings</URI>
                                       <BODY>{"usb_ports_disabled": false}</BODY>
                                       <KEY>settings</KEY>
                          </UNDO>
                          <ACTION_SCOPE>CLUSTER</ACTION_SCOPE>
                          <IGNORE>FALSE</IGNORE>
             </PapiOperation>
</CONFIG_ITEM>

The ‘isi_config_usb’ CLI utility can be used to display the USB port status on a subset of nodes. For example:

# isi_config_usb --nodes 1-10 --mode display

   Node   |  Current  |  Pending

-----------------------------------

   TME-9  |   UNSUP   | INFO: This platform is not supported to run this script.

   TME-8  |   UNSUP   | INFO: This platform is not supported to run this script.

   TME-1  |     On    |

   TME-3  |     On    |

   TME-2  |     On    |

  TME-10  |     On    |

   TME-7  |   AllOn   |

   TME-5  |   AllOn   |

   TME-6  |   AllOn   |

Unable to connect: TME-4

Note that, in addition to port status, the output will identify any nodes that do not support USB port control (nodes 8 and 9 above) or that are unreachable (node 4 above).

When investigating or troubleshooting issues with USB port control, the following log files are the first places to check:

Log file Description
/var/log/isi_papi_d.log Will log any requests to enable or disable USB ports.
/var/log/isi_config_usb.log Logs activity from the isi_config_usb script execution.
/var/log/isi_mcp Logs activity related to MCP actions on invoking the API.

OneFS Log Gather Transmission

The OneFS ‘isi_gather_info’ utility is the ubiquitous method for collecting and uploading a PowerScale cluster’s context and configuration to assist with the identification and resolution of bugs and issues. As such, it performs the following roles:

  • Executes many commands, scripts, and utilities on a cluster, and saves their results.
  • Collates, or gathers, all these files into a single ‘gzipped’ package.
  • Optionally transmits this log gather package back to Dell via a choice of several transport methods.

By default, a log gather tarfile is written to the /ifs/data/Isilon_Support/pkg/ directory. It can also be uploaded to Dell via the following means:

Upload Mechanism Description TCP Port OneFS Release Support
SupportAssist / ESRS Uses Dell Secure Remote Support (SRS) for gather upload. 443/8443 Any
FTP Use FTP to upload completed gather. 21 Any
FTPS Use SSH-based encrypted FTPS to upload gather. 22 Default in OneFS 9.5 and later
HTTP Use HTTP to upload gather. 80/443 Any

As indicated in the table above, OneFS 9.5 and later releases now leverage FTPS as the default option for FTP upload, thereby protecting the upload of cluster configuration and logs with an encrypted transmission session.

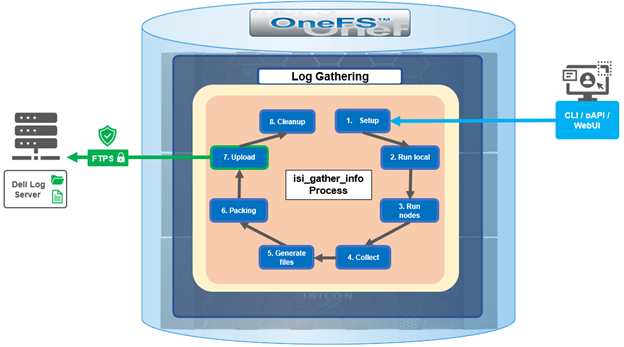
Under the hood, the log gather process comprises an eight phase workflow, with transmission comprising the penultimate ‘upload’ phase:

The details of each phase are as follows:

Phase Description
1.       Setup Reads from the arguments passed in, as well as any config files on disk, and sets up the config dictionary, which will be used throughout the rest of the codebase. Most of the code for this step is contained in isilon/lib/python/gather/igi_config/configuration.py. This is also the step where the program is most likely to exit, if some config arguments end up being invalid
2.       Run local Executes all the cluster commands, which are run on the same node that is starting the gather. All these commands run in parallel (up to the current parallelism value). This is typically the second longest running phase.
3.       Run nodes Executes the node commands across all of the cluster’s nodes. This runs on each node, and while these commands run in parallel (up to the current parallelism value), they do not run in parallel with the local step.
4.       Collect Ensures all of the results end up on the overlord node (the node that started gather). If gather is using /ifs, it is very fast, but if it’s not, it needs to SCP all the node results to a single node.
5.       Generate Extra Files Generates nodes_info and package_info.xml. These are two files that are present in every single gather, and tell us some important metadata about the cluster
6.       Packing Packs (tars and gzips) all the results. This is typically the longest running phase, often by an order of magnitude
7.       Upload Transports the tarfile package to its specified destination via SupportAssist, ESRS, FTPS, FTP, HTTP, etc. Depending on the geographic location, this phase might also be a lengthy duration.
8.       Cleanup Cleanups any intermediary files that were created on cluster. This phase will run even if gather fails, or is interrupted.

Since the isi_gather_info tool is primarily intended for troubleshooting clusters with issues, it runs as root (or compadmin in compliance mode), as it needs to be able to execute under degraded conditions (eg. without GMP, during upgrade, and under cluster splits, etc). Given these atypical requirements, isi_gather_info is built as a stand-alone utility, rather than using the platform API for data collection.

While FTPS is the new default and recommend transport, the legacy plaintext FTP upload method is still available in OneFS 9.5 and beyond. As such, Dell’s log server, ftp.isilon.com, also supports both encrypted FTPS and plaintext FTP, so will not impact older release FTP log upload behavior.

This OneFS 9.5 FTPS security enhancement encompasses three primary areas where an FTPS option is now supported:

  • ‘/usr/bin/isi_gather_info’ utility direct execution.
  • Running via the ‘isi diagnostics gather’ CLI command set.
  • A diagnostics gather through the OneFS WebUI.

For the ‘isi_gather_info’ script, two new options are added in OneFS 9.5:

New isi_gather_info Option Description Default Value
–ftp-insecure Flag enables gather to use unencrypted FTP transfer. False
–ftp-ssl-cert Enables user to specify location of special SSL certificate file. Empty spring. Not typically required.

Similarly, two new corresponding options for the ‘isi diagnostics’ CLI command:

New isi diagnostics Option Description Default Value
–ftp-upload-insecure Flag enables gather to use unencrypted FTP transfer. No
–ftp-upload-ssl-cert Enables user to specify location of special SSL certificate file. Empty spring. Not typically required.

Per the above, the following table shows command syntax usage examples for both FTPS and FTP uploads:

FTP Upload Type Description Example isi_gather_info Syntax Example isi diagnostics Syntax
Secure upload (default) Upload cluster logs to the Dell log server (ftp.isilon.com) via encrypted FTP (FTPS). # isi_gather_info

Or

# isi_gather_info –ftp

# isi diagnostics gather start

Or

# isi diagnostics gather start –ftp-upload-insecure=no

Secure upload Upload cluster logs to an alternative server via encrypted FTPS. # isi_gather_info –ftp-host <FQDN> –ftp-ssl-cert <SSL_CERT_PATH> # isi diagnostics gather start –ftp-upload-host=<FQDN> –ftp-ssl-cert= <SSL_CERT_PATH>
Unencrypted upload Upload cluster logs to the Dell log server (ftp.isilon.com) via plain text FTP. # isi_gather_info –ftp-insecure # isi diagnostics gather start –ftp-upload-insecure=yes
Unencrypted upload Upload cluster logs to an alternative server via plain text FTP. # isi_gather_info –ftp-insecure –ftp-host <FQDN> # isi diagnostics gather start –ftp-upload-host=<FQDN> –ftp-upload-insecure=yes

Note that OneFS 9.5 and later releases provide a warning if the cluster admin elects to continue using non-secure FTP as the for the isi_gather_info tool. Specifically, if the ‘–ftp-insecure’ option is configured, the following message is displayed, informing the user that plain text FTP upload is being used, and that the connection and data stream will not be encrypted.

# isi_gather_info --ftp-insecure

You are performing plain text FTP logs upload.

This feature is deprecated and will be removed

in a future release. Please consider the possibility

of using FTPS for logs upload. For further information,

please contact PowerScale support

...

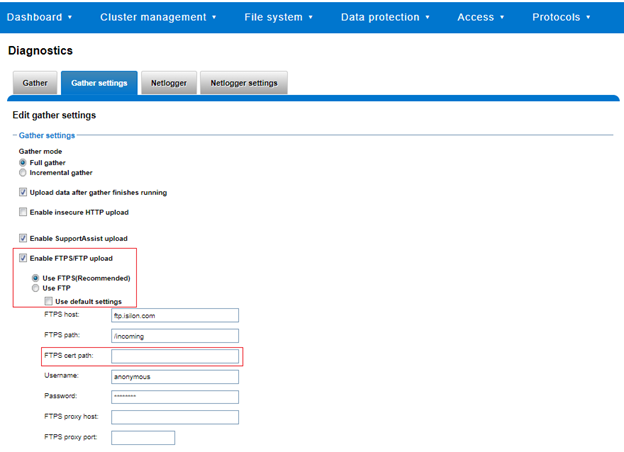
In addition to the command line, log gathers can also be configured via the OneFS WebUI by navigating to Cluster management > Diagnostics > Gather settings:

The ‘Edit gather settings’ page in OneFS 9.5 and later has been updated to reflect FTPS as the default transport, plus the addition of radio buttons and text boxes to accommodate the new configuration options:

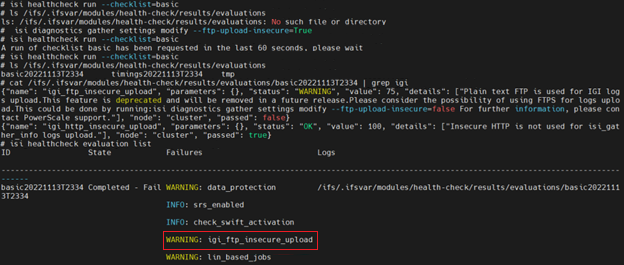
If plain text FTP upload is configured, healthcheck will display a warning that plain-text upload is used and is no longer a recommended option. For example:

For reference, the OneFS 9.5 and later ‘isi_gather_info’ CLI command syntax includes the following options:

Option Description
–upload <boolean> Enable gather upload.
–esrs <boolean> Use ESRS for gather upload.
–noesrs Do not attempt to upload via ESRS.
–supportassist Attempt SupportAssist upload.
–nosupportassist Do not attempt to upload via SupportAssist.
–gather-mode (incremental | full) Type of gather: incremental, or full.
–http-insecure <boolean> Enable insecure HTTP upload on completed gather.
–http -host <string> HTTP Host to use for HTTP upload.
–http -path <string> Path on HTTP server to use for HTTP upload.
–http -proxy <string> Proxy server to use for HTTP upload.
–http -proxy-port <integer> Proxy server port to use for HTTP upload.
–ftp <boolean> Enable FTP upload on completed gather.
–noftp Do not attempt FTP upload.
–set-ftp-password Interactively specify alternate password for FTP.
–ftp -host <string> FTP host to use for FTP upload.
–ftp -path <string> Path on FTP server to use for FTP upload.
–ftp-port <string> Specifies alternate FTP port for upload.
–ftp-proxy <string> Proxy server to use for FTP upload.
–ftp -proxy-port <integer> Proxy server port to use for FTP upload.
–ftp-mode <value> Mode of FTP file transfer. Valid values are: both, active, passive
–ftp -user <string> FTP user to use for FTP upload.
–ftp-pass <string> Specify alternative password for FTP.
–ftp -ssl-cert <string> Specifies the SSL certificate to use in FTPS connection.
–ftp-upload-insecure <boolean> Whether to attempt a plain text FTP upload.
–ftp-upload-pass <string> FTP user to use for FTP upload password.
–set-ftp-upload-pass Specify the FTP upload password interactively.

Once a logfile gather arrives at Dell, it is automatically unpacked by a support process and analyzed using the ‘logviewer’ tool.

OneFS SyncIQ and Windows File Create Date.

In the POSIX world, files typically possess three fundamental timestamps:

Timestamp Alias Description
Access atime Access timestamp of the last read.
Change ctime Status change timestamp of the last update to the file’s metadata.
Modify mtime Modification timestamp of the last write.

These timestamps can be easily viewed from a variety of file system tools and utilities. For example, in this case running ‘stat’ from the OneFS CLI:

# stat -x tstr

  File: "tstr"

  Size: 0            FileType: Regular File

  Mode: (0600/-rw-------)         Uid: (    0/    root)  Gid: (    0/   wheel)

Device: 18446744073709551611,18446744072690335895   Inode: 5103485107    Links: 1

Access: Mon Sep 11 23:12:47 2023

Modify: Mon Sep 11 23:12:47 2023

Change: Mon Sep 11 23:12:47 2023

A typical instance of a change, or  ‘ctime’, timestamp update occurs when a file’s access permissions are altered. Since modifying the permissions doesn’t physically open the file (ie. access the file’s data), its ‘atime’ field is not updated. Similarly, since no modification is made to the file’s contents the ‘mtime’ also remains unchanged. However, the file’s metadata has been changed, and the ctime field is used to record this event. As such, the ‘ctime’ stamp allows a workflow such as a backup application to know to make a fresh copy of the file, including its updated permission values. Similarly, a file rename is another operation that modifies its ‘ctime’ entry without affecting the other timestamps.

Certain other file systems also include a fourth timestamp: namely the ‘birthtime’ of when the file was created. Birthtime (by definition) should never change. It’s also an attribute which organizations and their storage administrators may or may not care about.

Within the Windows file system realm, this ‘birthtime’ timestamp, is affectionally known as ‘create date’. This create date of a file is essentially the date and time when its inode is ‘born’. Note that this is not a recognized POSIX attribute, like ctime or mtime, rather it is something that was introduced as part of Windows compatibility requirements. And, because it’s a birthtime, linking operations do not necessarily affect it unless a new inode is not created.

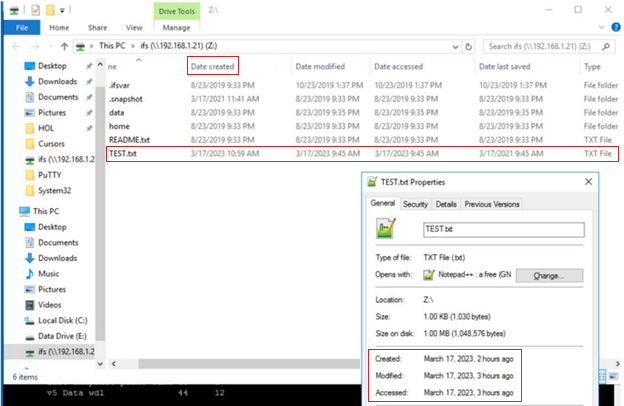
As shown below, this create, or birth, date can differ from a file’s modified or accessed dates because the creation date is when that file’s inode version originated. So, for instance, if a file is copied, the new file’s create date will be set to the current time since it has a new inode. This can be seen in the following example where a file is copied from a flash drive mounted on a Windows client’s file system under drive ‘E:’, to a cluster’s SMB share mounted at drive ‘Z:’.

The ‘Date created’ date above is ahead in time of both the ‘accessed’ and ‘modified’, because the latter two were merely inherited from the source file, whereas the create date was set when the copy was made.

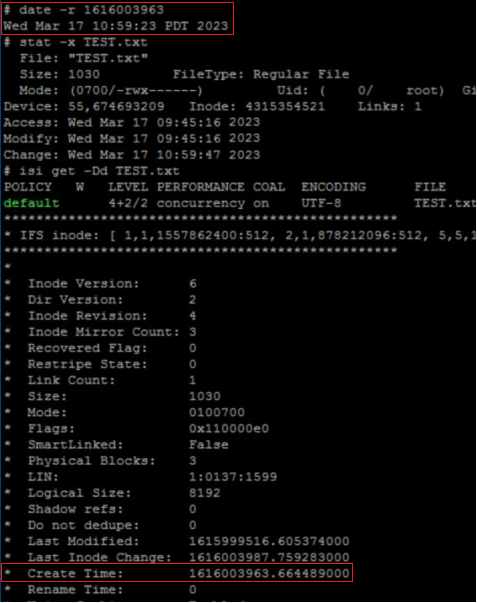
The corresponding ‘date’, ‘stat’, and ‘isi get’ CLI output from the cluster confirms this:

In before OneFS 9.5, when a file is replicated, its create date is timestamped when that file was copied from the source cluster. This means when the replication job ran, or, more specifically, when the individual job worker thread got around to processing that specific file.

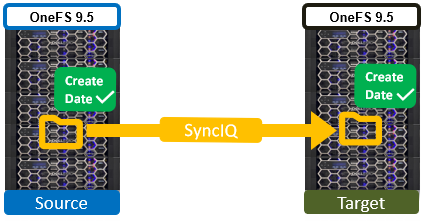
By way of contrast, OneFS 9.5 now ensures that SyncIQ fully replicates the full array of metadata, preserving all values, including that of the birth time / create date.

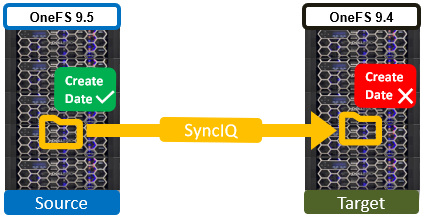
The primary consideration for the new create date functionality is that it requires both source and target clusters in a replication set to be running OneFS 9.5 or later.

If either the source or the target is running pre-9.5 code, this time field retains its old behavior of being set to the time of replication (actual file creation) rather than the correct value associated with the source file.

In OneFS 9.5, create date timestamping works exactly the same way as SyncIQ replication of other metadata (such as ‘mtime’, etc), occurring automatically as part of every file replication. Plus, no additional configuration is necessary beyond upgrading both clusters to OneFS 9.5.

One other significant thing to note about this feature is that SyncIQ is changelist-based, using OneFS snapshots under the hood for its checkpointing and delta comparisons.. This means that, if a replication relationship has been configured prior to OneFS 9.5 upgrade, the source cluster will have valid birthtime data, but the target’s birthtime data will reflect the local creation time of the files it’s copied.

Note that, upon upgrading both sides to OneFS 9.5 and running a SyncIQ job, nothing will change. This is  because SyncIQ will perform its snapshot comparison, determine that no changes were made to the dataset, and so will not perform any replication work. However, if a source file is ‘touched’ so that it’s mtime is changed (or any other action performed that will cause a copy-on-write, or CoW) that will cause the file to show up in the snapshot diff and therefore be replicated. As part of replicating that file, the correct birth time will be written on the target.

Note that a full replication (re)sync does not get triggered as a result of upgrading a replication cluster pair to OneFS 9.5 or later and thereby enabling this functionality. Instead, any create date timestamp resolution happens opportunistically and in the background as files gets touched or modified – and thereby replicated. Be aware that ‘touching’ a file does change its modification time, in addition to updating the create date, which may be undesirable.

OneFS System Configuration Auditing – Part 2

In the previous article in this series we looked at the architecture and operation of OneFS configuration auditing. Now, we’ll turn our attention to its management, event viewing, and troubleshooting.

The CLI command set for configuring ‘isi audit’ is split between two functional areas:

Area Detail Syntax
Events Specifies which specific events get logged, across three categories:

·         Audit Failure

·         Audit Success

·         Syslog Audit Events

isi audit settings …
Global Configuration of global audit parameters, including topics, zones, CEE, syslog, puring, retention, etc. isi audit settings global …

The ‘view’ argument for each command returns the following output:

  1. Events:
# isi audit settings view

            Audit Failure: create_file, create_directory, open_file_write, open_file_read, close_file_unmodified, close_file_modified, delete_file, delete_directory, rename_file, rename_directory, set_security_file, set_security_directory

            Audit Success: create_file, create_directory, open_file_write, open_file_read, close_file_unmodified, close_file_modified, delete_file, delete_directory, rename_file, rename_directory, set_security_file, set_security_directory

      Syslog Audit Events: create_file, create_directory, open_file_write, open_file_read, close_file_unmodified, close_file_modified, delete_file, delete_directory, rename_file, rename_directory, set_security_file, set_security_directory

Syslog Forwarding Enabled: No
  1. Global:
# isi audit settings global view

     Protocol Auditing Enabled: Yes

                 Audited Zones: -

               CEE Server URIs: -

                      Hostname:

       Config Auditing Enabled: Yes

         Config Syslog Enabled: No

         Config Syslog Servers: -

     Config Syslog TLS Enabled: No

  Config Syslog Certificate ID:

       Protocol Syslog Servers: -

   Protocol Syslog TLS Enabled: No

Protocol Syslog Certificate ID:

         System Syslog Enabled: No

         System Syslog Servers: -

     System Syslog TLS Enabled: No

  System Syslog Certificate ID:

          Auto Purging Enabled: No

              Retention Period: 180

       System Auditing Enabled: No

While configuration auditing is disabled on OneFS by default, the following CLI syntax can be used enable and verify config auditing across the cluster:

# isi audit settings global modify --config-auditing-enabled 1

# isi audit settings global view | grep -i 'config audit'

       Config Auditing Enabled: Yes

Similarly, to enable configuration change audit redirection to syslog:

# isi audit settings global modify --config-auditing-enabled true

# isi audit settings global modify --config-syslog-enabled true

# isi audit settings global view | grep -i 'config audit'

       Config Auditing Enabled: Yes

Or to disable redirection to syslog:

# isi audit settings global modify --config-syslog-enabled false

# isi audit settings global modify --config-auditing-enabled false

Up to six CEE servers per cluster can be configured. For example:

#isi audit settings global modify --add-cee-server-uris='<URL>’ For example: #isi audit settings global modify --add-cee-server-uris='http://cee1.isilon.com:12228/cee'

Auditing can be constrained by access zone, too:

# isi audit settings modify --add-audited-zones=audit_az1

Note that, when auditing is enabled, the system zone is included by default. However, it can be excluded, if desired:

# isi audit setting modify --remove-audited-zones=System

Access zone’s audit parameters can also be configured via the ‘isi zones’ CLI command set. For example:

# isi zone zones create --all-auth-providers=true --audit-failure=all --audit-success=all --path=/ifs/data --name=audit_az1

Granular audit event type configuration can be specified, if desired, to narrow the scope and reduce the amount of audit logging, etc.

For example, the following command syntax constrains auditing to read and logon failures and successful writes and deletes under path /ifs/data in the audit_az1 access zone:

# isi zone zones create --all-auth-providers=true --audit-failure=read,logon --audit-success=write,delete --path=/ifs/data --name=audit_az1

In addition to the CLI, the OneFS platform API can also be used to configure and manage auditing. For example, to enable configuration auditing on a cluster:

PUT /platform/1/audit/settings

Authorization: Basic QWxhZGRpbjpvcGVuIHN1c2FtZQ==

        {

               'config_auditing_enabled': True

        }

The following ‘204’ HTTP response code from the cluster indicates that the request was successful, and that configuration auditing is now enabled on the cluster. No message body is returned for this request.

204 No Content

Content-type: text/plain,

Allow: 'GET, PUT, HEAD'

Similarly, to modify the config audit topic’s maximum cached messages threshold to a value of ‘1000’ via the API:

PUT /1/audit/topics/config

Authorization: Basic QWxhZGRpbjpvcGVuIHN1c2FtZQ==

    {

        "max_cached_messages": 1000

    }

Again, no message body is returned from OneFS for this request.

204 No Content

Content-type: text/plain,

Allow: 'GET, PUT, HEAD'

Note that, in the unlikely event that a cluster experiences an outage during which it loses quorum, auditing will be suspended until it is regained. Events similar to the following will be written to the /var/log/audit_d.log file:

940b5c700]: Lost quorum! Audit logging will be disabled until /ifs is writeable again.

2023-08-28T15:37:32.132780+00:00 <1.6> TME-1(id1) isi_audit_d[6495]: [0x345940b5c700]: Regained quorum. Logging resuming.

When it comes to reading audit events on the cluster, OneFS natively provides the handy ‘isi_audit_viewer’ utility. For example, the following audit viewer output shows the events logged when the cluster admin added the ‘/ifs/tmp’ path to the SmartDedupe configuration, and created a new user named ‘test’1’:

# isi_audit_viewer

[0: Tue Aug 29 23:01:16 2023] {"id":"f54a6bec-46bf-11ee-920d-0060486e0a26","timestamp":1693350076315499,"payload":{"user":{"token": {"UID":0, "GID":0, "SID": "SID:S-1-22-1-0", "GSID": "SID:S-1-22-2-0", "GROUPS": ["SID:S-1-5-11", "GID:5", "GID:10", "GID:20", "GID:70"], "protocol": 17, "zone id": 1, "client": "10.135.6.255", "local": "10.219.64.11" }},"uri":"/1/dedupe/settings","method":"PUT","args":{}

,"body":{"paths":["/ifs/tmp"]}

}}

[1: Tue Aug 29 23:01:16 2023] {"id":"f54a6bec-46bf-11ee-920d-0060486e0a26","timestamp":1693350076391422,"payload":{"status":204,"statusmsg":"No Content","body":{}}}

[2: Tue Aug 29 23:03:43 2023] {"id":"4cfce7a5-46c0-11ee-920d-0060486e0a26","timestamp":1693350223446993,"payload":{"user":{"token": {"UID":0, "GID":0, "SID": "SID:S-1-22-1-0", "GSID": "SID:S-1-22-2-0", "GROUPS": ["SID:S-1-5-11", "GID:5", "GID:10", "GID:20", "GID:70"], "protocol": 17, "zone id": 1, "client": "10.135.6.255", "local": "10.219.64.11" }},"uri":"/18/auth/users","method":"POST","args":{}

,"body":{"name":"test1"}

}}

[3: Tue Aug 29 23:03:43 2023] {"id":"4cfce7a5-46c0-11ee-920d-0060486e0a26","timestamp":1693350223507797,"payload":{"status":201,"statusmsg":"Created","body":{"id":"SID:S-1-5-21-593535466-4266055735-3901207217-1000"}

}}

The audit log entries, such as those above, typically comprise the following components:

Order Component Detail
1 Timestamp Timestamp in human readable form
2 ID Unique entry ID
3 Timestamp Timestamp in UNIX epoch time
4 Node Node number
5 User tokens 1.       The user tokens of the Roles and rights of user executing the command

·         User persona (Unix/Windows)

·         Primary group persona (Unix/Windows)

·         Supplemental group personas (Unix/Windows)

·         RBAC privileges of the user executing the command

6 Interface Interface used to generate the command:

·         10 = pAPI / WebUI

·         16 = Console CLI

·         17 = SSH CLI

7 Zone Access zone that the command was executed against
8 Client IP Where the user connected from
9 Local node Local node address where the command was executed
10 Command Command syntax
11 Arguments Command arguments
12 Body Command body

The ‘isi_audit_viewer’ utility automatically reads the ‘config’ log topic by default, but can also be used read the ‘protocol’ log topic too. Its CLI command syntax is as follows:

# isi_audit_viewer -h

Usage: isi_audit_viewer [ -n <nodeid> | -t <topic> | -s <starttime>|

         -e <endtime> | -v ]

         -n <nodeid> : Specify node id to browse (default: local node)

         -t <topic>  : Choose topic to browse.

            Topics are "config" and "protocol" (default: "config")

         -s <start>  : Browse audit logs starting at <starttime>

         -e <end>    : Browse audit logs ending at <endtime>

         -v verbose  : Prints out start / end time range before printing records

Note that, on large clusters where there is heavy (ie. 100,000’s) of audit writes, when running the isi_audit_viewer utility across the cluster with ‘isi_for_array’, it can potentially lead to memory starvation and other issues – especially if outputting to a directory under /ifs. As such, consider directing the output to a non-IFS location such as /var/temp. Also, the isi_audit_viewer ‘-s’ (start time) and ‘-e’ (end time) flags can be used to limit a search (ie. for  1-5 minutes), helping reduce the size of data.

In addition to reading audit events, the view is also a useful tool to assist with troubleshoot any auditing issues. Additionally, any errors that are encountered while processing audit events, and when delivering them to an external CEE server, are written to the log file ‘/var/log/isi_audit_cee.log’. Additionally, the protocol specific logs will contain any issues the audit filter has collecting while auditing events.

OneFS System Configuration Auditing

OneFS auditing can detect potential sources of data loss, fraud, inappropriate entitlements, access attempts that should not occur, and a range of other anomalies that are indicators of risk. This can be especially useful when the audit associates data access with specific user identities.

In the interests of data security, OneFS provides ‘chain of custody’ auditing by logging specific activity on the cluster. This includes OneFS configuration changes plus NFS, SMB, and HDFS client protocol activity, which are required for organizational IT security compliance, as mandated by regulatory bodies like HIPAA, SOX, FISMA, MPAA, etc.

OneFS auditing uses Dell’s Common Event Enabler (CEE) to provide compatibility with external audit applications. A cluster can write audit events across up to five CEE servers per node in a parallel, load-balanced configuration. This allows OneFS to deliver an end to end, enterprise grade audit solution which efficiently integrates with third party solutions like Varonis DatAdvantage.

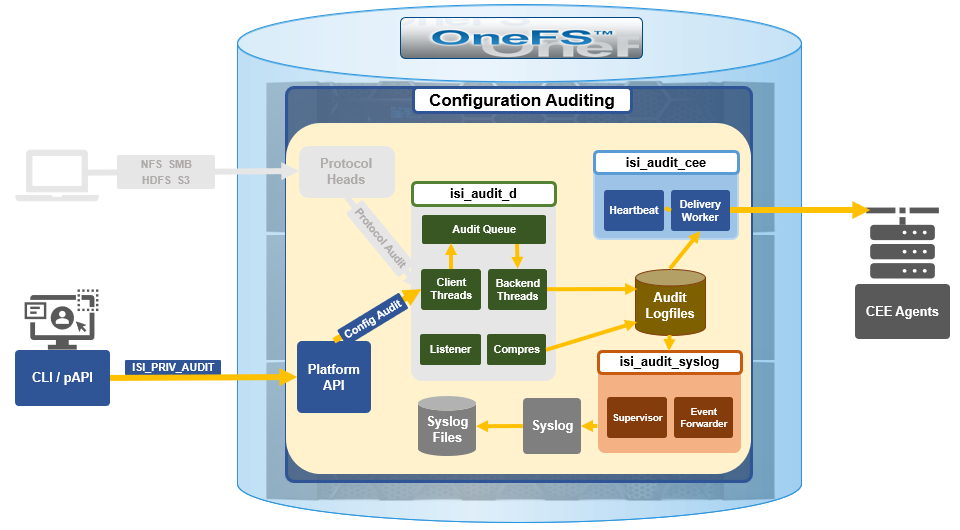
The following diagram outlines the basic architecture of OneFS audit:

Both system configuration changes, as well as protocol activity, can be easily audited on a PowerScale cluster. However, the protocol path is greyed out above, since it is outside the focus of this article. More information on OneFS protocol auditing can be found here.

As illustrated above, the OneFS audit framework is centered around three main services.

Service Description
isi_audit_cee Service allowing OneFS to support third-party auditing applications. The main method of accessing protocol audit data from OneFS is through a third-party auditing application.
isi_audit_d Responsible for per-node audit queues and managing the data store for those queues. It provides a protocol on which clients may produce event payloads within a given context. It establishes a Unix domain socket for queue producers and handles writing and rotation of log files in /ifs/.ifsvar/audit/logs/node###/{config,protocol}/*.
isi_audit_syslog Daemon providing forwarding of audit config and protocol events to syslog.

The basic configuration auditing workflow sees a cluster config change request come in via either the OneFS CLI, WebUI or platform API. The API handler infrastructure passes this request to the isi_audit_d service, which intercepts it as a client thread and adds it to the audit queue. It is then processed and passed via a backend thread and written to the audit log files (IFS) as appropriate.

If audit syslog forwarding has been configured, IFS also passes the event to the isi_audit_syslog daemon, where a supervisor process instructs a writer thread to send it to the syslog, which in turn updates its pertinent /var/log/ logfiles.

Similarly, if Common Event Enabler (CEE) forwarding has been enabled, IFS will also pass the request to the isi_audit_cee service, where a delivery worker threads will intercept it and send the event to the CEE server pool. The isi_audit_cee heartbeat task makes CEE servers available for audit event delivery. Only after a CEE server has received a successful heartbeat will audit events be delivered to it. Every ten seconds the heartbeat task wakes up and sends each CEE server in the configuration a heartbeat. While CEE servers are available and events are in memory an attempt will be made to deliver these. Shutdown will only save audit log position if all the events are delivered to CEE since audit should not lose events. It isn’t critical that all events are delivered at shutdown since any unsaved events can be resent to CEE on the next start of isi_audit_cee since CEE handles duplicates.

Within OneFS, all audit data is organized by topic and is securely stored in the file system.

# isi audit topics list

Name     Max Cached Messages

-----------------------------

protocol 2048

config   1024

-----------------------------

Total: 2

Auditing can detect a variety of potential sources of data loss. These include unauthorized access attempts, inappropriate entitlements, plus a bevy of other fraudulent activities that plague organizations across the gamut of industries. Enterprises are increasingly tasked required to comply with stringent regulatory mandates developed to protect against these sources of data theft and loss.

OneFS system configuration auditing is designed to track and record all configuration events that are handled by the API through the command-line interface (CLI).

# isi audit topics view config

               Name: config

Max Cached Messages: 1024

Once enabled, system configuration auditing requires no additional configuration, and auditing events are automatically stored in the config audit topic directories. Audit access and management is governed by the ‘ISI_PRIV_AUDIT’ RBAC privilege, and OneFS provides a default ‘AuditAdmin’ role for this purpose.

Audit events are stored in a binary file under /ifs/.ifsvar/audit/logs. The logs automatically roll over to a new file after the size reaches 1 GB. The audit logs are consumable by auditing applications that support the Dell Common Event Enabler (CEE).

OneFS audit topics and settings can easily be viewed and modified. For example, to increase the configuration auditing maximum cached messages threshold to 2048 from the CLI:

# isi audit topics modify config --max-cached-messages 2048

# isi audit topics view config

               Name: config

Max Cached Messages: 2048

Audit configuration can also be modified or viewed per access zone and/or topic.

Operation CLI Syntax Method and URI
Get audit settings isi audit settings  view GET <cluster-ip:port>/platform/3/audit/settings
Modify audit settings isi audit settings modify … PUT <cluster-ip:port>/platform/3/audit/settings
View JSON schema for this resource, including query parameters and object properties info. GET <cluster-ip:port>/platform/3/audit/settings?describe
View JSON schema for this resource, including query parameters and object properties info. GET <cluster-ip:port>/platform/1/audit/topics?describe

Configuration auditing can be enabled on a cluster from either the CLI or platform API. The current global audit configuration can be viewed as follows:

# isi audit settings global view

     Protocol Auditing Enabled: No

                 Audited Zones: -

               CEE Server URIs: -

                      Hostname:

       Config Auditing Enabled: No

         Config Syslog Enabled: No

         Config Syslog Servers: -

     Config Syslog TLS Enabled: No

  Config Syslog Certificate ID:

       Protocol Syslog Servers: -

   Protocol Syslog TLS Enabled: No

Protocol Syslog Certificate ID:

         System Syslog Enabled: No

         System Syslog Servers: -

     System Syslog TLS Enabled: No

  System Syslog Certificate ID:

          Auto Purging Enabled: No

              Retention Period: 180

       System Auditing Enabled: No

In this case, configuration auditing is disabled – its default setting. The following CLI syntax will enable (and verify) configuration auditing across the cluster:

# isi audit settings global modify --config-auditing-enabled 1

# isi audit settings global view | grep -i 'config audit'

       Config Auditing Enabled: Yes

In the next article, we’ll look at the config audit management, event viewing, and troubleshooting.

OneFS NFS Locking and Reporting – Part 2

In the previous article in this series we took a look at the new NFS locks and waiters reporting CLI command set and API endpoints in OneFS 9.5 and later. Next, we turn our attention to some additional context, caveats, and NFSv3 lock removal.

Before to the NFS locking enhancements in OneFS 9.5, the legacy CLI commands were somewhat inefficient.  Their output also included other advisory domain locks, such as SMB, which made the output harder to parse. The table below maps the new 9.5 CLI commands (and corresponding handlers), to the old NLM syntax. Note that the ‘isi_classic nfs locks and waiters’ CLI commands have also been deprecated in OneFS 9.5.

Type / Command set OneFS 9.5 and later OneFS 9.4 and earlier
Locks isi nfs locks isi nfs nlm locks
Sessions isi nfs nlm sessions isi nfs nlm sessions
Waiters isi nfs locks waiters isi nfs nlm locks waiters

When upgrading to OneFS 9.5 or later from a prior release, the legacy platform API handlers continue to function through and post upgrade. So any legacy scripts and automation are protected from this lock reporting deprecation. Additionally, while the new platform API handlers will work in during a rolling upgrade in mixed-mode, they will only return results for the nodes that have already been upgdraded (‘high nodes’).

Be aware that the NFS locking CLI framework does not support partial responses. However, if a node is down or the cluster has a rolling upgrade in progress, the alternative is to query the equivalent platform API endpoint instead.

Performance-wise, on very large, busy clusters, there is the possibility that the lock and waiter CLI commands’ output will be sluggish. In such instances, the ’–timeout flag’ can be used to increase the command timeout window. Additionally, output filtering can also be used to reduce number of locks reported.

When a lock is in a transition state, there is a chance that it may not have/report a version. In these instances, the ‘Version’ field will be represented as ‘—‘. For example:

# isi nfs locks list -v

Client: 1/TMECLI1:487722/10.22.10.250

Client ID: 487722351064074

LIN: 4295164422

Path: /ifs/locks/nfsv3/10.22.10.250_1

Lock Type: exclusive

Range: 0, 92233772036854775807

Created: 2023-08-18T08:03:52

Version: -

---------------------------------------------------------------

Total: 1

This behavior should be experienced very infrequently. However, if it is encountered, just execute the CLI command again and the lock version should be reported correctly.

When it comes to troubleshooting, NFSv3/NLM issues, if an NFSv3 client is consistently experiencing ‘NLM_DENIED’ or other lock management issues, this is often as a result of incorrectly configured firewall rules. For example, take the following packet capture (PCAP) excerpt from a Linux client:

   21 08:50:42.173300992  10.22.10.100 → 10.22.10.200 NLM 106    V4 LOCK Reply (Call In 19) NLM_DENIED

Often the assumption is that only the lockd or statd ports on the server side of the firewall need to be opened, and that the client always makes that connection that way. However, this is not the case. Instead, the server will frequently respond with a ‘let me get back to you’, then, later, it will reconnect to the client. As such, if the firewall blocks access to rcpbind on the client and/or lockd or statd on the client, connection failures will likely occur.

Occasionally it does become necessary to remove NLM locks and waiters from the cluster. Traditionally, the ‘isi_classic nfs clients rm’ command was frequently used, but that command has limitations, and is fully deprecated in OneFS 9.5 and later. Instead, the preferred method is to use the ‘isi nfs nlm sessions’ CLI utility, in conjunction with various other ancillary OneFS CLI commands, to clear problematic locks and waiters.

Note that the  ‘isi nfs nlm sessions’ CLI command, available in all current OneFS version, is Zone-Aware, and the output formatting is seen in the output for the client holding the lock, as it now shows the Zone ID number at the beginning. For example:

4/tme-linux1/10.22.10.250

The above represents:

Zone ID / Client _name / IP address of cluster node holding the connection.

A basic procedure to remove NFSv3 NLM locks and waiters from a cluster is as follows:

1.            First, list the NFS locks and search for the pertinent filename.

In OneFS 9.5 and later, the locks list can be filtered using the ‘–path’ argument.

# isi nfs locks list --path=<path> | grep <filename>

Be aware that the full path must be specified, starting with /ifs. There is no partial matching or substitution for paths in this command set.

For OneFS 9.4 and earlier, the following CLI syntax can be used:

#  isi_for_array -sX 'isi nfs nlm locks list | grep <filename>'

2.            Next, list the lock waiters associated with the same filename.

For OneFS 9.5 and later, the waiters list can also be filtered using the ‘–path’ syntax:

# isi nfs locks waiters –path=<path> | grep <filename>

With OneFS 9.4 and earlier, the following CLI syntax can be used:

# isi_for_array -sX 'isi nfs nlm locks waiters |grep -i <filename>'
  1. The next step is to confirm the client and LIN (logical inode number) being waited upon. This can be accomplished by querying the ‘efs.advlock.failover.lock_waiters’ sysctrl. For example:
# isi_for_array -sX 'sysctl efs.advlock.failover.lock_waiters'

For example:

[truncated output]
...
client = { '4/tme-linux1/10.20.10.200’, 0x26593d37370041 }
...
resource = 2:df86:0218

Note that for sanity checking, the ‘isi get -L’ CLI utility can be used to confirm the path of a file from its LIN:

# isi get -L <LIN>
  1.  The penultimate step involves the actual removal of the unwanted locks which are causing waiters to stack up.

Keep in mind that the ‘isi nfs nlm sessions’ command syntax is access zone-aware. As such, the following syntax will List the access zones by their IDs:

# isi zone zones list -v | grep -iE "Zone ID|name"

Once the desired zone ID has been determined, the ‘isi_run -z’ CLI utility can be used to specify the appropriate zone in which to run the ‘isi nfs nlm sessions’ commands:

# isi_run -z 4 -l root

Next, the ‘isi nfs nlm sessions delete’ CLI command will remove the specific lock waiter which is causing the issue. The command syntax requires specifying the client hostname and node IP of the node holding the lock.

# isi nfs nlm sessions delete –-zone <AZ_zone_ID> <hostname> <cluster-ip>

For example:

# isi nfs nlm sessions delete –zone 4 tme-linux1 10.20.10.200
Are you sure you want to delete all NFSv3 locks associated with client tme-linux1 against cluster IP 10.20.10.100? (yes/[no]): yes

5.   Finally, repeat the commands in step 1 above to confirm that the desired NLM locks and waiters have been successfully culled.

OneFS NFS Locking and Reporting

Also included among the plethora of OneFS 9.5 enhancements is an updated NFS lock reporting infrastructure, command set, and corresponding platform API endpoints. This new functionality includes enhanced listing and filtering options for both locks and waiters, based on NFS major version, client, LIN, path, creation time, etc. But first, some backstory…

The ubiquitous NFS protocol underwent some fundamental architectural changes between its versions 3 and 4. One of the major differences concerns the area of file locking.

NFSv4 is the most current major version of the protocol, and it natively incorporates file locking, thereby avoiding the need for any additional (and convoluted) RPC callback mechanisms, as with prior NFS versions. With NFSv4, locking is built in the main file protocol and supports new lock types, such as range locks, share reservations, and delegations/oplocks, which emulate those found in Window and SMB.

File lock state is maintained at the server under a lease-based model. A server defines a single lease period for all states held by an NFS client. If the client does not renew its lease within the defined period, all state associated with the client’s lease may be released by the server. If released, the client may either explicitly renew its lease, or simply issue a read request, or other associated operation. Additionally, with NFSv4, a client can elect whether to lock the entire file, or a byte range within a file.

In contrast to NFSv4, the NFSv3 protocol is stateless and does not natively support file locking. Instead, the ancillary NLM (Network Lock Manager) protocol supplies the locking layer. Because file locking is inherently stateful, NLM itself is considered stateful. For example, when an NFSv3 filesystem mounted on an NFS client receives a request to lock a file, instead of an NFS remote procedure call, it generates an NLM remote procedure call.

The NLM protocol itself consists of remote procedure calls that emulate the standard UNIX file control (fcntl) arguments and outputs. Because a process blocks waiting for a lock that conflicts with another lock holder, also known as a ‘blocking lock’, the NLM protocol has the notion of callbacks, from the file server to the NLM client to notify that a lock is available. As such, the NLM client sometimes acts as an RPC server in order to receive delayed results from lock calls.

Attribute NFSv3 NFSv4
State Stateless – A client does not technically establish a new session if it has the correct information to ask for files and so on. This allows for simple failover between OneFS nodes using dynamic IP pools Stateful – NFSv4 uses sessions in order to handle communication, as such both client and server must track session state to continue communicating.
Presentation User and Group info is presented numerically – Client and Server communicate user information by numeric identifiers, allowing the same user to appear as different names between client and server. User and Group info is presented as strings – Both the client and server must resolve the names of the numeric information stored. The server must lookup names to present, while the client must remap those to numbers on its end
Locking File Locking is out of band – uses NLM to perform locks. This requires the client to respond to RPC messages from the server to confirm locks have been granted, etc. File Locking is in band – No longer users a separate protocol for file locking, instead making it a type of call that is usually compounded with OPENs, CREATES, or WRITES
Transport Can run over TCP or UDP – This version of the protocol can run over UDP instead of TCP, leaving handling of loss and retransmission to the software instead of the operating system. We always recommend using TCP. Only supports TCP – Version 4 of NFS has left loss and retransmission up to the underlying operating system.

Can batch a series of calls in a single packet, allowing the server to process all of them and reply at the end. This is used to reduce the number of calls involved in common operations.

Since NFSv3 is stateless it requires more complexity to recover from failures such as client and server outages and network partitions. If an NLM server crashes, NLM clients that are holding locks must reestablish them on the server when it restarts. The NLM protocol deals with this by having the status monitor on the server send a notification message to the status monitor of each NLM client that was holding locks. The initial period after a server restart is known as the grace period, during which only requests to reestablish locks are granted. Thus, clients that reestablish locks during the grace period are guaranteed to not lose their locks.

When an NLM client crashes, ideally any locks it was holding at the time are removed from the pertinent NLM server(s). The NLM protocol handles this by having the status monitor on the client send a message to each server’s status monitor once the client reboots. The client reboot indication informs the server that the client no longer requires its locks. However, if the client crashes and fails to reboot, the client’s locks will persist indefinitely. This is undesirable for two primary reasons: Resources are indefinitely leaked. Eventually another client will want to get a conflicting lock on at least one of the files the crashed client had locked and, as a result, the other client is postponed indefinitely.

Therefore, having NFS server utilities to swiftly and accurately report on lock and waiter status, and utilities to clear NFS lock waiters is highly desirable for administrators – particularly on clustered storage architectures.

Prior to OneFS 9.5, the old NFS locking CLI commands were somewhat inefficient and also showed other advisory domain locks, which rendered the output somewhat confusing. The following table shows the new CLI commands (and corresponding handlers), which replace the older NLM syntax.

Type / Command set OneFS 9.4 and earlier OneFS 9.5
Locks isi nfs nlm locks isi nfs locks
Sessions isi nfs nlm sessions isi nfs nlm sessions
Waiters isi nfs nlm locks waiters isi nfs locks waiters

In OneFS 9.5 and later, the old API handlers will still exist to avoid breaking existing scripts and automation, but the CLI command syntax is deprecated and will no longer work.

Also be aware that the ‘isi_classic nfs locks and waiters’ CLI commands have also been disabled in OneFS 9.5. Attempts to run these will yield the following warning message:

# isi_classic nfs locks

This command has been disabled. Please use 'isi nfs' for this functionality.

The new ‘isi nfs locks’ CLI command output includes the following locks object fields:

Field Description
Client The client host name, Frequently Qualified Domain Name, or IP
Client_ID The client ID (internally generated)
Created The UNIX Epoch time that the lock was created
ID The lock ID (Id necessary for platform API sorting, not shown in CLI output)
LIN The logical inode number (LIN) of the locked resource
Lock_type The type of lock (shared, exclusive, none)
Path Path of locked file
Range The byte range within the file that is locked
Version The NFS major version: v3, or v4

Note that the ISI_NFS_PRIV RBAC privilege is required in order to view the NFS locks or waiters via the CLI or PAPI. In addition to ‘root’, the cluster’s ‘SystemAdmin’ and ‘SecurityAdmin’ roles contain this privilege by default.

Additionally, the new locks CLI command sets ha a default timeout of 60 seconds. If the cluster is very large, the timeout may need to be increased for the CLI command. For example:

# isi –timeout <timeout value> nfs locks list

The basic architecture behind the enhanced NFS locks reporting framework is as follows:
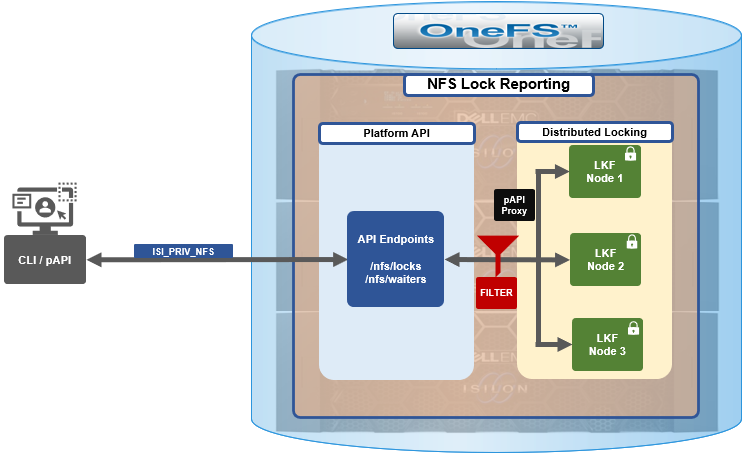
The new API handlers leverage the platform API proxy, yielding increased performance over the legacy handlers. Additionally, updated syscalls have been implemented to facilitate filtering by NFS service and major version.

Since NFSv3 is stateless, the cluster does not know when a client has lost its state unless it reconnects. For maximum safety, the OneFS locking framework (lk) holds locks forever. The ‘isi nfs nlm sessions’ CLI command allows administrators to manually free NFSv3 locks in such cases, and this command remains available in OneFS 9.5 as well as prior versions. NFSv3 locks may also be leaked on delete, since a valid inode is required for lock operations. As such, lkf has a lock reaper which periodically checks for locks associated with deleted files.

In OneFS 9.5 and later, current NFS locks can be viewed with the new ‘isi nfs locks list’ command. This command set also provides a variety of options to limit and format the display output. In its basic form, this command generates a basic list of client IP address and the path. For example:

# isi nfs locks list

Client                              Path

-------------------------------------------------------------------

1/TMECLI1:487722/10.22.10.250       /ifs/locks/nfsv3/10.22.10.250_1

1/TMECLI1:487722/10.22.10.250       /ifs/locks/nfsv3/10.22.10.250_2

Linux NFSv4.0 TMECLI1:487722/10.22.10.250       /ifs/locks/nfsv4/10.22.10.250_1

Linux NFSv4.0 TMECLI1:487722/10.22.10.250       /ifs/locks/nfsv4/10.22.10.250_2

-------------------------------------------------------------------

Total: 4

To include more information, the ‘-v’ flag can be used to generate a verbose locks listing:

 # isi nfs locks list -v

Client: 1/TMECLI1:487722/10.22.10.250

Client ID: 487722351064074

LIN: 4295164422

Path: /ifs/locks/nfsv3/10.22.10.250_1

Lock Type: exclusive

Range: 0, 92233772036854775807

Created: 2023-08-18T08:03:52

Version: v3

---------------------------------------------------------------

Client: 1/TMECLI1:487722/10.22.10.250

Client ID: 5175867327774721

LIN: 42950335042

Path: /ifs/locks/nfsv3/10.22.10.250_1

Lock Type: exclusive

Range: 0, 92233772036854775807

Created: 2023-08-18T08:10:31

Version: v3

---------------------------------------------------------------

Client: Linux NFSv4.0 TMECLI1:487722/10.22.10.250

Client ID: 487722351064074

LIN: 429516442

Path: /ifs/locks/nfsv3/10.22.10.250_1

Lock Type: exclusive

Range: 0, 92233772036854775807

Created: 2023-08-18T08:19:48

Version: v4

---------------------------------------------------------------

Client: Linux NFSv4.0 TMECLI1:487722/10.22.10.250

Client ID: 487722351064074

LIN: 4295426674

Path: /ifs/locks/nfsv3/10.22.10.250_2

Lock Type: exclusive

Range: 0, 92233772036854775807

Created: 2023-08-18T08:17:02

Version: v4

---------------------------------------------------------------

Total: 4

The above syntax returns more detailed information for each lock, including client ID, LIN, path, lock type, range, created date, and NFS version.

The lock listings can also be filtered by client or client-id. Note that the –client option must be the full name in quotes.

# isi nfs locks list --client="full_name_of_client/IP_address" -v

For example:

# isi nfs locks list --client="1/TMECLI1:487722/10.22.10.250" -v

Client: 1/TMECLI1:487722/10.22.10.250

Client ID: 5175867327774721

LIN: 42950335042

Path: /ifs/locks/nfsv3/10.22.10.250_1

Lock Type: exclusive

Range: 0, 92233772036854775807

Created: 2023-08-18T08:10:31

Version: v3

Additionally, be aware that the CLI does not support partial names, so the full name of the client must be specified.

Filtering by NFS version can be helpful when attempting to narrow down which client has a lock. For example, to show just the NFSv3 locks:

# isi nfs locks list --version=v3

Client                              Path

-------------------------------------------------------------------

1/TMECLI1:487722/10.22.10.250       /ifs/locks/nfsv3/10.22.10.250_1

1/TMECLI1:487722/10.22.10.250       /ifs/locks/nfsv3/10.22.10.250_2

-------------------------------------------------------------------

Total: 2

Note that the ‘–-version’ flag supports both ‘v3’ and ‘nlm’ as arguments, and will return the same v3 output in either case. For example:

# isi nfs locks list --version=nlm

Client                              Path

-------------------------------------------------------------------

1/TMECLI1:487722/10.22.10.250       /ifs/locks/nfsv3/10.22.10.250_1

1/TMECLI1:487722/10.22.10.250       /ifs/locks/nfsv3/10.22.10.250_2

-------------------------------------------------------------------

Total: 2

Filtering  by LIN or path is also supported. For example:

# isi nfs locks list --lin=42950335042 -v

Client: 1/TMECLI1:487722/10.22.10.250

Client ID: 5175867327774721

LIN: 42950335042

Path: /ifs/locks/nfsv3/10.22.10.250_1

Lock Type: exclusive

Range: 0, 92233772036854775807

Created: 2023-08-18T08:10:31

Version: v3

Or by path:

# isi nfs locks list --path=/ifs/locks/nfsv3/10.22.10.250_2

 -v

Client: Linux NFSv4.0 TMECLI1:487722/10.22.10.250

Client ID: 487722351064074

LIN: 4295426674

Path: /ifs/locks/nfsv3/10.22.10.250_2

Lock Type: exclusive

Range: 0, 92233772036854775807

Created: 2023-08-18T08:17:02

Version: v4

Be aware that the full path must be specified, starting with /ifs. There is no partial matching or substitution for paths in this command set.

Filtering can also be performed by creation time, for example:

# isi nfs locks list --created=2023-08-17T09:30:00 -v

Note that, when filtering by ‘created’ the output will include all locks that were created before or at the time provided.

The ‘—limits’ argument can be used curtail the number of results returned, and ‘limits’ can be used in conjunction with all other query options. For example, to limit the output of the NFSv4 locks listing to one lock:

# isi nfs locks list -–version=v4 --limit=1

Note that ‘limit’ can be used with the range of query types.

The filter options are mutually exclusive with the exception of ‘version’, and ‘version’ can be used with any of the other filter options. For example, filtering by both ‘created’ and ‘version’:

This can be helpful when troubleshooting and trying to narrow down results.

In addition to locks, OneFS 9.5 also provides the ‘isi nfs locks waiters’ CLI command set. Note that ‘waiters’ are specific to NFSv3 clients, and the CLI reports any v3 locks that are pending and not yet granted.

Since NFSv3 is stateless, a cluster does not know when a client has lost its state unless it reconnects. For maximum safety, lk holds locks forever. The isi nfs nlm command allows administrators to manually free locks in such cases. Locks may also be leaked on delete, since a valid inode is required for lock operations. Thus lkf has a lock reaper which periodically checks for locks associated with deleted files

# isi nfs locks waiters

The ‘waiters’ CLI syntax uses a similar range of query arguments as the ‘isi nfs locks list’ command set.

In addition to the CLI, the platform API can also be used to query both NFS locks and NFSv3 waiters. For example, using ‘curl’ to view the waiters via the OneFS pAPI:

# curl -k -u <username>:<passwd> https://localhost:8080/platform/protocols/nfs/waiters”

{

“total” : 2,

“waiters”;

}

{

“client” : “1/TMECLI1487722/10.22.10.250”,

“client_id” : “4894369235106074”,

“created” : “1668146840”,

“id” : “1 1YUIAEIHVDGghSCHGRFHTiytr3u243567klj212-MANJKJHTTy1u23434yui-ouih23ui4yusdftyuySTDGJSDHVHGDRFhgfu234447g4bZHXhiuhsdm”,

“lin” : “4295164422”,

“lock_type” : “exclusive”

“path” : “/ifs/locks/nfsv3/10.22.10.250_1”

“range” : [0, 92233772036854775807 ],

“version” : “v3”

}

},

“total” : 1

}

Similarly, using the platform API to show locks, filtered by client ID:

# curl -k -u <username>:<passwd> “https://<address>:8080/platform/protocols/nfs/locks?client=<client_ID>”

For example:

# curl -k -u <username>:<passwd> “https://localhost:8080/platform/protocols/nfs/locks?client=1/TMECLI1487722/10.22.10.250”

{

“locks”;

}

{

“client” : “1/TMECLI1487722/10.22.10.250”,

“client_id” : “487722351064074”,

“created” : “1668146840”,

“id” : “1 1YUIAEIHVDGghSCHGRFHTiytr3u243567FCUJHBKD34NMDagNLKYGHKHGKjhklj212-MANJKJHTTy1u23434yui-ouih23ui4yusdftyuySTDGJSDHVHGDRFhgfu234447g4bZHXhiuhsdm”,

“lin” : “4295164422”,

“lock_type” : “exclusive”

“path” : “/ifs/locks/nfsv3/10.22.10.250_1”

“range” : [0, 92233772036854775807 ],

“version” : “v3”

}

},

“Total” : 1

}

Note that, as with the CLI, the platform API does not support partial name matches, so the full name of the client must be specified.

OneFS SSL Certificate Creation and Renewal – Part 2

In the initial article in this series, we took a look at the OneFS SSL architecture, plus the first two steps in the basic certificate renewal or creation flow:

The procedure below includes options to complete a self-signed certificate replacement or renewal, or to request an SSL replacement or renewal from a Certificate Authority (CA).


Signing the SSL Certificate

At this point, depending on the security requirements of the environment, the certificate can either be self-signed or signed by a Certificate Authority.

a.      Self-Sign the SSL Certificate.

The following CLI syntax can be used to self-sign the certificate with the key, which creates a new signed certificate which, in this instance, is valid for 1 year (365 days):

# openssl x509 -req -days 365 -in server.csr -signkey server.key -out server.crt

To verify that the key matches the certificate, ensure that the output of the following CLI commands return the same md5 checksum value:

# openssl x509 -noout -modulus -in server.crt | openssl md5           
# openssl rsa -noout -modulus -in server.key | openssl md5

Next, proceed to the ‘Add certificate to cluster’ section of this article once this step is complete.

b.      Use a CA to Sign the Certificate.

If a CA is signing the certificate, ensure that the new SSL certificate is in x509 format, and includes the entire certificate trust chain.

Note that the CA may return the new SSL certificate, the intermediate cert, and the root cert in different files. If this is the case, the PEM formatted certificate will need to be created manually.

Also, the correct ordering is important when creating the PEM-formatted certificate. The SSL cert must be the top of the file, followed by the intermediate certificate, and with the root certificate at the bottom. For example:

-----BEGIN CERTIFICATE-----

<Contents of new SSL certificate>

-----END CERTIFICATE-----

-----BEGIN CERTIFICATE-----

<Contents of intermediate certificate>

<Repeat as necessary for every intermediate certificate provided by your CA>

-----END CERTIFICATE-----

-----BEGIN CERTIFICATE-----

<Contents of root certificate file>

-----END CERTIFICATE-----

A simple method for creating the PEM formatted file from the CLI is to ‘cat’ the in the correct order as follows:

# cat CA_signed.crt intermediate.crt root.crt > onefs_pem_formatted.crt

Copy the onefs_pem_formatted.crt file to /ifs/tmp and rename it to server.crt.

Note that if any of the above files are generated with a ‘.cer’ extension, it should be renamed with a .crt extension instead.

The attributes and integrity of the certificate can be sanity checked with the following CLI syntax:

# openssl x509 -text -noout -in server.crt


Adding the certificate to the cluster.    

The first step in adding the certificate involves importing the new certificate and key into the cluster:

# isi certificate server import /ifs/tmp/server.crt /ifs/tmp/server.key

Next, verify that the certificate imported successfully:

# isi certificate server list -v

Note that the following CLI command can be used to show just the names and corresponding IDs of the certificates:

# isi certificate server list -v | grep -A1 "ID:"

Set the freshly imported certificate to be the default:

# isi certificate settings modify --default-https-certificate=<id_of_cert_to_set_as_default>

Confirm that the imported certificate is being used as default by verifying status of ‘Default HTTPS Certificate’:

# isi certificate settings view

If there is an unused or outdated certificate, it can be deleted with the following CLI syntax:

# isi certificate server delete --id=<id_of_cert_to_delete>

Next, the new imported certificate can be viewed and verified with the following CLI command:

# isi certificate server view --id=<id_of_cert>

Note that ports 8081 and 8083 still use the certificate from the local directory for SSL. Follow the below steps if you want to use the new certificates for port 8081/8083.

# isi services -a isi_webui disable# chmod 640 server.key# chmod 640 server.crt# isi_for_array -s 'cp /ifs/tmp/server.key /usr/local/apache2/conf/ssl.key/server.key'# isi_for_array -s 'cp /ifs/tmp/server.crt /usr/local/apache2/conf/ssl.crt/server.crt'isi services -a isi_webui enable


Verifying the SSL certificate.

There are two simple ways of verifying the updated SSL certificate: Either via the CLI, using the ‘openssl’ command as follows:

# echo QUIT | openssl s_client -connect localhost:8080

Or via a web browser, using the following URL:

 https://<cluster_name>:8080

Note that where <cluster_name> is the FQDN or IP address that’s typically used to access the cluster’s WebUI interface. The security details for the web page will contain the location and contact info, as above.

In both cases, the output includes location and contact info. For example:

Subject: C=US, ST=<yourstate>, L=<yourcity>, O=<yourcompany>, CN=isilon.example.com/emailAddress=tme@isilon.com

Additionally, OneFS provides warning of an impending certificate expiry by sending a CELOG event alert along the lines of the following:

SW_CERTIFICATE_EXPIRING: X.509 certificate default is nearing expiration: 

Event: 400170001
Certificate 'default' in '**' store is nearing expiration:

Note that OneFS does not attempt to automatically renew a certificate. Instead an expiring cert has to be renewed manually, per the procedure described above.

When adding an additional certificate, any time you connect to that SmartConnect name via HTTPS, the matching cert is used. If no matching certificate is found, OneFS will automatically revert to using the default self-signed certificate.

OneFS SSL Certificate Renewal – Part 1

When using either the OneFS WebUI or platform API (pAPI), all communication sessions are encrypted using SSL (Secure Sockets Layer), also known as Transport Layer Security (TLS). In this series, we’ll take a look at how to replace or renew the SSL certificate for the OneFS WebUI.

SSL requires a certificate that serves two principal function: It grants permissions to use encrypted communication via Public Key Infrastructure, and also authenticates the identity of the certificate’s holder.

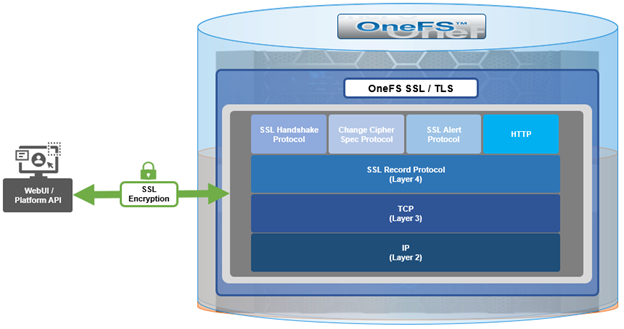
Architecturally, SSL comprises four fundamental components:

SSL Component Description
Alert Reports issues.
Change cipher spec Implements negotiated crypto parameters.
Handshake Negotiates crypto parameters for SSL session. Can be used for many SSL/TCP connections.
Record Provides encryption and MAC.

These sit in the stack as follows:

The basic handshake process begins with a client requesting an HTTPS WebUI session to the cluster. OneFS then returns the SSL certificate and public key. The client creates a session key, encrypted with the public key it’s received from OneFS. At this point, the client only knows the session key. The client now sends its encrypted session key to the cluster, which decrypts it with the private key. Now, both the client and OneFS know the session key. So, finally the session, encrypted via symmetric session key, can be established. OneFS automatically defaults to the best supported version of SSL, based on the client request.

A PowerScale cluster initially contains a self-signed certificate, which can be used as-is, or replaced with a third-party certificate authority (CA)-issued certificate. If the self-signed certificate is used, upon expiry, it must be replaced with either a third-party (public or private) CA-issued certificate or another self-signed certificate that is generated on the cluster. The following are the default locations for the server.crt and server.key files.

File Location
SSL certificate /usr/local/apache2/conf/ssl.crt/server.crt
SSL certificate key /usr/local/apache2/conf/ssl.key/server.key

The ‘isi certificate settings view’ CLI command displays all of the certificate-related configuration options. For example:

# isi certificate settings view

         Certificate Monitor Enabled: Yes

Certificate Pre Expiration Threshold: 4W2D

           Default HTTPS Certificate

                                      ID: default

                                 Subject: C=US, ST=Washington, L=Seattle, O="Isilon", OU=Isilon, CN=Dell, emailAddress=tme@isilon.com

                                  Status: valid

The above ‘certificate monitor enabled’ and ‘certificate pre expiration threshold’ config options govern a nightly cron job, which monitors the expiration of each managed certificate and fires a CELOG alert if a certificate is set to expire within the configured threshold. Note that the default expiration is 30 days (4W2D, which represents 4 weeks plus 2 days). The ‘ID: default’ config option indicates that this certificate is the default TLS certificate.

The basic certificate renewal or creation flow is as follows:

The steps below include options to complete a self-signed certificate replacement or renewal, or to request an SSL replacement or renewal from a Certificate Authority (CA).

Backing up the existing SSL certificate

The first task is to obtain the list of certificates by running the following CLI command, and identify the appropriate one to renew:

# isi certificate server list

ID      Name    Status  Expires

-------------------------------------------

eb0703b default valid   2025-10-11T10:45:52

-------------------------------------------

It’s always a prudent practice to save a backup of the original certificate and key. This can be easily accomplished via the following CLI commands, which, in this case, create the directory ‘/ifs/data/ssl_bkup’ directory, set the perms to root-only access, and copy the original key and certificate to it:

# mkdir -p /ifs/data/ssl_bkup

# chmod 700 /ifs/data/ssl_bkup

# cp /usr/local/apache24/conf/ssl.crt/server.crt /ifs/data/ssl_bkup

# cp /usr/local/apache24/conf/ssl.key/server.key /ifs/data/ssl_bkup

# cd !$

cd /ifs/data/ssl_bkup

# ls

server.crt      server.key

Renewing or creating a certificate

The next step in the process involves either the renewal of an existing certificate or creation of a certificate from scratch. In either case, first, create a temporary directory, for example /ifs/tmp:

# mkdir /ifs/tmp; cd /ifs/tmp

a)       Renew an existing self-signed Certificate.

The following syntax creates a renewal certificate that is based on the existing ssl.keyThe value of the ‘-days’ parameter can be adjusted to generate a certificate with the desired expiration date. For example, the following command will create a one-year certificate.

# cp /usr/local/apache2/conf/ssl.key/server.key ./ ; openssl req -new -days 365 -nodes -x509 -key server.key -out server.crt

Answer the system prompts to complete the self-signed SSL certificate generation process, entering the pertinent information location and contact information. For example:

Country Name (2 letter code) [AU]:US
State or Province Name (full name) [Some-State]:Washington
Locality Name (eg, city) []:Seattle
Organization Name (eg, company) [Internet Widgits Pty Ltd]:Isilon
Organizational Unit Name (eg, section) []:TME
Common Name (e.g. server FQDN or YOUR name) []:isilon.com
Email Address []:tme@isilon.com

When all the information has been successfully entered, the server.csr and server.key files will be generated under the /ifs/tmp directory.

Optionally,  the attributes and integrity of the certificate can be verified with the following syntax:

# openssl x509 -text -noout -in server.crt

Next, proceed directly to the ‘Add the certificate to the cluster’ steps in section 4 of this article.

b)      Alternatively, a certificate and key can be generated from scratch, if preferred.

The following CLI command can be used to create an 2048-bit RSA private key:

# openssl genrsa -out server.key 2048

Generating RSA private key, 2048 bit long modulus

............+++++

...........................................................+++++

e is 65537 (0x10001)

Next, create a certificate signing request:

# openssl req -new -nodes -key server.key -out server.csr

For example:

# openssl req -new -nodes -key server.key -out server.csr -reqexts SAN -config <(cat /etc/ssl/openssl.cnf <(printf "[SAN]\nsubjectAltName=DNS:isilon.com"))

You are about to be asked to enter information that will be incorporated

into your certificate request.

What you are about to enter is what is called a Distinguished Name or a DN.

There are quite a few fields but you can leave some blank

For some fields there will be a default value,

If you enter '.', the field will be left blank.

-----

Country Name (2 letter code) [AU]:US

State or Province Name (full name) [Some-State]:WA

Locality Name (eg, city) []:Seattle

Organization Name (eg, company) [Internet Widgits Pty Ltd]:Isilon

Organizational Unit Name (eg, section) []:TME

Common Name (e.g. server FQDN or YOUR name) []:h7001

Email Address []:tme@isilon.com

Please enter the following 'extra' attributes

to be sent with your certificate request

A challenge password []:1234

An optional company name []:

#

Answer the system prompts to complete the self-signed SSL certificate generation process, entering the pertinent information location and contact information. Additionally, a ‘challenge password’ with a minimum of 4-bytes in length will need to be selected and entered.

As prompted, enter the information to be incorporated into the certificate request. When completed, the server.csr and server.key files will appear in the /ifs/tmp directory.

If desired, a CSR file for a Certificate Authority which includes Subject-Alternative-Names (SAN) can be generated. For example, additional host name entries can be added by using a comma (IE. DNS:isilon.com,DNS:www.isilon.com).

In the next article, we’ll look at the certificate singing, addition, and verification steps of the process.