Prior to OneFS 9.4, Healthchecks were frequently regarded by storage administrators as yet another patch that need to be installed on a PowerScale cluster. As a result, their adoption was routinely postponed or ignored, potentially jeopardizing a cluster’s wellbeing. To address this, OneFS 9.4 introduces Healthcheck auto-updates, enabling new Healthchecks to be automatically downloaded and non-disruptively installed on a PowerScale cluster without any user intervention.
This new automated Healthcheck update framework helps accelerate the adoption of OneFS Healthchecks, by removing the need for manual checks, downloads and installation. In addition to reducing management overhead, the automated Healthchecks integrate with CloudIQ to update the cluster health score – further improving operational efficiency, while avoiding known issues affecting cluster availability.
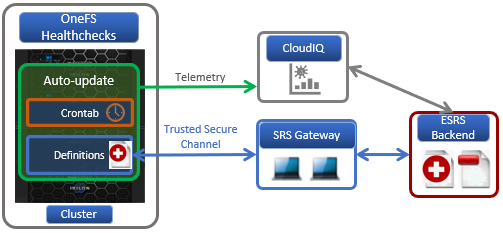
Formerly known as Healthcheck patches, with OneFS 9.4 these are now renamed as Healthcheck definitions. The Healthcheck framework checks for updates to these definitions via Dell Secure Remote Services (SRS).
An auto-update configuration setting in the OneFS SRS framework controls whether the Healthcheck definitions are automatically downloaded and installed on a cluster. A OneFS platform API endpoint has been added to verify the Healthcheck version, and Healthchecks also optionally support OneFS compliance mode.
Healthcheck auto-update is enabled by default in OneFS 9.4, and is available for both existing and new clusters running 9.4, but can also be easily disabled from the CLI. If the auto-update is on and SRS is enabled, the healthcheck definition is downloaded to the desired staging location and then automatically and non-impactfully installed on the cluster. Any Healthcheck definitions that are automatically downloaded are obviously signed and verified before being applied, to ensure their security and integrity.
So the Healthcheck auto-update execution process itself is as follows:
1. Auto-update queries current Healthcheck version
2. Checks Healthcheck definition availability via SRS.
3. Version comparison.
4. Downloads new Healthcheck definition package to the cluster.
5. Package is unpacked and installed.
6. Telemetry data is sent, and Healthcheck framework updated with new version.
On the cluster, the Healthcheck auto-update utility, ‘isi_healthcheck_update’, monitors for new package once a night, by default. This python script checks the cluster’s current Healthcheck definition version and new updates availability via SRS. Next it performs version comparison of the install package, after which, the new definition is downloaded and installed. Telemetry data is sent and the /var/db/healthcheck_version.json file is created if it’s not already present. This json file is then updated with the new healthcheck version info.
In order to configure and use the Healthcheck auto-update functionality, the following prerequisite steps are required::
- Upgrade cluster to OneFS 9.4 and commit the upgrade.
- In order to use the isi_healthcheck script, OneFS needs to be licensed and connected to the ESRS gateway. OneFS 9.4 also introduces a new option for ESRS, ‘SRS Download Enabled’, which must be set to ‘Yes’ (the default value) to allow the ‘isi_healthcheck_update’ utility to run. This can be done with the following syntax, in this example using ‘lab-sea-esrs.onefs.com’ as the primary ESRS gateway:
# isi esrs modify --enabled=yes --primary-esrs-gateway=10.12.15.50 --srs-download-enabled=true
The ESRS configuration can be confirmed as follows:
# isi esrs view

                                    Enabled: Yes

                       Primary ESRS Gateway: 10.12.15.50

                     Secondary ESRS Gateway:

                        Alert on Disconnect: Yes

                       Gateway Access Pools: -

          Gateway Connectivity Check Period: 60

License Usage Intelligence Reporting Period: 86400

                           Download Enabled: No

                       SRS Download Enabled: Yes

          ESRS File Download Timeout Period: 50

           ESRS File Download Error Retries: 3

              ESRS File Download Chunk Size: 1000000

             ESRS Download Filesystem Limit: 80

        Offline Telemetry Collection Period: 7200

                Gateway Connectivity Status: Connected
- Next, the cluster is onboarded into CloudIQ via its web interface, which requires creating a site, and then from the ‘Add Product’ page configuring the serial number of each node in the cluster, along with the product type “ISILON_NODE”, site ID, and then selecting ‘Submit’.:
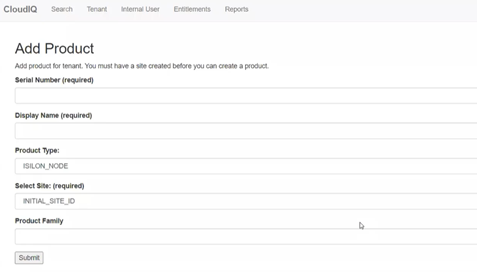
CloudIQ cluster onboarding typically takes a couple of hours and, when complete, the ‘Product Details’ page will show the ‘CloudIQ Status’, ‘ESRS Data’, and ‘CloudIQ Data’ fields as ‘Enabled’.

- Verify via cluster status that cluster is available and connected in CloudIQ
Once these pre-requisite steps are complete, auto-update can be enabled via the new ‘isi_healthcheck_update’ CLI command. For example, to enable:
# isi_healthcheck_update --enable

2022-05-02 22:21:27,310 - isi_healthcheck.auto_update - INFO - isi_healthcheck_update started

2022-05-02 22:21:27,513 - isi_healthcheck.auto_update - INFO - Enable autoupdate
Similarly, auto-update can also be easily disabled, either by:
# isi_healthcheck_update -s --enable
Or:
# isi esrs modify --srs-download-enabled=false
Auto-update also has the following gconfig global config options and default values:
# isi_gconfig -t healthcheck

Default values: healthcheck_autoupdate.enabled (bool) = true healthcheck_autoupdate.compliance_update (bool) = false healthcheck_autoupdate.alerts (bool) = false healthcheck_autoupdate.max_download_package_time (int) = 600 healthcheck_autoupdate.max_install_package_time (int) = 3600 healthcheck_autoupdate.number_of_failed_upgrades (int) = 0 healthcheck_autoupdate.last_failed_upgrade_package (char*) = healthcheck_autoupdate.download_directory (char*) = /ifs/data/auto_upgrade_healthcheck/downloads
The isi_healthcheck_update utility is scheduled by cron and executed across all the nodes in the cluster, as follows:
# grep -i healthcheck /etc/crontab

# Nightly Healthcheck update

0       1       *       *       *       root    /usr/bin/isi_healthcheck_update -s
This default /etc/crontab entry executes auto-update once daily at 1am. However, this schedule can be adjusted to meet the needs of the local environment.
Auto-update checks for new package availability and downloads and performs a version comparison of the installed and the new package. The package is then installed, telemetry data sent, and the healthcheck_version.json file updated with new version.
After the Healthcheck update process has completed, the following CLI command can be used to view any automatically downloaded Healthcheck packages. For example:
# isi upgrade patches list

Patch Name               Description                                Status

-----------------------------------------------------------------------------

HealthCheck_9.4.0_32.0.3 [9.4.0 UHC 32.0.3] HealthCheck definition  Installed

-----------------------------------------------------------------------------

Total: 1
Additionally, viewing the json version file will also confirm this:
# cat /var/db/healthcheck_version.json

{“version”: “32.0.3”}
In the unlikely event that auto-updates runs into issues, the following troubleshoot steps can be of benefit:
- Confirm that Healthcheck auto-update is actually enabled:
Check the ESRS global config settings and verify they are set to ‘True’.
# isi_gconfig -t esrs esrs.enabled

esrs.enabled (bool) = true

# isi_gconfig -t esrs esrs.srs_download_enabled

esrs.srs_download_enabled (bool) = true
If not, run:
# isi_gconfig -t esrs esrs.enabled=true

# isi_gconfig -t esrs esrs.srs_download_enabled=true
- If an auto-update patch installation is not completed within 60 minutes, OneFS increments the unsuccessful installations counter for the current patch, and re-attempts installation the following day.
- If the unsuccessful installations counter exceeds 5 attempts, installation will be aborted. However, the following auto-update gconfig values can be reset as follows to re-enable installation:
# isi_gconfig -t healthcheck healthcheck_autoupdate.last_failed_upgrade_package = 0

# isi_gconfig -t healthcheck healthcheck_autoupdate.number_of_failed_upgrades = ""
- In the event that a patch installation status is reported as ‘failed’, as below, the recommendation is to contact Dell Support to diagnose and resolve the issue:
# isi upgrade patches list

Patch Name               Description                                Status

-----------------------------------------------------------------------------

HealthCheck_9.4.0_32.0.3 [9.4.0 UHC 32.0.3] HealthCheck definition  Failed

-----------------------------------------------------------------------------

Total: 1
However, the following CLI command can be carefully used to repair the patch system by attempting to abort the most recent failed action:
# isi upgrade patches abort
The ‘isi upgrade archive –clear’ command stops the current upgrade and prevents it from being resumed:
# isi upgrade archive --clear
Once the upgrade status is reported as ‘unknown’ run:
# isi upgrade patch uninstall
- The ‘/var/log/isi_healthcheck.log’ is also a great source for detailed auto-upgrade information.