Received the following question from the field, which seemed like it would make a useful blog article:
“I have an 8 node A2000 cluster with 12TB drives that has a recommended protection level of +2d:1n. I need to add capacity because the cluster is already 87% full so will be adding a new half chassis/node pair. According to the sizer at 10 nodes the cluster’s recommended protection level changes to +3d:1n1d. What’s the quickest way to go about this?”
Essentially, this boils down to whether the protection level should be changed before or after adding the new nodes.
The principle objective here is efficiency, by limiting the amount of protection and layout work that OneFS has to perform. In this case, both node addition and a change in protection level require that the cluster’s restriper daemon to run. This entails two long running operations: To balance data evenly across the cluster and to increase the data protection.
If the new A2000s are added first, and then the cluster protection is changed to the recommend level for the new configuration, the process would look like:
1) Add a new node pair to the cluster
2) Let rebalance finish
3) Configure the data protection level to +3d:1n1d
4) Allow the restriper to complete the re-protection
However, by altering the protection level first, all the data restriping can be performed more efficiently and in a single step:
1) Change the protection level setting to +3d:1n1d
2) Add nodes (immediately after changing the protection level)
3) Let rebalance finish
In addition to reducing the amount of work the cluster has to do, this streamlined process also has the benefit of getting data re-protected at the new recommended level more quickly.
OneFS protects and balances data by writing file blocks across multiple drives on different nodes. This process is known as ‘restriping’ in OneFS jargon. The Job Engine defines a restripe exclusion set that contains those jobs which involve file system management, protection and on-disk layout. The restripe set encompasses the following jobs:
| Job | Description |
| Autobalance(Lin) | Balance free space in a cluster |
| FlexProtect(Lin) | Scans file system after device failure to ensure all files remain protected |
| MediaScan | Locate and clear media-level errors from disks |
| MultiScan | Runs AutoBalance and Collect jobs concurrently |
| SetProtectPlus | Applies the default file policy (unless SmartPools is activated) |
| ShadowStoreProtect | Protect shadow stores |
| SmartPools | Protects and moves data between tiers of nodes within cluster |
| Upgrade | Manages OneFS version upgrades |
Each of the Job Engine jobs has an associated restripe goal, which can be displayed with the following command:
# isi_gconfig -t job-config | grep restripe_goal
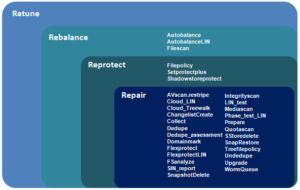
The different restriper functions operate as follows, where each in the path is a superset of the previous:
![]()
The following table describes the action and layout goal of each restriper function:
| Function | Detail | Goal |
| Retune | Always restripe using the retune layout goal. Originally intended to optimize layout for performance, but has instead become a synonym for ‘force restripe’. | LAYOUT_RETUNE |
| Rebalance | Attempt to balance utilization between drives etc. Also address all conditions implied by REPROTECT. | LAYOUT_REBALANCE |
| Reprotect | Change the protection level to more closely match the policy if the current cluster state allows wider striping or more mirrors. Re-evaluate the disk pool policy and SSD strategy. Also address all conditions implied by REPAIR. | LAYOUT_REPAIR |
| Repair | Replaces any references to restripe_from (down/smartfailed) components. Also fixes recovered writes. | LAYOUT_REPAIR |
Here’s how the various Job Engine jobs (as reported by the isi_gconfig –t job-config command above) align with the four restriper goals:
The retune goal moves the current disk pool to the bottom of the list, increasing the likelihood (but not guaranteeing) that another pool will be selected as the restripe target. This is useful, for example, in the event of a significant drive loss in one of the disk pools that make up the node’s pool (eg. disk pool 4 suffers loss of 2+ drives and it becomes > 90% full). Using a retune goal more ‘quickly’ forces rebalance to the other pools.
So, an efficient approach to the earlier cluster expansion scenario is to change protection and then add the new node. A procedure for this is as follows:
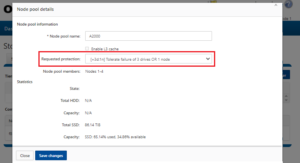
- Reconfigure the protection level to the recommended setting for the appropriate node pool(s). This can be done from the WebUI by navigating to File System > Storage Pools > SmartPools and editing the appropriate node pool(s):
2. Especially for larger clusters (ie. twenty nodes or more), of if there’s a mix of node hardware generations, it’s helpful to do some prep work upfront prior to adding a node. Prior to adding node(s):
-
- Image any new node to the same OneFS version that the cluster is running.
- Ensure that any new nodes have the correct versions of node and drive firmware, plus any patches that may have been added, before joining to the cluster.
- If the nodes are from different hardware generations or configuration, ensure that they fit within the Node Compatibility requirements for the cluster’s OneFS version.
3. Set the Job Engine daemon to ‘disable’ an hour or so prior to adding new node(s) to help ensure a clean node join. This can be done with the following command:
# isi services –a isi_job_d disable
4. Add the new node(s) and verify the healthy state of the expanded cluster:
5. Confirm there are no un-provisioned drives:
# disi –I diskpools ls | grep –i “Unprovisioned drives”
6. Check that the node(s) joined the existing pools
# isi storagepool list
7. Restart the Job Engine:
# isi services –a isi_job_d enable
8. After adding all nodes, the recommendation for a cluster with SSDs is to run AutoBalanceLin with an impact policy of ‘LOW’ or OFF_HOURS. For example:
# isi job jobs start autobalancelin --policy LOW
9. To ensure the restripe is going smoothly, monitor the disk IO (‘DiskIn’ and ‘DiskOut’ counters) using the following command:
# isi statistics system –nall –-oprates –-nohumanize
Monitor the ‘DiskIn’ and ‘DiskOut’ counters. Between 2500-5000 disk IOPS is pretty healthy for nodes containing SSDs.
10. Additionally, cancelling Mediascan and/or MultiScan and pausing FSanalysis will reduce resource contention and allow the AutoBalanceLIN job to complete more efficiently.
# isi job jobs cancel mediascan

# isi job jobs cancel multiscan

# isi job jobs pause fsanalyze
Finally, it’s worth periodically running and reviewing the OneFS health check reports – especially pre and post configuring changes and adding new nodes to the cluster. These can be found an run from the WebUI by navigating to Cluster Management > HealthCheck > HealthChecks.

The OneFS Healthcheck diagnostic tool will help verify that the OneFS configuration is as expected and verify there are no cluster issues. The important checks to run include basic, job engine, cluster capacity, pre-upgrade, and performance.